Type
Crochet
Difficulty
advanced
Category
blanket
AI Thinking Process
Planning
Verification
Pattern
Marshmallow Cloud Throw
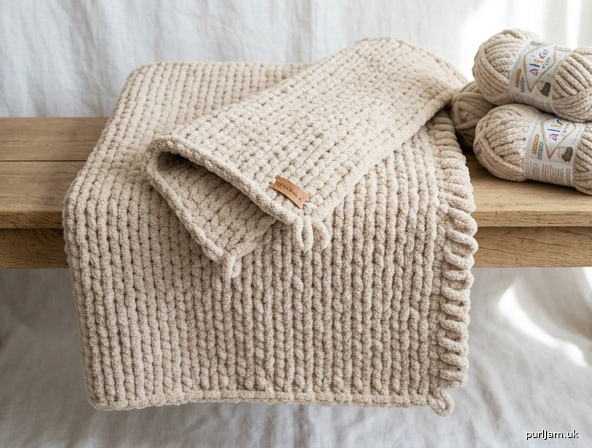
Beginner Alize Puffy Loop-Yarn Blanket
A super-chunky, cloud-soft throw worked in Alize Puffy. This yarn is a chain of premade loops — you do not wrap yarn around a hook the usual way. You pull each new loop through the loop below with your fingers (or a jumbo hook). The fabric looks like garter knit, is fully reversible, and lies flat without curling. Most makers finish this size in a weekend.
Skill level: Beginner
Construction: Flat, bottom-up, worked in rows
Fit: Throw / lapghan
Finished Measurements
40" wide × 52" long (102 × 132 cm) after light shaping, excluding optional fringe.
        40" (102 cm)
   |----------------------|
   |                      |
   |                      |  52" (132 cm)
   |                      |
   |----------------------|
Materials
Yarn: Alize Puffy (100% micropolyester; Super Bulky / Jumbo; 100 g / 9.2 m / 10 yd per skein)
Amount: 10 skeins (1000 g / 92 m / 100 yd total)
One extra skein is cheap insurance if your loops sit looser than gauge. Color is your choice; cream, oatmeal, blush, and fog gray all show the ridged texture well.
Hook: None required (finger method). Optional: US P/Q (15 mm) or US S (19 mm) if you prefer to pull loops with a hook.
Notions:
- 2 stitch markers (lock onto the first and last foundation loops)
- Sharp scissors
- Yarn needle with a large eye (optional; most ends are pulled through loops with fingers)
Gauge
5 loop stitches and 5 rows = 4" (10 cm) in Loop Stitch, unstretched, measured on a 6" × 6" (15 × 15 cm) swatch.
Swatch: count out 10 foundation loops, work 10 rows, bind off. The inner 5 sts × 5 rows should measure 4" × 4" (10 × 10 cm).
- Too few stitches per 4" = fabric too loose (use slightly more foundation loops, or pull each loop snug).
- Too many stitches per 4" = fabric too tight (relax your pull; do not stretch the loops).
Do not skip the swatch. Alize Puffy has almost no yardage; a loose gauge will eat extra skeins.
Width check: 50 sts × 4" / 5 sts = 40" ✓
Length check: 65 rows × 4" / 5 rows = 52" ✓
Abbreviations (US)
| Term | Meaning |
|---|---|
| LS | loop stitch — pull one working loop through one stitch loop |
| st(s) | stitch(es); on this yarn, one stitch = one live loop |
| WS / RS | wrong side / right side (fabric is reversible; RS is the side you prefer) |
| pm / sm | place marker / stitch marker |
| rep | repeat |
This pattern uses US crochet language. There are no wrapped sc/hdc/dc stitches.
How Alize Puffy Works (read before you start)
The skein is a ladder of ready-made loops. The working “yarn” is simply the next unused loop on the skein.
- Never cut the ladder until bind-off or a planned color change.
- One loop in, one loop out. Every stitch of every row uses exactly one working loop and leaves exactly one new live loop. If a row does not still have 50 live loops, a stitch was skipped or worked twice — fix it before the next row.
- Direction. Work from right to left if you are right-handed (left to right if left-handed). At the end of every row, turn the piece exactly as you would turn knitting.
- How to pull a loop. Pinch the next working loop. Push it through the live loop of the stitch below, front to back, and draw it up until it sits at the same height as its neighbors. Do not yank — stretched loops look thin and waste yarn.
- Edge loops are stitches. The first and last loops of the row are easy to miss. Markers on those two loops prevent a slanted blanket.
- Joining a new skein. When 6–8 loops remain on the old skein, lay the first 4–5 loops of the new skein beside them. For the next 4 stitches, pull a doubled loop (old + new) through each stitch, then drop the old skein and continue with the new one only. After bind-off, pull the leftover short tails to the back and thread each through 3–4 nearby loops.
Pattern Notes
- The ridged fabric is created by turning at the end of every row and always pulling the new loop through from the same side of the stitch. Do not work in the round.
- Stitch count stays 50 loops on every row.
- Count at the end of Rows 1, 2, 5, then every 10 rows. Catching a missed loop is easy on this yarn if you find it within a row or two.
- No traditional foundation chain. The first 50 loops of the skein are the cast-on.
Throw
Foundation (cast-on)
Do not cut the yarn. From the starting end of the first skein, count out 50 loops. These 50 loops are your foundation row. Let them lie in a straight line with the working skein attached at the left (right-handers) or right (left-handers).
Place a marker on loop 1 and loop 50.
50 foundation loops. Width target: 50 sts × 4" / 5 sts = 40" (102 cm) ✓
Body
Row 1 (LS): Pull the next working loop through foundation loop 1 (marked). Pull the next working loop through foundation loop 2. Continue across, one working loop through each foundation loop, through marked loop 50. Turn.
50 live loops.
Row 2: Pull the next working loop through the first live loop of Row 1 (marked edge). Continue 1 LS in each loop across, including the last marked loop. Turn.
50 live loops.
Rows 3–65: Repeat Row 2.
You will have 65 rows total. 65 rows × 4" / 5 rows = 52" (132 cm) ✓
Checkpoints (count 50 loops at each):
- End of Row 5 — piece should measure about 4" (10 cm) tall
- End of Row 15 — about 12" (30 cm)
- End of Row 30 — about 24" (61 cm)
- End of Row 45 — about 36" (91 cm)
- End of Row 65 — about 52" (132 cm)
If height is short, add rows in pairs until 52" (132 cm). If height is already 52" before Row 65, bind off at that row and note that your row gauge is taller than 5 rows / 4".
Bind-off (do not skip)
The live loops will run if they are not closed.
- Start at the edge you would normally work next.
- Pull loop 2 through loop 1.
- Pull loop 3 through loop 2.
- Continue across: always pull the next loop through the one just closed, like a chain.
- One loop remains. Cut the connecting strand of the unused yarn about 8" (20 cm) beyond that last loop, pull the cut end through the last loop, and snug it. Do not yank the chenille into a skinny point.
- Weave the tail through 4–5 nearby loops on the WS, then trim.
50 loops bound off.
Optional Loop Border
Worked after bind-off. Uses about ½–1 extra skein if your 10 skeins are already gone; otherwise it fits inside the 10-skein budget for most gauges.
Join yarn at any corner by pulling one loop through the corner stitch.
Round 1: Working loosely around the blanket, pull 1 loop through each stitch along the bind-off edge, 1 loop through the corner (same corner stitch already holds the join — this extra loop is the corner extra), 1 loop in each row-end down the side (65 row-ends → 65 loops), 1 extra loop in the next corner, 1 loop in each of the 50 foundation loops, 1 extra loop in the next corner, 1 loop in each row-end of the remaining side (65 loops), 1 extra loop in the last corner. Bind off the border the same way as the body.
Corner extras keep the border from cupping. If a side looks tight, add 1 extra loop at the midpoint of that side.
Expected border count: 50 + 1 + 65 + 1 + 50 + 1 + 65 + 1 = 234 loops ✓
Easy Stripe Variation (still beginner)
Use 2 or 3 colors. Change color only at the end of a row.
Suggested layout for 65 rows:
- Color A — 15 rows
- Color B — 15 rows
- Color A — 15 rows
- Color B — 15 rows
- Color A — 5 rows
15 + 15 + 15 + 15 + 5 = 65 rows ✓
To change color: drop the old skein at the end of a row. With the new skein, pull its first loop through the first stitch of the new row and continue. After the blanket is finished, pull both color tails to the WS and thread each through 4–5 loops. Do not knot bulky chenille on the RS — the knot shows.
Finishing
- Weave in every tail by pulling it through 4–5 WS loops, then trimming close. Finger-weaving is enough; a large-eye needle helps on short tails.
- Check both long edges. If a row-end loop was skipped, you will see a small step — open the nearby stitches back to that row (they unzip cleanly) and rework.
- Optional skinny fringe: cut 8" (20 cm) lengths of leftover Puffy, fold in half, and pull the fold through a foundation or bind-off stitch, then pull the ends through the fold. One fringe every 2nd stitch along both short ends is plenty. Trim even.
Blocking and Care
Do not iron. Do not rest a hot steamer on the fabric. Alize Puffy is micropolyester chenille and will melt or crush flat.
- Shaping only: Lay the throw flat. Pat it to 40" × 52" (102 × 132 cm). If needed, hover a steam iron 3–4" (8–10 cm) above the surface and let steam fall; never press. Dry flat.
- Washing: Cool or lukewarm gentle cycle (or hand wash). Use a mesh bag. Lay flat to dry. No high-heat tumble.
- Storage: Fold, don’t hang — jumbo loop fabric can grow lengthwise on a hanger.
Quick Reference
| Item | Number |
|---|---|
| Foundation loops | 50 |
| Rows | 65 |
| Stitches every row | 50 |
| Finished size | 40" × 52" (102 × 132 cm) |
| Gauge | 5 sts × 5 rows = 4" (10 cm) |
| Yarn | 10 skeins Alize Puffy (1000 g) |
| Width math | 50 × 4 / 5 = 40" ✓ |
| Length math | 65 × 4 / 5 = 52" ✓ |
Disclaimer: This pattern was generated by AI and should be reviewed for accuracy before use. While we strive for quality, AI-generated content may contain errors. Please verify measurements, stitch counts, charts, and instructions before beginning your project. Generated by purlJam.uk
Love this pattern?
Save this pattern to your free PurlJam libraryAccess your pattern anytime
Bookmark this page to access your pattern anytime