Type
Knitting
Difficulty
intermediate
Category
hat
AI Thinking Process
Planning
Verification
Pattern
Merino Rib Balaclava Hood
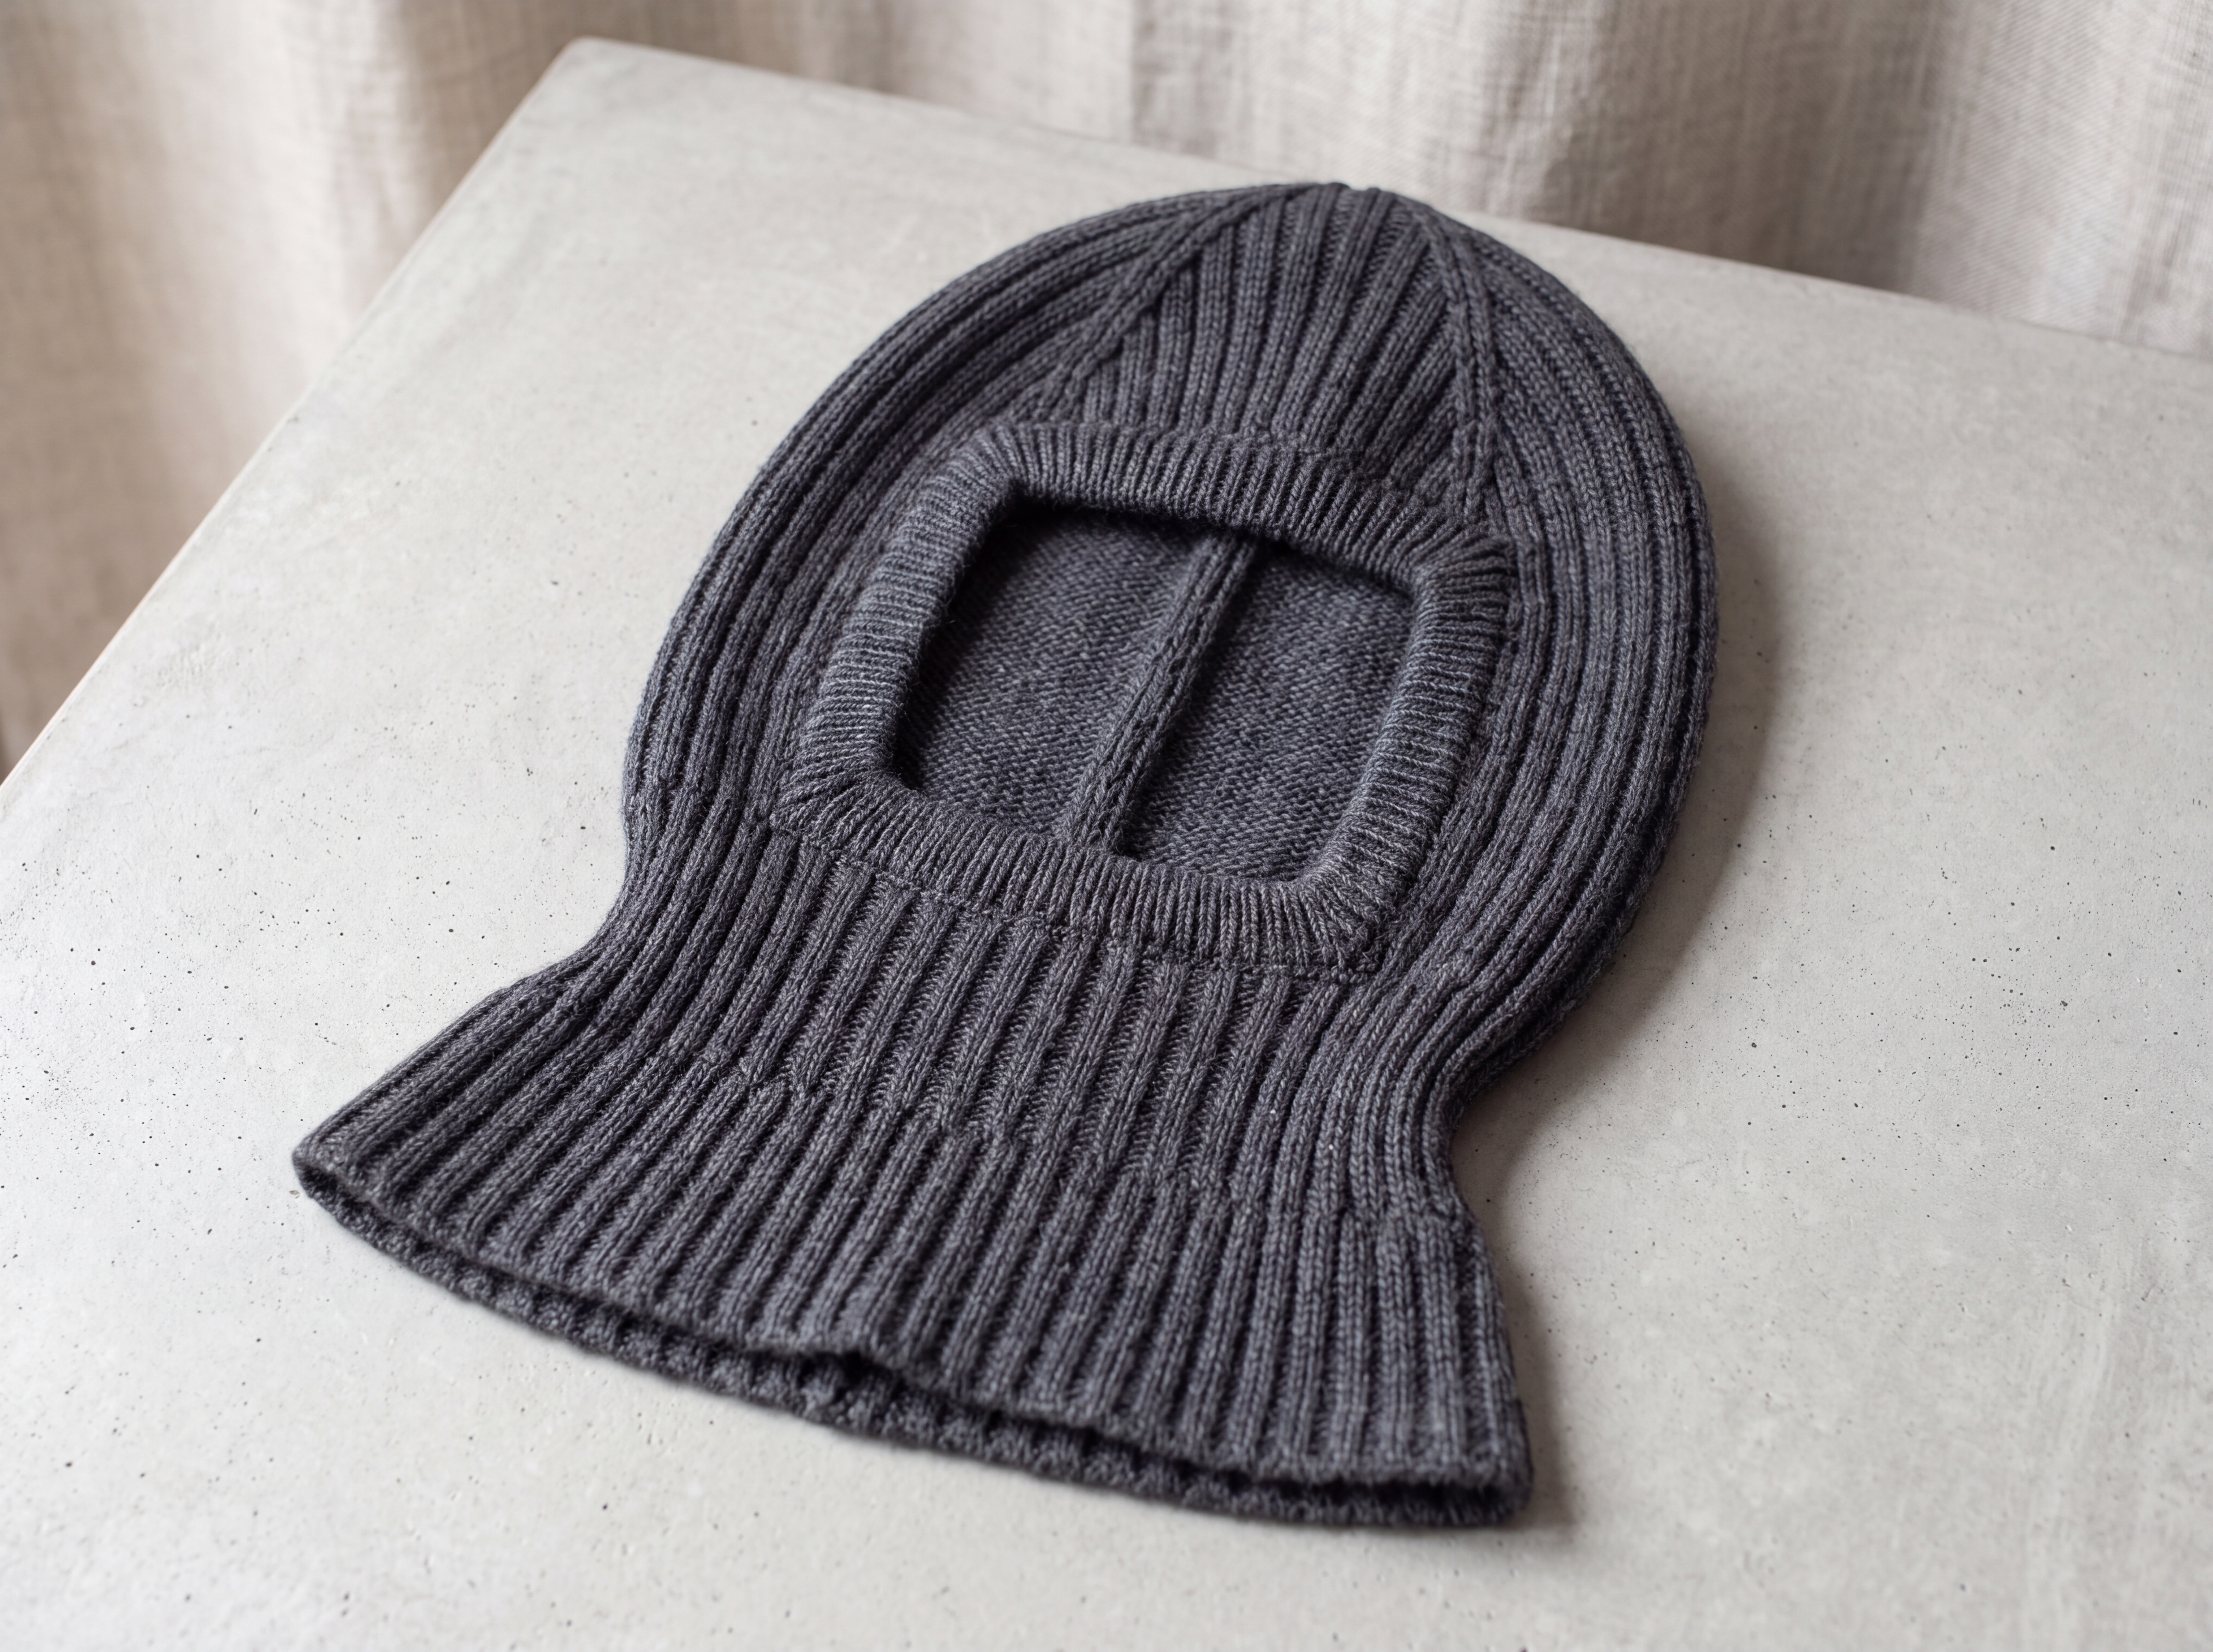
Style F — Balaclava / hood. A unisex, close-fitting hood worked bottom-up in worsted merino. A flared 2×2 rib neck warmer sits over the shoulders, a rectangular face opening is worked flat, and a four-point crown is shaped with paired decreases. A picked-up 1×1 rib border frames the face.
Difficulty: Intermediate. Stitches are plain rib and simple decreases, but the opening transitions, rib shaping, and crown must be worked to gauge, and the hood needs blocking to set the flare and the rectangle. Not a first project.
Construction: Cast on at the shoulder edge and work in the round. Decrease at four points to head circumference, bind off the center front, and work the cheeks and back flat with chain selvedges. Cast on over the brow, rejoin, and shape the crown in the round. Pick up the face border last.
Sizes: Adult S/M (Adult L). Instructions are written S/M (L). One number applies to both sizes.
To fit head circumference: 20–21½ (22–23) in [51–54.5 (56–58.5) cm].
Choose the size by head circumference, measured around the forehead. The head tube is about 1–2 in (2.5–5 cm) smaller than the head; 2×2 rib supplies the stretch. If you are between sizes, work the smaller size.
Finished measurements
Measured blocked and gently stretched, as worn.
| S/M | L | |
|---|---|---|
| Lower edge circumference | 25½ in (65 cm) | 27¼ in (69 cm) |
| Head circumference | 19¼ in (49 cm) | 20¾ in (53 cm) |
| Neck depth, edge to face opening | 8 in (20.5 cm) | 8 in (20.5 cm) |
| Face opening, before border | 4¾ in wide × 5 in tall (12 × 12.5 cm) | 5½ in wide × 5½ in tall (14 × 14 cm) |
| Crown depth, brow cast-on to apex | 5 in (12.5 cm) | 5¼ in (13.5 cm) |
| Face border depth | ¾ in (2 cm) | ¾ in (2 cm) |
| Total length, lower edge to apex up the back | 18 in (45.5 cm) | 18¾ in (47.5 cm) |
The lower edge is meant to lie on the shoulders, not hug the neck. The face opening is one rectangle (eyes, nose, and mouth), not separate eye holes.
Yarn
Worsted weight (CYC 4) merino wool, plied rather than a loosely spun single so the rib keeps its shape.
300 (340) yd / 275 (310) m; about 4.8 (5.5) oz / 136 (155) g.
Two skeins of a typical 220 yd (200 m) / 3.5 oz (100 g) worsted merino will cover either size.
Needles
- US 7 / 4.5 mm circular needle, 16 in (40 cm), for the main fabric. A 24 in (60 cm) circular is optional for the cast-on only.
- US 7 / 4.5 mm double-pointed needles, or a long circular for magic loop, for the crown.
- US 6 / 4 mm circular needle, 16 in (40 cm), for the face border. One size smaller than the main needle, so the frame stays firm.
Notions
Four stitch markers (one distinct for the beginning of the round), tapestry needle, scrap yarn for trying on.
Gauge
20 stitches and 28 rounds = 4 in (10 cm) in 2×2 rib on US 7 / 4.5 mm needles, blocked and gently stretched (the amount the rib will be stretched when worn — not limp, and not pulled hard).
That is 5 stitches and 7 rounds per inch. Take time to check gauge. A tight gauge will not go over the head comfortably; a loose gauge will not stay fitted.
To swatch: cast on 44 stitches, join in the round, and work k2, p2 for 5 in (12.5 cm). Block, then measure 20 stitches in the center of the swatch while the rib is gently stretched. Change needle size if needed. Flat row gauge through the face opening is close to this round gauge; the try-on check below is the final control for opening height.
Notes
- Reading the sizes. S/M is written first; L is in parentheses.
- Rib through the flare. After the first decrease round, knit the knits and purl the purls as they face you. Do not try to restart k2, p2 until the reset round at the top of the flare.
- Rib reset. At the end of the flare the columns are angled. One reset round straightens them into vertical 2×2 for the neck, face, and crown. The single transition sits at the base of the close-fitting neck.
- Size L opening. Both sides of the L bind-off are 38 stitches, so the rectangle is centered. Those 38 stitches are not a multiple of 4, so the rib phase at the edges is offset by 2 stitches. Bind off in pattern. The face border covers the offset.
- Both sizes use a chain selvedge on the flat section so the pickup is even.
- Colorwork. This is a solid ribbed fabric. Do not place stranded motifs across the flare, the opening, or the crown decreases; the repeats will not stay aligned. For a two-tone hood, work the flared section in a contrast color and change to the main color on the rib-reset round. Buy an extra skein of contrast if the whole neck is a second color; the yardage above is for one color.
- Putting it on. The wide lower edge goes over the head. The snug rib stretches. Settle the rectangle over the face and smooth the flare onto the shoulders.
Abbreviations
| Abbreviation | Meaning |
|---|---|
| BO | bind off |
| BOR | beginning of round |
| CO | cast on |
| dec | decrease |
| k | knit |
| k2tog | knit 2 together |
| p | purl |
| p2tog | purl 2 together |
| pm | place marker |
| rnd(s) | round(s) |
| RS | right side |
| sl | slip |
| sm | slip marker |
| ssk | slip, slip, knit: slip 2 stitches knitwise one at a time, return them to the left needle, knit them together through the back loops |
| st(s) | stitch(es) |
| WS | wrong side |
| wyif | with yarn in front |
Special techniques
Knitted cast-on. Knit into the first stitch on the left needle, but do not drop it; place the new stitch onto the left needle. Repeat until the required stitches are cast on. This edge is firm enough to pick up for the brow.
Chain selvedge. Slip the first stitch of every flat row purlwise wyif. Work in pattern to the last stitch, and knit the last stitch. One neat chain forms on each side of the opening.
Draw-through crown. Cut the yarn, leaving an 8 in (20 cm) tail. Thread it through the remaining stitches, drop the needles, pull tight, and take the tail to the wrong side.
Instructions
Neck warmer
With US 7 / 4.5 mm needle and a loose long-tail cast-on, CO 128 (136) stitches. Join to work in the round, being careful not to twist. Place the BOR marker. This point is center back.
(128 and 136 are both multiples of 4, so 2×2 rib joins cleanly. ✓)
Set-up round: *K2, p2; repeat from * to end.
Place three more markers so the round is divided into four equal sections of 32 (34) stitches, including the BOR marker as the center-back marker. The marker opposite BOR is center front. Slip markers as you come to them on every round.
If your long-tail cast-on is tight, cast on over two needles held together, or use a needle one size larger for the cast-on row only. The lower edge must stretch over the head and then lie flat on the shoulders.
Lower edge
Work 7 rounds in k2, p2 rib. 1 in (2.5 cm).
Flare
Decrease 8 stitches on each decrease round: 2 stitches at each marker. Four decrease rounds remove 32 stitches.
(4 × 8 = 32; 128 − 32 = 96; 136 − 32 = 104. ✓)
Work the decrease to match the stitches so the rib stays smooth:
- At the start of a section, ssk if the next 2 stitches are knits; p2tog if they are purls.
- At the end of a section, p2tog if the last 2 stitches are purls; k2tog if they are knits.
On the first decrease round the sections still begin with k2 and end with p2, so the round is simply ssk at the start of each section and p2tog at the end.
Work 6 rounds in established rib.
Decrease round: *Ssk (or p2tog to match), work in established rib to 2 stitches before the marker, p2tog (or k2tog to match), sm; repeat from * to end. 8 stitches decreased — 120 (128) stitches.
Work 6 rounds in established rib.
Decrease round: Decrease 8 stitches as set — 112 (120) stitches.
Work 6 rounds in established rib.
Decrease round: Decrease 8 stitches as set — 104 (112) stitches.
Work 6 rounds in established rib.
Decrease round: Decrease 8 stitches as set — 96 (104) stitches.
The flare is 28 rounds (6 + 1, four times), 4 in (10 cm). Section stitch counts are now 24 (26). Keep all four markers.
Work these decrease rounds at the same tension as the even rounds so the flare does not pucker.
Close-fitting neck
Reset round: *K2, p2; repeat from * to end, slipping markers.
Work 20 more rounds in k2, p2 rib. 21 rounds total, 3 in (7.5 cm).
Neck depth from cast-on is 7 + 28 + 21 = 56 rounds, 8 in (20.5 cm). (56 / 7 = 8. ✓)
Fit check (optional): Slip the live stitches to scrap yarn and try the neck on. The lower edge should rest on the shoulders. The round you just finished should sit at the chin. If it is high, rip back and add rounds in k2, p2 (7 rounds = 1 in / 2.5 cm). If it is low, undo some of the 21 even rounds. End at the BOR marker before continuing. Put the stitches back on the working needle.
Face opening
The opening is centered on the center-front marker. You will move the beginning of the round to one edge of the opening so the bind-off can be worked and the hood turned without cutting the yarn.
Reposition round: Work in pattern to the center-front marker and remove it. Work 12 (14) more stitches. Place a new BOR marker. This is one edge of the opening. Continue in pattern, removing the old center-back marker and both side markers as you come to them, until you reach the new BOR marker. Stitch count is still 96 (104).
Opening round (RS): Bind off the next 24 (28) stitches in pattern (knit the knits and purl the purls as you bind them off), at the same tension as the rib. Work in established rib to end. 72 (76) stitches remain. Do not join. Turn, ready to work a WS row.
(96 − 24 = 72, and 36 + 24 + 36 = 96. 104 − 28 = 76, and 38 + 28 + 38 = 104. The bind-off is centered. ✓)
The bound-off edge is the chin edge of the rectangle. The two ends of the row are the side edges.
Flat section
Row 1 (WS): Sl 1 purlwise wyif, work in established rib to the last stitch, k1.
Row 2 (RS): Sl 1 purlwise wyif, work in established rib to the last stitch, k1.
Repeat Rows 1–2 until 35 (39) rows have been worked, ending with a WS row (Row 1). Opening height is 5 (5½) in [12.5 (14) cm].
(35 / 7 = 5; 39 / 7 = 5.6, finished as 5½ in. Both counts are odd, so both end on a WS row. ✓)
Fit check (optional): The top of this flat section should reach the eyebrows when the chin edge sits at the chin. If you need a different height, add or remove rows in pairs so you still end with a WS row (Row 1).
Do not break the yarn. Turn so the RS is facing. The yarn is at one side edge of the opening.
Brow and crown
Rejoin round (RS): Cast on 12 (14) stitches using the knitted cast-on, pm for center front, cast on 12 (14) more stitches. 24 (28) stitches cast on. Work across the cast-on stitches in k2, p2, then work in established rib across the 72 (76) body stitches, and join to work in the round. 96 (104) stitches.
(72 + 24 = 96; 76 + 28 = 104. ✓)
A one- or two-stitch rib interruption at each end of the cast-on is normal, especially in Size L. It sits on the brow edge and is covered by the face border.
Next 13 rounds: *K2, p2; repeat from * to end, slipping the center-front marker. 14 rounds from the rejoin, including the rejoin round. 2 in (5 cm) of forehead.
Shape the crown
Slip stitches until the center-front marker is the BOR marker. Place three more markers, one every 24 (26) stitches, so the crown is divided into four equal sections. Markers sit at center front (BOR), one side, center back, and the other side.
(96 / 4 = 24; 104 / 4 = 26. ✓)
Change to double-pointed needles or magic loop when the stitches no longer reach comfortably around the 16 in circular, usually once fewer than about 72 stitches remain.
The crown decreases are worked as ssk and k2tog even when they land on purl stitches. They form four fitted contour lines: one above the brow, one at the center back, and one above each ear. Between the lines, keep working established rib (knit the knits, purl the purls).
Decrease round: *Ssk, work in established rib to 2 stitches before the marker, k2tog, sm; repeat from * to end. 8 stitches decreased.
Even round: Work in established rib.
Repeat these 2 rounds 10 (11) more times, then work the decrease round once more. That is 11 (12) decrease rounds, with an even round between them and no even round after the last decrease.
On the last decrease round, 4 stitches remain in each section. Work ssk, k2tog in each section (nothing to work between the decreases). 8 stitches remain.
(S/M: 11 × 8 = 88, and 96 − 88 = 8. L: 12 × 8 = 96, and 104 − 96 = 8. ✓)
Stitch count after each decrease round
- S/M: 88, 80, 72, 64, 56, 48, 40, 32, 24, 16, 8
- L: 96, 88, 80, 72, 64, 56, 48, 40, 32, 24, 16, 8
Shaping depth is 21 (23) rounds, 3 (3¼) in [7.5 (8.5) cm], after the 2 in forehead. Crown depth from the brow cast-on is 5 (5¼) in [12.5 (13.5) cm]. (S/M: 14 + 21 = 35 rounds = 5 in. L: 14 + 23 = 37 rounds = 5.3 in, finished as 5¼ in. ✓)
Cut the yarn, draw it through the remaining 8 stitches, pull tight, and secure the tail on the wrong side.
Face-framing border
With the RS facing and the US 6 / 4 mm needle, pick up stitches around the rectangular opening. Begin at a lower corner (where the bound-off chin edge meets a selvedge). Pick up 1 stitch in each corner as part of the count for the edge you are starting.
- 24 (28) stitches along the bound-off chin edge (1 stitch in each bound-off stitch)
- 24 (28) stitches evenly along the first selvedge
- 24 (28) stitches along the brow cast-on (1 stitch in each cast-on stitch)
- 24 (28) stitches evenly along the second selvedge
96 (112) stitches. Place a marker at each corner, and place the BOR marker at the corner where you began. Join to work in the round.
(24 × 4 = 96; 28 × 4 = 112. Both even, so 1×1 rib joins. ✓)
Side pickup rate: on S/M, 24 stitches in 35 rows is about 2 stitches for every 3 rows. On L, 28 stitches in 39 rows is about 5 stitches for every 7 rows. Space them evenly. A hole at a corner means the corner stitch was skipped; pick it up before joining.
Rounds 1–6: *K1, p1; repeat from * to end.
Because each side has an even number of stitches and the round starts with k1 at a corner, every corner stitch is a knit.
Bind off in pattern with medium tension. The edge should lie flat. If it puckers, bind off with a US 7 / 4.5 mm needle instead. Do not use a tight bind-off; it will pull the rectangle out of shape.
Border depth is about ¾ in (2 cm).
Finishing
Weave in ends. Use the crown tail to close any small hole at the apex, then weave it in on the wrong side. Sew down the little step at each end of the brow cast-on if one shows inside the border.
Blocking
Wet-block or steam gently. This fabric needs blocking to hold its shape.
- Ease the crown over a bowl or a balloon about the size of the head. Do not stretch the 4 decrease lines into points; the crown should be a low, fitted dome.
- Smooth the neck flare outward and let the lower edge dry flat and wide, so it will sit on the shoulders without rolling into a tight collar.
- Pin the face opening to a rectangle, 4¾ × 5 in (12 × 12.5 cm) for S/M or 5½ × 5½ in (14 × 14 cm) for L, measured inside the border. Keep the 1×1 border flat and even. Do not stretch it into a flare.
Dry completely before removing the pins or the form.
Wearing
Pull the hood on from the wide lower edge. Place the rectangle over the eyes, nose, and mouth, with the border framing the face and the brow cast-on sitting at the eyebrows. Smooth the flared rib over the shoulders. The four crown lines should run center front, center back, and over each ear.
Adjusting the fit
- Neck length: change the 21 even rounds after the reset. Keep the flare as written.
- Opening height: change the flat rows in pairs so you still end on a WS row.
- Opening width: bind off 4 more stitches, or 4 fewer, and cast on the same number over the brow. Keep the opening centered (subtract the bind-off from 96 (104), then split the remainder in half for the two sides). Each 4 stitches changes the width by about ¾ in (2 cm). Pick up the new bind-off and cast-on counts stitch for stitch, and adjust each side pickup so the border total stays even.
- Crown depth: add or remove even forehead rounds before the first crown decrease. Do not change the decrease sequence; it is calculated to end at 8 stitches.
Care
Hand wash in cool water. Squeeze, do not wring. Reshape over a bowl and dry flat, keeping the face opening rectangular. Merino will stretch permanently if it is stored hanging or dried over a hook.
Disclaimer: This pattern was generated by AI and should be reviewed for accuracy before use. While we strive for quality, AI-generated content may contain errors. Please verify measurements, stitch counts, charts, and instructions before beginning your project. Generated by purlJam.uk
Love this pattern?
Save this pattern to your free PurlJam libraryAccess your pattern anytime
Bookmark this page to access your pattern anytime