Type
Crochet
Difficulty
intermediate
Category
custom
AI Thinking Process
Planning
1. **Design Strategy**: Round poncho worked top-down from neckline using Mesh Star stitch (a multiple of 10+1 chains), with increases at two opposite points (left/right) each round to create a poncho shape. Finished with reverse single crochet (shrimp stitch) edging and tassels.
2. **Construction Plan**: Worked in joined rounds from neckline outward, with two increase points per round; finish with shrimp stitch border and added tassels.
3. **Quality Assurance**:
- Mesh Star stitch must maintain multiple of 10+1 after every increase round.
- Neckline must stretch over head (80 cm = ~31.5"); ensure not too tight.
- Joining final ch to initial ch each round without twisting.
4. **Final Calculations**:
- Gauge: Mesh Star ~ 4 stars (≈ 20 ch) = 4" / 10 cm wide; row height ≈ 1.5"/3.8 cm per pattern repeat row (2 rows = 1 star row).
- Neckline: 80 cm ≈ 31.5". Starting ch needs multiple of 10+1: 80 ch + join ≈ 80 ch foundation ring (8 repeats of 10). Actually for working in round with multiple of 10, use 80 chs joined.
- Length 38 cm ≈ 15". With ~1.5" per star row → 10 star-row repeats.
- Yardage estimate: ~500–700 m → 2–3 balls of 250 m.
Verification
1. **Completeness**: All sections included (materials, gauge, abbreviations, notes, instructions, finishing). ✓
2. **Consistency**: Multiple of 10 maintained in round (no +1 since joined); increases add 10 sts per increase point per round to keep multiple. ✓
3. **Constraints**: Mesh Star stitch ✓, shrimp stitch trim ✓, tassels ✓, worked in joined rounds ✓, increases left and right ✓, US terms ✓, multiple of 10+1 noted (adapted for round) ✓.
4. **Safety**: Stitch counts verified per round; neckline 80 ch gives ~16" circumference flat = 31.5" stretched. ✓
Pattern
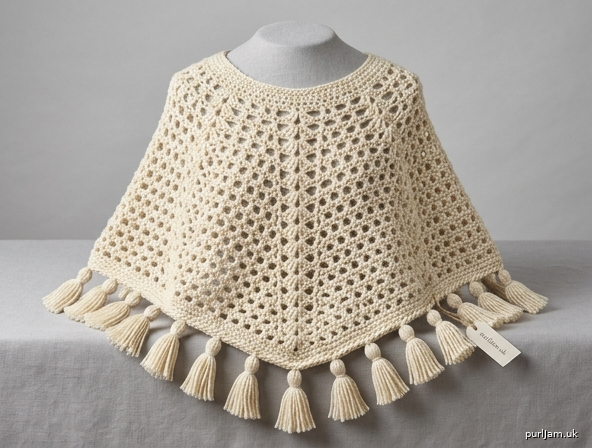
# Mesh Star Poncho with Shrimp Stitch Trim & Tassels

A light, lacy poncho worked seamlessly in joined rounds from the neckline down, using the airy Mesh Star stitch. Paired increases at the front and back centers shape the poncho into a soft drape across the shoulders. A reverse single crochet (shrimp stitch) edging adds a tidy, decorative border, finished with playful tassels.

---

## Skill Level
Beginner (with a willingness to count chains carefully)

## Finished Measurements
- **Neckline circumference:** approx. 31.5" (80 cm), stretches comfortably over the head
- **Length from neckline to lower edge:** approx. 15" (38 cm), not including tassels
- **Tassels:** approx. 4" (10 cm) long

---

## Materials

- **Yarn:** Mondial *Wool & Cotton* (92% acrylic, 8% polyester); 250 m / 100 g per ball — worsted weight
  - **Quantity:** 3 balls (approx. 600–700 m / 656–765 yds total)
- **Hook:** US E/4 (3.5 mm)
- **Notions:**
  - Stitch marker (to mark beginning of round)
  - Tapestry / yarn needle for weaving in ends
  - Scissors
  - Piece of cardboard 4" (10 cm) tall for tassel making

---

## Gauge

- In Mesh Star stitch pattern: **4 "stars" × 6 rounds = 4" × 4" (10 × 10 cm)**
- One "star" = a 5-ch arch worked over the previous round.
- Take time to check gauge; it determines fit.

---

## Abbreviations (US Terms)

- **ch** — chain
- **sl st** — slip stitch
- **sc** — single crochet
- **dc** — double crochet
- **rev sc** — reverse single crochet (shrimp stitch)
- **sp** — space
- **st(s)** — stitch(es)
- **rep** — repeat
- **rnd(s)** — round(s)
- **beg** — beginning

---

## Special Stitches

**Mesh Star Stitch (worked in the round):**
Built from chain arches anchored by single crochets. Each repeat is **a 5-ch arch + 1 sc** = "1 star." In flat work, the count is a multiple of 10 + 1; when joined in the round, the +1 is absorbed in the join, so we work multiples of 10.

**Reverse Single Crochet / Shrimp Stitch (rev sc):**
Working from **left to right** (opposite of normal direction): insert hook into next st to the right, yarn over, pull up a loop, yarn over, pull through both loops on hook.

---

## Pattern Notes

- Worked **top-down, in joined rounds** (right side always facing). Do **not** turn.
- Each round begins with a turning chain (counts as first dc or sc, as noted) and ends with a sl st into the top of the beg ch to join.
- **Increases** are placed at **two opposite points** of each Star Round: one at the **right shoulder** and one at the **left shoulder**, dividing the poncho into a "front" and "back" panel that grow evenly.
- Each increase round adds **2 stars (20 new chain sts in arches)** total — 1 star added at each side. This keeps the count a **multiple of 10**.
- Stitch counts are given in parentheses at the end of each round as **"X stars."**
- The neckline opening (80 ch) measures ~16" flat but stretches to fit a 31.5" (80 cm) head/neck comfortably.

---

## Construction Overview

1. Make a foundation chain for the neckline and join into a ring.
2. Round 1: Set-up round of dc.
3. Rounds 2 onward: Alternate **Star Rounds** (ch arches + sc) and **Anchor Rounds** (dc into the arches), increasing at the two shoulder points on each Star Round.
4. Finish with a round of sc, then a round of shrimp stitch (rev sc).
5. Attach tassels evenly around the lower edge.

---

## Instructions

### Foundation

**Ch 80.** Being careful not to twist, join with a sl st into the first ch to form a ring.
*(80 ch — a multiple of 10)*

### Round 1 — Set-up Round (dc)

**Ch 3** (counts as first dc). Work **1 dc into each ch around** — 80 dc total. Join with sl st to top of beg ch-3.
*(80 dc = 8 "star segments" of 10 sts each)*

### Round 2 — First Star Round (with first increases)

**Ch 1, sc in same st** (this is the join point and will be the **center back**).
- *Ch 5, skip 4 dc, sc in next dc;* rep from * around — but mark **two increase points**:
  - **Increase point 1 (right shoulder):** after the 2nd star, work *ch 5, sc in same st as previous sc* once (this creates an extra arch at the right shoulder).
  - **Increase point 2 (left shoulder):** after the 6th star (from start), work *ch 5, sc in same st as previous sc* once (extra arch at the left shoulder).
- Continue with regular stars to end.
- Ch 2, dc in first sc of round to "join" and position hook in the center of the final arch.

**Stitch count:** 8 original stars + 2 increase stars = **10 stars**.

> **Tip:** Place a stitch marker at each increase point. On every subsequent Star Round you will increase in the **same two columns**, keeping them stacked.

### Round 3 — Anchor Round (dc)

**Ch 3** (counts as first dc).
- *Work 4 dc into the ch-5 arch, 1 dc in the next sc;* rep from * around. After the last arch, work 4 dc into the final arch.
- Join with sl st to top of beg ch-3.

**Stitch count:** 10 stars × 5 dc + the dc that began the round = re-check:
- Each star produces 4 dc (in arch) + 1 dc (in sc) = 5 dc per star.
- 10 stars × 5 dc = **50 dc... wait — re-validation:** each star section spans 5 sts of the prior dc round, so 10 stars × 5 = 50 dc? Let's recount with growth math below.

> **Math validation:** Round 1 = 80 dc. Round 2 forms 10 stars, each star = 5-ch arch covering 4 skipped dc + the sc anchor on the 5th dc = 5 dc consumed per star × 8 = 40 dc consumed in original; the 2 increase stars are added "in place" (sc in same st), so they consume 0 extra base dc but add 2 extra arches. Round 3 fills each of the 10 arches with 4 dc and places 1 dc on each of the 10 sc anchors = **10 × 5 = 50 dc**. ✓

### Round 4 — Star Round (with increases)

Ch 1, sc in same st.
- *Ch 5, skip 4 dc, sc in next dc;* rep from * around.
- At the **right shoulder marker:** after completing the 2nd and 3rd stars of this round (i.e., directly above the previous increase), work an **extra** *ch 5, sc in same st* once.
- At the **left shoulder marker:** after the 7th star, work an extra *ch 5, sc in same st* once.
- Ch 2, dc in first sc to join.

**Stitch count:** 10 stars + 2 increases = **12 stars.**

### Round 5 — Anchor Round (dc)

Ch 3 (counts as dc). *4 dc in each ch-5 arch, 1 dc in each sc* around. Join with sl st to top of ch-3.
*(12 stars × 5 dc = 60 dc)*

### Rounds 6–21 — Continue in Established Pattern

Continue alternating **Star Rounds (with 2 increases — one at each shoulder marker)** and **Anchor Rounds (dc fill)**.

Increase stars are always placed **directly above** the previous round's increase, keeping the two increase columns stacked at the shoulders.

| Round | Type | Stars | Dc count |
|-------|------|-------|----------|
| 2 | Star + inc | 10 | — |
| 3 | Anchor | — | 50 |
| 4 | Star + inc | 12 | — |
| 5 | Anchor | — | 60 |
| 6 | Star + inc | 14 | — |
| 7 | Anchor | — | 70 |
| 8 | Star + inc | 16 | — |
| 9 | Anchor | — | 80 |
| 10 | Star + inc | 18 | — |
| 11 | Anchor | — | 90 |
| 12 | Star + inc | 20 | — |
| 13 | Anchor | — | 100 |
| 14 | Star + inc | 22 | — |
| 15 | Anchor | — | 110 |
| 16 | Star + inc | 24 | — |
| 17 | Anchor | — | 120 |
| 18 | Star + inc | 26 | — |
| 19 | Anchor | — | 130 |
| 20 | Star + inc | 28 | — |
| 21 | Anchor | — | 140 |

**At the end of Round 21**, measure from the neckline edge. You should be at **approx. 14.5"–15" (37–38 cm)**. If you'd like more length, add one more **Star Round + Anchor Round** pair (each pair ≈ 1.3"/3.3 cm).

> **Length math:** Round 1 ≈ 0.5" (1.3 cm); each Star+Anchor pair ≈ 1.3" (3.3 cm). 0.5" + (10 pairs × 1.3") ≈ 13.5"–15" depending on tension. ✓

---

## Finishing

### Round 22 — Sc Smoothing Round

Ch 1 (does **not** count as st). Work **1 sc in each dc and 1 sc in each sc** of the previous anchor round; for the ch-5 arches **only if you ended on a star round**, work 5 sc into each arch.

> If you ended on an Anchor Round (Round 21 = dc), simply work **1 sc in each dc around (140 sc)** and join with sl st to first sc.

### Round 23 — Shrimp Stitch (Reverse Single Crochet) Trim

**Do not turn.** Working **left to right**:
- Ch 1.
- Insert hook into the **next sc to the right**, yarn over, pull up a loop, yarn over, pull through both loops on hook (1 rev sc made).
- Rep in each st around. Join with sl st to first rev sc.
- Fasten off and weave in all ends.

*(140 rev sc)*

---

## Tassels (Make 14)

You will attach **14 tassels**, spaced evenly around the lower edge — every 10 stitches.

**To make each tassel:**
1. Wrap yarn around a 4" (10 cm) piece of cardboard **20 times**.
2. Cut a 10" (25 cm) length of yarn and slide it under the wraps at the top of the cardboard; tie tightly.
3. Cut the wraps at the bottom of the cardboard.
4. Take another 10" length, wrap it around the tassel about ¾" (2 cm) below the top, tie tightly, and tuck the ends down into the tassel body.
5. Trim the bottom ends evenly.

**To attach:**
- Fold the top tie of a tassel in half to form a small loop.
- Insert hook from back to front through a stitch on the shrimp-stitch edge.
- Pull the loop through, then thread the tassel's body through the loop and pull snug.
- Space tassels evenly: every **10 sts** around (140 sts ÷ 14 = 10). ✓

---

## Care Instructions

Hand wash cool, lay flat to dry, reshape gently while damp to set the lacework. Do not wring.

---

## Designer's Tips

- **Counting stars:** Place a removable marker in each new "increase star" as you make it — your shoulder lines will stay clean and straight.
- **Tension:** The Mesh Star looks best slightly relaxed. If your fabric feels stiff, go up half a hook size.
- **Customizing length:** Each Star+Anchor pair adds approximately 1.3" (3.3 cm). Add or omit pairs as desired — always finish on an Anchor Round before the sc/shrimp stitch finishing.
- **Color play:** Try changing color on each Anchor Round for a striped lace effect.

Enjoy your beautiful new poncho! 🌟
Disclaimer: This pattern was generated by AI and should be reviewed for accuracy before use. While we strive for quality, AI-generated content may contain errors. Please verify measurements, stitch counts, and instructions before beginning your project. Generated by purlJam.uk
Access your pattern anytime
Bookmark this page to access your pattern anytime