Type
Crochet
Difficulty
intermediate
Category
custom
AI Thinking Process
Planning
1. **Design Strategy**: Circular poncho worked top-down from neckline using the Lace Star Flower stitch, with symmetrical increases at two opposing points to create a draped, shawl-like silhouette. Tassels added at lower edge for movement.
2. **Construction Plan**: Worked in joined rounds from neck down, with increases at two side "seam" points each round to widen the poncho evenly left and right.
3. **Quality Assurance**:
- Star Flower stitch is a multi-stitch repeat — neckline count must be divisible by repeat (5 sts + adjustments).
- Increases must keep pattern repeat intact (work increases in plain tr rounds between pattern repeats).
- Neck circumference 80 cm must fit over head comfortably.
4. **Final Calculations**:
- Tension: 18 tr × 10 rows = 10 × 10 cm with 3.5 mm hook (worsted/aran).
- Neck: 80 cm → 80 × 1.8 = 144 sts. Round to 145 (multiple of 5) for Star Flower repeat.
- Length: 38 cm. Star Flower pattern row ≈ 2.5 cm tall → ~15 pattern rounds, alternating with plain tr increase rounds.
- Construction: 8 pattern repeats of ~4.75 cm each = 38 cm.
- Increases: 4 sts per round (2 each side) × ~10 increase rounds = ~40 extra sts, growing hem to ~185 sts (~103 cm circumference at hem).
Verification
1. **Completeness**: All sections included — materials, tension, abbreviations, notes, instructions, finishing, tassels. ✓
2. **Consistency**: 145 neck sts ÷ 5 = 29 repeats. Tension 18 sts/10 cm → 145 sts = 80.5 cm ≈ 80 cm. ✓
3. **Constraints**: Neck 80 cm ✓, length 38 cm ✓, worked in the round ✓, increases left & right ✓, tassels at hem ✓, white acrylic worsted ✓, 3.5 mm hook ✓.
4. **Safety**: Star Flower repeat preserved by working increases on plain tr rounds only. Math verified.
Pattern
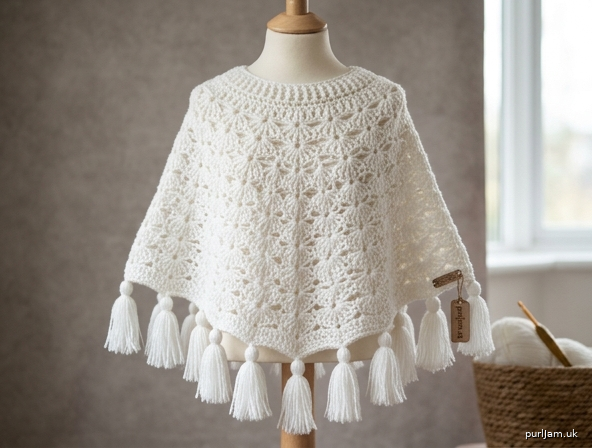
# Star Flower Lace Poncho

A beginner-friendly circular poncho worked seamlessly from the neckline down, featuring the romantic **Lace Star Flower stitch** and finished with playful tassels at the hem. Worked in the round in white worsted-weight acrylic — soft, warm and easy to care for.

---

## Skill Level
Beginner (confident with basic stitches: ch, dc, tr, ss).

## Finished Measurements
- **Neckline circumference:** 80 cm
- **Length (from neck to hem, excluding tassels):** 38 cm
- **Hem circumference:** approximately 103 cm
- **Tassels:** 10 cm long

---

## Materials
- **Yarn:** Worsted-weight (Aran) 100% acrylic in white — approximately 400–450 g (around 800–900 m total)
- **Hook:** 3.5 mm crochet hook
- **Notions:** Stitch marker (1), tapestry/yarn needle, scissors, piece of card 10 cm tall (for tassels)

---

## Tension (Gauge)
**18 tr × 10 rows = 10 × 10 cm** using a 3.5 mm hook.
Tension is not critical for fit, but it affects yarn quantity and finished length. Always make a swatch.

---

## Abbreviations (UK terms)
- **ch** – chain
- **ss** – slip stitch
- **dc** – double crochet (US sc)
- **tr** – treble crochet (US dc)
- **sk** – skip
- **sp** – space
- **st(s)** – stitch(es)
- **rep** – repeat
- **rnd** – round
- **PM** – place marker
- **Star Flower** – special stitch, see below

---

## Special Stitch: Lace Star Flower

Worked over a multiple of 5 stitches.

**Star Flower cluster (SF):** In the same stitch or space indicated, work *[tr, ch 1, tr, ch 1, tr, ch 1, tr, ch 1, tr]* — 5 tr separated by 4 ch-1 spaces, forming a fan/star.

**Joining stitch (j-dc):** A dc worked between two Star Flower fans to "pinch" them closed at the centre.

---

## Pattern Notes
- Poncho is worked **in joined rounds** from the **neck down**.
- Each round begins with a turning chain and ends with a ss join to the top of the starting chain.
- **Beginning ch-3 counts as 1 tr** throughout (unless stated otherwise).
- Increases are placed at **two opposite side points** (left and right of the body) — marked at the start. 4 sts are added per increase round (2 at each side point).
- Stitch counts are given at the end of every round in **(brackets)**.
- The poncho alternates **increase rounds (plain tr with increases)** and **pattern rounds (Star Flower)** to keep the lace repeat intact.

---

## Construction Overview
1. Foundation neckline ring (145 sts).
2. Work alternating increase rounds and Star Flower pattern rounds (8 pattern repeats total).
3. Finishing edge round.
4. Attach tassels evenly along hem.

---

## INSTRUCTIONS

### Neckline Foundation
Make a loose slip knot.

**Foundation:** Ch 146 (loosely). Being careful not to twist, ss into the first ch to form a ring.

**Rnd 1 (Set-up):** Ch 3 (counts as 1 tr), 1 tr in each ch around, ss to top of beg ch-3. **(145 tr)**

Place a stitch marker in the **1st tr** (this is **Side Point A — right side**). Count 72 sts around and PM in the **73rd tr** (this is **Side Point B — left side**). The points sit opposite each other, dividing the poncho into a front and a back of approximately equal width.

*Maths check: 145 ÷ 2 = 72.5, so points are 72 and 73 sts apart — close enough to opposite without breaking the 5-st repeat.*

---

### Increase Round 2
**Rnd 2:** Ch 3 (counts as tr).
- 2 tr in the **next** st (1 inc made at Point A side),
- 1 tr in each st until you reach Point B,
- 2 tr in the marked Point B st (1 inc),
- 1 tr in next st,
- 2 tr in next st (1 inc),
- 1 tr in each st until 1 st before the beginning,
- 2 tr in last st (1 inc).
- ss to top of beg ch-3. **(149 tr)**

Move both markers up into the new round, repositioning them around the new increases so that Point A and Point B each have 2 extra sts to either side of the marker over time.

*Tip: After each increase round, simply mark the centre stitch of the side point — the new sts grow symmetrically around it.*

---

### Pattern Round 3 — Star Flower
You need a multiple of 5 sts. **149 ÷ 5 = 29 remainder 4.** To work the Star Flower repeat, we'll absorb 4 sts by working four single tr at the very end as a "balance panel". (Beginner-friendly — just count carefully!)

**Rnd 3:** Ch 1, 1 dc in same st.
*Sk 2 sts, work SF (Star Flower) in next st, sk 2 sts, 1 dc in next st;* rep from * to * 28 more times. You will have used 145 sts. Work 1 tr in each of the last 4 sts. ss to first dc to join. **(29 Star Flowers + 30 dc joins + 4 tr = 149 sts)**

---

### Increase Round 4
**Rnd 4:** Ch 3 (counts as tr).
1 tr in each st AND each ch-1 sp around, working increases as follows: at each side point, work **2 tr in 1 st, 1 tr, 2 tr in next st** (2 increases per point = 4 inc total).
ss to top of beg ch-3.

*Counting tip: In each Star Flower fan there are 5 tr + 4 ch-1 sps = 9 places to put a tr (treat each ch-1 sp as a stitch). Plus the dc joins between fans count as 1 st each.*

**Stitch count: 149 + 4 = (153 tr).**

---

### Pattern Round 5 — Star Flower
153 ÷ 5 = 30 r 3. Work 30 Star Flower repeats and 3 balance tr at the end.

**Rnd 5:** Ch 1, 1 dc in same st. *Sk 2, SF in next st, sk 2, 1 dc in next st;* rep from * 29 more times (30 SF total), 1 tr in each of last 3 sts. ss to first dc. **(153 sts)**

---

### Increase Round 6
**Rnd 6:** As Rnd 4 — ch 3, 1 tr in each st/sp around, 4 increases at the two side points. ss to top of beg ch-3. **(157 tr)**

---

### Pattern Round 7
157 ÷ 5 = 31 r 2. 31 SF repeats + 2 balance tr.
**Rnd 7:** Ch 1, 1 dc in same st. *Sk 2, SF in next st, sk 2, 1 dc in next st;* rep 30 more times, 1 tr in each of last 2 sts. ss to first dc. **(157 sts)**

---

### Increase Round 8
**Rnd 8:** As Rnd 4. **(161 tr)**

---

### Pattern Round 9
161 ÷ 5 = 32 r 1. 32 SF repeats + 1 balance tr.
**Rnd 9:** Ch 1, 1 dc in same st. *Sk 2, SF in next st, sk 2, 1 dc in next st;* rep 31 more times, 1 tr in last st. ss to first dc. **(161 sts)**

---

### Increase Round 10
**Rnd 10:** As Rnd 4. **(165 tr)**

---

### Pattern Round 11
165 ÷ 5 = 33. **Perfect repeat!**
**Rnd 11:** Ch 1, 1 dc in same st. *Sk 2, SF in next st, sk 2, 1 dc in next st;* rep 32 more times. ss to first dc. **(165 sts: 33 SF + 33 dc joins, treating each fan as 5 sts)**

---

### Increase Round 12
**Rnd 12:** As Rnd 4. **(169 tr)**

---

### Pattern Round 13
169 ÷ 5 = 33 r 4. 33 SF + 4 balance tr.
**Rnd 13:** Ch 1, 1 dc in same st. *Sk 2, SF in next st, sk 2, 1 dc in next st;* rep 32 more times, 1 tr in last 4 sts. ss to first dc. **(169 sts)**

---

### Increase Round 14
**Rnd 14:** As Rnd 4. **(173 tr)**

---

### Pattern Round 15
173 ÷ 5 = 34 r 3. 34 SF + 3 balance tr.
**Rnd 15:** Ch 1, 1 dc in same st. *Sk 2, SF in next st, sk 2, 1 dc in next st;* rep 33 more times, 1 tr in last 3 sts. ss to first dc. **(173 sts)**

---

### Increase Round 16
**Rnd 16:** As Rnd 4. **(177 tr)**

---

### Pattern Round 17 — Final Star Flower Round
177 ÷ 5 = 35 r 2. 35 SF + 2 balance tr.
**Rnd 17:** Ch 1, 1 dc in same st. *Sk 2, SF in next st, sk 2, 1 dc in next st;* rep 34 more times, 1 tr in last 2 sts. ss to first dc. **(177 sts)**

---

### Edging Round 18
**Rnd 18:** Ch 1, 1 dc in same st, 1 dc in each st AND each ch-1 sp around, ss to first dc. **(approximately 185 dc — exact count not critical)**

Fasten off, leaving a 15 cm tail. Weave in all ends with a tapestry needle.

*Length check: Rnds 1 + 2 ≈ 2.5 cm; each pattern + inc pair (Rnds 3–17) ≈ 4.5 cm × 8 pairs = ~36 cm; edging ≈ 1 cm. **Total ≈ 38 cm. ✓***

---

## TASSELS (make 12)

You will attach 12 tassels evenly spaced around the hem.

**For each tassel:**
1. Wrap yarn around a 10 cm tall piece of card **20 times**.
2. Cut a 20 cm length of yarn, slide it under the wraps at the top of the card, and tie tightly.
3. Slip the wraps off the card. Cut through the loops at the bottom edge.
4. Take another 20 cm length of yarn and wrap it tightly around the tassel about 1.5 cm below the top tie. Knot securely and tuck the ends down into the tassel.
5. Trim the tassel ends evenly to 10 cm.

**Attach tassels:**
- 185 hem dc ÷ 12 tassels ≈ every 15th stitch.
- Use a crochet hook to pull the top tie of each tassel through a hem dc, then pass the tassel ends through the loop and pull tight (lark's head knot).
- Space them evenly around the hem.

---

## FINISHING
- Weave in any remaining yarn tails.
- Gently steam-block (acrylic-safe: hold iron above the fabric, **do not press**) to open up the lace and even out the drape.
- Lay flat to dry.

---

## Tips for Success
- **Count your stitches** at the end of every round before joining — this is the single best habit for a tidy finished piece.
- **Move your markers** up every round so you never lose your side points.
- The Star Flower fans look messy until you block them — don't worry, blocking transforms the fabric.
- If the neckline feels tight when trying on, work the foundation ch more loosely or go up half a hook size for Rnd 1 only.

Enjoy your beautiful new poncho! 🌟
Disclaimer: This pattern was generated by AI and should be reviewed for accuracy before use. While we strive for quality, AI-generated content may contain errors. Please verify measurements, stitch counts, and instructions before beginning your project. Generated by purlJam.uk
Access your pattern anytime
Bookmark this page to access your pattern anytime