Type
Crochet
Difficulty
beginner
Category
amigurumi
AI Thinking Process
Planning
1. **Design Strategy**: A cute beginner-friendly mini car made from a rectangular body worked in the round, with a smaller cabin on top and four wheel discs. Simple amigurumi techniques using UK terms.
2. **Construction Plan**: Body worked as a flattened tube (oval base worked in rounds), cabin worked separately as smaller flattened tube, wheels worked as flat circles, all sewn together.
3. **Quality Assurance**:
- Keep stitches tight to hide stuffing
- Stuff body before closing
- Position wheels symmetrically before sewing
4. **Final Calculations**: Tension ~20 dc x 22 rounds = 10cm. Finished size approx 8cm long x 4cm tall x 4cm wide. Body starts from 6-ch oval, increases to 24 sts. Wheels: 4 flat circles ending at 18 sts.
Verification
1. **Completeness**: All template sections included — materials, tension, abbreviations, instructions, assembly, finishing.
2. **Consistency**: Stitch counts checked at each round; oval base maths verified (6+6+2+2 = 16 after rnd 2 increases... rechecked below).
3. **Constraints**: UK terminology (dc, tr), metric first, worsted yarn, beginner level.
4. **Safety**: All round counts add up; no negative stitches; stuffing instructions placed before closing rounds.
Pattern
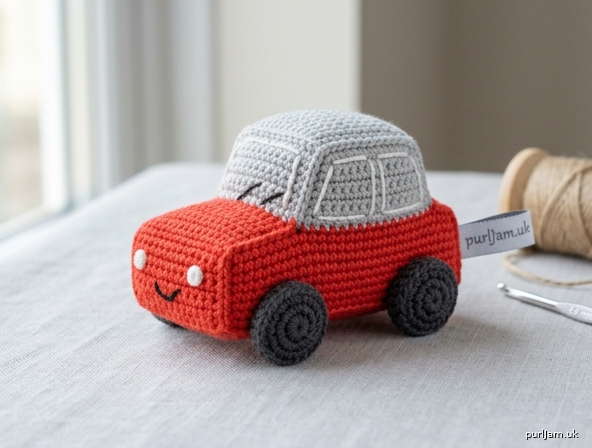
# Mini Crochet Car 🚗

A charming little car plushie that fits in the palm of your hand. Perfect for beginners — uses only basic stitches and simple shapes. Make it in your favourite colour for a sweet handmade gift, desk buddy, or keychain charm.

**Skill level:** Beginner
**Finished size:** Approximately 8 cm long × 4 cm tall × 4 cm wide (3¼" × 1½" × 1½")

---

## Materials

- **Yarn (worsted weight / aran, Category 4):**
  - Colour A (car body): approx. 15 g — choose a bright colour (red, blue, yellow)
  - Colour B (cabin/roof): approx. 8 g — contrast or matching shade
  - Colour C (wheels): approx. 5 g — black or dark grey
  - Small scrap of white/light grey for windows (optional)
- **Crochet hook:** 3.5 mm (UK 9 / US E-4)
- **Polyester toy stuffing (fibrefill)**
- **Yarn needle** (tapestry/darning needle)
- **Stitch marker** (or scrap of contrast yarn)
- **Scissors**
- Optional: 2 small safety eyes (6 mm), or embroidery thread for face details

---

## Tension (Gauge)

Approximately **20 dc × 22 rounds = 10 cm (4")** worked in continuous spiral.
Exact tension is not critical for toys — just work tightly enough that stuffing does not show through.

---

## Abbreviations (UK terms)

- **ch** — chain
- **dc** — double crochet (= US single crochet)
- **dc2tog** — double crochet 2 stitches together (decrease)
- **inc** — increase (work 2 dc into the same stitch)
- **sl st** — slip stitch
- **st(s)** — stitch(es)
- **MR** — magic ring
- **[ ]** — stitch count at end of round
- **( ) x n** — repeat instructions inside brackets n times

> **Note:** This pattern uses UK crochet terminology. UK dc = US sc.

---

## Construction Overview

The car is made in **four parts**:
1. **Body** (worked as a flattened oval tube in Colour A)
2. **Cabin/roof** (smaller flattened oval in Colour B)
3. **Wheels** (4 flat circles in Colour C)
4. Assembly with yarn needle

Work in **continuous spirals** unless otherwise stated — do not join or turn. Use a stitch marker to track the start of each round.

---

## Pattern Instructions

### Part 1: Car Body (make 1, in Colour A)

Begin with an oval base.

**Foundation:** Ch 7 with Colour A.

**Rnd 1:** Working into the chain: dc in 2nd ch from hook, dc in next 4 ch, 3 dc in last ch; rotating to work along the opposite side of the chain, dc in next 4 ch, 2 dc in last ch (same as starting ch). **[14 sts]**

*Math check: 1 + 4 + 3 + 4 + 2 = 14 ✓*

Place stitch marker in first st of next round.

**Rnd 2:** inc, dc in next 4, (inc) x 3, dc in next 4, (inc) x 2. **[20 sts]**

*Math check: 14 + 6 increases = 20 ✓*

**Rnd 3:** dc in each st around. **[20 sts]**

**Rnd 4:** dc in next 6, inc, dc in next 4, inc, dc in next 8. **[22 sts]**

**Rnds 5–10:** dc in each st around (6 rounds). **[22 sts]**

This forms the boxy body of the car.

**Begin shaping the top edge:**

**Rnd 11:** dc in next 5, dc2tog, dc in next 4, dc2tog, dc in next 7, dc2tog. **[19 sts]**

**Stuff the body firmly** with fibrefill, shaping it into a rectangular block.

**Rnd 12:** dc in next 4, dc2tog, dc in next 3, dc2tog, dc in next 6, dc2tog. **[16 sts]**

**Rnd 13:** (dc, dc2tog) x 5, dc. **[11 sts]**

Add a little more stuffing if needed.

**Rnd 14:** (dc2tog) x 5, dc. **[6 sts]**

Fasten off, leaving a 15 cm tail. Thread tail through remaining stitches and pull closed. Weave in end.

---

### Part 2: Cabin / Roof (make 1, in Colour B)

A smaller flattened oval that sits on top of the body.

**Foundation:** Ch 5 with Colour B.

**Rnd 1:** dc in 2nd ch from hook, dc in next 2 ch, 3 dc in last ch; rotating, dc in next 2 ch, 2 dc in last ch. **[10 sts]**

*Math check: 1 + 2 + 3 + 2 + 2 = 10 ✓*

**Rnd 2:** inc, dc in next 2, (inc) x 3, dc in next 2, (inc) x 2. **[16 sts]**

**Rnds 3–5:** dc in each st around (3 rounds). **[16 sts]**

**Rnd 6:** (dc in next 2, dc2tog) x 4. **[12 sts]**

Lightly stuff the cabin.

**Rnd 7:** (dc2tog) x 6. **[6 sts]**

Fasten off, leaving a 30 cm tail for sewing. Pull closed.

---

### Part 3: Wheels (make 4, in Colour C)

Small flat discs.

**Rnd 1:** 6 dc into MR. **[6 sts]**

**Rnd 2:** (inc) x 6. **[12 sts]**

**Rnd 3:** sl st in next st to join, fasten off, leaving a 20 cm tail for sewing.

*Math check: 6 → 12 sts, flat disc ✓*

---

## Assembly

Lay out all pieces and pin before sewing for best placement.

### Step 1: Attach the Cabin
- Centre the cabin on top of the body, slightly toward the back half (leaving the front section as the "bonnet").
- Using the long tail and yarn needle, sew the cabin securely all the way around using whip stitch.
- Weave in end.

### Step 2: Attach the Wheels
- Position **2 wheels on each side** of the car:
  - Front wheels: approximately 1.5 cm from the front edge
  - Back wheels: approximately 1.5 cm from the back edge
  - Wheels should sit at the bottom edge of the body
- Pin in place first to check symmetry.
- Using the long tails, whip stitch each wheel to the body around its full circumference.
- Weave in all ends.

### Step 3: Add Windows (optional)
- With white or light grey yarn, embroider a small rectangle on each side of the cabin using straight stitches, or sew on small felt rectangles.
- Embroider a windscreen on the front-facing slope of the cabin.

### Step 4: Optional Details
- **Headlights:** Two small French knots in white or yellow on the front of the bonnet.
- **Face (cute version):** Add 6 mm safety eyes to the front of the body and embroider a smile for a Pixar-style car.
- **Keychain:** Attach a split ring with a small length of yarn looped through the top of the cabin.

---

## Finishing

- Weave in all loose ends with the yarn needle, hiding them inside the stuffed body.
- Gently shape the car with your hands, pressing the corners to define a boxy silhouette.
- Trim any stray fibres.

---

## Tips for Success

- **Work tightly!** Tight stitches prevent stuffing from showing through and keep the car's shape crisp.
- **Stuff firmly but evenly** — over-stuffing distorts the rectangular shape; under-stuffing makes it floppy.
- **Pin before sewing** — wheel placement makes a big difference to the finished look.
- **Use a stitch marker** every round; it's easy to lose your place in continuous spirals.
- **Colour ideas:** Classic red with black wheels and grey cabin; pastel blue with white roof; yellow taxi with black checkers embroidered.

---

## Size Variations

- **Keychain mini (≈ 5 cm):** Use 4-ply / DK yarn and a 3.0 mm hook — finished car ≈ 6 cm long.
- **Larger car (≈ 12 cm):** Use chunky yarn and a 5 mm hook, and add 2 extra plain rounds to the body (Rnds 5–10 become Rnds 5–12).

---

Enjoy your mini crochet car! 🚙 Tag your makes and share with friends — this little vehicle is perfect for car-loving kids, party favours, or a sweet handmade keepsake.
Disclaimer: This pattern was generated by AI and should be reviewed for accuracy before use. While we strive for quality, AI-generated content may contain errors. Please verify measurements, stitch counts, and instructions before beginning your project. Generated by purlJam.uk
Access your pattern anytime
Bookmark this page to access your pattern anytime