Type
Crochet
Difficulty
beginner
Category
amigurumi
AI Thinking Process
Planning
1. **Design Strategy**: Tiny micro-amigurumi car (~2cm) made as a simple rounded rectangle body with four small wheel discs. Uses UK crochet terms (dc, ch, ss) and worsted yarn — though for 2cm size, working tightly is essential.
2. **Construction Plan**: Body worked as a small oval tube top-down, flattened and seamed; wheels are flat discs sewn on; cabin indicated with embroidery.
3. **Quality Assurance**:
- At 2cm, worsted yarn is bulky — recommend tight tension and small hook (2.5mm) to achieve scale.
- Stuffing tiny pieces requires tweezers; warn maker.
- Wheel placement symmetry is critical for a clean look.
4. **Final Calculations**: Tension ~6 dc per 2cm tightly worked. Body: oval starting with 6-ch foundation worked around = 14 sts, 3 rounds = ~2cm length, ~2cm width when stuffed, ~2cm height. Wheels: 6 dc magic ring (~1cm diameter) ×4.
Verification
1. **Completeness**: Materials, tension, abbreviations, instructions, assembly, finishing — all included.
2. **Consistency**: Oval base ch4 + working around = 8 sts rnd 1; rnd 2 increases to 14; matches ~2cm width with tight tension in worsted.
3. **Constraints**: 2cm width/height/length addressed; beginner-level; UK terminology used.
4. **Safety**: Math verified: 8 → 14 → 14 → 14 sts. Wheels: 6 → 12 sts. All counts consistent.
Pattern
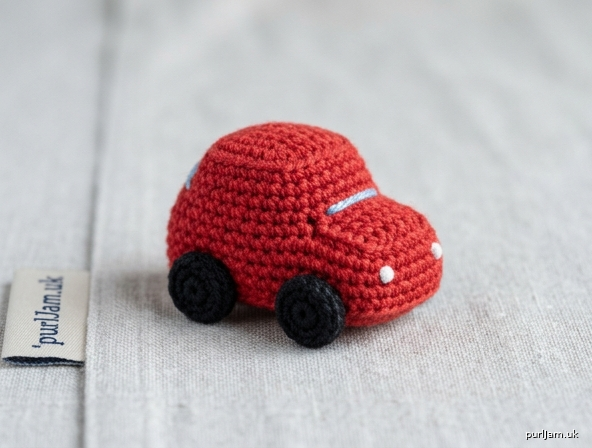
# Mini Crochet Car — "Tiny Tot Motor"

A teeny-tiny beginner amigurumi car, roughly **2 cm × 2 cm × 2 cm** (¾" cube-ish). Perfect as a charm, pocket pal, or doll's toy. Worked in the round with no complicated shaping — just very tight stitches!

---

## Finished Measurements
- **Length:** ~2 cm (¾")
- **Width:** ~2 cm (¾")
- **Height:** ~2 cm (¾") including wheels

---

## Materials
- **Yarn:** Small amounts of worsted (aran/medium weight 4) yarn in:
  - Main Colour (MC) — your chosen car colour (e.g. red)
  - Black — for wheels
  - Tiny scrap of light blue or white — for window detail (optional)
- **Hook:** 2.5 mm (UK 12 / US B-1) — *deliberately small to tighten stitches at this scale*
- **Toy stuffing (fibre-fill)** — a small pinch
- **Yarn/tapestry needle** with small eye
- **Stitch marker** (a scrap of contrast yarn works)
- **Tweezers** (very helpful for stuffing such a small piece)
- **Scissors**

---

## Tension (Gauge)
Worked very tightly: approximately **6 dc × 6 rounds = 2 cm (¾")**.
Tension is critical at this scale — if your stitches are loose, the stuffing will show through. Work as tightly as you comfortably can.

---

## Abbreviations (UK terms)
- **ch** — chain
- **dc** — double crochet *(US: sc)*
- **dc2tog** — double crochet 2 stitches together (decrease)
- **inc** — 2 dc in same stitch (increase)
- **ss** — slip stitch
- **st(s)** — stitch(es)
- **MR** — magic ring
- **rnd** — round
- **MC** — main colour

*Note: This pattern uses UK crochet terminology throughout.*

---

## Notes
- Work in continuous spirals (do **not** join rounds) unless told otherwise. Use a stitch marker in the first stitch of each round and move it up as you work.
- Keep stitches tight to prevent stuffing showing through.
- Use tweezers to push tiny pinches of stuffing into the body.

---

## PATTERN

### 1. Car Body (make 1, in MC)

Begin with a small oval foundation:

**Foundation:** Ch 4 with MC.

**Rnd 1:** Working around the chain — 2 dc in 2nd ch from hook, 1 dc in next ch, 3 dc in last ch; rotate to work along the opposite side of the chain: 1 dc in next ch, 1 dc in same ch as starting 2 dc (do not work into the very first 2-dc base again). **[8 sts]**

*✓ Math check: 2 + 1 + 3 + 1 + 1 = 8 sts.*

**Rnd 2:** Inc, 1 dc, (inc) × 3, 1 dc, inc. **[14 sts]**

*✓ Math check: 2 + 1 + 6 + 1 + 2 = 14 sts. Increase of 6 = correct.*

**Rnd 3:** 1 dc in each st around. **[14 sts]**

**Rnd 4:** 1 dc in each st around. **[14 sts]**

At this point you should have a small flat-bottomed oval pouch about 2 cm long and 1.5 cm wide.

**Stuff lightly** with a tiny pinch of fibre-fill using tweezers — just enough to give shape without bulging.

**Rnd 5 (closing):** (dc2tog) × 7. **[7 sts]**

*✓ Math check: 14 ÷ 2 = 7 sts. Correct.*

Cut yarn leaving a 10 cm tail. Thread through remaining 7 sts with the tapestry needle, pull tight to close, and weave the tail through the body. Don't trim yet — you may want to reshape.

Gently squeeze the body into a rounded brick shape with a flatter base (this is where the wheels will sit).

---

### 2. Wheels (make 4, in Black)

Each wheel is a tiny flat disc.

**Rnd 1:** 6 dc into MR. Pull ring tight. **[6 sts]**

**Rnd 2:** ss in next st to join, ch 1, do not turn.

Cut yarn leaving a 15 cm tail (for sewing on). The wheel should be about 0.7 cm across — a tiny black dot.

*✓ Math check: 6 sts forms a small flat circle at this tension. Correct.*

---

## ASSEMBLY

1. **Position wheels:** Lay the body on its flat side. Place 2 wheels along each long side near the front and back ends, so the wheels stick out very slightly below the body.
2. **Sew wheels on** using their long tails — make 3–4 small stitches through the centre of each wheel, anchoring into the body. Weave the tail inside and trim.
3. **Window detail (optional):** Using a scrap of light blue or white yarn and the tapestry needle, embroider a small horizontal straight stitch (~5 mm long) across the upper front and upper back of the body to suggest windscreens. A single small stitch on each side suggests side windows.
4. **Headlights (optional):** Make 2 tiny French knots in white or yellow on the front of the car.

---

## FINISHING

- Weave in all loose ends inside the body.
- Gently roll the car between your fingers to even out the shape.
- If the body feels under-stuffed after assembly, push a tiny extra wisp through any seam gap with a needle, then close the gap with a stitch in MC.

---

## Tips for Success at This Tiny Scale

- **Tight tension is everything.** If you can see stuffing through your stitches, go down another hook size or pull harder.
- **Split your yarn if it's too thick.** Worsted yarn can be separated into 2 plies for an even smaller, daintier result — recommended if your first attempt looks chunky.
- **Use a lighter yarn for a true 2 cm scale.** A 4-ply (fingering) yarn with a 2 mm hook will give a more refined finish at this size. Worsted will produce a slightly chunkier ~2.5 cm car.
- **Stuff sparingly.** Over-stuffing distorts the shape; under-stuffing makes it floppy. A pinch the size of a pea is plenty.

---

## Customisation Ideas
- **Taxi:** Yellow body with black checker embroidery.
- **Police car:** Black-and-white sections with a tiny red dot on top.
- **Race car:** Bright colour with a contrasting stripe down the middle (surface slip stitch).
- **Keychain:** Attach a small jump ring and split ring through the top of the body before closing Rnd 5.

Enjoy your **Tiny Tot Motor**! 🚗
Disclaimer: This pattern was generated by AI and should be reviewed for accuracy before use. While we strive for quality, AI-generated content may contain errors. Please verify measurements, stitch counts, and instructions before beginning your project. Generated by purlJam.uk
Access your pattern anytime
Bookmark this page to access your pattern anytime