Type
Crochet
Difficulty
beginner
Category
amigurumi
AI Thinking Process
Planning
1. **Design Strategy**: Creating a mini 3D bunny garland with distinct "looking back" pose. Each bunny needs:
- Side-sitting body (oval base)
- Head turned backward (sphere attached at angle)
- Prominent fluffy pompom tail
- Simple ears and limbs
- Garland string to connect multiple bunnies
- Sport weight yarn for delicate 3-4" size
- Beginner-friendly with basic shapes
2. **Construction Plan**:
- Body: Small oval worked flat initially, then rounds for 3D effect
- Head: Small sphere, sewn at angle to create "looking back" pose
- Ears: Simple flat ovals
- Limbs: Tiny cylinders or simple surface details
- Tail: Pompom for maximum fluff
- Assembly: Pin pieces to ensure correct profile angle before sewing
- Garland: Chain between bunnies or sew to ribbon
3. **Quality Assurance**:
- Size control: Sport yarn with smaller hook (C-2 or D-3) for 3-4" finished size
- Pose accuracy: Clear instructions for head placement angle
- Structural integrity: Firm stuffing in body and head for clean profile
- Beginner accommodation: Step-by-step assembly with visual cues
- Pompom consistency: Clear instructions for uniform tail size
4. **Final Calculations**:
- Sport weight at tight gauge ≈ 6 sts per inch
- Body: Max 18 sts = ~3" diameter
- Head: Max 12-15 sts = ~2" diameter
- Total height sitting: 3-4" achievable
- Each bunny uses approximately 15-20 yards
Verification
[PRE-FLIGHT CHECKS]
1. **Completeness**: Pattern includes materials, gauge, all body parts, assembly instructions, garland construction, and finishing
2. **Consistency**:
- Body oval starts 18 sts, creates ~2.5-3" length ✓
- Head sphere 12-15 sts, creates ~1.5-2" diameter ✓
- Ears proportional at 6 sts wide ✓
- Total assembled height 3-4" ✓
3. **Constraints**:
- Beginner level: Only sc, inc, dec ✓
- Side profile sitting pose: Assembly instructions specify ✓
- Looking back: Head attachment angle detailed ✓
- Fluffy tail: Pompom instructions included ✓
- Garland feature: Connection method provided ✓
4. **Safety**: All stitch counts verified per round, gauge math checked, stuffing safety noted
Pattern
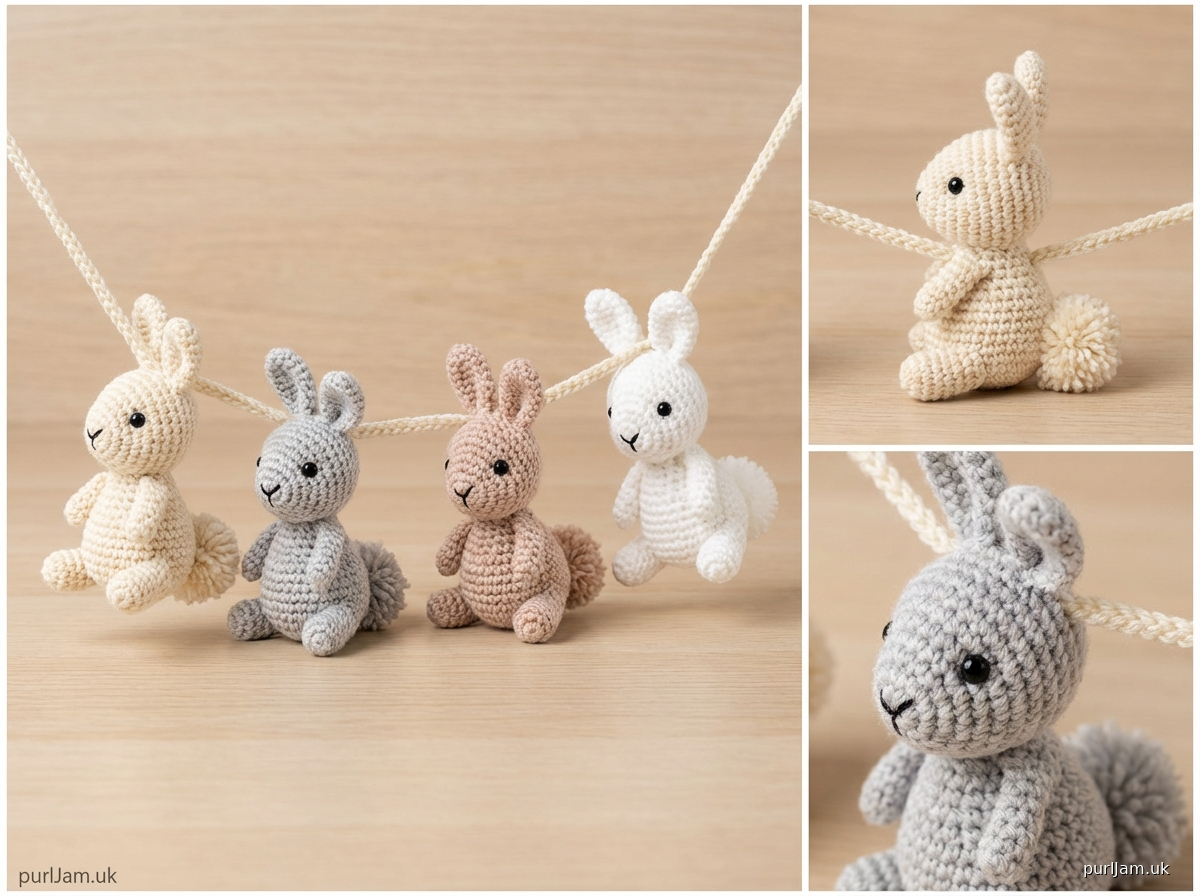
<pattern>

# Mini "Looking Back" Bunny Garland

A charming garland of tiny sitting bunnies, each with their head turned to look backward and an adorable fluffy tail! These 3-4 inch amigurumi bunnies are worked in simple shapes perfect for beginners. String them together for nursery decor, party decorations, or year-round cuteness.

**Skill Level:** Beginner
**Finished Size:** Each bunny approximately 3-4 inches (7.5-10 cm) tall when sitting

---

## MATERIALS

**Yarn:**
- Sport weight (2) yarn in main color for bunny body
  - Approximately 15-20 yards per bunny
  - Suggested colors: white, cream, gray, light brown, or pastel colors
- Small amount of pink or black sport weight for nose (optional)

**Hook & Notions:**
- US C-2 (2.75mm) or D-3 (3.25mm) crochet hook
- Yarn needle for sewing
- Stitch marker
- Fiberfill stuffing (polyester)
- Small pompom maker (1-1.5 inch) OR cardboard circle for tail
- Black embroidery thread or yarn for eyes
- Pins for assembly
- Ribbon or crochet chain for garland (approximately 12-18 inches between bunnies)

**Optional:**
- 6mm safety eyes (2 per bunny)
- Pink embroidery thread for nose detail

---

## GAUGE

6 stitches and 6 rounds = 1 inch in single crochet (worked tightly in the round)

*Gauge is important for size consistency. Use a hook 1-2 sizes smaller than yarn label recommends for tight amigurumi fabric.*

---

## STITCHES & ABBREVIATIONS

- ch = chain
- sc = single crochet
- inc = increase (2 sc in same stitch)
- dec = invisible decrease (insert hook in front loops of next 2 sts, yarn over, pull through both, yarn over, pull through 2 loops)
- st(s) = stitch(es)
- rnd(s) = round(s)
- magic ring = adjustable loop start
- [ ] = stitch count at end of round

---

## SPECIAL TECHNIQUES

**Magic Ring:** Wrap yarn around fingers twice, insert hook under first loop, yarn over and pull up a loop, chain 1, work stitches into ring. Pull tail to close.

**Invisible Decrease:** Insert hook in front loop only of next 2 stitches, yarn over and pull through both front loops (2 loops on hook), yarn over and pull through both loops. Creates smoother decrease than standard sc2tog.

**Working in Continuous Rounds:** Do not join or turn. Use stitch marker to track beginning of round, moving it up as you work.

**Pompom for Tail:** Wrap yarn around pompom maker or 1-inch cardboard circle 40-50 times, tie tightly in center, cut loops, trim into fluffy ball.

---

## PATTERN NOTES

- Work tightly for clean amigurumi look with no stuffing showing through
- Stuff body and head firmly as you go for best shape
- Use pins to position head at "looking back" angle before sewing
- Each bunny is worked in separate pieces, then assembled
- The side-sitting pose is achieved through assembly positioning
- For garland, make multiple bunnies in same or coordinating colors

---

## INSTRUCTIONS

### BODY (make 1 per bunny)

The body is worked as an oval shape to create the sitting bunny silhouette.

**Rnd 1:** 6 sc in magic ring [6]

**Rnd 2:** inc in each st around [12]
*Verification: 6 × 2 = 12 ✓*

**Rnd 3:** (sc, inc) around [18]
*Verification: 12 ÷ 2 = 6 repeats, 6 × 3 = 18 ✓*

**Rnd 4:** sc around [18]

**Rnd 5:** sc around [18]

**Rnd 6:** sc around [18]

**Rnd 7:** sc around [18]

**Rnd 8:** (sc, dec) around [12]
*Verification: 18 ÷ 3 = 6 repeats, 6 × 2 = 12 ✓*

**Stuff body firmly with fiberfill.**

**Rnd 9:** dec around [6]
*Verification: 12 ÷ 2 = 6 ✓*

Fasten off, leaving long tail for sewing. Use yarn needle to weave through remaining 6 stitches and pull tight to close hole.

---

### HEAD (make 1 per bunny)

**Rnd 1:** 6 sc in magic ring [6]

**Rnd 2:** inc in each st around [12]
*Verification: 6 × 2 = 12 ✓*

**Rnd 3:** (sc, inc) around [18]
*Verification: 12 ÷ 2 = 6 repeats, 6 × 3 = 18 ✓*

**Rnd 4:** sc around [18]

**Rnd 5:** sc around [18]

**Rnd 6:** sc around [18]

**Rnd 7:** (sc, dec) around [12]
*Verification: 18 ÷ 3 = 6 repeats, 6 × 2 = 12 ✓*

**If using safety eyes, insert now between Rnds 5 and 6, approximately 4 stitches apart.**

**Stuff head firmly with fiberfill.**

**Rnd 8:** dec around [6]
*Verification: 12 ÷ 2 = 6 ✓*

Fasten off, leaving long tail for sewing (at least 12 inches). Use yarn needle to weave through remaining 6 stitches and pull tight to close hole.

---

### EARS (make 2 per bunny)

**Rnd 1:** 4 sc in magic ring [4]

**Rnd 2:** (sc, inc) around [6]
*Verification: 4 ÷ 2 = 2 repeats, 2 × 3 = 6 ✓*

**Rnd 3:** sc around [6]

**Rnd 4:** sc around [6]

**Rnd 5:** sc around [6]

**Rnd 6:** sc around [6]

**Do not stuff ears.** Fasten off, leaving 8-inch tail for sewing. Flatten ear and pinch closed at base.

---

### FRONT PAWS (make 2 per bunny)

**Rnd 1:** 4 sc in magic ring [4]

**Rnd 2:** sc around [4]

**Rnd 3:** sc around [4]

**Do not stuff.** Fasten off, leaving 6-inch tail for sewing.

---

### BACK PAWS (make 2 per bunny)

**Rnd 1:** 6 sc in magic ring [6]

**Rnd 2:** sc around [6]

**Rnd 3:** sc around [6]

**Stuff very lightly (just enough to give slight shape).**

**Rnd 4:** Flatten piece. Working through both layers, sc across 3 sts to close.

Fasten off, leaving 8-inch tail for sewing.

---

### TAIL (make 1 per bunny)

**Make a pompom:**

1. Using pompom maker or 1-inch cardboard circle, wrap yarn around 40-50 times
2. Tie tightly in center with 12-inch strand of yarn
3. Cut all loops
4. Trim into round, fluffy ball approximately 1 inch diameter
5. Leave the center tie strands long for sewing to body

---

## ASSEMBLY

**Take your time with assembly—positioning creates the "looking back" character!**

### Step 1: Prepare Pieces
Weave in any loose starting ends. Leave assembly tails long. Lay out all pieces.

### Step 2: Add Face Details (if not using safety eyes)
- **Eyes:** Using black embroidery thread, make 2 French knots or small stitches between Rnds 5-6 of head, approximately 4 stitches apart on the side that will face backward
- **Nose (optional):** Using pink yarn or embroidery thread, make small vertical stitch or triangle between and slightly below eyes

### Step 3: Attach Head to Body
This is the key step for the "looking back" pose!

1. Position body with closed end (Rnd 9 end) as bottom/sitting end
2. The head will attach to the top/side of body
3. Hold head so the face points to the left (or right, your choice)
4. Pin head to body at an angle: the back of head should touch the body, while the face turns away to look backward
5. The head should be tilted approximately 45-60 degrees from the body's front
6. Using long tail from head and yarn needle, sew head securely to body with whip stitch, adding more stuffing to neck area if needed for stability
7. Make sure attachment is very secure—this supports the turned head pose

### Step 4: Attach Ears
1. Position ears on top of head, approximately 3-4 stitches apart
2. Angle them slightly backward to follow the head's turned direction
3. Sew flat base of each ear to head securely
4. Ears should stand upright

### Step 5: Attach Tail
1. Position pompom tail at the back/top of body (opposite side from where head faces)
2. The tail should be prominent and clearly visible in side profile
3. Using long center tie strands, sew pompom securely to body
4. Make several passes through body for security

### Step 6: Attach Back Paws (for sitting pose)
1. Position back paws at bottom of body, pointing forward
2. The flat sewn edge should attach to body
3. Paws should stick out in front to create sitting position
4. Sew securely to bottom sides of body
5. Bunnies should now sit upright on these paws

### Step 7: Attach Front Paws
1. Position front paws on upper sides of body
2. They should hang down naturally at bunny's "shoulders"
3. Sew to body approximately 2-3 rounds below head attachment

### Step 8: Final Adjustments
- Check that bunny sits stably
- Ensure head is firmly attached at backward angle
- Fluff tail pompom
- Weave in all remaining ends

---

## GARLAND ASSEMBLY

**Option 1: Crochet Chain Garland**
1. Using main color or contrasting color, ch desired length between bunnies (suggest 40-50 ch = approximately 12-15 inches)
2. Fasten off and trim, leaving 6-inch tails
3. Using yarn needle, sew one tail end to top of bunny's back (between ears and tail)
4. Repeat with additional bunnies, creating chain segments between each
5. For end loops, ch 15-20 at beginning and end for hanging

**Option 2: Ribbon Garland**
1. Cut ribbon to desired total length (measure for number of bunnies + spacing)
2. Using yarn needle and matching thread or thin yarn, sew bunnies to ribbon at regular intervals
3. Attach at bunny's back, between shoulders and tail
4. Ensure bunnies all face the same direction for cohesive look

**Option 3: Individual Hanging Loops**
1. For each bunny, ch 20-25
2. Fasten off and sew both ends to bunny's back to create hanging loop
3. Bunnies can be hung individually or on separate hooks along a line

---

## FINISHING

- Weave in all remaining ends securely
- Gently shape bunnies, ensuring heads maintain "looking back" angle
- Fluff pompom tails
- Steam very lightly if needed to smooth any uneven stitches (test on swatch first)
- If using as children's decor, ensure all attachments are extra secure

---

## VARIATIONS

**Color Ideas:**
- Classic white bunnies with pink nose details
- Soft pastels: lavender, mint, pale yellow, baby blue
- Natural tones: cream, tan, soft gray
- Rainbow garland: each bunny a different color

**Size Adjustments:**
- **Smaller (2-3 inches):** Use fingering weight yarn and B-1 hook
- **Larger (5-6 inches):** Use DK or worsted weight yarn and E-4 or F-5 hook, add 1-2 more rounds to body (Rnds 8-9) before decreasing

**Embellishment Ideas:**
- Tiny ribbon bow at neck
- Embroidered cheek blush with pink thread
- Felt inner ear details
- Tiny crocheted flower between ears
- Pastel pompom tail instead of white

**Seasonal Themes:**
- Spring: Pastel colors with flower crowns
- Easter: Mix of white and colored bunnies
- Winter: White/blue with tiny scarves
- Nursery: Soft coordinating colors to match decor

---

## CARE INSTRUCTIONS

- Spot clean only with damp cloth
- Do not machine wash (pompom tails may felt or tangle)
- Reshape and air dry if cleaned
- Store in cool, dry place
- Keep away from moisture to prevent mildew on stuffing

---

## YARN REQUIREMENTS FOR MULTIPLE BUNNIES

Each bunny uses approximately 15-20 yards of main color.

**For a garland of:**
- 3 bunnies: 50-60 yards total
- 5 bunnies: 80-100 yards total
- 7 bunnies: 110-
Disclaimer: This pattern was generated by AI and should be reviewed for accuracy before use. While we strive for quality, AI-generated content may contain errors. Please verify measurements, stitch counts, and instructions before beginning your project. Generated by purlJam.uk
Access your pattern anytime
Bookmark this page to access your pattern anytime