Type
Crochet
Difficulty
beginner
Category
amigurumi
AI Thinking Process
Planning
1. **Design Strategy**: Mini polo mallet consists of a long slim handle (cylinder) with a perpendicular cigar-shaped mallet head at the bottom, plus a wrist strap loop at the top. Worked in worsted with 3.5mm hook for tight amigurumi fabric.
2. **Construction Plan**: Handle worked as a slim cylinder top-down; mallet head worked as a tapered cylinder (cigar shape) with closed ends; head sewn perpendicularly to base of handle; small chain loop added at top.
3. **Quality Assurance**:
- Stuff handle lightly and use a wooden skewer/pipe cleaner for rigidity
- Attach head perpendicular (T-shape), centred on handle base
- Keep stitches tight to avoid stuffing showing through
4. **Final Calculations**: Tension 22 dc x 24 rnds = 10cm. Handle: 6-st cylinder, ~14cm long. Head: oval/cigar shape, ~6cm long x 2cm diameter. Total mallet length ~15cm; head width ~6cm.
Verification
1. **Completeness**: Materials, tension, abbreviations, instructions, assembly, finishing all included. ✓
2. **Consistency**: Handle 6 sts around at 22 dc/10cm ≈ 2.7cm circumference ≈ 0.9cm diameter — slim handle ✓. Head increases to 12 sts ≈ 5.5cm circumference ≈ 1.7cm diameter ✓.
3. **Constraints**: UK terminology (dc, tr), metric first with inches, worsted yarn, intermediate level ✓.
4. **Safety**: Math verified: 6→12 by inc in each [12]; 12→6 by dc2tog around [6]. Head stitch counts add up correctly.
Pattern
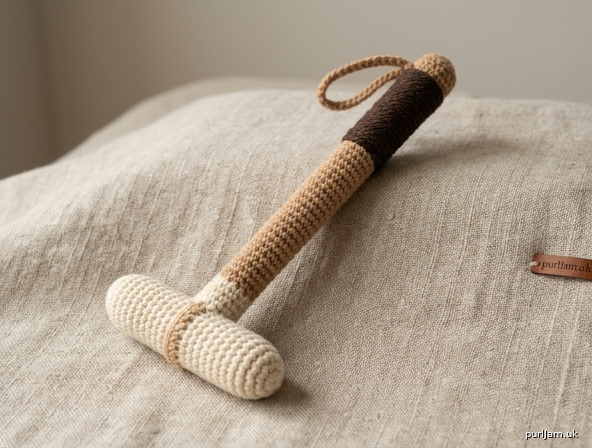
# Mini Polo Mallet — Crochet Pattern

A charming miniature replica of a traditional polo mallet, perfect as a keepsake, ornament, or gift for equestrian enthusiasts. Worked in simple amigurumi shapes and assembled into a classic T-shape.

**Skill Level:** Intermediate
**Finished Size:** Approx. 15 cm (6 in) total length; head approx. 6 cm (2½ in) wide

---

## Materials

- **Yarn:** Worsted weight (DK/Aran, Yarn Weight 4), small amounts in:
  - **Colour A** — Light brown/tan (handle shaft) — approx. 10 g
  - **Colour B** — Cream or natural (mallet head) — approx. 8 g
  - **Colour C** — Dark brown or black (grip wrap & strap) — approx. 5 g
- **Hook:** 3.5 mm (UK 9 / US E-4)
- **Notions:**
  - Polyester toy stuffing (fibrefill)
  - Yarn/tapestry needle
  - Stitch marker
  - 1 wooden skewer or pipe cleaner, approx. 13 cm (5 in) long — for handle rigidity (optional but recommended)
  - Small amount of dark thread for whip-stitch detail (optional)

---

## Tension (Gauge)

22 dc x 24 rnds = 10 cm (4 in) in continuous rounds of dc.
Exact tension is not critical; work tightly so stuffing does not show through.

---

## Abbreviations (UK Terms)

- **ch** — chain
- **dc** — double crochet (= US single crochet)
- **dc2tog** — double crochet 2 stitches together (decrease)
- **inc** — work 2 dc in same stitch
- **MR** — magic ring
- **sl st** — slip stitch
- **st(s)** — stitch(es)
- **rnd** — round
- **[ ]** — stitch count at end of round

*Note: This pattern uses UK crochet terminology throughout. UK dc = US sc.*

---

## Construction Overview

1. **Handle (shaft)** — a long slim cylinder in Colour A
2. **Grip wrap** — top portion of handle worked over with Colour C, or wrapped with Colour C
3. **Mallet head** — a closed cigar/tube shape in Colour B
4. **Wrist strap** — small chain loop in Colour C
5. **Assemble** in a T-shape and finish

---

## Pattern Instructions

Work in continuous spirals unless otherwise stated. Place a stitch marker in the first st of each round and move up as you go.

### Part 1 — Handle / Shaft (make 1, in Colour A)

- **Rnd 1:** 6 dc in MR. **[6]**
- **Rnd 2:** inc in each st around. **[12]**
  *Math check: 6 × 2 = 12 ✓*
- **Rnd 3:** dc2tog, 10 dc. **[11]**
- **Rnd 4:** dc2tog, 9 dc. **[10]**
- **Rnd 5:** dc2tog, 8 dc. **[9]**
- **Rnd 6:** dc2tog, 7 dc. **[8]**
- **Rnds 7–32:** dc in each st around. **[8]** (26 rnds)

The shaft should now measure approx. 13–14 cm (5¼ in) from start.

- **Rnd 33:** sl st in next st, fasten off, leaving a 20 cm (8 in) tail for sewing.

**Before closing:** Stuff lightly. Insert the wooden skewer or pipe cleaner down the centre for rigidity (trim to fit, ensuring it does not poke through). Add a little more stuffing around it.

Leave the final round open — the head will attach at this end.

---

### Part 2 — Grip Wrap (in Colour C)

You can either:

**Option A — Crocheted cuff:**
- With Colour C, ch 8.
- **Row 1:** dc in 2nd ch from hook and each ch across. **[7]**
- **Rows 2–3:** ch 1, turn, dc in each st. **[7]**
- Fasten off, leaving a long tail.

Wrap this strip around the top 2.5 cm (1 in) of the handle and whip-stitch the seam closed and to the handle.

**Option B — Yarn wrap (simpler):**
- Tie Colour C to the handle 2.5 cm (1 in) from the top.
- Wrap tightly around the handle for 2 cm (¾ in), keeping wraps neat and side-by-side.
- Secure end with a yarn needle, threading through wraps to hide.

---

### Part 3 — Mallet Head (make 1, in Colour B)

This is a closed tube (cigar shape) approx. 6 cm long.

- **Rnd 1:** 6 dc in MR. **[6]**
- **Rnd 2:** inc in each st around. **[12]**
  *Math check: 6 × 2 = 12 ✓*
- **Rnd 3:** dc in each st around. **[12]**
- **Rnd 4:** (3 dc, inc) ×3. **[15]**
  *Math check: 4 × 3 = 12 sts worked, producing 15 ✓*
- **Rnds 5–14:** dc in each st around. **[15]** (10 rnds)

Head should now measure approx. 5 cm (2 in).

Begin stuffing firmly — use small amounts and pack tightly with the blunt end of a hook.

- **Rnd 15:** (3 dc, dc2tog) ×3. **[12]**
  *Math check: 5 × 3 = 15 worked, producing 12 ✓*
- **Rnd 16:** dc in each st around. **[12]**
- **Rnd 17:** (dc2tog) ×6. **[6]**
  *Math check: 2 × 6 = 12 worked, producing 6 ✓*

Top up stuffing.

- **Rnd 18:** (dc2tog) ×3. **[3]**

Fasten off, leaving a 15 cm (6 in) tail. Thread tail through remaining 3 sts and pull tight to close. Weave end into the head to hide.

---

### Part 4 — Wrist Strap (in Colour C)

- Ch 20.
- sl st into the first ch to form a loop.
- Fasten off, leaving 15 cm (6 in) tails on both ends.

---

## Assembly

1. **Position the head perpendicular to the handle** to form a T-shape. The mallet head should sit roughly **centred along its length** against the **base** (the closed magic-ring end) of the handle, with the shaft meeting the side of the head at its midpoint.

2. Using the long tail from the handle, **whip-stitch the handle to the head**, working all the way around the join (approx. 8 sts on the handle). Go around twice for strength — the join takes most of the stress in handling.

3. Weave the end into the head to secure.

4. **Attach the wrist strap loop** at the very top of the handle (above the grip):
   - Thread the tails of the chain loop onto a needle.
   - Push through the top of the handle from one side to the other, ensuring the loop sticks out approx. 2 cm.
   - Knot the tails inside the handle (if accessible) or secure with several small stitches on the top, then weave in.

---

## Finishing

- Weave in all loose ends, burying them inside the stuffing where possible.
- **Optional embellishments:**
  - Use dark thread to embroider a small diagonal whip-stitch detail along the head (mimicking the leather binding on real polo mallets).
  - Add a tiny dc band in Colour C at the join between handle and head for a polished look — ch 6, join, sl st around the handle base.
- Lightly steam or shape with fingers to straighten the handle.

---

## Care Instructions

Hand wash in cool water with mild detergent. Reshape and lay flat to dry. Avoid wringing — the internal skewer may snap. If using a pipe cleaner, the piece can be very gently bent back to shape after washing.

---

## Designer's Notes

- **Authenticity tip:** Traditional polo mallets have a **cigar-shaped head** (slightly fatter in the middle, tapered at both ends) — the increase/decrease shaping in Rnds 4 and 15 of the head creates this subtle barrel effect.
- **For a keychain version:** Reduce the handle to 20 rnds of plain dc (Rnds 7–26) and use a smaller hook (3.0 mm). Attach a keyring through the wrist strap loop.
- **For a sturdier display piece:** Replace the wooden skewer with a length of stiff wire (e.g. 1.5 mm floral wire) — this allows the mallet to be posed.
- **Colour variations:** Try a white head with red grip and natural shaft for a competition look, or all-natural tones for a vintage finish.

Enjoy your mini polo mallet — chukka, anyone? 🐎
Disclaimer: This pattern was generated by AI and should be reviewed for accuracy before use. While we strive for quality, AI-generated content may contain errors. Please verify measurements, stitch counts, and instructions before beginning your project. Generated by purlJam.uk
Access your pattern anytime
Bookmark this page to access your pattern anytime