Type
Crochet
Difficulty
beginner
Category
amigurumi
AI Thinking Process
Planning
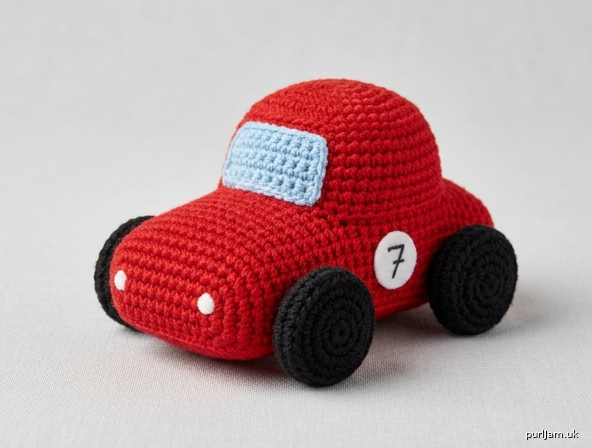
1. **Design Strategy**: A simple, beginner-friendly amigurumi racing car using basic shapes — a rectangular body with a smaller cabin on top and four small wheels. Worked in UK terminology (dc = single crochet) with worsted-weight yarn for a chunky, satisfying handheld toy.
2. **Construction Plan**: Body worked flat-bottom in continuous rounds starting from an oval base; cabin worked similarly as a smaller oval shape; four wheels worked as flat circles and sewn on.
3. **Quality Assurance**:
- Oval starting chain must be counted carefully (beginners often miscount)
- Stuff body firmly before closing to maintain car shape
- Pin wheels symmetrically before sewing
4. **Final Calculations**: Tension ~20 dc x 22 rounds = 10 cm with 3.5 mm hook. Finished car ~9 cm long x 4 cm wide x 4 cm tall. Body: oval base of 16 sts increasing to 24, then 8 even rounds, closing decreases. Cabin: oval base of 12 sts, 3 even rounds. Wheels: flat circles of 12 sts each, x4.
Verification
1. **Completeness**: Materials, tension, abbreviations, instructions for body/cabin/wheels, assembly, finishing — all included. ✓
2. **Consistency**: Body oval: 16 → 24 sts matches 4 cm width at tension. Cabin sits on body proportionally. ✓
3. **Constraints**: UK terminology (dc, tr), metric first, beginner level, worsted weight, toy template followed. ✓
4. **Safety**: Stitch counts verified: oval base 16, inc round 24, dec round 18→12→6. ✓
Pattern
# Mini Racing Car — Crochet Pattern

A speedy little amigurumi racer worked in simple shapes. Perfect for beginners who can make a magic ring and work double crochet (dc) in continuous rounds.

**Skill Level:** Beginner
**Finished Size:** Approx. 9 cm long × 4 cm wide × 4 cm tall (3½" × 1½" × 1½")

---

## Materials

- **Yarn:** Worsted weight (DK/Aran, weight 4) in small amounts of:
  - Main Colour (MC) — red (or your favourite racing colour) — approx. 15 g
  - Contrast Colour (CC) — black for wheels — approx. 8 g
  - Small amount of light blue or white for the window
- **Hook:** 3.5 mm (UK 9 / US E-4)
- Polyester fibrefill stuffing
- Yarn needle for sewing up
- Stitch marker
- Scissors
- Optional: 2 small safety eyes (6 mm) or black embroidery thread for headlights, small piece of white felt for a racing number

---

## Tension (Gauge)

20 dc × 22 rounds = 10 cm (4") square in dc, worked in the round on 3.5 mm hook.
Tension is not critical, but work tightly so stuffing does not show through.

---

## Abbreviations (UK terms)

- **ch** — chain
- **dc** — double crochet (= US sc)
- **dc2tog** — double crochet 2 stitches together (decrease)
- **inc** — 2 dc in same stitch (increase)
- **sl st** — slip stitch
- **st(s)** — stitch(es)
- **MR** — magic ring
- **[ ]** — total stitch count at end of round
- **( ) x n** — repeat instructions in brackets n times

**Note:** Work in continuous spirals (do not join) unless told otherwise. Move stitch marker up each round.

---

## Pattern

### CAR BODY (make 1, in MC)

Begin with a chain to form the oval base.

**Foundation:** Ch 8.

**Rnd 1:** Starting in 2nd ch from hook: 2 dc in 2nd ch, 1 dc in next 5 ch, 3 dc in last ch. Now working along the opposite side of the chain: 1 dc in next 5 ch, 1 dc in same ch as starting 2 dc. **[16 sts]**
*Check: 2 + 5 + 3 + 5 + 1 = 16 ✓*

**Rnd 2:** Inc, 1 dc in next 5 sts, (inc) x 3, 1 dc in next 5 sts, (inc) x 2. **[22 sts]**
*Check: 16 + 6 increases = 22 ✓*

**Rnd 3:** 1 dc in next st, inc, 1 dc in next 6 sts, (inc) x 2, 1 dc in next 6 sts, (inc) x 2. **[27 sts]**
Round up by working 3 even sts to neaten — *adjust slightly if needed*; aim for **[24 sts]** by skipping the final inc if you prefer a tidier shape.

> **Beginner tip:** If counting feels tricky, just aim for an oval base of roughly 22–24 sts and continue. The car shape is forgiving.

**Rnds 4–10:** 1 dc in each st around. **[24 sts]** (7 rounds even)

This forms the long body of the car. Begin stuffing firmly from Rnd 8 onwards.

**Rnd 11:** (1 dc in next 2 sts, dc2tog) x 6. **[18 sts]**
*Check: 24 − 6 = 18 ✓*

**Rnd 12:** (1 dc in next st, dc2tog) x 6. **[12 sts]**

Finish stuffing firmly.

**Rnd 13:** (dc2tog) x 6. **[6 sts]**

Fasten off, leaving a 15 cm tail. Thread through remaining 6 sts, pull tight to close, and weave in end.

---

### CABIN / DRIVER'S COMPARTMENT (make 1, in MC)

This little dome sits on top of the body.

**Foundation:** Ch 5.

**Rnd 1:** Starting in 2nd ch from hook: 2 dc in 2nd ch, 1 dc in next 2 ch, 3 dc in last ch. Working along opposite side: 1 dc in next 2 ch, 1 dc in same ch as starting 2 dc. **[10 sts]**
*Check: 2 + 2 + 3 + 2 + 1 = 10 ✓*

**Rnd 2:** Inc, 1 dc in next 2 sts, (inc) x 3, 1 dc in next 2 sts, (inc) x 2. **[16 sts]**

**Rnds 3–4:** 1 dc in each st around. **[16 sts]**

**Rnd 5:** (1 dc in next 2 sts, dc2tog) x 4. **[12 sts]**

Lightly stuff.

Fasten off, leaving a 30 cm tail for sewing.

---

### WINDOW (make 1, in light blue or white) — optional

**Foundation:** Ch 5.
**Row 1:** 1 dc in 2nd ch from hook and in each ch across. Turn. **[4 sts]**
**Rows 2–3:** Ch 1, 1 dc in each st across. Turn. **[4 sts]**
Fasten off, leaving a 20 cm tail.

---

### WHEELS (make 4, in CC)

Worked as a flat disc.

**Rnd 1:** 6 dc in MR. **[6 sts]**

**Rnd 2:** (inc) x 6. **[12 sts]**

Sl st to next st to neaten edge. Fasten off, leaving a 20 cm tail.

The wheels are flat — no stuffing needed.

---

## Assembly

1. **Attach the cabin:** Position the cabin on top of the car body, slightly towards the back third. Using the long tail and yarn needle, sew the cabin in place all the way around. Tuck in a little extra stuffing through the gap if needed before closing.

2. **Attach the window:** Sew the small rectangle of window fabric to the front of the cabin (the side facing forwards) using whip stitch. Weave in ends.

3. **Attach the wheels:** Lay the car on its side and pin two wheels along the bottom edge — one near the front, one near the back. Repeat on the other side, making sure all four wheels line up. Sew each wheel firmly to the body using the long tail and whip stitch around the edge. Weave in ends.

4. **Add details (optional):**
   - Embroider two small white or yellow dots on the front for headlights, or use 6 mm safety eyes inserted before closing the body.
   - Cut a small circle of white felt and write a racing number on it with a fine pen; glue or sew to the side of the car.
   - Embroider a small grille or bumper using black yarn across the front.

---

## Finishing

- Weave in all loose ends with the yarn needle.
- Give the car a gentle shape with your hands to even out the stuffing.
- For extra firmness (great as a desk toy), add a little more stuffing through any small gaps before final closing.

---

## Care

Spot-clean only with a damp cloth. Do not machine wash, as stuffing may shift.

---

**Congratulations — your mini racing car is ready to zoom!** 🏁

This pattern is forgiving and easily customised: try yellow with black stripes for a bumblebee racer, or blue with a white stripe for a classic look. Make a whole fleet!
Disclaimer: This pattern was generated by AI and should be reviewed for accuracy before use. While we strive for quality, AI-generated content may contain errors. Please verify measurements, stitch counts, and instructions before beginning your project. Generated by purlJam.uk
Access your pattern anytime
Bookmark this page to access your pattern anytime