Type
Knitting
Difficulty
beginner
Category
pullover
AI Thinking Process
Planning
Verification
Pattern
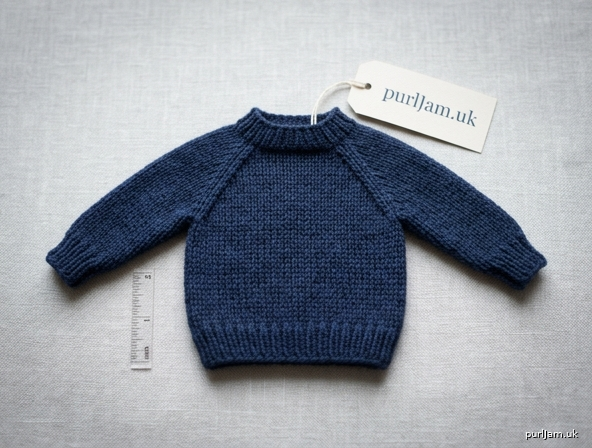
Mini Raglan Pullover
A seamless miniature crew-neck pullover worked top down. Laid flat, the body is about 2.25 inches wide and the sweater is 3.5 inches from neck edge to hem. The sleeve cap is formed by the raglan yoke; the sleeve section below is written round by round from the underarm to the cuff.
This is a display or doll-scale miniature, not an infant garment. It has no button placket. A placket needs extra stitches this size does not have, and the requested width leaves no room for one.
Skill level: Intermediate
Size: Mini (one size)
Finished measurements
- Length, cast-on edge to hem: 3.5 inches (9 cm)
- Body width, laid flat side to side: 2.2 inches (5.6 cm)
- Body circumference: 4.4 inches (11.2 cm)
- Neck circumference, unstretched: 2.7 inches (6.8 cm); ribbing draws in slightly and the neck stretches
- Armhole depth (raglan yoke below the neckband): 1 inch (2.5 cm)
- Sleeve length, underarm to cuff edge: 2 inches (5 cm)
- Upper arm circumference: 1.8 inches (4.5 cm)
- Cuff circumference: 1.3 inches (3.4 cm)
Width is the body laid flat. “About 2.25 inches wide” is met at 2.2 inches. A 2.25-inch circumference cannot hold a raglan and two sleeves in worsted weight.
Materials
- Worsted weight yarn (Category 4): approximately 25 yards (23 m). A smooth solid yarn makes the small counts easier to see. If the mini will be handled as a toy, use a machine-washable yarn.
- US 8 / 5 mm double-pointed needles, set of 4 or 5, or a US 8 / 5 mm circular needle 32 inches (80 cm) or longer for magic loop
- 4 stitch markers, one a different color for the beginning of the round
- Waste yarn or 2 small stitch holders
- Tapestry needle
A 16-inch circular needle will not hold 12 to 20 stitches. Do not change to a smaller needle “to make it finer”; the gauge below is the size the measurements are built on.
Gauge
18 stitches and 24 rounds = 4 inches (10 cm) in Stockinette stitch worked in the round, after blocking.
That is 4.5 stitches and 6 rounds per inch. Take time to match stitch gauge. Row gauge may be adjusted by working to the inch marks; do not add or skip raglan increases to chase length, or the width will change.
Abbreviations
- BO: bind off
- BOR: beginning of round
- CO: cast on
- dec: decrease
- DPN: double-pointed needle(s)
- k: knit
- k2tog: knit 2 stitches together
- M1L: make 1 left (see Techniques)
- M1R: make 1 right (see Techniques)
- p: purl
- pm: place marker
- rep: repeat
- rnd(s): round(s)
- RS: right side
- sl: slip
- sm: slip marker
- ssk: slip, slip, knit (see Techniques)
- st(s): stitch(es)
- St st: stockinette stitch (knit every round)
Techniques
M1L: Insert the left needle from front to back under the strand between the needles. Knit that strand through the back loop. The new stitch leans left.
M1R: Insert the left needle from back to front under the strand between the needles. Knit that strand through the front loop. The new stitch leans right.
ssk: Slip 2 stitches knitwise, one at a time. Return them to the left needle and knit them together through the back loops. One stitch decreased, leaning left.
k2tog: Knit 2 stitches together. One stitch decreased, leaning right.
Knitted cast-on: Knit 1 stitch, but do not drop the old stitch from the left needle. Slip the new stitch back onto the left needle. Repeat for each stitch to be cast on. Work it snugly.
Notes
- Join every round carefully. On 12 stitches a twist is easy to miss and cannot be fixed later without ripping.
- The yoke increases every other round, 8 stitches each increase round (2 at each of 4 raglan lines). Increases stop after 2 rounds so the chest stays at 20 stitches. Three plain rounds after that set the 1-inch armhole. They do not add width.
- Underarm cast-on is 2 stitches per side, not the 4 to 8 used on a child sweater. Four extra stitches per side would add almost an inch of width.
- Hem and cuff ribbing are 0.5 inch. A 1- to 2-inch rib would use most of a 3.5-inch length.
- Sleeve decreases sit at the underarm marker, on the underside of the sleeve, so the top of the sleeve stays smooth.
- Measure length from the cast-on edge with the fabric relaxed, not stretched on the needle.
Instructions
Neckband
CO 12 stitches. Place the BOR marker and join to work in the round, being careful not to twist.
Work 3 rounds in k1, p1 rib.
3 rounds ÷ 6 rounds per inch = 0.5 inch (1.3 cm). 12 is even, so the round begins with k and ends with p and the rib joins cleanly. (12 ÷ 4.5 = 2.7 inches around ✓)
On the last rib round, place section markers as you work:
Work 4 stitches (back), pm, work 2 stitches (first sleeve), pm, work 4 stitches (front), pm, work 2 stitches (second sleeve). The BOR marker is already between the second sleeve and the back.
Section check: 4 + 2 + 4 + 2 = 12. ✓
The rib does not have to line up with the markers. The next round is Stockinette.
Yoke
The round still begins at the start of the back.
Increase round (work on Rounds 1 and 3): *K1, M1L, knit to 1 stitch before the marker, M1R, k1, sm; rep from * 3 more times. 8 stitches increased.
On Round 1 each sleeve has only 2 stitches. For those sections the instruction becomes k1, M1L, M1R, k1, with no knit stitch between the two makes. That is correct. Do not borrow a stitch from the next section.
Round 1 (increase): Back 4 → 6, sleeve 2 → 4, front 4 → 6, sleeve 2 → 4. 20 stitches (12 + 8 = 20 ✓).
Round 2: Knit, slipping markers. 20 stitches.
Round 3 (increase): Back 6 → 8, sleeve 4 → 6, front 6 → 8, sleeve 4 → 6. 28 stitches (20 + 8 = 28 ✓). Each sleeve now has 2 knit stitches between the makes (k1, M1L, k2, M1R, k1).
Rounds 4–6: Knit, slipping markers. 28 stitches.
Yoke check: 6 rounds ÷ 6 = 1 inch (2.5 cm) below the neckband, about 1.5 inches (3.8 cm) from the cast-on edge. Stitches on the needle: 8 back, 6 sleeve, 8 front, 6 sleeve. ✓
Stop increasing here even if you would like a deeper armhole with more stitches. Another increase round would add 8 stitches and make the body wider than requested. If the yoke is short of 1 inch because your row gauge is tight, work extra plain knit rounds before the divide. Do not increase on those rounds.
Divide body and sleeves
The round begins at the start of the back.
- Knit 8 back stitches. Remove the marker.
- Slip the next 6 stitches purlwise to waste yarn or a holder (first sleeve). Remove the marker.
- CO 2 stitches using the knitted cast-on, snugly (first underarm).
- Knit 8 front stitches. Remove the marker.
- Slip the next 6 stitches purlwise to waste yarn or a holder (second sleeve). Remove the marker.
- CO 2 stitches using the knitted cast-on, snugly (second underarm).
- Place the BOR marker. You are back at the start of the back stitches.
Body stitch check: 8 back + 2 underarm + 8 front + 2 underarm = 20. Held sleeve stitches: 6 + 6 = 12. The 4 cast-on stitches are new, so 16 kept + 12 held + 4 cast on = 32, and 16 + 4 = 20 on the needle. ✓
Body
Knit 9 rounds. 9 ÷ 6 = 1.5 inches (3.8 cm) from the underarm. If your row gauge differs, knit until the body measures 1.5 inches (3.8 cm) from the underarm divide, ending with a completed round. Keep 20 stitches.
Work 3 rounds in k1, p1 rib. 3 ÷ 6 = 0.5 inch (1.3 cm). 20 is even, so the rib joins cleanly. ✓
BO loosely in pattern.
Length check: neck 0.5 + yoke 1 + body 1.5 + hem 0.5 = 3.5 inches. In rounds: 3 + 6 + 9 + 3 = 21, and 21 ÷ 6 = 3.5. ✓
Weave in the two underarm tails later, after the sleeves are picked up, so you can use them to close any tiny gap.
Sleeves
Read this section before you pick up a stitch. Both sleeves are the same. There is no right or left sleeve on this raglan.
What the sleeve already includes
The sleeve cap is finished. Those 6 held stitches, and the raglan increases that grew them from 2 stitches to 6, are the cap. Do not work a set-in cap, short rows, or extra increases at the top. From here the sleeve is a short tube, tapered at the underarm, ending in a ribbed cuff.
You will:
- Put the held stitches back on the needles.
- Pick up the underarm and one stitch at each corner to close the gaps (10 stitches).
- Decrease the two corner stitches on the next round (8 stitches). This is a join, not the wrist taper.
- Knit straight, then decrease once more at the underarm (6 stitches).
- Work a 0.5-inch ribbed cuff and bind off loosely.
Work one sleeve completely, including the bind-off, before starting the second. The counts are small enough that working both at once is more confusing than helpful.
Needles for the sleeve
Use 3 DPNs plus the working needle, or magic loop.
Suggested split so the underarm decreases stay easy to see:
- 10 stitches: 3 on the first needle, 4 on the second, 3 on the third, with the BOR marker between the last and first stitch
- 8 stitches: 3, 2, 3
- 6 stitches: 2, 2, 2
The first stitch of each needle tends to ladder. Give the second stitch of each needle a gentle tug after you knit it.
Step 1 — Set up the held stitches
Slip 6 held stitches of one sleeve onto a DPN, purlwise, without twisting them. The right side (knit side) faces you. The two ends of these stitches sit at the corners of the underarm cast-on. The 2 cast-on stitches are the bridge between those ends.
Join yarn at the center of that underarm, leaving a 6-inch (15 cm) tail. You will use the tail to tidy the join.
Step 2 — Pick-up round (Round 1): 10 stitches
Start with the BOR at the center of the underarm, between the two cast-on stitches. Pick up in this order so the marker stays at the center:
- Pick up and knit 1 stitch in the first underarm cast-on stitch, going through both legs of that cast-on if it looks loose.
- Pick up and knit 1 stitch in the corner gap: lift the strand where the underarm meets the held stitches and knit it through the back loop, as for an M1L. This is a corner stitch, not one of the 6.
- Knit the 6 held sleeve stitches.
- Pick up and knit 1 stitch in the second corner the same way (lift the strand, knit through the back loop).
- Pick up and knit 1 stitch in the remaining underarm cast-on stitch.
- Place the BOR marker and join.
Count: 1 underarm + 1 corner + 6 held + 1 corner + 1 underarm = 10. ✓
If you have 8, a corner was skipped and a hole will show. If you have 12, an extra strand was picked up; drop the extra corner strand back off the needle before going on.
Tug the corner stitches once so the holes close. Do not tug so hard that the underarm puckers.
Step 3 — Close the corners (Round 2): 10 stitches to 8
This decrease removes only the two corner stitches. It is not the wrist shaping.
Round 2 (decrease): K1, k2tog, knit to the last 3 stitches, ssk, k1.
On these 10 stitches that is exactly: k1, k2tog, k4, ssk, k1.
Stitch check: 1 + 2 + 4 + 2 + 1 = 10 stitches used; 1 + 1 + 4 + 1 + 1 = 8 stitches left. ✓
The stitch just before the marker and the stitch just after it are the two underarm cast-on stitches. They stay. The corners are gone. Upper arm is now 8 stitches: 8 ÷ 4.5 = 1.8 inches (4.5 cm) around. ✓
Step 4 — Knit straight (Rounds 3–6)
Rounds 3, 4, 5, and 6: Knit. 8 stitches.
Four rounds is about 0.7 inch. Keep the BOR marker at the underarm. If a ladder opens under the marker, the join is loose; snug the first stitch of the round and continue. Do not decrease early to “fix” a ladder.
Step 5 — Taper at the wrist (Round 7): 8 stitches to 6
The taper is one decrease round, again at the underarm, so both decreases stack on the underside.
Round 7 (decrease): K1, k2tog, knit to the last 3 stitches, ssk, k1.
On these 8 stitches that is exactly: k1, k2tog, k2, ssk, k1.
Stitch check: 1 + 2 + 2 + 2 + 1 = 8 stitches used; 1 + 1 + 2 + 1 + 1 = 6 stitches left. ✓
Stop decreasing. A further decrease round would leave 4 stitches. Four worsted stitches on a US 8 needle will not open into a cuff.
Rounds 8 and 9: Knit. 6 stitches.
Step 6 — Cuff (Rounds 10–12)
Rounds 10, 11, and 12: *K1, p1; rep from * to end.
6 is even, so each round begins with k and ends with p and the rib joins cleanly. ✓
3 rounds ÷ 6 = 0.5 inch (1.3 cm) of cuff. Cuff circumference is 6 ÷ 4.5 = 1.3 inches (3.4 cm). The rib will look firm. That is the yarn and the scale, not a missed increase.
Sleeve length check: 12 rounds ÷ 6 = 2 inches (5 cm) from the pickup round through the cuff. ✓
If you want a longer sleeve, add plain knit rounds after Round 9, before the cuff. Every 6 added rounds adds 1 inch. Do not decrease below 6 stitches.
Step 7 — Bind off
BO in pattern, loosely: knit the knit stitches and purl the purl stitches as you bind them off. After each bind-off, the new stitch on the right needle should sit relaxed, not pinched. A tight bind-off will cup the cuff and can make it smaller than the 6 stitches above it.
Cut yarn, leaving a 6-inch tail, and pull it through the last stitch.
Step 8 — Second sleeve
Repeat Steps 1–7 on the other 6 held stitches. Same pickup order, same two decrease rounds (Round 2 and Round 7), same 3-round cuff.
The two sleeves should match in round count. Do not add the optional extra rounds to only one sleeve.
Sleeve troubleshooting
- Hole at the corner: The corner strand was picked up only through the front, or not at all. On the next mini, knit that strand through the back loop. On this one, use the underarm tail to stitch the hole closed from the wrong side. Do not try to pick up another stitch now; the count would be wrong.
- 11 or 9 stitches after the pickup: You are one corner off. Count again before Round 2. The decrease line “k1, k2tog … ssk, k1” is written for 10 stitches. Do not run it on a wrong count.
- Cuff will not go over a doll hand: The 6-stitch cuff is firm. Bind off again more loosely, or unpick the cuff and the Round 7 decrease and work the cuff on 8 stitches instead. The sleeve will be less tapered, and the cuff will be about 1.8 inches (4.5 cm) around. That is the only safe way to widen it without changing the body.
- Ladders at the underarm: Typical on 6 to 10 stitches. Tug the second stitch of each needle. Blocking evens the rest.
Finishing
Weave in all ends on the wrong side. Use the underarm tails to close any remaining gap at the sleeve join, then weave them in. Do not weave in so tightly that the underarm pulls.
Block to the measurements: 3.5 inches long, 2.2 inches wide across the body, sleeves 2 inches from underarm to cuff. A light steam or a short soak is enough. Pin the width at 2.2 inches; stretching it to look larger will open the gauge and the sweater will not match the stitch counts.
If the yarn band allows, a finished toy-scale sweater may be machine washed on gentle and laid flat to dry. This piece is not sized, seamed, or finished for a baby to wear.
Construction summary
| Piece | Stitches | Rounds | Measured length |
|---|---|---|---|
| Neckband | 12 | 3 | 0.5 inch |
| Yoke | 12 growing to 28 | 6 (increases on 1 and 3) | 1 inch |
| Body, Stockinette | 20 | 9 | 1.5 inches |
| Hem rib | 20 | 3 | 0.5 inch |
| Sweater total | 21 | 3.5 inches | |
| Sleeve, after join | 8, then 6 | 12 | 2 inches |
| of which cuff | 6 | 3 | 0.5 inch |
Body width: 20 stitches ÷ 4.5 stitches per inch = 4.4 inches around, 2.2 inches laid flat. ✓
Disclaimer: This pattern was generated by AI and should be reviewed for accuracy before use. While we strive for quality, AI-generated content may contain errors. Please verify measurements, stitch counts, charts, and instructions before beginning your project. Generated by purlJam.uk
Love this pattern?
Save this pattern to your free PurlJam libraryAccess your pattern anytime
Bookmark this page to access your pattern anytime