Type
Crochet
Difficulty
intermediate
Category
amigurumi
AI Thinking Process
Planning
Verification
Pattern
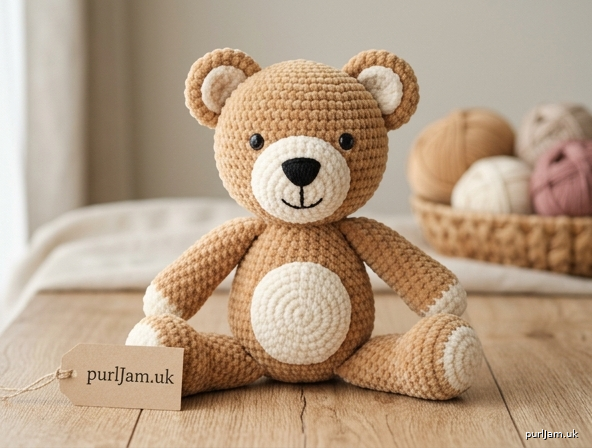
Minimal Multi-Color Plush Teddy Bear — Amigurumi Pattern
Design: A sweet, sitting minimalist teddy bear in soft plush yarn with simple two-tone colorwork. Finished bear sits ~7" (18 cm) tall. Perfect for gifting or (after your own test) selling on Etsy.
Skill Level: Intermediate
Materials
- Plush / velvet worsted-weight yarn (weight 4), e.g., chenille "blanket" style:
- MC (Main Color) — Caramel Tan: ~120 yds (110 m)
- CC1 (Contrast Color 1) — Cream: ~40 yds (37 m)
- CC2 (Contrast Color 2) — Dusty Rose: ~15 yds (14 m)
- US G-6 (4.0 mm) crochet hook (size down from label for tight gauge)
- 9 mm safety eyes (2)
- Polyester fiberfill stuffing
- Yarn needle (blunt, large-eye — essential for plush yarn)
- Stitch markers (2)
- Black embroidery floss or yarn (for nose/mouth)
- Optional: small poly-pellet pouch for weighted sitting base
Gauge
5 sc × 5.5 rounds = 1" (2.5 cm) in single crochet, worked tightly. Plush yarn hides stitches — count by feeling the bumps and always use a marker.
Abbreviations (US Terms)
- sc – single crochet
- inc – 2 sc in same stitch (increase)
- dec – invisible decrease (insert hook in FLO of next 2 sts, yo, pull through both loops, yo, pull through all remaining loops)
- st(s) – stitch(es)
- rnd – round
- MR – magic ring
- [ ] – repeat instructions in brackets
- [ ]N – total stitch count at end of round
Notes
- Work in continuous spirals — do NOT join or turn unless stated. Move your marker up each round.
- Stuff firmly as you go, especially before closing.
- With plush yarn, weave in tails on the inside and secure well — they slip easily.
- For color changes, complete the last stitch of the old color, then start the new color; carry only short distances or cut and rejoin (see Color Management).
COLOR MANAGEMENT
Because plush/chenille yarn does not hold tight floats well, this pattern uses round-based color blocks rather than stranded fair isle. Colors change at round boundaries or in discrete stitch sections. This gives clean multi-color results with no messy floats.
- MC (Tan): head, body, arms, ears (outer), legs
- CC1 (Cream): muzzle, inner ears, belly patch (optional), paw tips
- CC2 (Dusty Rose): optional cheek accents (embroidered) and inner-ear alternative
Change technique: On the final yo of the last stitch in a color, drop the old color and pull the new color through. Secure both tails inside. When resuming a carried color, do not pull tight (plush stretches).
Blocking note: Plush amigurumi is not wet-blocked. Instead, "finger-block" by gently rolling finished pieces between palms to even out stitches and settle color joins.
COLORWORK CHARTS
These are round-placement charts (read bottom to top). Each square = one stitch. Because the work is in the round, read every row right to left. Brackets [ ] mark the repeat.
CHART A: Muzzle Face Placement (worked as a flat-ish oval, 6 rnds)
Rnd6: □□□□□□□□□□□□□□□□□□   [18]
Rnd5: □□□□□□□□□□□□□□□□□□   [18]
Rnd4: [□□■]×6                [18]  ← nose area marked
Rnd3: □□□□□□□□□□□□          [12]
Rnd2: □□□□□□□□□□□□          [12]
Rnd1: □□□□□□                [6]
Key: □ = CC1 (Cream) · ■ = position for embroidered black nose (do NOT crochet in black; embroider after)
CHART B: Inner Ear Placement (per ear, flat circle)
Rnd2: [○○]×6      [12]
Rnd1: ○○○○○○      [6]
Key: ○ = CC1 (Cream) inner ear, sewn onto MC outer ear
CHART C: Optional Belly Patch (flat circle, sewn to body front)
Rnd3: [●●□]×6   [18]
Rnd2: [●□]×6    [12]
Rnd1: ●●●●●●    [6]
Key: ● = CC1 (Cream) · □ = leave as MC body showing through / edge
Chart placement summary: Chart A → sewn to head front (see Assembly). Chart B → inside each ear. Chart C → optional, centered on body front.
HEAD (make 1, in MC)
- Rnd 1: 6 sc in MR [6]
- Rnd 2: inc in each st around [12] (6 inc → 6 + 6 = 12 ✓)
- Rnd 3: [sc, inc] ×6 [18] (6 inc → 12 + 6 = 18 ✓)
- Rnd 4: [2 sc, inc] ×6 [24] (6 inc → 18 + 6 = 24 ✓)
- Rnd 5: [3 sc, inc] ×6 [30] (6 inc → 24 + 6 = 30 ✓)
- Rnds 6–12: sc in each st around [30] (7 rounds even)
- Insert 9 mm safety eyes between Rnd 11 and Rnd 12, about 8 sts apart, centered over where the muzzle will sit.
- Rnd 13: [3 sc, dec] ×6 [24] (6 dec → 30 − 6 = 24 ✓)
- Rnd 14: [2 sc, dec] ×6 [18] (6 dec → 24 − 6 = 18 ✓)
- Begin stuffing firmly now.
- Rnd 15: [sc, dec] ×6 [12] (6 dec → 18 − 6 = 12 ✓)
- Rnd 16: [dec] ×6 [6] (6 dec → 12 − 6 = 6 ✓)
- Fasten off, leaving a 10" tail. Cinch remaining 6 sts closed with the tail. Weave in.
MUZZLE (make 1 — follow Chart A, in CC1)
- Rnd 1: 6 sc in MR [6]
- Rnd 2: [sc, inc] ×3 [9]... actually: [sc, inc] ×3 gives 9; instead work inc in each st ×6 → [12] (6 inc → 6 + 6 = 12 ✓)
- Rnd 3: sc in each st around [12]
- Rnd 4: [sc, inc] ×6 [18] (6 inc → 12 + 6 = 18 ✓)
- Rnds 5–6: sc in each st around [18]
- Fasten off, leaving a 12" tail for sewing. Stuff lightly.
BODY (make 1, in MC)
- Rnd 1: 6 sc in MR [6]
- Rnd 2: inc in each st around [12] (6 + 6 = 12 ✓)
- Rnd 3: [sc, inc] ×6 [18] (12 + 6 = 18 ✓)
- Rnd 4: [2 sc, inc] ×6 [24] (18 + 6 = 24 ✓)
- Rnd 5: [3 sc, inc] ×6 [30] (24 + 6 = 30 ✓)
- Rnd 6: [4 sc, inc] ×6 [36] (30 + 6 = 36 ✓)
- Rnds 7–15: sc in each st around [36] (9 rounds even — gives sitting height)
- Rnd 16: [4 sc, dec] ×6 [30] (36 − 6 = 30 ✓)
- Rnd 17: sc in each st around [30]
- Rnd 18: [3 sc, dec] ×6 [24] (30 − 6 = 24 ✓)
- Begin stuffing very firmly (add optional weighted pouch at base first for stable sitting).
- Rnd 19: [2 sc, dec] ×6 [18] (24 − 6 = 18 ✓)
- Rnd 20: [sc, dec] ×6 [12] (18 − 6 = 12 ✓)
- Fasten off, leaving a 14" tail for attaching head. Do not fully close — leave the 12-st opening for stuffing/head attachment.
ARMS (make 2, in MC with CC1 paw tips)
- Rnd 1: with CC1, 6 sc in MR [6]
- Rnd 2: inc in each st around [12] (6 + 6 = 12 ✓)
- Rnd 3: sc in each st around [12] — change to MC on last st
- Rnds 4–9: with MC, sc in each st around [12] (6 rounds even)
- Rnd 10: [dec] ×6 [6]... use: [4 sc, dec] ×2 [10] (2 dec → 12 − 2 = 10 ✓) to flatten slightly for sewing
- Stuff lightly (bottom half only). Flatten opening, fasten off leaving 10" tail.
LEGS (make 2, in MC with CC1 paw pads)
- Rnd 1: with CC1, 6 sc in MR [6]
- Rnd 2: inc in each st around [12] (6 + 6 = 12 ✓)
- Rnd 3: [sc, inc] ×6 [18] (12 + 6 = 18 ✓) — change to MC on last st
- Rnd 4: with MC, sc in each st around [18]
- Rnd 5: [sc, dec] ×6 [12] (6 dec → 18 − 6 = 12 ✓)
- Rnds 6–9: sc in each st around [12] (4 rounds even)
- Stuff firmly. Flatten opening, fasten off leaving 10" tail.
EARS (make 2 outer in MC + 2 inner in CC1 — follow Chart B)
Outer ear (MC), make 2:
- Rnd 1: 6 sc in MR [6]
- Rnd 2: [sc, inc] ×3 [9]... use inc in each st ×6 → [12] (6 + 6 = 12 ✓)
- Fasten off, leaving 8" tail. Do not stuff.
Inner ear (CC1), make 2: work Chart B:
- Rnd 1: 6 sc in MR [6]
- Rnd 2: [sc, inc] ×3 → [9]; then inc in each st across to 12: work as inc in each st ×6 → [12] (6 + 6 = 12 ✓)
- Fasten off, leaving 6" tail.
Both ear pieces finish at [12] so inner sits neatly on outer.
ASSEMBLY
Pin everything before sewing. Use whip stitch and matching yarn.
-
Ears: Whip-stitch each CC1 inner ear centered onto each MC outer ear. Fold each ear slightly and sew to head between Rnds 5–7, about 6 sts apart at the top of the head. Curve them forward for a cute look.
-
Muzzle (Chart A): Position the CC1 muzzle centered just below and between the eyes (over Rnds 9–12 of head). Whip-stitch all around, stuffing lightly before closing.
-
Nose & mouth: With black floss, embroider a small triangular/oval nose at the ■ position (Chart A, Rnd 4), then a short vertical line down and a small "Y" or smile below it.
-
Optional cheeks: With CC2 (Dusty Rose), embroider two small satin-stitch or straight-stitch blush marks below the eyes.
-
Body + Head: Add extra stuffing into the body opening. Position the head (opening down) onto the body's 12-st opening. Whip-stitch firmly all the way around, adding stuffing to the neck as you go for a stable head.
-
Legs: For a stable sitting pose, sew both legs to the front-lower edge of the body, splayed slightly outward, flattened sides down. This creates a wide, non-rolling base.
-
Arms: Sew arms to the sides of the body around Rnds 15–16 (upper body), angled slightly forward so the paws rest in the bear's "lap."
-
Optional belly patch (Chart C): Center the CC1 patch on the body front and whip-stitch before attaching arms.
-
Finish: Weave in all ends securely on the inside. Finger-block by gently rolling pieces to settle stitches.
SIZE GUIDANCE
- Worsted plush + 4.0 mm hook = ~7" (18 cm) seated bear.
- For a larger bear, work with bulky plush and a 5.0 mm hook (~9–10").
- For a smaller bear, use DK plush and a 3.5 mm hook (~5–6").
SAFETY
- Use safety eyes (not buttons) and lock the backs firmly; for babies under 3, embroider eyes instead.
- Test that all limbs are securely sewn and cannot be pulled off.
- No loose small parts.
SELLING NOTE (Etsy)
Test your pattern first. Crochet one full sample following these written instructions exactly, noting any adjustments. You may sell the finished bears you make. If you plan to resell this pattern document itself, it must be your own rewritten work — use this as a tested template for your original listing, and always credit that it is your independently tested design.
Stitch count master check: Head: 6→12→18→24→30 (even) →24→18→12→6 ✓ Body: 6→12→18→24→30→36 (even) →30→30→24→18→12 ✓ Arms: 6→12→12 (even) →10 ✓ · Legs: 6→12→18→18→12 (even) ✓ · Ears: 6→12 ✓ · Muzzle: 6→12→12→18 (even) ✓
Disclaimer: This pattern was generated by AI and should be reviewed for accuracy before use. While we strive for quality, AI-generated content may contain errors. Please verify measurements, stitch counts, and instructions before beginning your project. Generated by purlJam.uk
Access your pattern anytime
Bookmark this page to access your pattern anytime