Type
Crochet
Difficulty
beginner
Category
amigurumi
AI Thinking Process
Planning
Verification
Pattern
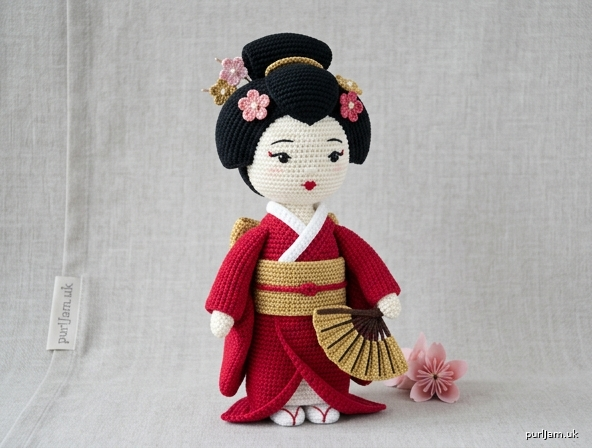
Miyako — Amigurumi Geisha Doll
A stylized geiko-inspired doll in worsted amigurumi: ivory oshiroi face, shimada hair with kanzashi, crimson kimono, hanging sleeves, white eri, gold taiko obi, tabi, and a hand fan. This is a respectful, simplified tribute to traditional Kyoto geiko dress—not a costume replica.
Skill level: Advanced. Tight spiral amigurumi, invisible decreases, many pieces, precise embroidery, and layered assembly.
Finished size: About 8½ in (21.5 cm) tall including bun, at given gauge.
Materials
Yarn: Worsted weight (category 4), acrylic or cotton-acrylic.
| Color | Role | Amount |
|---|---|---|
| A Ivory | Skin | 40 yd (37 m) |
| B Black | Hair | 55 yd (50 m) |
| C Crimson | Kimono and sleeves | 75 yd (69 m) |
| D Gold | Obi, fan, trim | 35 yd (32 m) |
| E White | Eri collar and tabi | 20 yd (18 m) |
| F Dusty pink | Sakura, kanzashi | 15 yd (14 m) |
| G Dark brown | Fan handle, optional brows | 5 yd (5 m) |
Hook: US E-4 / 3.5 mm (one to two sizes smaller than the yarn label).
Notions:
- Polyester fiberfill
- Yarn needle and embroidery needle
- Stitch marker
- Pins
- Black and red embroidery floss (or 1–2 yd / 1–2 m of thin black and red yarn)
- Optional: 6 mm safety eyes (embroidered eyes are more authentic)
- Optional: 4 mm gold beads or pearls for kanzashi (not for children under 3)
Gauge
5 sc and 6 rnds = 1 in (2.5 cm) in single crochet, worked tightly in the round, unstuffed.
A 36-st sphere measures about 2¼ in (5.5 cm) in diameter. If your fabric is loose, go down a hook size. Loose stitches let stuffing show and distort the face.
Abbreviations (US)
- MR — magic ring
- ch — chain
- sc — single crochet
- hdc — half double crochet
- dc — double crochet
- inc — 2 sc in the same stitch
- dec — invisible decrease (see Special Stitches)
- sl st — slip stitch
- BLO — back loop only
- FO — fasten off
- st(s) — stitch(es)
- rnd(s) — round(s)
- [...] — stitch count at end of rnd/row
- (…) × N — work the parentheses N times
Special Stitches
Invisible decrease: Insert hook through front loop of next st, then through front loop of following st, yarn over, pull through both front loops, yarn over, pull through 2 loops.
Color change: On the last yarn-over of the last st of the old color, draw the new color through. Carry or cut as noted.
Pattern Notes
- Work in continuous spirals unless a row (turn) is specified. Do not join or chain up at the end of a rnd. Mark the first st of every rnd.
- Work tightly for a closed amigurumi fabric.
- Stuff as directed; overstuffing the neck will stretch the eri, understuffing the head will wrinkle the face.
- Pin every piece before sewing. Use mattress stitch or whip stitch with matching yarn, hiding joins in color-change lines where possible.
- The white eri sits lower at the nape so a crescent of ivory shows at the back of the neck—that nape line is part of the geiko silhouette.
- Safety: If you add beads, this is a decorative object, not a toy for children under 3. Embroidered eyes are safer than safety eyes.
Head
With A (ivory).
Rnd 1: 6 sc in MR. [6]
Rnd 2: inc in each st. [12] (6 inc → 6 + 6 = 12 ✓)
Rnd 3: (sc, inc) × 6. [18] (6 inc → 12 + 6 = 18 ✓)
Rnd 4: (2 sc, inc) × 6. [24] (6 inc → 18 + 6 = 24 ✓)
Rnd 5: (3 sc, inc) × 6. [30] (6 inc → 24 + 6 = 30 ✓)
Rnd 6: (4 sc, inc) × 6. [36] (6 inc → 30 + 6 = 36 ✓)
Rnds 7–12: sc in each st. [36] (6 rnds)
Rnd 13: (4 sc, dec) × 6. [30] (6 dec → 36 − 6 = 30 ✓)
Rnd 14: (3 sc, dec) × 6. [24] (6 dec → 30 − 6 = 24 ✓)
Stuff firmly, rounding the cheeks. If using safety eyes, insert them now between rnds 9 and 10, 6 sts apart.
Rnd 15: (2 sc, dec) × 6. [18] (6 dec → 24 − 6 = 18 ✓)
Rnd 16: (sc, dec) × 6. [12] (6 dec → 18 − 6 = 12 ✓)
Rnd 17: dec × 6. [6] (6 dec → 12 − 6 = 6 ✓)
FO, close remaining hole, weave in. Head is about 2¼ in (5.5 cm) wide and 2¾ in (7 cm) tall.
Face (embroider before hair). Use 2–3 strands of floss. Rnd 1 of the head is the crown.
- Eyes: Thin almond shapes in black on rnds 9–10, 6 sts between inner corners. A single straight stitch with a tiny flick at the outer corner is enough.
- Me-tsuri: A short red stitch at each outer eye corner, angling slightly up.
- Brows: Very thin, high, gently arched lines on rnd 7, set wider than the eyes.
- Nose: One small vertical stitch on rnd 11, centered.
- Lips: A small red bow on rnd 12, both lips filled, no wider than 3 sts. Geiko wear both lips red; keep them tiny.
- Cheeks: Skip blush. Oshiroi reads as clean ivory.
Do not hide the forehead. The hairline will sit near rnd 6 at the front.
Body (kimono)
Worked top-down from an open neck. With C (crimson).
Foundation: Ch 18, sl st to first ch to join, with no twist. From here, work in a spiral.
Rnd 1: Sc in each ch around. [18]
Rnd 2: (2 sc, inc) × 6. [24] (6 inc → 18 + 6 = 24 ✓)
Rnd 3: (3 sc, inc) × 6. [30] (6 inc → 24 + 6 = 30 ✓)
Rnd 4: (4 sc, inc) × 6. [36] (6 inc → 30 + 6 = 36 ✓)
Rnds 5–10: sc in each st. [36] (6 rnds — torso)
Rnd 11: (5 sc, inc) × 6. [42] (6 inc → 36 + 6 = 42 ✓)
Rnds 12–15: sc in each st. [42] (4 rnds — waist; obi sits here)
Rnd 16: (6 sc, inc) × 6. [48] (6 inc → 42 + 6 = 48 ✓)
Rnds 17–23: sc in each st. [48] (7 rnds — skirt). On rnd 23 only, work BLO for a hem ridge.
Rnd 24: (6 sc, dec) × 6. [42] (6 dec → 48 − 6 = 42 ✓)
Rnd 25: (5 sc, dec) × 6. [36] (6 dec → 42 − 6 = 36 ✓)
Rnd 26: (4 sc, dec) × 6. [30] (6 dec → 36 − 6 = 30 ✓)
Rnd 27: (3 sc, dec) × 6. [24] (6 dec → 30 − 6 = 24 ✓)
Stuff firmly. Shape the base so the doll stands. Keep stuffing out of a hard point; flatten the last rnds into a shallow oval.
Rnd 28: (2 sc, dec) × 6. [18] (6 dec → 24 − 6 = 18 ✓)
Rnd 29: (sc, dec) × 6. [12] (6 dec → 18 − 6 = 12 ✓)
Rnd 30: dec × 6. [6] (6 dec → 12 − 6 = 6 ✓)
FO, close hole. Body is about 5 in (12.5 cm) tall. Waist circumference at 42 sts is about 8½ in (21.5 cm).
Arms (make 2)
With A (ivory). Stuff the hand firmly and the arm lightly; leave the last 3 rnds empty so the shoulder sews flat.
Rnd 1: 6 sc in MR. [6]
Rnd 2: inc in each st. [12] (6 inc → 6 + 6 = 12 ✓)
Rnds 3–5: sc in each st. [12] (3 rnds — hand)
Rnd 6: (2 sc, dec) × 3. [9] (3 dec → 12 − 3 = 9 ✓)
Rnds 7–15: sc in each st. [9] (9 rnds — arm)
FO, leaving a 10 in (25 cm) tail. Arm is about 2½ in (6.5 cm) long.
Sleeves (make 2)
With C (crimson). Do not stuff. These hang over the arms.
Foundation: Ch 12, sl st to first ch to join, with no twist.
Rnd 1: Sc in each ch around. [12]
Rnd 2: (sc, inc) × 6. [18] (6 inc → 12 + 6 = 18 ✓)
Rnd 3: (2 sc, inc) × 6. [24] (6 inc → 18 + 6 = 24 ✓)
Rnds 4–18: sc in each st. [24] (15 rnds)
FO, leaving a 12 in (30 cm) tail. Flatten the tube. Sleeve is about 3 in (7.5 cm) long and should hang past the hand.
Tabi / feet (make 2)
With E (white). Stuff lightly.
Rnd 1: 6 sc in MR. [6]
Rnd 2: inc in each st. [12] (6 inc → 6 + 6 = 12 ✓)
Rnds 3–5: sc in each st. [12]
Rnd 6: (2 sc, dec) × 3. [9] (3 dec → 12 − 3 = 9 ✓)
Rnds 7–8: sc in each st. [9]
FO, leaving a tail. Optional: with black floss, stitch a short vertical line at the front of rnd 2 to suggest the tabi split.
Hair cap
With B (black). Worked to match the head, then split for the face.
Rnds 1–6: Work as Head rnds 1–6. [36]
Rnds 7–10: sc in each st. [36] (4 rnds)
Row 11: Sc in next 22 sts, ch 1, turn, leaving 14 sts unworked for the face opening. [22] (14 unworked sts ≈ 2¾ in / 7 cm face width ✓)
Rows 12–15: Sc in each of 22 sts, ch 1, turn. [22] (4 rows — nape panel)
FO, leaving a 18 in (46 cm) tail for sewing.
Hair lift pad
With B. This sits under the bun so the shimada sits high.
Rnd 1: 6 sc in MR. [6]
Rnd 2: inc in each st. [12] (6 inc → 6 + 6 = 12 ✓)
Rnds 3–4: sc in each st. [12]
Rnd 5: dec × 6. [6] (6 dec → 12 − 6 = 6 ✓)
Stuff firmly. FO, close hole, leave a tail.
Bun (mage)
With B.
Rnd 1: 6 sc in MR. [6]
Rnd 2: inc in each st. [12] (6 inc → 6 + 6 = 12 ✓)
Rnd 3: (sc, inc) × 6. [18] (6 inc → 12 + 6 = 18 ✓)
Rnd 4: (2 sc, inc) × 6. [24] (6 inc → 18 + 6 = 24 ✓)
Rnds 5–7: sc in each st. [24] (3 rnds)
Rnd 8: (2 sc, dec) × 6. [18] (6 dec → 24 − 6 = 18 ✓)
Stuff firmly into a wide, slightly flattened bun (about 1½ in / 4 cm across).
Rnd 9: (sc, dec) × 6. [12] (6 dec → 18 − 6 = 12 ✓)
Rnd 10: dec × 6. [6] (6 dec → 12 − 6 = 6 ✓)
FO, close hole, leave a tail.
Side bins (make 2)
With B. Small rolls at the temples.
Rnd 1: 6 sc in MR. [6]
Rnd 2: (sc, inc) × 3. [9] (3 inc → 6 + 3 = 9 ✓)
Rnds 3–5: sc in each st. [9]
Stuff lightly. FO, leave a tail. Flatten each into a short sausage.
Kanzashi (make 3 flowers)
Flower (make 2 in F, 1 in D): In MR, (ch 2, 2 dc, ch 2, sl st in ring) × 5. Pull ring closed. FO, leave a tail. French-knot a gold or pink center.
Hair stick (make 2, with D): Ch 8, sl st in 2nd ch from hook and in each ch across. [7] FO. Sew a flower to one end of each stick. Sew the third flower at the bun without a stick.
Sakura applique (make 1 or 2)
With F: In MR, (ch 2, 2 dc, ch 2, sl st in ring) × 5. Pull closed. FO. Yellow or gold French knot in the center. Sew off-center on the lower kimono (asymmetric placement).
Eri (white collar)
With E, worked flat.
Ch 33.
Row 1: Sc in 2nd ch from hook and in each ch across. [32] (32 sts ≈ 6½ in / 16.5 cm ✓)
Rows 2–4: Ch 1, turn, sc in each st. [32]
FO, leaving a 14 in (35.5 cm) tail. Fold in half lengthwise so the collar is 2 rows thick. The fold is the visible white edge.
Obi
With D (gold), worked flat.
Ch 9.
Row 1: Sc in 2nd ch from hook and in each ch across. [8] (8 sts ≈ 1½ in / 4 cm tall ✓)
Rows 2–56: Ch 1, turn, sc in each st. [8] (56 rows ≈ 9¼ in / 23.5 cm; waist is ≈ 8½ in / 21.5 cm, leaving ~¾ in / 2 cm overlap ✓)
FO, leave a tail.
Taiko (back drum bow)
With D.
Ch 11.
Row 1: Sc in 2nd ch from hook and in each ch across. [10]
Rows 2–12: Ch 1, turn, sc in each st. [10]
FO, leave a tail. Fold in half (10 sts × 6 rows showing), stuff very lightly, and whip-stitch the three open sides.
Obi-jime (center cord): With C or leftover F, ch 40. FO. This wraps the taiko once and ties at the front or tucks under.
Fan (sensu)
With D.
Ch 12.
Row 1: Hdc in 3rd ch from hook and in each ch across. [10]
Rows 2–8: Ch 2, turn, hdc in each st. [10]
FO. With B or G, surface-sl-st 5 radiating ribs from one short edge.
Handle: With G, ch 6, sl st in 2nd ch and in each ch. [5] Sew to one short edge. Fold the fan in a gentle accordion and tack the base so it stays partly closed, or leave it open as a decorative panel.
Assembly
Pin first. Use matching yarn. Order matters.
1. Feet. Sew tabi to the front of the body at rnds 24–27, toes pointing forward, just peeking from the hem. They help the doll stand.
2. Arms. Sew the open top of each arm to body rnds 3–5, 8 sts apart at the sides, thumbs (the hand shaping) facing in and slightly forward.
3. Sleeves. Slide each flattened sleeve over an arm. Sew the 12-st top opening around the shoulder, covering the arm join. Let the sleeve hang; tack the inner top only, not the hanging length. Optional: surface-sl-st D around each sleeve opening.
4. Head to body. Stuff the neck firmly through the 18-st opening. Seat the head on rnds 1–2 of the body, facing forward (face aligned with the tabi). Sew around twice. The join will be covered by the eri.
5. Eri. Place the folded collar around the neck, fold-edge out. Form a shallow V at center front. At the back, pull the collar down so a crescent of ivory nape shows (about 2 rnds of head). Sew through both collar layers.
6. Hair cap. Pull the cap over the head. Forehead hairline sits at about head rnd 6; nape panel covers the back to about rnd 14. The 14-st opening frames the face. Sew all around the hairline with small stitches in B.
7. Lift pad and bun. Sew the lift pad to the crown, slightly back of center. Sew the bun on top of the pad, flattened side against the pad.
8. Bins. Sew one side roll at each temple, along the hairline, angling back toward the bun.
9. Kanzashi. Insert (sew) the two flower sticks into the left side of the bun at different heights. Sew the third flower at the front-right of the bun.
10. Obi. Wrap the obi around body rnds 11–15. Overlap at the back. Sew the overlap invisibly. Sew the stuffed taiko over the overlap, centered on the spine. Wrap the obi-jime around the taiko once and secure.
11. Kimono details. Sew sakura applique on the lower skirt, off-center. Optional: surface-sl-st D along the BLO hem ridge.
12. Fan. Tack the fan into one hand (usually the left). A few stitches through the handle and the hand are enough.
13. Final stuffing check. If the neck dimples, add a little fill with a stuffing stick before closing any remaining gaps. Weave in every end.
Finishing
- Steam-block only the flat pieces (obi, eri, fan, sleeves) if the yarn allows; do not crush the stuffed forms.
- Smooth the hair with the eye of a needle so the cap lies sleek—geiko hair reads as lacquered, not fluffy.
- Check symmetry from the front: eyes level, obi horizontal, bun on the center-back axis.
- Optional display: a 2 in (5 cm) wood disc under the base, or a small origami umbrella beside her.
Care: Surface-clean only. Do not machine-wash once embroidered and assembled.
Design notes (optional variations)
- Maiko instead of geiko: Add a longer hanging sleeve (work sleeves through rnd 24), more kanzashi, and embroider only the lower lip in red.
- Kimono color: Navy, deep purple, or black with gold sakura are equally traditional for a mature geiko look.
- No beads: Crocheted flowers alone are enough, and the doll is then safer around children (still not a hard-use toy).
Disclaimer: This pattern was generated by AI and should be reviewed for accuracy before use. While we strive for quality, AI-generated content may contain errors. Please verify measurements, stitch counts, charts, and instructions before beginning your project. Generated by purlJam.uk
Love this pattern?
Save this pattern to your free PurlJam libraryAccess your pattern anytime
Bookmark this page to access your pattern anytime