Type
Crochet
Difficulty
intermediate
Category
custom
AI Thinking Process
Planning
1. **Design Strategy**: Moschino-style biker bag is a structured rectangular shoulder bag with a flap, buckle details, and a chunky chain strap. For beginners, I'll use UK double crochet (dc) for a dense, structured fabric that mimics leather. Medium size: approx 25cm wide x 18cm tall x 7cm deep.
2. **Construction Plan**: Worked flat in one continuous panel (back-base-front), then sides seamed; flap worked separately and attached; strap is a long chain-stitch cord.
3. **Quality Assurance**:
- Dense tension essential for structure
- Clear seaming instructions for beginners
- Stitch counts verified at each stage
4. **Final Calculations**:
- Tension: 14 dc x 16 rows = 10cm in dc
- Width: 25cm = 35 dc
- Base depth: 7cm = 10 rows
- Back/front height: 18cm = 29 rows each
- Main panel total: 29 + 10 + 29 = 68 rows
- Side panels: 7cm x 18cm = 10 dc x 29 rows
- Flap: 25cm x 14cm = 35 dc x 22 rows
Verification
1. **Completeness**: All sections included — materials, tension, abbreviations, notes, instructions, finishing. ✓
2. **Consistency**: 35 dc ÷ 14 dc per 10cm = 25cm width ✓; 68 rows × (10cm/16 rows) = 42.5cm panel length (back 18cm + base 7cm + front 18cm = 43cm) ✓
3. **Constraints**: UK terminology used (dc, tr), metric first, beginner-level stitches only. ✓
4. **Safety**: Stitch counts consistent throughout; turning chain clearly defined as not counting as a stitch. ✓
Pattern
# Moschino-Style Biker Bag — Crochet Pattern

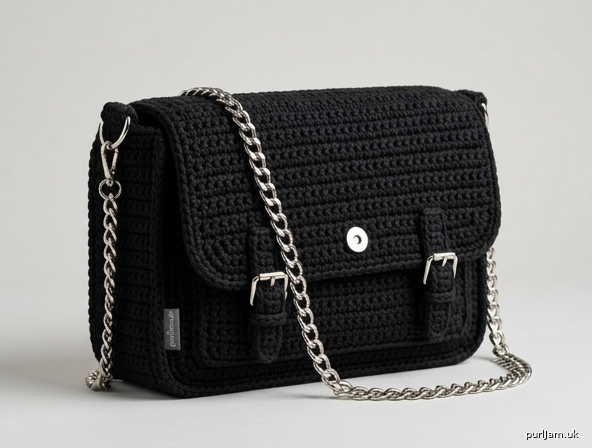
A structured, medium-sized shoulder bag inspired by iconic biker-style designer bags. Features a foldover flap, boxy silhouette, and a chunky chain strap. Worked in dense double crochet for a firm, leather-like finish.

**Skill Level:** Beginner
**Finished Size:** Approximately 25cm wide × 18cm tall × 7cm deep (10" × 7" × 2¾")

---

## Materials

- **Yarn:** Worsted weight (medium / Aran) cotton or cotton-blend yarn in main colour (MC) — approx. 400m / 440 yds. Black is classic Moschino, but choose your favourite colour.
- **Hook:** 4 mm crochet hook (smaller than usual for worsted to create dense fabric)
- **Notions:**
  - Tapestry needle
  - Stitch markers (2–3)
  - Sew-on magnetic snap closure (18mm)
  - Chunky metal bag chain, approx. 110cm (43") for shoulder strap
  - 2 small D-rings or split rings (to attach chain)
  - Sewing thread and needle (to secure chain and snap)
  - Optional: medium-weight fusible interfacing or fabric lining (25cm × 50cm)
  - Optional: 2 decorative metal buckles for front detail

---

## Tension (Gauge)

**14 dc × 16 rows = 10cm (4") square** in double crochet using 4 mm hook.

*Tension is important for a structured bag — if your fabric feels floppy, go down a hook size.*

---

## Abbreviations (UK Terms)

- **ch** — chain
- **dc** — double crochet (UK) = single crochet (US)
- **ss** — slip stitch
- **st(s)** — stitch(es)
- **MC** — main colour
- **RS / WS** — right side / wrong side
- **sk** — skip

---

## Pattern Notes

- Pattern uses **UK crochet terminology**.
- Turning **ch 1 at the start of each row does NOT count as a stitch**.
- The bag is constructed in flat panels: one main panel (back + base + front in one piece), two side gussets, and one flap. All pieces are seamed together at the end.
- Work into both loops of each stitch unless otherwise stated.
- Stitch counts are given in parentheses at the end of each row.

---

## Instructions

### Main Panel (Back + Base + Front)
*Worked as one long rectangle, folded later to form the bag body.*

**Foundation:** With MC, ch 36.

**Row 1:** dc in 2nd ch from hook, dc in each ch across, turn. **(35 dc)**

**Row 2:** ch 1, dc in each st across, turn. **(35 dc)**

**Rows 3–68:** Repeat Row 2 a further 66 times. **(35 dc each row)**

*Check: 68 rows total. At 16 rows = 10cm, total length = 68 ÷ 16 × 10 = 42.5cm. The fold lines will be at row 29 (top of back) and row 39 (top of front), creating: back 18cm + base 7cm + front 18cm.*

Fasten off, leaving a long tail (~30cm) for seaming.

---

### Side Gussets (Make 2)

**Foundation:** With MC, ch 11.

**Row 1:** dc in 2nd ch from hook, dc in each ch across, turn. **(10 dc)**

**Row 2:** ch 1, dc in each st across, turn. **(10 dc)**

**Rows 3–29:** Repeat Row 2 a further 27 times. **(10 dc each row)**

*Finished gusset: 10 sts (≈ 7cm) × 29 rows (≈ 18cm).*

Fasten off, leaving a long tail (~50cm) for seaming.

---

### Flap

**Foundation:** With MC, ch 36.

**Row 1:** dc in 2nd ch from hook, dc in each ch across, turn. **(35 dc)**

**Rows 2–22:** ch 1, dc in each st across, turn. **(35 dc each row)**

**Row 23 (shape rounded corners — optional):** ch 1, ss in first 2 sts, dc in each st to last 2 sts, ss in last 2 sts. Turn. **(35 sts — 4 ss + 31 dc)**

**Row 24 (edging):** ch 1, dc evenly around all four sides of the flap, working 2 dc in each corner. Join with ss to first dc. Fasten off.

*Finished flap: approximately 25cm × 14cm.*

---

### Strap Loops (Make 2)
*Small tabs to attach the chain strap.*

**Foundation:** With MC, ch 7.

**Row 1:** dc in 2nd ch from hook, dc in each ch across, turn. **(6 dc)**

**Rows 2–4:** ch 1, dc in each st across, turn. **(6 dc each row)**

Fasten off, leaving a long tail for sewing.

---

## Finishing

### 1. Block all pieces
Lightly steam-block each piece to neat rectangles. This makes seaming much easier.

### 2. Optional lining
If lining, cut fabric to match each panel plus 1cm seam allowance. Stitch into a bag shape and set aside.

### 3. Assemble the body
1. Fold the main panel so that **rows 1–29 form the back**, **rows 30–39 form the base**, and **rows 40–68 form the front**.
2. With RS together (or WS together for a visible decorative seam), pin one side gusset along the side edge of the back (29 rows / 29 row-ends), across the base side (10 row-ends), and up the side of the front (29 row-ends). That's 68 row-ends along one side of the gusset's long edge — match this to the gusset's outer edges.
   - *Note: the gusset is 29 rows × 10 sts. Sew the back side (29 row-ends along the gusset) to the back panel's 29 row-ends, the base edge (10 sts at the bottom of the gusset) to the base section's 10 row-ends, and the front side (29 row-ends) to the front panel's 29 row-ends.*
3. Using the long tail and a tapestry needle, whip stitch or mattress stitch the gusset in place.
4. Repeat with the second gusset on the other side.

### 4. Attach the flap
1. Position the flap along the **top edge of the back panel** (the 35-st edge at row 68 of the main panel).
2. With WS together, whip stitch the flap's foundation edge to the top of the back. The flap should fold forward over the front of the bag.

### 5. Magnetic snap
1. Mark the centre of the front panel about 3cm down from the top.
2. Mark the matching centre point on the underside of the flap.
3. Sew or insert the two halves of the magnetic snap at these points, securing firmly with thread.

### 6. Attach chain strap
1. Sew one strap loop to the top outer edge of each side gusset, folding the loop through a D-ring before stitching both ends down securely.
2. Clip each end of the metal chain to a D-ring. If your chain doesn't have clips, thread it through the D-rings and use a jump ring or sew the end links closed with strong thread.

### 7. Optional buckle detail
For an authentic Moschino-biker look, sew two small decorative buckles onto the front of the flap, evenly spaced, as faux fastenings.

### 8. Weave in all ends
Use a tapestry needle to neatly weave in all yarn tails on the wrong side.

---

## Tips for Success

- **Keep your tension tight:** the firmer the fabric, the more the bag will hold its boxy shape.
- **Line your bag:** a fabric lining adds structure, prevents stretching, and looks professional.
- **Use a piece of plastic canvas or thin cardboard** cut to 7cm × 25cm at the base of the bag for extra rigidity.
- **Test your magnetic snap placement** by folding the flap closed before sewing — adjust if needed.

Enjoy your handmade designer-inspired biker bag! 🖤
Disclaimer: This pattern was generated by AI and should be reviewed for accuracy before use. While we strive for quality, AI-generated content may contain errors. Please verify measurements, stitch counts, and instructions before beginning your project. Generated by purlJam.uk
Access your pattern anytime
Bookmark this page to access your pattern anytime