Type
Crochet
Difficulty
beginner
Category
gloves
AI Thinking Process
Planning
Verification
Pattern
Moss Stitch Fingerless Gloves
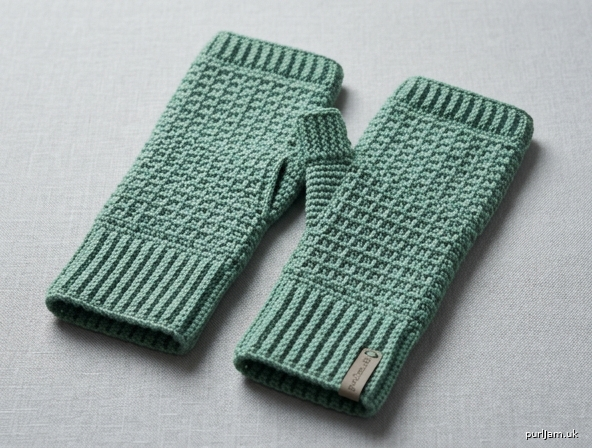
Mid-forearm fingerless gloves in moss stitch, with a ribbed cuff, a short ribbed thumb, and a ribbed knuckle edge. Worked in the round from the forearm down to the hand. The fabric is the same on both sides. A confident beginner project.
Figures are given for S (M, L). Where one figure is given, it applies to all sizes.
Sizes
Measure around the palm just below the knuckles, excluding the thumb.
| Size | To fit hand circumference |
|---|---|
| S | 17–18 cm (6¾–7 in) |
| M | 19–20 cm (7½–8 in) |
| L | 21–23 cm (8¼–9 in) |
If you are between sizes, choose the smaller size for a close fit or the larger for a relaxed fit.
Finished measurements (approx., unstretched)
- Forearm circumference: 22 (24.5, 27.5) cm [8¾ (9⅝, 10⅞) in]
- Hand circumference: 17.5 (20, 22.5) cm [6⅞ (7⅞, 8⅞) in]
- Length: 23 cm (9 in) from foundation edge to top edge
- Thumb: about 3 cm (1¼ in) long
Moss stitch stretches slightly. The ribbed cuff is firmer and is what holds the glove up.
Materials
- Yarn: 4-ply sock yarn (fingering weight), wool or wool-blend with a little nylon wears best. Smooth fibre shows the moss stitch; a heavily flecked yarn will hide it.
- Amount: 280 (320, 370) metres / 305 (350, 405) yards
- One 100 g skein of about 400 metres is enough for S and M. For L, keep a second skein in reserve if your tension is loose or you lengthen the forearm.
- Hook: 3.5 mm (US E/4), or size needed to obtain tension. Optional 4 mm hook for the foundation chain only, if you chain tightly.
- Stitch marker, tapestry needle, scissors.
Tension (gauge)
22 stitches and 22 rounds = 10 cm (4 in) in moss stitch, worked in the round, after blocking.
Every double crochet and every ch-1 counts as one stitch.
Swatch: ch 30, join with a sl st, and work Moss Round A once then Moss Round B until the piece measures at least 12 cm. Measure 22 sts and 22 rounds in the centre. If you have more than 22 sts in 10 cm, use a larger hook. If you have fewer, use a smaller hook. The swatch may be unravelled and reused.
Ribbing will be a little firmer than the swatch. Lengths below are given in centimetres so you can measure as you go.
Abbreviations (UK terms)
This pattern uses UK crochet terms. UK dc is the stitch called single crochet in US patterns. Do not work a US double crochet or the fabric will be far too open.
- ch — chain
- dc — double crochet
- dc2tog — double crochet two together (see Special stitches)
- sl st — slip stitch
- st(s) — stitch(es)
- ch-sp — chain space
- rep — repeat
- BLO — back loop only
- yrh — yarn round hook
- cm — centimetres
- mm — millimetres
Special stitches
Moss stitch (also called linen stitch or granite stitch) A woven grid of short dashes. In the round, once it is established, every round is the same:
Dc in the next ch-sp, ch 1, miss the next dc.
That is one moss repeat. It uses one chain space and makes 2 stitches (the dc and the ch-1).
dc2tog over chain spaces (decrease of 2 sts) Insert hook in the next ch-sp, yrh, pull up a loop (2 loops on hook), miss the dc between the chain spaces, insert hook in the following ch-sp, yrh, pull up a loop (3 loops on hook), yrh, pull through all 3 loops.
Notes
- The beginning ch-1 never counts as a stitch. Always join with a sl st to the first dc (or dc2tog), not to the ch-1.
- Count at the end of every round. A correct moss round has the same number of dc and ch-1 spaces.
- The round join is the inner wrist. Decreases sit here, so the taper is on the underside of the arm. Keep a marker in the first stitch and move it up each round.
- Do not twist the foundation chain when you join it.
- The cuff has to pass over the hand. If your chains are tight, work the foundation chain on a 4 mm hook, then change to the 3.5 mm hook.
- Moss stitch is reversible, so there is no wrong side to hide.
- To lengthen or shorten the glove, add or omit rounds in the forearm moss section before shaping. Two rounds add about 1 cm.
Stitch counts at a glance
| S | M | L | |
|---|---|---|---|
| Foundation / cuff / forearm | 48 | 54 | 60 |
| After shaping (hand) | 38 | 44 | 50 |
| Thumb pickup | 16 | 18 | 20 |
48, 54 and 60 are all even, which moss stitch needs (24 + 24 = 48, 27 + 27 = 54, 30 + 30 = 60 ✓).
Glove (make 2)
Work both gloves the same until the thumb slit. The second glove is mirrored only when you rejoin for the slit.
Cuff
Foundation: Ch 48 (54, 60). Join with a sl st to the first ch, being careful not to twist.
Round 1: Ch 1, dc in each ch around, working the first dc into the same ch as the joining sl st. Join with a sl st to the first dc. — 48 (54, 60) dc.
Round 2: Ch 1, dc BLO in each dc around. Join with a sl st to the first dc. — 48 (54, 60) dc.
Repeat Round 2 until the cuff measures 5 cm (2 in). This is about 12 rounds from the foundation chain, including Round 1. Do not fasten off.
The cuff should stretch comfortably over your hand. If it does not, start again with a larger hook for the chain, or go up a size.
Forearm (moss stitch)
Moss Round A (transition from rib): Ch 1, *dc in next st, ch 1, miss 1 st; rep from * around. Join with a sl st to the first dc.
Count: 24 (27, 30) dc and 24 (27, 30) ch-sps = 48 (54, 60) sts (24 + 24 = 48, 27 + 27 = 54, 30 + 30 = 60 ✓). The circumference has not been decreased; each rib stitch has become either a dc or a ch-1.
Moss Round B (established): Ch 1, *dc in next ch-sp, ch 1, miss next dc; rep from * around. Join with a sl st to the first dc. — 48 (54, 60) sts.
Work Moss Round B until you have 10 moss rounds in total (Round A plus 9 rounds of Round B), or until the piece measures 9.5 cm (3¾ in) from the foundation edge. — 48 (54, 60) sts.
Shape to the wrist
Decreases are worked at the start of the round only (inner wrist).
Decrease round: Ch 1, dc2tog over the next 2 ch-sps, ch 1, miss next dc, *dc in next ch-sp, ch 1, miss next dc; rep from * to end. Join with a sl st to the dc2tog. — 2 sts decreased.
Even round: Work Moss Round B.
Work a decrease round, then an even round, 5 times (10 rounds). — 5 × 2 = 10 sts decreased ✓.
Stitch count after each decrease round:
- 46 (52, 58)
- 44 (50, 56)
- 42 (48, 54)
- 40 (46, 52)
- 38 (44, 50) (48 − 10 = 38, 54 − 10 = 44, 60 − 10 = 50 ✓)
The following even round does not change the count. Piece measures about 14 cm (5½ in) from the foundation edge. This point sits at the wrist.
Lower hand
Work 2 rounds of Moss Round B. — 38 (44, 50) sts.
Piece measures about 15 cm (6 in) from the foundation edge. This is the base of the thumb.
Thumb slit
The slit is a vertical opening at the side of the wrist, not at the inner-wrist marker. You leave the round for 8 rows, then join again. Stitch count does not change.
Fasten off. Weave in this end now, or leave it to close a tiny gap later.
Right glove: From the marked join, count 10 (12, 12) sts forward in the direction you have been working (do not count the marked stitch itself). You finish on a dc, because the fabric alternates dc, ch and 10 (12, 12) is even ✓. Rejoin the yarn with a sl st in that dc.
Left glove: Count 10 (12, 12) sts back from the marked join, against the direction of work. Rejoin with a sl st in that dc. (The same even count also lands on a dc ✓.)
Row 1: Ch 1, *dc in next ch-sp, ch 1, miss next dc; rep from * all the way around, working the last repeat into the ch-sp just before the dc you rejoined in. Do not join. Turn. — 38 (44, 50) sts.
You have worked every chain space once. The gap between the start and end of the row is the thumb slit.
Rows 2–8: Ch 1, *dc in next ch-sp, ch 1, miss next dc; rep from * to end. Turn. — 38 (44, 50) sts.
At the end of Row 8, do not turn. Join with a sl st to the first dc of the row, ready to work in the round again. The slit should be about 3.5 cm (1½ in) long.
There may be a small hole at the top or base of the slit. Sew it closed on the inside when you weave in the ends.
Upper hand
Work 6 rounds of Moss Round B, joining each round. — 38 (44, 50) sts.
Try the glove on. The last round should sit at the base of the fingers. Add or omit moss rounds here if you want the edge higher or lower. Keep the marker at the inner wrist so the thumb stays on the side.
Top edging
Round 1: Ch 1, dc in each dc and each ch-sp around. Join with a sl st to the first dc. — 38 (44, 50) dc (one dc in every moss stitch ✓).
Rounds 2–4: Ch 1, dc BLO in each dc around. Join. — 38 (44, 50) dc.
Work a few more BLO rounds if you want a deeper edge. The band should measure about 1.5–2 cm. Fasten off.
Finished length is about 23 cm (9 in). A little more or less is fine if the wrist checkpoint and the knuckle edge are in the right place on your arm.
Thumb
Hold the glove with the slit facing you. Join yarn at the base of the slit (the end nearest the cuff), leaving a 20 cm tail.
Round 1 (pickup): Work dc around the opening as follows, then join with a sl st to the first dc.
- S: 1 dc in each of the 8 row-ends on the first side, 1 dc in each of the 8 row-ends on the second side. — 8 + 8 = 16 dc ✓
- M: 1 dc in each of the 8 row-ends on the first side, 2 dc in the base of the slit, 1 dc in each of the 8 row-ends on the second side. — 8 + 2 + 8 = 18 dc ✓
- L: 1 dc in each of the 8 row-ends on the first side, 2 dc in the base of the slit, 1 dc in each of the 8 row-ends on the second side, 2 dc in the top of the slit. — 8 + 2 + 8 + 2 = 20 dc ✓
Rounds 2–6: Ch 1, dc BLO in each dc around. Join. — 16 (18, 20) dc.
Fasten off, leaving a tail. The thumb measures about 3 cm. For a longer thumb, repeat Round 2. For a shorter thumb, stop at Round 4.
With the tails, close any small hole at the top or base of the thumb on the inside. Do not sew the slit itself closed.
Second glove
Work a second glove the same, but use the left-glove rejoin position if the first was the right, and the right-glove position if the first was the left. Decreases stay at the start of the round on both gloves.
Finishing
Weave in all ends. Sew only the tiny gaps at the thumb corners, not the opening.
Block lightly: soak in cool water, squeeze (do not wring), and lay flat to the measurements above. Do not stretch the ribbing, or the cuff will not grip. Dry flat.
Wearing and fit
Put the glove on cuff first. The marked decrease line sits on the inner wrist; the thumb tube points to the side. The wider end is the forearm, the ribbed top sits at the knuckles.
- Cuff will not go over the hand: the foundation chain was too tight. Re-chain with a 4 mm hook.
- Glove twists: the thumb was rejoined on the wrong side of the marker. Count again from the decrease join.
- Thumb feels tight: repeat the pickup with one size’s extra stitches (add 2 dc at the base).
- Forearm feels tight and the hand feels right: work the forearm on the next size’s foundation count, then decrease until you reach your hand count (still decrease 2 sts each decrease round, and stop when you have 38, 44 or 50 sts).
- You want the gloves longer: add moss rounds before the shaping. Two rounds add about 1 cm (2 ÷ 22 × 10 cm ≈ 1 cm ✓).
Care
Follow the ball band. Most sock yarn can be hand-washed cool and dried flat. Do not hang the gloves to dry, or the cuffs will lengthen.
Disclaimer: This pattern was generated by AI and should be reviewed for accuracy before use. While we strive for quality, AI-generated content may contain errors. Please verify measurements, stitch counts, charts, and instructions before beginning your project. Generated by purlJam.uk
Love this pattern?
Save this pattern to your free PurlJam libraryAccess your pattern anytime
Bookmark this page to access your pattern anytime