Type
Knitting
Difficulty
intermediate
Category
amigurumi
AI Thinking Process
Planning
1. **Design Strategy**: Classic fully-jointed teddy bear with fluffy mohair-blend yarn worked flat on two needles in stocking stitch, then seamed. Five-point disc joints (head, two arms, two legs) for traditional articulated movement.
2. **Construction Plan**: Flat pieces (two halves each for head, body, limbs, plus ears) knitted in stocking stitch, seamed leaving openings, stuffed firmly, jointed with cotter-pin disc joints, then closed.
3. **Quality Assurance**:
- Fluffy yarn obscures stitches — count rows carefully and use stitch markers
- Joint placement must be symmetrical for proper posing
- Tight tension essential to prevent stuffing show-through
4. **Final Calculations**: Tension 22 sts × 30 rows = 10 cm in st st on 3.25 mm needles. Finished bear ~28 cm tall. Body cast-on 24 sts; head 20 sts; arms 14 sts; legs 16 sts; ears 10 sts.
Verification
1. **Completeness**: All template sections included — materials, tension, abbreviations, instructions per piece, assembly, finishing.
2. **Consistency**: 22 sts/10 cm × body width ~11 cm = 24 sts ✓; head circumference ~18 cm at widest = 40 sts around (2 × 20) ✓.
3. **Constraints**: Knitted on two needles ✓; fully jointed (5 joints) ✓; fluffy yarn specified ✓; UK terminology and metric ✓; AI image note included ✓.
4. **Safety**: Safety warning re: joints/eyes for children under 3 included.
Pattern
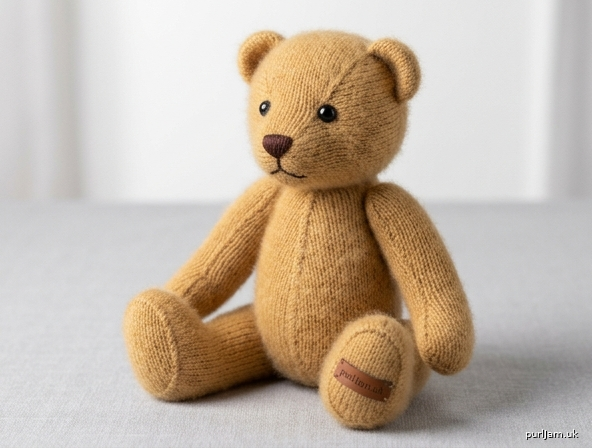
# Mr. Bramble — A Fully Jointed Fluffy Knitted Bear

*A traditional articulated teddy bear knitted flat on two needles in soft, fluffy yarn. His five disc joints allow him to sit, wave and turn his head, just like a vintage mohair bear — but he's worked in simple stocking stitch throughout, making him a wonderful intermediate project.*

**[AI-generated image placeholder: A finished honey-coloured fluffy knitted teddy bear, approximately 28 cm tall, sitting upright with jointed arms and legs, black safety eyes, embroidered nose, and small rounded ears. Soft halo of fibre around the body gives a vintage mohair appearance.]**

---

## Finished Size
Approximately **28 cm (11 in)** tall, seated approximately **20 cm (8 in)**.

## Difficulty
Intermediate — requires flat knitting, shaping, mattress stitch seaming, and assembly of disc joints.

---

## Materials

- **Yarn**: 100 g (approx. 200 m) of worsted-weight brushed/fluffy yarn in honey, caramel or biscuit colour. A mohair-blend or brushed alpaca worsted gives the best vintage look. *(Sample uses Drops Air or similar; any worsted with a soft halo works.)*
- **Needles**: 3.25 mm (UK 10 / US 3) straight needles — *one to two sizes smaller than the yarn band recommends, to create a firm fabric that hides stuffing.*
- **Stuffing**: Approximately **80–100 g** polyester toy fibrefill.
- **Joints**: 5 sets of cotter-pin teddy bear joints, 25 mm diameter (one for the neck, two for arms, two for legs). Each set = 2 hardboard discs, 2 metal washers, 1 cotter pin.
- **Eyes**: Pair of 9 mm black safety eyes (or embroider with black yarn for under-3s).
- **Embroidery**: Small amount of dark brown DK yarn or 6-strand cotton embroidery thread for nose and mouth.
- **Notions**: Tapestry needle, sharp scissors, stitch markers, awl or knitting needle for piercing joint holes, long doll-making needle (optional, for sculpting).

> ⚠️ **Safety note**: Cotter-pin joints and safety eyes are not suitable for children under 3. For young children, embroider features and stitch limbs in place rather than jointing.

---

## Tension (Gauge)

**22 sts × 30 rows = 10 cm (4 in)** measured over stocking stitch on 3.25 mm needles, after light blocking.

A firm, tight fabric is far more important than matching the exact tension — if stuffing shows through, go down a needle size.

---

## Abbreviations (UK terminology)

- **k** — knit
- **p** — purl
- **st(s)** — stitch(es)
- **st st** — stocking stitch (k on RS, p on WS)
- **kfb** — knit into front and back (1 st increased)
- **k2tog** — knit 2 together (1 st decreased)
- **ssk** — slip, slip, knit (1 st decreased)
- **p2tog** — purl 2 together
- **RS / WS** — right side / wrong side
- **rep** — repeat
- **rem** — remaining

---

## Pattern Notes

- All pieces are knitted **flat** in **two halves** (front and back), then seamed with mattress stitch leaving small openings for stuffing and joints.
- Work with **fluffy yarn loosely held**: knit slowly so you can see your stitch count, since the halo hides individual stitches.
- Place a removable marker every 10 rows on each piece to keep track.
- Always begin and end yarn tails at seam edges so they can be hidden inside.

---

## THE PATTERN

### HEAD (make 2 identical side panels)

Cast on **8 sts**.

- **Row 1 (RS)**: kfb in every st. *(16 sts)* ✓
- **Row 2**: p.
- **Row 3**: (k1, kfb) to end. *(24 sts)* ✓
- **Row 4**: p.
- **Row 5**: (k2, kfb) to end. *(32 sts)* ✓
- **Rows 6–8**: st st, beginning with p.
- **Row 9**: (k3, kfb) to end. *(40 sts)* ✓
- **Rows 10–22**: work 13 rows in st st (ending with WS row).
- **Row 23**: k1, ssk, k to last 3 sts, k2tog, k1. *(38 sts)*
- **Row 24**: p.
- Rep Rows 23–24 four more times. *(30 sts after Row 32)* ✓
- **Row 33**: (k1, k2tog) to end. *(20 sts)* ✓
- **Row 34**: p.
- **Row 35**: k2tog to end. *(10 sts)* ✓

Cut yarn leaving a long tail, thread through rem 10 sts, draw up tightly and fasten off. This forms the **nose tip**.

Make a second identical piece.

### HEAD GUSSET (make 1)

Cast on **6 sts** and work 30 rows in st st. Cast off.
*(This narrow strip runs from nose tip over the top of the head to the neck, giving the head shape.)*

---

### BODY (make 2 identical halves — front & back)

Cast on **24 sts**.

- **Rows 1–2**: st st.
- **Row 3 (inc)**: k1, kfb, k to last 2 sts, kfb, k1. *(26 sts)*
- Work 3 rows st st.
- **Row 7 (inc)**: rep Row 3. *(28 sts)*
- Work 3 rows st st.
- **Row 11 (inc)**: rep Row 3. *(30 sts)* ✓ — widest point of body
- Work 11 rows st st straight (Rows 12–22).
- **Row 23 (dec)**: k1, ssk, k to last 3 sts, k2tog, k1. *(28 sts)*
- Work 3 rows st st.
- **Row 27 (dec)**: rep Row 23. *(26 sts)*
- Work 3 rows st st.
- **Row 31 (dec)**: rep Row 23. *(24 sts)*
- **Row 33 (dec)**: rep Row 23. *(22 sts)*
- **Row 35 (dec)**: rep Row 23. *(20 sts)* ✓ — neck

Cast off.

Make a second identical piece.

---

### ARMS (make 4 — 2 fronts, 2 backs)

Cast on **6 sts**.

- **Row 1**: kfb in every st. *(12 sts)* — paw
- **Row 2**: p.
- **Row 3**: (k1, kfb) to end. *(18 sts)* ✓
- Work 7 rows st st (Rows 4–10).
- **Row 11**: k1, ssk, k to last 3 sts, k2tog, k1. *(16 sts)*
- Work 5 rows st st.
- **Row 17**: rep Row 11. *(14 sts)*
- Work 11 rows st st straight (length of upper arm).
- **Row 29**: k2tog to end. *(7 sts)*

Cast off.

Make 4 in total (2 mirrored pairs, but pieces are symmetrical so identical knitting is fine).

---

### LEGS (make 4 — 2 fronts, 2 backs)

Cast on **8 sts**.

- **Row 1**: kfb in every st. *(16 sts)*
- **Row 2**: p.
- **Row 3**: (k1, kfb) to end. *(24 sts)* ✓ — foot
- Work 5 rows st st.
- **Row 9 (shape ankle)**: k1, (ssk) twice, k to last 5 sts, (k2tog) twice, k1. *(20 sts)*
- Work 3 rows st st.
- **Row 13**: k1, ssk, k to last 3 sts, k2tog, k1. *(18 sts)*
- Work 13 rows st st straight (upper leg).
- **Row 27**: k2tog to end. *(9 sts)*

Cast off.

Make 4 in total.

---

### EARS (make 4)

Cast on **10 sts**.

- Work 6 rows st st.
- **Row 7**: k1, ssk, k4, k2tog, k1. *(8 sts)*
- **Row 8**: p.
- **Row 9**: k1, ssk, k2, k2tog, k1. *(6 sts)*
- Cast off.

Make 4 (two pairs — each ear is two pieces sewn together).

---

## ASSEMBLY

### 1. Sew the head
With RS together, pin the two head side pieces along the **chin/neck edge** (the cast-on/lower edge). Stitch from neck up to nose using mattress stitch. Open out and pin the **head gusset** between the two side panels: one short end at the nose tip, the long sides running up over the head crown to the neck. Stitch in place. Turn RS out.

### 2. Insert eyes
Decide eye placement (approx. 4 cm apart, 2 cm above the nose seam). Push safety-eye posts through the knitting and secure washers tightly inside. *Do this before stuffing.*

### 3. Stuff the head
Stuff very firmly through the open neck — the head should feel solid. Insert a **25 mm joint disc** with the cotter pin pointing down out of the neck opening. Gather the neck edge around the pin shaft with a running stitch and pull tight, securing well.

### 4. Sew the body
With RS together, seam the two body halves along the sides and top (shoulders), leaving the neck edge open and a 4 cm opening on one side seam for stuffing. Turn RS out.

### 5. Joint the head to the body
Make a small hole in the centre top of the body. Push the head's cotter pin through. Inside the body, slide on a hardboard disc, then a metal washer, then split and curl the cotter-pin legs down tightly using pliers. The head should turn but not flop.

### 6. Make and joint the arms
Pair up arm pieces (2 per arm). Seam with RS together around the curve, leaving the upper straight edge open. Turn RS out.
- Insert a 25 mm joint disc near the top inside each arm, cotter pin pointing **inward** (toward body).
- Stuff the arm firmly around the disc.
- Close the opening with ladder stitch, allowing the cotter pin to protrude.
- Pierce a hole on each side of the body (at shoulder level, approx. 2 cm below neck joint).
- Push pin through, fit disc + washer inside body, curl pins tight.

### 7. Make and joint the legs
Repeat as for arms, using the leg pieces. Position leg joints at the **lower side** of the body, approximately 4 cm apart, so the bear can sit.

### 8. Stuff and close the body
Through the side opening, stuff the body firmly. Close with ladder stitch.

### 9. Ears
Place two ear pieces WS together and overcast around the curved edge (no need to turn — the doubled fabric gives body). Pinch the lower edge slightly and ladder-stitch to the head, approximately 5 cm apart, curving slightly forward.

### 10. Face
- **Nose**: Using dark brown yarn, embroider a solid satin-stitch triangle (approx. 1.5 cm wide) at the nose tip.
- **Mouth**: Work an inverted Y from the base of the nose, about 1.5 cm long.
- Optional: add a few long stitches between the eyes and brush gently with a pet slicker brush to fluff the face.

### 11. Brushing (optional but recommended)
Gently brush the entire bear with a soft pet slicker brush to raise the halo and give a vintage mohair appearance. Brush *with* the knit direction, not against, and avoid the embroidered face.

### 12. Weave in ends
Bury all yarn ends inside the body or limbs through the seams. Trim closely.

---

## Finishing Tips

- **Posing**: Work the joints back and forth a few times to loosen them slightly so your bear can hold a pose.
- **Naming**: Every jointed bear deserves a name — Mr. Bramble welcomes a companion.
- **Care**: Surface wash only with a damp cloth. Do not machine wash (joints will rust).

---

*Pattern © for personal use. Please credit the designer if sharing finished bears on social media. Happy knitting!* 🐻
Disclaimer: This pattern was generated by AI and should be reviewed for accuracy before use. While we strive for quality, AI-generated content may contain errors. Please verify measurements, stitch counts, and instructions before beginning your project. Generated by purlJam.uk
Access your pattern anytime
Bookmark this page to access your pattern anytime