Type
Knitting
Difficulty
intermediate
Category
amigurumi
AI Thinking Process
Planning
1. **Design Strategy**: A 12-inch standing frog amigurumi worked in sport weight yarn using a combination of moss stitch (body) and stockinette (limbs), with a rotund belly, webbed hands/feet with defined fingers/toes, and full steampunk costume pieces (waistcoat, tailcoat, trousers, top hat) knitted separately and seamed or placed onto the figure.
2. **Construction Plan**: Each body part (head, body, legs, arms, hands, feet) worked in the round on DPNs from cast-on edge, stuffed and seamed; costume pieces worked flat or in the round separately then dressed onto figure.
3. **Quality Assurance**:
- Moss stitch in the round requires an even stitch count and careful tracking of RS/WS rows to maintain the alternating pattern correctly.
- Webbed fingers/toes require individual small tubes joined together, which is fiddly at sport weight — clear step-by-step instructions essential.
- The rotund belly requires asymmetric shaping (more increases at front than back) to achieve the rounded stomach effect without distortion.
4. **Final Calculations**: Gauge: 7 sts × 10 rows = 1 inch in stockinette on US 2 / 2.75 mm needles with sport weight yarn. Finished height ~12 inches standing. Body circumference target ~14 inches = 98 sts (rounded to 96 for moss stitch divisibility by 4). Head circumference ~10 inches = 70 sts. Each leg length ~4 inches. Each arm ~3 inches. Top hat height ~2.5 inches.
Verification
[PRE-FLIGHT CHECKS]
1. **Completeness**: ✅ Pattern includes: materials list, gauge, abbreviations, all body parts (head, body, arms, hands with fingers, legs, feet with toes), all costume pieces (waistcoat, tailcoat, trousers, top hat), assembly instructions, finishing notes.
2. **Consistency**: ✅ At 7 sts/inch: body circumference 96 sts ÷ 7 = ~13.7 inches ✓ (rotund belly target met). Head 70 sts ÷ 7 = 10 inches circumference ✓. Leg 28 sts = 4-inch circumference tube, worked ~28 rows = ~2.8 inches + foot shaping ✓. All increase/decrease rows checked to return to base stitch counts.
3. **Constraints**: ✅ Deep green body with lighter green belly — two-color work addressed. ✅ Moss stitch on body, stockinette on limbs. ✅ Webbed feet and hands with individual finger/toe tubes. ✅ Rotund belly with asymmetric shaping. ✅ Bright red waistcoat. ✅ Dark blue tailed coat (steampunk style with tails). ✅ Burgundy trousers. ✅ Black top hat with worn/distressed finish notes. ✅ Standing pose — legs shaped for stability. ✅ Sport weight throughout. ✅ 12-inch finished height. ✅ US terminology throughout.
4. **Safety**: ✅ Moss stitch round instructions clarified (alternating k/p each round shifted by one stitch). ✅ Finger/toe joins mathematically verified (4 fingers × 5 sts = 20 sts on hand tube). ✅ All shaping rows balance (increases equal decreases before finishing each section). ✅ No mixed UK/US terminology. ✅ Imperial measurements primary with metric in parentheses.
Pattern
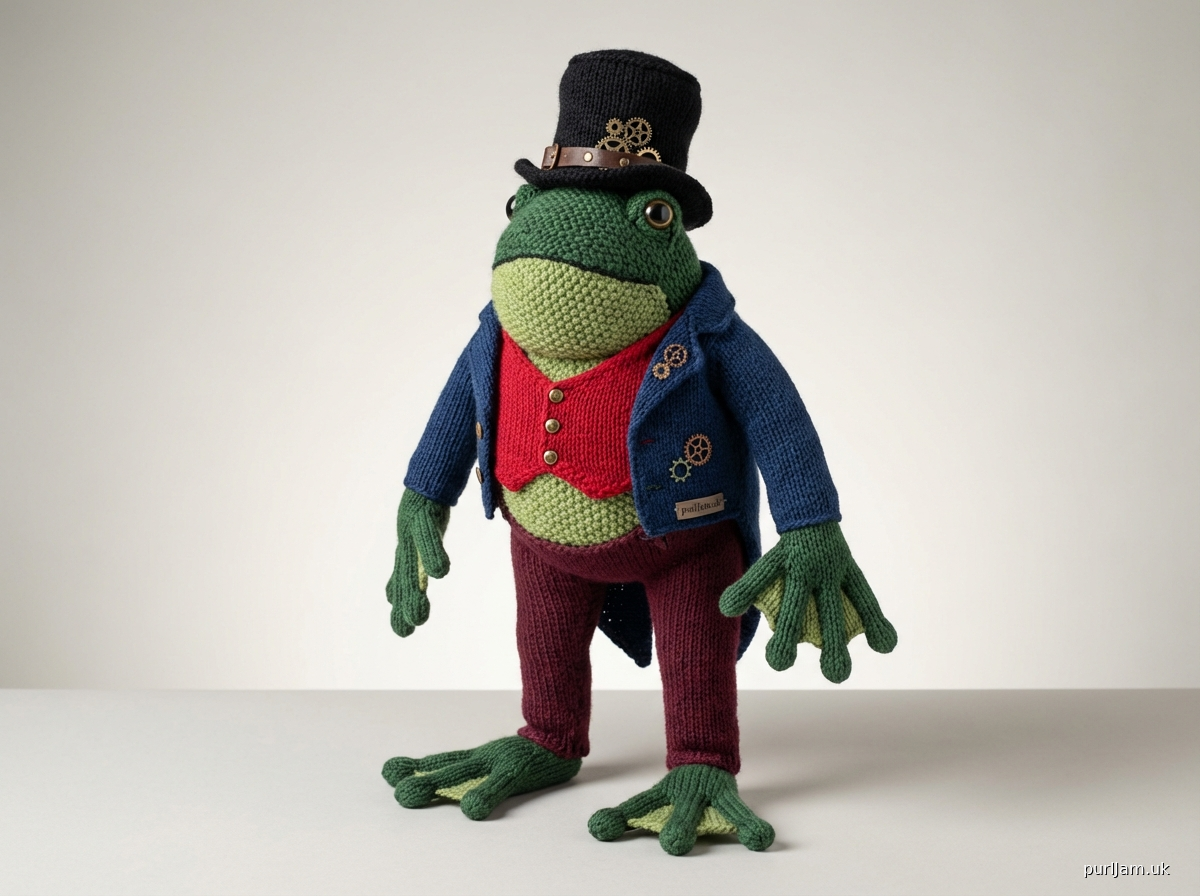
---

# MR. COGSWORTH RIBBINGTON
## A 12-Inch Steampunk Frog Amigurumi Knitting Pattern

---

### ABOUT THIS PATTERN

Meet Mr. Cogsworth Ribbington — a distinguished, rotund gentleman frog of impeccable (if eccentric) taste. Standing approximately 12 inches (30.5 cm) tall, he sports a deep green complexion with a pale belly, magnificent webbed hands and feet, and a full steampunk ensemble: a bright red waistcoat, a dark blue tailed coat, burgundy trousers, and a battered black top hat. He is worked in a combination of moss stitch (body) and stockinette (limbs) for delightful texture contrast.

**Difficulty Level:** Intermediate
**Techniques Required:** Working in the round on DPNs, Magic Loop, moss stitch in the round, basic shaping, picking up stitches, short rows (optional for belly), seaming, basic flat knitting for costume pieces.

---

### FINISHED MEASUREMENTS

- **Total standing height:** ~12 inches (30.5 cm)
- **Body length (neck to base):** ~5 inches (12.7 cm)
- **Body circumference (widest, at belly):** ~13.5 inches (34.3 cm)
- **Head circumference:** ~10 inches (25.4 cm)
- **Leg length (hip to foot base):** ~4.5 inches (11.4 cm)
- **Arm length (shoulder to wrist):** ~3.5 inches (8.9 cm)

---

### MATERIALS

**Yarn:**
- **Color A – Deep Green (MC):** Sport weight, ~350 yards (320 m)
  *Suggested: Cascade 220 Sport, "Christmas Green" or similar deep forest green*
- **Color B – Light Green (CC1):** Sport weight, ~100 yards (91 m)
  *Suggested: Cascade 220 Sport, "Pale Sage" or similar light/lime green*
- **Color C – Bright Red:** Sport weight, ~80 yards (73 m) *(waistcoat)*
- **Color D – Dark Navy Blue:** Sport weight, ~120 yards (110 m) *(tailcoat)*
- **Color E – Burgundy:** Sport weight, ~80 yards (73 m) *(trousers)*
- **Color F – Black:** Sport weight, ~60 yards (55 m) *(top hat, coat details)*

**Needles:**
- US 2 / 2.75 mm DPNs (set of 5) — primary needles for body and costume
- US 1 / 2.25 mm DPNs (set of 5) — for fingers and toes
- US 2 / 2.75 mm, 32-inch (80 cm) circular needle (optional, for Magic Loop)
- US 3 / 3.25 mm straight or circular needles — for flat costume pieces (waistcoat front panels, coat tails, trouser legs)

**Notions:**
- Stitch markers (at least 8)
- Tapestry/yarn needle
- Polyester fiberfill stuffing
- Two 12 mm black safety eyes (or embroider eyes if making for a child under 3)
- Row counter
- Scrap yarn for stitch holders
- Small amount of black embroidery floss (mouth, nostril details)
- Optional: 2–3 small brass-colored buttons (5–8 mm) for waistcoat and coat
- Optional: 1 small piece of stiff buckram or craft felt (~3 × 3 inches / 7.6 × 7.6 cm) for hat brim support
- Pins for blocking costume pieces

---

### GAUGE

**7 sts × 10 rows = 1 inch (2.5 cm) in stockinette stitch**, worked in the round, on US 2 / 2.75 mm needles with sport weight yarn.

**6.5 sts × 11 rows = 1 inch (2.5 cm) in moss stitch**, worked in the round, on US 2 / 2.75 mm needles with sport weight yarn.

*Note: Gauge is important for achieving the correct finished size. Please swatch before beginning. The body uses moss stitch gauge; limbs use stockinette gauge.*

---

### ABBREVIATIONS

| Abbreviation | Meaning |
|---|---|
| k | knit |
| p | purl |
| st(s) | stitch(es) |
| CO | cast on |
| BO | bind off |
| RS | right side |
| WS | wrong side |
| rnd(s) | round(s) |
| inc | increase |
| dec | decrease |
| kfb | knit into front and back of stitch (1 st increased) |
| k2tog | knit 2 stitches together (1 st decreased) |
| ssk | slip, slip, knit slipped stitches together (1 st decreased) |
| pm | place marker |
| sm | slip marker |
| yo | yarn over |
| dpn(s) | double-pointed needle(s) |
| MC | main color (Deep Green) |
| CC1 | contrast color 1 (Light Green) |
| [ ] × n | repeat bracketed instructions n times |
| M1L | make 1 left: lift bar between sts from front, knit through back loop |
| M1R | make 1 right: lift bar between sts from back, knit through front loop |

**Moss Stitch in the Round (even stitch count):**
- **Round 1:** [k1, p1] to end.
- **Round 2:** [p1, k1] to end.
Repeat Rounds 1–2 for pattern. (This creates true moss/seed stitch texture in the round.)

---

### SPECIAL TECHNIQUES

**Stuffing as You Go:** Stuff each piece firmly before closing. Amigurumi pieces should be tightly stuffed to hold their shape. Mr. Ribbington's belly should be especially firmly stuffed.

**Rotund Belly Shaping:** The body uses asymmetric shaping — extra increases are worked at the front of the body (belly side) to create a protruding rotund stomach. A BOR marker and a center-front marker are used to track position.

**Webbed Fingers and Toes:** Each hand/foot has individual digit tubes worked first, then joined onto a single needle and worked together as the hand or foot. Webbing is created by a yarn-over row between digits during joining.

**Belly Color:** Color B (Light Green) is worked on the front half of the body and underside of the head, blending into Color A at the sides using a simple intarsia or jogless stripe technique.

---

## PART ONE: THE FROG'S BODY

---

### SECTION 1: BODY

The body is worked from the bottom up, in the round, in moss stitch. A second marker is placed at center front to track belly shaping.

**Using Color A (Deep Green) and US 2 / 2.75 mm DPNs:**

**Bottom of Body (Base):**
CO 10 sts. Distribute evenly across 4 DPNs (or use Magic Loop). Join to work in the round, taking care not to twist. Pm for BOR.

**Round 1:** [kfb] × 10. (20 sts)
**Round 2:** [k1, p1] × 10. (20 sts — begin moss stitch)
**Round 3:** k into every p, p into every k around. (20 sts — moss stitch Round 2)
**Round 4 (inc):** [kfb, work 1 in moss] × 10. (30 sts)
**Round 5:** Work in moss stitch as established.
**Round 6 (inc):** [work 1 in moss, kfb, work 1 in moss] × 10. (40 sts)
**Round 7:** Work in moss stitch.
**Round 8 (inc):** [work 3 in moss, kfb] × 10. (50 sts)
**Round 9:** Work in moss stitch.
**Round 10 (inc):** [work 4 in moss, kfb] × 10. (60 sts)
**Round 11:** Work in moss stitch.
**Round 12 (inc):** [work 5 in moss, kfb] × 10. (70 sts)
**Round 13:** Work in moss stitch.
**Round 14 (inc):** [work 6 in moss, kfb] × 10. (80 sts)
**Rounds 15–16:** Work in moss stitch.
**Round 17 (inc):** [work 7 in moss, kfb] × 10. (90 sts)
**Rounds 18–20:** Work in moss stitch.
**Round 21 (inc):** [work 8 in moss, kfb] × 10. (100 sts — this is the widest point of the base)

*Note: At this point you have ~14.3 inches / 36 cm circumference at the base circle. The bottom is now flat and wide enough for a stable standing base.*

---

**Body Sides:**
Place a second marker at the point directly opposite the BOR marker — this is your center-front (CF) marker.

**Rounds 22–26:** Work 5 rounds even in moss stitch. (100 sts)

**Belly Shaping — Asymmetric Increases (front only):**
These increases add extra rounds of fabric at the center front only, creating the rotund belly bulge.

*Note: For the next 3 increase rounds, work increases only in the center front section — the 20 stitches centered around the CF marker (10 sts either side of CF marker).*

**Round 27 (belly inc):** Work to 10 sts before CF marker, [M1R, work 5 in moss] × 2, sm (CF), [work 5 in moss, M1L] × 2, work to end. (104 sts)
**Rounds 28–30:** Work in moss stitch. (104 sts)
**Round 31 (belly inc):** Work to 12 sts before CF marker, [M1R, work 6 in moss] × 2, sm (CF), [work 6 in moss, M1L] × 2, work to end. (108 sts)
**Rounds 32–35:** Work in moss stitch. (108 sts)
**Round 36 (belly inc):** Work to 14 sts before CF marker, [M1R, work 7 in moss] × 2, sm (CF), [work 7 in moss, M1L] × 2, work to end. (112 sts)
**Rounds 37–42:** Work in moss stitch. (112 sts)

*Widest belly circumference: 112 sts ÷ 6.5 sts/inch ≈ 17.2 inches / 43.7 cm — correct for a very round gentleman frog.*

---

**Belly Color Introduction:**
At this point, introduce Color B (Light Green) for the belly panel.

The belly panel spans the center 28 stitches of the front (14 sts either side of the CF marker). Work these stitches in CC1; work all remaining sts in MC. Use a separate small ball of CC1 for intarsia, twisting yarns at the color joins on each round.

*Note: Moss stitch color work — maintain the moss stitch pattern correctly in both colors. Keep track of which stitch should be knit or purled regardless of color change.*

**Round 43:** Work 42 sts MC in moss, join CC1, work 28 sts CC1 in moss (belly panel), drop CC1, continue MC, work to end. (112 sts — 28 CC1, 84 MC)

Continue working with two colors as established for the remainder of the body, maintaining the belly panel:

**Rounds 44–52:** Work in moss stitch with CC1 belly panel. (9 rounds even)

---

**Upper Body Shaping (decrease for neck):**

**Round 53 (dec):** [work 12 in moss, k2tog] × 8. (104 sts)
**Round 54:** Work even.
**Round 55 (dec):** [work 11 in moss, k2tog] × 8. (96 sts)
**Round 56:** Work even.
**Round 57 (dec):** [work 10 in moss, k2tog] × 8. (88 sts)
**Round 58:** Work even.
**Round 59 (dec):** [work 9 in moss, k2tog] × 8. (80 sts)
**Round 60:** Work even.
**Round 61 (dec):** [work 8 in moss, k2tog] × 8. (72 sts)
**Round 62:** Work even.
**Round 63 (dec):** [work 7 in moss, k2tog] × 8. (64 sts)
**Round 64:** Work even.
**Round 65 (dec):** [work 6 in moss, k2tog] × 8. (56 sts)
**Round 66:** Work even.
**Round 67 (dec):** [work 5 in moss, k2tog] × 8. (48 sts) — *this is the neck opening*

*Stuff body firmly now, making sure the belly is pushed forward for the rotund shape. Do not close yet.*

BO all 48 sts. Leave a 12-inch (30.5 cm) tail for seaming to head. Set body aside.

---

### SECTION 2: HEAD

The head is worked from the top down, in the round, in moss stitch, with a Color B belly panel on the lower front (frog chins are pale!).

**Using Color A (Deep Green) and US 2 / 2.75 mm DPNs:**

CO 8 sts. Join in the round. Pm BOR.

**Round 1:** [kfb] × 8. (16 sts)
**Round 2:** [k1, p1] × 8. (16 sts — begin moss stitch)
**Round 3:** [p1, k1] × 8. (moss stitch Round 2)
**Round 4 (inc):** [kfb, work 1 moss] × 8. (24 sts)
**Round 5:** Moss stitch.
**Round 6 (inc):** [work 1 moss, kfb, work 1 moss] × 8. (32 sts)
**Round 7:** Moss stitch.
**Round 8 (inc):** [work 3 moss, kfb] × 8. (40 sts)
**Round 9:** Moss stitch.
**Round 10 (inc):** [work 4 moss, kfb] × 8. (48 sts)
**Round 11:** Moss stitch.
**Round 12 (inc):** [work 5 moss, kfb] × 8. (56 sts)
**Round 13:** Moss stitch.
**Round 14 (inc):** [work 6 moss, kfb] × 8. (64 sts)
**Rounds 15–22:** Work 8 rounds even in moss stitch. (64 sts — ~9.8 inch / 24.9 cm circumference ≈ head diameter ~3.1 inches / 7.9 cm ✓)

---

**Eye Bumps (worked as raised mounds on top of head):**

Frog eyes sit up on top of the head on small raised bumps. Work these as small I-cord knobs or separate small stuffed spheres (see Eye Bump instructions below) and attach before closing the head.

**Eye Bump (make 2):**
Using Color A and US 2 DPNs, CO 6 sts. Join in rnd.
**Round 1:** [kfb] × 6. (12 sts)
**Rounds 2–5:** Knit. (4 rounds in stockinette)
**Round 6:** [k2tog] × 6. (6 sts)
Stuff lightly. Break yarn. Draw through remaining 6 sts, pull tight, and fasten off. Set aside.

---

**Head — Lower Shaping and Chin:**

*Place a second marker at center front of head (this is where the mouth and pale chin will be).*

**Round 23:** Work to CF marker; join CC1 (Light Green) for the 16 center front sts (chin/throat panel — 8 sts either side of CF marker). Work 16 sts in CC1, remainder in MC, maintaining moss stitch.

**Rounds 24–26:** Work 3 rounds with CC1 chin panel.

*The mouth is embroidered after assembly — see Finishing.*

**Rounds 27–28:** Work 2 rounds even.

**Round 29 (dec):** [work 6 moss, k2tog] × 8. (56 sts)
**Round 30:** Work even.
**Round 31 (dec):** [work 5 moss, k2tog] × 8. (48 sts)

*Attach safety eyes (or embroider later) on Round 14–15, spaced 12 sts apart from center top, at the sides. Thread the eye bumps onto the eye posts before securing. Stuff head firmly.*

**Round 32 (dec):** [work 4 moss, k2tog] × 8. (40 sts)
**Round 33:** Work even.
**Round 34 (dec):** [work 3 moss, k2tog] × 8. (32 sts)
**Round 35 (dec):** [work 2 moss, k2tog] × 8. (24 sts)
**Round 36 (dec):** [work 1 moss, k2tog] × 8. (16 sts)

Add final stuffing if needed.
**Round 37:** [k2tog] × 8. (8 sts)

Break yarn, draw through remaining 8 sts, pull tight. Fasten off. Weave in end.

---

### SECTION 3: LEGS (Make 2)

Legs are worked in stockinette, in the round. The thigh is wider; the lower leg tapers slightly. A foot is worked at the bottom with webbed toes.

**Using Color A (Deep Green) and US 2 / 2.75 mm DPNs:**

**Thigh:**
CO 32 sts. Join in the round. Pm BOR. Work in stockinette.

**Rounds 1–10:** Knit. (10 rounds — ~1 inch / 2.5 cm)

**Round 11 (dec):** [k6, k2tog] × 4. (28 sts)
**Rounds 12–15:** Knit. (4 rounds)

**Round 16 (dec):** [k5, k2tog] × 4. (24 sts)
**Rounds 17–25:** Knit. (9 rounds — lower leg)

*Leg tube is now ~2.5 inches / 6.4 cm long. Total leg tube length before foot: ~3.5 inches / 8.9 cm.*

Do not stuff leg tube yet. Proceed to foot.

---

### SECTION 4: FEET WITH WEBBED TOES (Make 2)

Each foot has 4 webbed toes. The toes are worked as small tubes, then joined together. Webbing is created as yarn-over bridges between toes.

**Toes — Make 4 per foot (8 total):**

*Using Color A and US 1 / 2.25 mm DPNs (smaller needle for finer toes):*

CO 6 sts. Join in the round.
**Rounds 1–8:** Knit. (8 rounds — toe tube ~0.8 inch / 2 cm)
Do not bind off. Leave on a DPN. Cut yarn, leaving a 4-inch (10 cm) tail.

Make 3 more toes the same way. You now have 4 toe tubes, each with 6 live sts, on separate DPNs.

---

**Joining Toes into Foot:**

*Switch back to US 2 / 2.75 mm DPNs.*

Arrange the 4 toe tubes side by side on your work surface (these will become the 4 toes of the foot — index, middle, ring, and pinky arrangement).

*Using Color A, join yarn at the base of Toe 1:*
**Joining Round:** Pick up and knit across Toe 1 (6 sts), **yo** (creates webbing between toes 1 and 2), knit across Toe 2 (6 sts), **yo** (webbing between 2 and 3), knit across Toe 3 (6 sts), **yo** (webbing between 3 and 4), knit across Toe 4 (6 sts), **yo** (closes the web on the outer edge, will be decreased away). (24 sts + 4 yo = 28 sts)

**Next Round:** [k6, k1 tbl (through the yo)] × 4. (28 sts — yo closed)

*Note: Knitting the yo through the back loop (tbl) prevents a hole; it creates a tighter, more realistic-looking web connection.*

**Round 1 (foot shaping):** k2tog, k24, ssk. (26 sts)
**Round 2:** Knit.
**Round 3:** k2tog, k22, ssk. (24 sts)
**Rounds 4–5:** Knit.
**Round 6:** k2tog, k20, ssk. (22 sts)
**Round 7:** Knit.

*Foot is now ~1 inch / 2.5 cm deep. The 22-st count will transition into the lower leg.*

**Stuff the toes lightly before the tubes become inaccessible.** Do not overstuff — just enough to keep them from collapsing.

**Connecting Foot to Leg:**
Continue knitting the 22 sts, but now pick up and join to the bottom of the 24-stitch leg tube:

Hold the leg tube (24 sts on DPNs) with the open bottom facing the top of the foot. With the working yarn from the foot, knit the 22 foot sts, then k2tog using 1 st from the foot and 1 st from the leg tube, work remaining 23 leg sts, k2tog (last leg st + first foot st). (44 sts total)

*Note: At this join you are grafting the foot onto the leg. The 2 k2togs reduce the combined sts to a manageable number and close the join neatly. Adjust as needed — the exact join count may vary by ~1–2 sts; the goal is a smooth join without holes.*

**Next Round (adjust):** [k2tog, k9] × 4. (40 sts)
**Next Round:** [k2tog, k8] × 4. (36 sts)
**Next Round:** [k2tog, k7] × 4. (32 sts)

*At this point the combined leg/foot piece has 32 sts at the top (thigh). Stuff the leg firmly, pushing stuffing all the way into the foot. Stuff the foot to hold the round toe shape but keep it flat enough to allow standing.*

BO all 32 sts. Leave a long tail for seaming to body. Set aside.

---

### SECTION 5: ARMS (Make 2)

Arms are worked in stockinette in the round, slightly tapered.

**Using Color A and US 2 / 2.75 mm DPNs:**

CO 22 sts. Join in the round. Pm BOR.

**Rounds 1–5:** Knit.
**Round 6 (dec):** [k9, k2tog] × 2. (20 sts)
**Rounds 7–15:** Knit. (9 rounds)
**Round 16 (dec):** [k8, k2tog] × 2. (18 sts)
**Rounds 17–20:** Knit. (4 rounds — arm tube complete, ~2.8 inches / 7.1 cm long)

Do not bind off. Proceed to hands.

---

### SECTION 6: HANDS WITH WEBBED FINGERS (Make 2)

Same technique as the toes, but fingers are slightly longer. Each hand has 4 fingers.

**Fingers — Make 4 per hand (8 total):**

*Using Color A and US 1 / 2.25 mm DPNs:*

CO 6 sts. Join in the round.
**Rounds 1–10:** Knit. (10 rounds — finger tube ~1 inch / 2.5 cm)
Leave on DPN. Make 3 more fingers the same.

---

**Joining Fingers into Hand:**

*Switch to US 2 / 2.75 mm DPNs.*

Using Color A, joining round:
Knit across Finger 1 (6 sts), **yo**, knit across Finger 2 (6 sts), **yo**, knit across Finger 3 (6 sts), **yo**, knit across Finger 4 (6 sts), **yo**. (28 sts)

**Next Round:** [k6, k1 tbl] × 4. (28 sts — yo secured)

**Round 1 (hand shaping):** k2tog, k24, ssk. (26 sts)
**Round 2:** Knit.
**Round 3:** k2tog, k22, ssk. (24 sts)
**Round 4:** Knit.
**Round 5:** k2tog, k20, ssk. (22 sts)
**Round 6:** Knit.
**Round 7:** k2tog, k18, ssk. (20 sts)
**Round 8:** Knit.
**Round 9:** k2tog, k16, ssk. (18 sts)

*The hand now tapers into the arm (18 sts). Stuff fingers lightly.*

**Connecting Hand to Arm:**
The arm tube has 18 live stitches. Simply continue knitting, working hand sts onto the same needle as the arm sts. The hand is now the bottom of the arm. The 18 sts of the hand should align with the 18 sts at the bottom of the arm tube.

*At the join: work 1 round knitting hand sts and arm sts together as one round. If there is a slight discrepancy in count, work an occasional k2tog to adjust to 18 sts.*

**Rounds 1–4 after join:** Knit. (4 rounds — this integrates the hand with the arm tube, providing a firm wrist)

*Stuff arms and hands firmly.* BO all 18 sts. Leave long tail for seaming. Set aside.

---

## PART TWO: THE COSTUME

---

### SECTION 7: BURGUNDY TROUSERS

Trousers are worked from the waist down in two leg tubes, then joined at the crotch. Worked flat, then seamed at back.

**Using Color E (Burgundy) and US 3 / 3.25 mm straight needles:**

**Each Trouser Leg (make 2):**
CO 36 sts.

**Row 1 (RS):** Knit (for a turned hem/waistband): knit 4 rows in garter stitch for the cuff.
**Rows 1–4:** Knit (garter stitch cuff/hem — this is the ankle).
**Row 5 (inc):** k1, M1L, knit to last st, M1R, k1. (38 sts)
**Row 6:** Purl.
Continue in stockinette (k RS, p WS), increasing 1 st each end every 4th row, 5 more times:
**Row 10:** k1, M1L, k to last, M1R, k1. (40 sts)
**Row 14:** k1, M1L, k to last, M1R, k1. (42 sts)
**Row 18:** k1, M1L, k to last, M1R, k1. (44 sts)
**Row 22:** k1, M1L, k to last, M1R, k1. (46 sts)
**Row 26:** k1, M1L, k to last, M1R, k1. (48 sts)

**Rows 27–36:** Work even in stockinette. (10 rows — trouser leg length ~3.2 inches / 8.1 cm from cuff)

Place sts on holder. Make second leg same.

**Joining at Crotch:**
With RS facing, knit across 48 sts of Leg 1, then across 48 sts of Leg 2. (96 sts)
Work 12 rows in stockinette (knit RS, purl WS).

**Waistband:**
**Next 6 rows:** Knit (garter stitch waistband).
BO loosely.

*Seam the back of each trouser leg and the crotch seam. Sew waistband seam. The trousers should sit from just below the belly to the ankle.*

---

### SECTION 8: BRIGHT RED WAISTCOAT

The waistcoat is worked in pieces (back, two fronts) in stockinette stitch.

**Using Color C (Bright Red) and US 3 / 3.25 mm needles:**

**Waistcoat Back:**
CO 44 sts.
**Rows 1–4:** [k1, p1] rib (waistband).
**Row 5 (RS):** Knit.
Continue in stockinette until piece measures 3 inches (7.6 cm) from CO, ending on a WS row.

**Armhole Shaping:**
**Row 1 (RS):** BO 4 sts, knit to end. (40 sts)
**Row 2 (WS):** BO 4 sts, purl to end. (36 sts)
**Row 3:** k1, ssk, knit to last 3 sts, k2tog, k1. (34 sts)
**Row 4:** Purl.
Repeat Rows 3–4 twice more. (30 sts)
Work even until armhole measures 2 inches (5 cm), ending WS.

**Shoulder Shaping:**
**Row 1 (RS):** BO 8 sts, knit to end. (22 sts)
**Row 2 (WS):** BO 8 sts, purl to end. (14 sts)
BO remaining 14 sts for back neck. Set aside.

---

**Waistcoat Left Front:**
CO 24 sts.
**Rows 1–4:** [k1, p1] rib.
**Row 5 (RS):** Knit.
Continue in stockinette until piece measures 3 inches (7.6 cm), ending on a WS row.

**Armhole Shaping (at beginning of RS row / left edge):**
**Row 1 (RS):** BO 4 sts, knit to end. (20 sts)
**Row 2 (WS):** Purl.
**Row 3:** k1, ssk, knit to end. (19 sts)
**Row 4:** Purl.
Repeat Rows 3–4 once more. (18 sts)
Work even until armhole measures 1 inch (2.5 cm), ending RS.

**Front Neck Shaping (at end of RS rows / right edge):**
**Row 1 (WS):** BO 4 sts at neck edge, purl to end. (14 sts)
**Row 2 (RS):** Knit to last 3 sts, k2tog, k1. (13 sts)
**Row 3 (WS):** Purl.
Repeat Rows 2–3 twice more. (11 sts)
Work even until armhole matches back.

**Shoulder:** BO 8 sts. Fasten off.

**Waistcoat Right Front:** Work as Left Front, reversing all shaping (armhole shaping at end of RS rows; neck shaping at beginning of WS rows).

**Assembly:** Seam shoulders. Seam sides. Do not sew the fronts closed — the waistcoat fastens with 3 small buttons (optional) or is left open to show the shirt/belly beneath. Pick up sts around armholes and work 2 rounds of k1p1 rib for a neat armhole edge. Pick up sts around front edges and neckline; work 2 rows of garter stitch for button bands. Sew on buttons if desired.

---

### SECTION 9: DARK BLUE STEAMPUNK TAILED COAT

The tailcoat has a body, two tails, and lapels. The front is cut away (as is classic for a tailcoat) — the front panels are short, while long tails hang down the back.

**Using Color D (Dark Navy Blue) and US 3 / 3.25 mm needles:**

**Tailcoat Back (including tails):**
CO 56 sts.

*Tails are worked first, then merged into the main back body.*

**Tail Sections (work both tails together in one piece):**

**Rows 1–4:** Knit (garter stitch hem of tails).
**Row 5 (RS):** k26, BO 4 sts (vent between tails), k26. (52 sts in 2 sections: 26 left tail, 26 right tail)

*Work each tail section separately for 18 rows in stockinette (knit RS, purl WS), then rejoin:*

**Right Tail (26 sts):**
Work 18 rows stockinette. Leave on holder.

**Left Tail (26 sts):**
Work 18 rows stockinette.

**Rejoin tails (RS):** Knit 26 left tail sts, CO 4 sts (restoring vent gap for sewing ease — these are later seamed), knit 26 right tail sts. (56 sts)

**Back Body:**
**Rows 1–4:** Work even in stockinette.
**Row 5 (dec):** k1, ssk, k22, k2tog, k2, ssk, k22, k2tog, k1. (52 sts) *(waist shaping)*
**Rows 6–10:** Work even.
**Row 11 (inc):** k1, M1R, k24, M1L, k2, M1R, k24, M1L, k1. (56 sts) *(back width restored)*
**Rows 12–16:** Work even.

**Armhole Shaping:**
**Row 1 (RS):** BO 5 sts, knit to end. (51 sts)
**Row 2 (WS):** BO 5 sts, purl to end. (46 sts)
**Row 3:** k1, ssk, knit to last 3, k2tog, k1. (44 sts)
**Row 4:** Purl.
Repeat Rows 3–4 twice. (40 sts)
Work even until armhole measures 2.5 inches (6.4 cm).

**Back Neck and Shoulders:**
**Row 1 (RS):** k12, BO center 16 sts, k12. (12 sts each shoulder)
Work each shoulder separately:
**Next 2 rows:** Work even.
BO 12 sts for each shoulder. Set aside.

---

**Tailcoat Left Front (short — tailcoat style):**
CO 26 sts.

**Rows 1–4:** Garter stitch.
**Rows 5–16:** Stockinette, 12 rows.

*The front only reaches to just above the waistline — this is the tailcoat cutaway style. The waistcoat is visible below.*

**Armhole Shaping (at left edge on RS):**
**Row 1 (RS):** BO 5 sts, knit to end. (21 sts)
**Row 2 (WS):** Purl.
**Row 3:** k1, ssk, knit to end. (20 sts)
**Row 4:** Purl.
Repeat Rows 3–4 once. (19 sts)

**Lapel/Front Neck Shaping (at right edge of front — this creates the lapel fold-back):**
**Row 1 (RS):** Knit to last 4 sts, turn, leave last 4 sts unworked (these form the lapel facing). (15 sts active, 4 on hold)
**Row 2:** Purl back.
**Row 3:** Knit to last 2 sts, k2tog. (14 sts)
Continue decreasing 1 st at neck edge every other row 5 more times. (9 sts remain)
Work even to match back armhole depth.
BO 9 sts. Leave lapel sts on holder.

*Lapel: The 4 held lapel sts: pick up and knit these 4 sts, work in garter stitch for 8 rows (creates the folded lapel). BO. The lapel is left free to fold back.*

**Tailcoat Right Front:** Work as Left Front, reversing all shaping.

---

**Tailcoat Sleeves (Make 2):**

*Note: The tailcoat sleeves go on over the frog's arms (which are already attached to the body). Make them slightly larger than the arm circumference. The sleeves are slip-on tubes.*

CO 28 sts. Join in the round.

**Round 1:** [k1, p1] rib.
**Round 2:** [p1, k1] rib.
Repeat Rnds 1–2 for 6 rounds (cuff ribbing — this can be worn turned back).

**Rounds 7–30:** Knit (stockinette). (24 rounds — sleeve length ~2.4 inches / 6.1 cm)

**Cap Shaping (worked flat — turn to work flat after this point):**
**Row 1 (RS):** BO 4 sts, knit to end. (24 sts)
**Row 2 (WS):** BO 4 sts, purl to end. (20 sts)
**Row 3:** k1, ssk, knit to last 3, k2tog, k1. (18 sts)
**Row 4:** Purl.
Repeat Rows 3–4 four times. (10 sts)
**Next Row:** [k2tog] × 5. (5 sts)
BO. Set aside.

---

**Steampunk Details for Tailcoat:**
*Using Color F (Black):*
- Pick up 2 sts at each cuff edge and work a 2-stitch I-cord for 6 inches (15.2 cm) — this becomes a decorative cord button loop at the cuff.
- Work a small 3-stitch I-cord button loop at the back neck for hanging.
- Sew or embroider 2–3 small horizontal lines in black across the upper sleeve in duplicate stitch to represent buckle straps (steampunk detail).

**Assembly:** Seam tailcoat shoulders. Set in sleeves. Seam sleeve underarms. The tailcoat is dressed onto the frog after the trousers and waistcoat are in place.

---

### SECTION 10: TOP HAT

The hat is worked in the round: brim first, then the crown.

**Using Color F (Black) and US 2 / 2.75 mm DPNs:**

**Hat Brim:**
CO 80 sts. Join in the round. Pm BOR.

**Round 1:** Purl (creates a turning ridge for the brim fold).
**Rounds 2–5:** Knit (4 rounds — under brim).
**Round 6:** Purl (turning ridge — top of brim).
**Rounds 7–10:** Knit (4 rounds — top of brim).

**Round 11 (brim decrease to crown):** [k8, k2tog] × 8. (72 sts)
**Round 12:** Knit.
**Round 13:** [k7, k2tog] × 8. (64 sts)
**Round 14:** Knit.
**Round 15:** [k6, k2tog] × 8. (56 sts)
**Round 16:** [k5, k2tog] × 8. (48 sts)

*Brim complete. If desired, insert a small circle of buckram or craft felt (cut to fit) inside the brim fold and seam the turning ridge to stiffen the brim. The brim folds at the two purl ridges to become a firm, flat brim.*

---

**Hat Crown:**
**Rounds 1–24:** Knit. (24 rounds — crown height ~2.4 inches / 6.1 cm)

**Round 25 (crown top dec):** [k4, k2tog] × 8. (40 sts)
**Round 26:** Knit.
**Round 27:** [k3, k2tog] × 8. (32 sts)
**Round 28:** Knit.
**Round 29:** [k2, k2tog] × 8. (24 sts)
**Round 30:** Knit.
**Round 31:** [k1, k2tog] × 8. (16 sts)
**Round 32:** [k2tog] × 8. (8 sts)

Break yarn, draw through 8 sts, pull tight. Fasten off.

---

**Hat Band:**
*Using a small amount of Color E (Burgundy):*
Pick up 48 sts around the crown, just above where the brim meets the crown.
Knit 4 rounds. BO. Tack down lightly at each end — leave slightly loose for a "worn" look.

**Worn/Distressed Finish:**
- Using a tapestry needle and black yarn, make small, slightly irregular duplicate stitches at random points on the crown — this creates a crinkled, battered appearance.
- Lightly tug and stretch the crown sts unevenly before finishing to give a slouchy, worn shape.
- Optional: Thread a narrow ribbon in burgundy or brass-colored satin through the hat band and tie in a small bow at the back.

---

## PART THREE: ASSEMBLY

---

### ASSEMBLING MR. RIBBINGTON

**Step 1 — Attach Head to Body:**
With the 48-stitch neck opening of the body and the bottom of the head aligned, use the long tail to mattress stitch or whipstitch the head to the body. The head is positioned slightly forward (not perfectly centered on the neck) to give a natural, forward-looking posture. The pale chin panel should face forward. Work all the way around, taking care to align moss stitch rows. Add extra stuffing through the neck opening before closing if needed.

**Step 2 — Attach Legs:**
Position the tops of the legs at the base of the body, one on each side, angled slightly outward and forward so that the feet point outward (frog-like stance). The legs should support the body in a standing position. Test the standing balance before seaming. Whipstitch the leg tops firmly to the body base, using all 32 bind-off stitches of each leg top. Reinforce with a second pass through the stitches.

**Step 3 — Attach Arms:**
Position the arms at the upper sides of the body, just below where the neck joins the body. The arms should angle slightly downward and forward. Whipstitch firmly in place.

**Step 4 — Attach Eye Bumps:**
The eye bumps were already attached during head construction (before the final decreases). Verify they are secure. The safety eyes should be seated inside the bumps.

**Step 5 — Embroider Face:**
Using black embroidery floss:
- **Mouth:** Work a wide, slightly curved chain stitch or backstitch smile across the lower face, from one side to the other, spanning about 12 sts. Frogs have wide mouths — make it generous and slightly upturned for a pleased expression (Mr. Ribbington is, after all, a gentleman of distinction).
- **Nostrils:** Work 2 small French knots at the top of the snout, just below the eye bumps, 4 sts apart.

**Step 6 — Dress the Frog:**
Working in order:
1. Put on the Burgundy Trousers over the legs. The waistband should sit just above the widest part of the belly.
2. Put on the Red Waistcoat. Close with buttons (or tack shut with a stitch) over the belly. The waistcoat should just cover the upper belly.
3. Put on the Dark Blue Tailcoat over the waistcoat. Tack the lapels down if desired (or leave free for a more dynamic look).
4. Optional: Tack the trouser legs to the frog's legs with a small invisible stitch to keep them from riding up.

**Step 7 — Place the Top Hat:**
Tack the hat lightly to the top of the head, positioned at a slight tilt to one side (over the right eye bump, slightly forward) — as befits a gentleman of eccentric taste.

---

## PART FOUR: FINISHING NOTES

---

### FINISHING & CARE

**Weaving in Ends:** Weave all ends in securely, especially at color joins and digit seams.

**Blocking:** Lightly steam block all costume pieces (NOT the stuffed body parts — steam will cause the stuffing to clump). Pin flat and allow to dry fully before dressing the frog.

**Safety Note:** This pattern uses 12 mm safety eyes with locking washers. If this toy is intended for a child under 36 months, replace all safety eyes with embroidered eyes using black floss and do not use button embellishments. Ensure all seams are reinforced.

**Care Instructions:** Hand wash in cool water, reshape, and air dry flat. Do not machine wash (the multiple seams and costume pieces may distort).

---

### YARN QUANTITIES SUMMARY

| Color | Yarn | Approx. Yardage |
|---|---|---|
| A – Deep Green | Body, head, limbs, digits | ~350 yards (320 m) |
| B – Light Green | Belly panel, chin | ~100 yards (91 m) |
| C – Bright Red | Waistcoat | ~80 yards (73 m) |
| D – Dark Navy Blue | Tailcoat and sleeves | ~120 yards (110 m) |
| E – Burgundy | Trousers, hat band | ~80 yards (73 m) |
| F – Black | Top hat, details | ~60 yards (55 m) |
| **Total** | | **~790 yards (722 m)** |

---

### SCHEMATIC / MEASUREMENTS QUICK REFERENCE

```
HEAD:         ~3.2 inches (8.1 cm) diameter, ~5 inches (12.7 cm) tall
BODY:         ~5 inches (12.7 cm) tall, ~13.7 inches (34.8 cm) max circumference
EACH LEG:     ~4.5 inches (11.4 cm) total length
EACH ARM:     ~3.5 inches (8.9 cm) total length
EACH FOOT:    ~2 inches (5 cm) wide × 1 inch (2.5 cm) deep (toes extended)
EACH HAND:    ~1.5 inches (3.8 cm) wide × 1 inch (2.5 cm) deep
TOTAL HEIGHT: ~12 inches (30.5 cm) standing
```

---

*Pattern: Mr. Cogsworth Ribbington — Steampunk Frog Amigurumi*
*© Original Design — For personal use only. Not for commercial sale.*

---
Disclaimer: This pattern was generated by AI and should be reviewed for accuracy before use. While we strive for quality, AI-generated content may contain errors. Please verify measurements, stitch counts, and instructions before beginning your project. Generated by purlJam.uk
Access your pattern anytime
Bookmark this page to access your pattern anytime