Type
Crochet
Difficulty
intermediate
Category
custom
AI Thinking Process
Planning
Verification
Pattern
Navy & Gold Scalloped Round Placemat
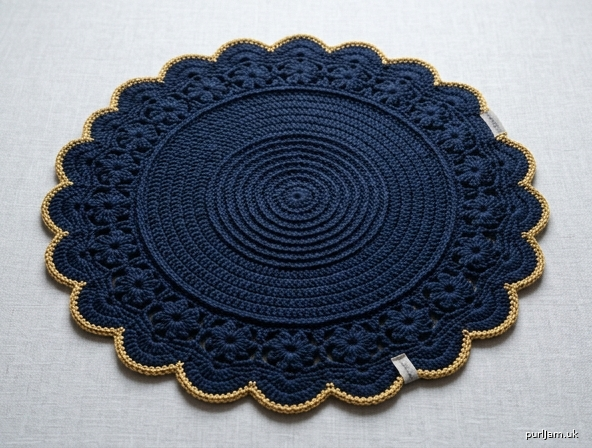
A round dinner placemat with a dense, ridged circular center, even concentric rounds, a floral cluster band near the edge, eighteen large rounded scallops, and a neat metallic-gold single-crochet edging. Worked in joined rounds from the center out in deep navy, with the gold joined only for the final round.
Skill Level: Easy
Finished Measurement: 16" (40.5 cm) diameter after blocking
One size.
Materials
Yarn: Worsted weight (Category 4)
- MC (deep navy): 230 yd / 210 m (approximately 4 oz / 113 g)
- CC (metallic or mustard gold): 45 yd / 41 m (approximately 0.8 oz / 23 g)
Smooth worsted acrylic, cotton, or cotton-blend is ideal for a placemat (wipeable, holds blocking). For the edging, use a gold metallic worsted or a mustard-gold worsted; if your metallic yarn is thin or splitty, hold it together with a matching gold fingering strand.
Hook: US H-8 (5 mm), or size needed to obtain gauge
A 4.5 mm hook may be used if you want a firmer, denser fabric.
Notions:
- Yarn needle
- Scissors
- Stitch marker
- Blocking mat and rustproof pins
Gauge
14 hdc = 4" (10 cm) worked in the round.
Pattern gauge: Rounds 1–6 measure 4" (10 cm) in diameter.
Check diameter after Round 6. If the disc is larger than 4" (10 cm), drop to a 4.5 mm hook so the center stays dense and the finished mat hits 16" (40.5 cm).
Abbreviations (US)
| Abbrev. | Meaning |
|---|---|
| BLO | back loop only |
| CC | contrasting color |
| ch | chain |
| cl | 3-double-crochet cluster (see Special Stitches) |
| dc | double crochet |
| hdc | half double crochet |
| MC | main color |
| MR | magic ring |
| rep | repeat |
| rnd(s) | round(s) |
| RS | right side |
| sc | single crochet |
| sk | skip |
| sl st | slip stitch |
| sp(s) | space(s) |
| st(s) | stitch(es) |
| yo | yarn over |
Special Stitches
Magic ring (MR): Wrap yarn around index finger to form a ring, insert hook, yo and pull up a loop, ch as instructed, work the first-round stitches into the ring, then pull the tail to close.
Alternative: Ch 4, sl st in first ch to form a ring, and work Rnd 1 into the ring.
3-dc cluster (cl): Yo, insert hook in indicated st, yo and pull up a loop, yo and draw through 2 loops (2 loops on hook); [yo, insert hook in same st, yo and pull up a loop, yo and draw through 2 loops] twice (4 loops on hook); yo and draw through all 4 loops.
2 hdc in next (increase): Work 2 hdc in the same stitch.
2 dc in next (increase): Work 2 dc in the same stitch.
Pattern Notes
- US crochet terminology throughout. Do not mix UK stitch names.
- Worked in joined rounds with RS always facing. Do not turn at the end of a round.
- Join every round with a sl st in the first stitch of the round (not in a beginning chain, unless noted).
- Ch-2 at the beginning of an hdc round does not count as a stitch.
- Ch-3 at the beginning of a dc round counts as the first dc.
- Ch-1 at the beginning of an sc round does not count as a stitch.
- Work in both loops unless the round specifies BLO.
- Place a marker in the first stitch of each round and move it up as you go.
- Stitch count appears in parentheses at the end of every round, with inline validation.
- Increases sit in 8 (hdc) then 12 (dc) spokes; wet-blocking rounds the circle.
- Color change: cut MC after the scallop round. Join CC only for the gold edging.
- Read Special Stitches before beginning the floral band.
Placemat
With MC (deep navy), begin at the center.
Dense Textured Center
Rnd 1 (RS): Make a MR, ch 2 (does not count as a st here and throughout hdc rnds), 8 hdc in ring, pull ring closed, join. (8 hdc)
Rnd 2: Ch 2, 2 hdc in each st around, join. (8 increases → 8 + 8 = 16 hdc ✓)
Rnd 3: Ch 2, *hdc in next st, 2 hdc in next st; rep from * around, join. (8 increases → 16 + 8 = 24 hdc ✓)
Rnd 4: Ch 2, *hdc in next 2 sts, 2 hdc in next st; rep from * around, join. (8 increases → 24 + 8 = 32 hdc ✓)
Rnd 5: Ch 2, *hdc in next 3 sts, 2 hdc in next st; rep from * around, join. (8 increases → 32 + 8 = 40 hdc ✓)
Rnd 6: Ch 2, *hdc in next 4 sts, 2 hdc in next st; rep from * around, join. (8 increases → 40 + 8 = 48 hdc ✓)
Checkpoint: piece should measure 4" (10 cm) in diameter.
Rnds 7–12 are worked in BLO to create the dense concentric ridges.
Rnd 7: Ch 2, working in BLO, *hdc in next 5 sts, 2 hdc in next st; rep from * around, join. (8 increases → 48 + 8 = 56 hdc ✓)
Rnd 8: Ch 2, working in BLO, *hdc in next 6 sts, 2 hdc in next st; rep from * around, join. (8 increases → 56 + 8 = 64 hdc ✓)
Rnd 9: Ch 2, working in BLO, *hdc in next 7 sts, 2 hdc in next st; rep from * around, join. (8 increases → 64 + 8 = 72 hdc ✓)
Rnd 10: Ch 2, working in BLO, *hdc in next 8 sts, 2 hdc in next st; rep from * around, join. (8 increases → 72 + 8 = 80 hdc ✓)
Rnd 11: Ch 2, working in BLO, *hdc in next 9 sts, 2 hdc in next st; rep from * around, join. (8 increases → 80 + 8 = 88 hdc ✓)
Rnd 12: Ch 2, working in BLO, *hdc in next 10 sts, 2 hdc in next st; rep from * around, join. (8 increases → 88 + 8 = 96 hdc ✓)
Center measures about 8" (20.5 cm) in diameter.
Concentric Double-Crochet Rounds
Resume working in both loops.
Rnd 13: Ch 3 (counts as first dc here and throughout dc rnds), dc in same st, dc in next 7 sts, *2 dc in next st, dc in next 7 sts; rep from * around, join in top of beg ch-3. (12 increases → 96 + 12 = 108 dc ✓)
Rnd 14: Ch 3, dc in same st, dc in next 8 sts, *2 dc in next st, dc in next 8 sts; rep from * around, join. (12 increases → 108 + 12 = 120 dc ✓)
Rnd 15: Ch 3, dc in same st, dc in next 9 sts, *2 dc in next st, dc in next 9 sts; rep from * around, join. (12 increases → 120 + 12 = 132 dc ✓)
Rnd 16: Ch 3, dc in same st, dc in next 10 sts, *2 dc in next st, dc in next 10 sts; rep from * around, join. (12 increases → 132 + 12 = 144 dc ✓)
Body measures about 13" (33 cm) in diameter.
Floral / Cluster Band
Rnd 17 (ridge): Ch 1 (does not count as a st), sc in BLO of each st around, join. (144 sc ✓)
Rnd 18 (floral clusters): Ch 1, *sc in next st, sk 3 sts, (cl, ch 2, cl, ch 2, cl) in next st, sk 3 sts; rep from * around, join in first sc.
(8 sts used per repeat, 144 ÷ 8 = 18 repeats ✓)
(18 sc, 18 floral motifs of 3 clusters each)
Tip: Keep the ch-2 spaces relaxed so the three clusters open into a small flower. The skipped stitches behind each motif should stay hidden on the WS.
Rnd 19 (set-up for scallops): Ch 1, *sc in next sc, sc in next cl, 3 sc in next ch-2 sp, sc in next cl, 3 sc in next ch-2 sp, sc in next cl; rep from * around, join.
(10 sc per motif × 18 = 180 sc ✓)
Large Rounded Scalloped Border
Rnd 20 (scallops): Ch 1, *sc in next st, sk 4 sts, 9 dc in next st, sk 4 sts; rep from * around, join in first sc.
(10 sts used per repeat, 180 ÷ 10 = 18 scallops ✓)
(18 sc + 18 shells of 9 dc)
Each 9-dc group lands in the center cluster of the flower below it, so the scallops line up with the floral band.
Fasten off MC. Weave in the navy tail at the join so the gold round starts clean.
Gold Edging
Rnd 21 (CC): With RS facing, join CC (gold) with sl st in any sc between scallops. Ch 1, *sc in the sc between scallops, sc in next 4 dc, 2 sc in next dc (peak of scallop), sc in next 4 dc; rep from * around, join in first sc.
(11 sc per scallop × 18 = 198 sc ✓)
The extra stitch at each peak lets the gold hug the curve instead of cutting across it.
Fasten off CC with an invisible join: cut yarn, pull the tail through the last loop, thread the tail under both loops of the first sc of the round, then back down through the last sc. The join should look like a regular stitch.
Finishing
- Weave in all remaining ends on the WS with the yarn needle. Tug the magic-ring tail firmly so the center hole closes, then weave it through several center stitches and trim.
- Check that the gold join sits in a valley between two scallops, not on a peak.
Blocking
Wet-blocking is what turns the octagon-leaning increases into a true circle and opens the scallops.
- Soak the placemat in lukewarm water for 15–20 minutes. If the yarn is superwash wool, use a no-rinse wool wash; if acrylic, a drop of mild soap is enough.
- Press out water — do not wring. Roll in a towel and press again.
- Lay flat on a blocking mat. Smooth the center into a circle 13" (33 cm) across before the floral band, then pin the outermost gold stitch at the peak of each of the 18 scallops so they are evenly spaced on a 16" (40.5 cm) circle (about 2¾" / 7 cm from peak to peak along the rim).
- Pin the valleys (the sc between scallops) slightly inward so each scallop is a smooth, rounded fan.
- Let dry completely before unpinning.
- Acrylic only: after pinning, hover a steam iron 1–2" (2.5–5 cm) above the fabric (do not touch the iron to metallic yarn) to set the shape.
Care
Machine-wash cold on gentle in a mesh bag if using acrylic or cotton; lay flat to dry. Re-shape the scallops while damp. Do not tumble-dry metallic yarn. Low steam is fine on the navy body; keep direct heat off the gold edging.
Stitch-count recap
| Rnd | Stitch | Count |
|---|---|---|
| 1 | hdc | 8 |
| 2 | hdc | 16 |
| 3 | hdc | 24 |
| 4 | hdc | 32 |
| 5 | hdc | 40 |
| 6 | hdc | 48 |
| 7 | hdc BLO | 56 |
| 8 | hdc BLO | 64 |
| 9 | hdc BLO | 72 |
| 10 | hdc BLO | 80 |
| 11 | hdc BLO | 88 |
| 12 | hdc BLO | 96 |
| 13 | dc | 108 |
| 14 | dc | 120 |
| 15 | dc | 132 |
| 16 | dc | 144 |
| 17 | sc BLO | 144 |
| 18 | floral | 18 motifs |
| 19 | sc | 180 |
| 20 | scallops | 18 shells |
| 21 | gold sc | 198 |
Disclaimer: This pattern was generated by AI and should be reviewed for accuracy before use. While we strive for quality, AI-generated content may contain errors. Please verify measurements, stitch counts, charts, and instructions before beginning your project. Generated by purlJam.uk
Love this pattern?
Save this pattern to your free PurlJam libraryAccess your pattern anytime
Bookmark this page to access your pattern anytime