Type
Crochet
Difficulty
intermediate
Category
custom
AI Thinking Process
Planning
Verification
Pattern
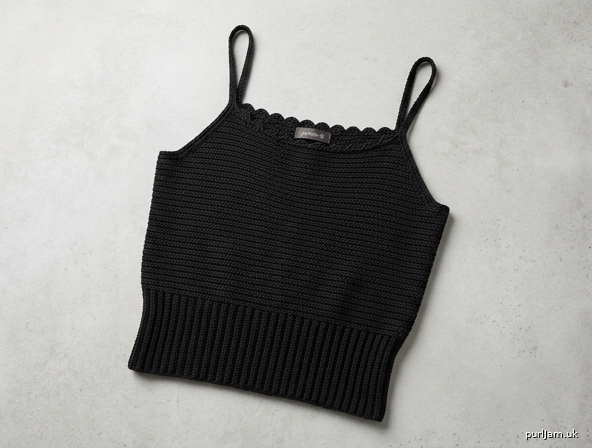
Midnight Camisole — Fitted Cotton Tank with Scalloped Neckline
A sleek, minimalist camisole worked in smooth single crochet with subtle horizontal ridges, finished with a wide stretchy ribbed waistband, delicate scalloped neckline, and thin adjustable shoulder straps. Designed in solid black sport-weight cotton for an elegant, everyday layering piece.
Skill Level
Easy / Advanced Beginner (confident sc, simple shaping, front-/back-post stitches)
Construction Overview
Two identical panels (front + back) worked bottom-up. Each panel begins with a sideways ribbed waistband (FPdc/BPdc), then the main body is worked upward in single crochet through the back loop only (sc BLO) for a smooth, subtly ridged fabric. Panels are seamed at the sides; straps and a scalloped neckline edging are added during finishing.
Materials
- Yarn: Sport weight (#2 Fine) 100% cotton, solid black
- Approx. yardage: 550 / 620 / 700 / 820 / 950 / 1080 yds (XS–XXL)
- Hook: US E-4 / 3.5 mm (main body); US D-3 / 3.25 mm (scallop edging & straps, optional for firmer finish)
- Notions: Tapestry needle, stitch markers (4–6), scissors, measuring tape, optional 2 small buttons for adjustable straps
Gauge
- Body (sc BLO): 22 sts × 26 rows = 4" (10 cm) → 5.5 sts/inch, 6.5 rows/inch
- Ribbing (FPdc/BPdc, unstretched): 20 sts × 10 rows = 4"
- ⚠️ Gauge is critical for fit. Make a 5" swatch in sc BLO and block before starting.
Sizes (Finished Bust — Fitted, ~2" negative ease)
| Size | To Fit Bust | Finished Bust | Panel Width | Body sts/panel |
|---|---|---|---|---|
| XS | 30–31" | ~30.5" | 15.3" | 84 |
| S | 32–33" | ~32" | 16.0" | 88 |
| M | 34–35" | ~34.2" | 17.1" | 94 |
| L | 38–39" | ~38.5" | 19.3" | 106 |
| XL | 42–43" | ~42.2" | 21.1" | 116 |
| XXL | 46–47" | ~46.5" | 23.3" | 128 |
Math check (M): 94 sts ÷ 5.5 sts/in = 17.1" per panel × 2 = 34.2" bust. ✓
Length (waistband-to-shoulder), adjustable:
- Ribbed waistband: 3.5" tall
- Lower body (waistband → underarm): 9"
- Armhole/upper body (underarm → shoulder edge): 7"
- Total body ≈ 19.5" + straps
Abbreviations (US Terms)
- ch — chain
- sc — single crochet
- sc BLO — single crochet through back loop only
- dc — double crochet
- FPdc — front post double crochet
- BPdc — back post double crochet
- sl st — slip stitch
- st(s) — stitch(es)
- sk — skip
- sc2tog — single crochet 2 stitches together (decrease)
- RS / WS — right side / wrong side
- rep — repeat
- ( ) — stitch count at end of row
Pattern Notes
- Turning chain: The ch-1 at the start of sc rows does NOT count as a stitch. Work first sc into the first stitch.
- Body is worked in sc BLO on every row (both RS and WS), producing horizontal ridges on both faces.
- The waistband is worked sideways first: you crochet a long ribbed strip whose row count equals the number of body stitches, then you work the body up from the long edge.
- Stitch counts are given in parentheses at the end of each row.
- Numbers are written as: XS (S, M, L, XL, XXL).
- Make 2 identical panels.
SPECIAL STITCHES
- FPdc: yarn over, insert hook front-to-back-to-front around the post of the indicated st, pull up loop, [yo, draw through 2] twice.
- BPdc: yarn over, insert hook back-to-front-to-back around the post of the indicated st, pull up loop, [yo, draw through 2] twice.
- Scallop: worked in finishing — see Neckline Edging.
PATTERN
PART 1 — Ribbed Waistband (make on each panel)
The waistband is worked sideways. Its length (number of rows) must equal your body sts/panel number.
Foundation: Ch 19 (this makes a 3.5" tall ribbing: 18 dc + turning ch).
Row 1 (RS): dc in 3rd ch from hook and each ch across. (17 dc — the beginning ch-2 counts as first dc, so 18 sts total). Note: ch-2 counts as a st here. → Count: 18 sts. ✓
Row 2: ch 2 (counts as first st), turn. Sk first st, FPdc around next st, BPdc around next st; rep from * across, ending with dc in top of turning ch. (18 sts)
Row 3: ch 2, turn. Sk first st, work BPdc over each previous FPdc and FPdc over each previous BPdc (i.e., work opposite of what faces you) across, ending dc in turning ch. (18 sts)
Rows 4 onward: Rep Row 3, always working FPdc over BPdc and BPdc over FPdc, keeping ribs aligned.
Continue until you have worked the number of rows equal to your body stitch count:
| Size | Total ribbing rows |
|---|---|
| XS | 84 |
| S | 88 |
| M | 94 |
| L | 106 |
| XL | 116 |
| XXL | 128 |
Fasten off. The ribbing stretches widthwise for a snug waist.
PART 2 — Body (worked up from waistband)
Turn the waistband so a long edge is at top. You will work 1 sc into the end of each ribbing row.
Set-up Row (RS): With RS facing, join yarn to the top-right corner of the ribbing long edge. Ch 1. Work 1 sc into the end of each ribbing row across. → Count: 84 (88, 94, 106, 116, 128) sc. ✓ (one sc per rib row = matches Body sts/panel target)
Rows 1–58 (Lower Body): ch 1, turn. sc BLO in each st across. → Count: 84 (88, 94, 106, 116, 128) sts each row.
Work until lower body measures 9" from top of waistband. At 6.5 rows/inch that is ≈ 58 rows. Adjust rows here to lengthen/shorten torso.
PART 3 — Armhole Shaping
At the start of the next two rows, we decrease each side to create armholes.
Underarm bind-off: Determine underarm stitches to remove per side:
| Size | Sts removed each side | Sts remaining after both sides |
|---|---|---|
| XS | 6 | 84 − 12 = 72 |
| S | 6 | 88 − 12 = 76 |
| M | 7 | 94 − 14 = 80 |
| L | 8 | 106 − 16 = 90 |
| XL | 9 | 116 − 18 = 98 |
| XXL | 10 | 128 − 20 = 108 |
Row A (RS): sl st across first 6 (6, 7, 8, 9, 10) sts, ch 1, sc BLO in each st until 6 (6, 7, 8, 9, 10) sts remain, turn — leave those last sts unworked. → Count: 72 (76, 80, 90, 98, 108) sts. ✓
Armhole edge decreases (next rows): ch 1, turn. sc2tog (BLO), sc BLO across to last 2 sts, sc2tog (BLO). (2 sts decreased)
Repeat this decrease row 4 times total, then work even.
After 4 decrease rows: → Count: 72 − 8 = 64 (68, 72, 82, 90, 100) sts. ✓
Work even in sc BLO (ch 1, turn, sc BLO across) until armhole measures 5" from underarm (≈ 33 rows). This leaves ~2" for neckline shaping below.
PART 4 — Straight Neckline & Shoulder Shaping
The neckline is worked straight across (no curve) for the minimalist look; only the shoulder "ledges" are formed by leaving the center open.
Divide for shoulders. The center front/back stays open as the straight neckline; each shoulder ledge is worked flat to full height.
Shoulder stitch allotment (each shoulder):
| Size | Shoulder sts (each) | Center neckline sts |
|---|---|---|
| XS | 12 | 40 |
| S | 13 | 42 |
| M | 14 | 44 |
| L | 16 | 50 |
| XL | 18 | 54 |
| XXL | 20 | 60 |
Check (M): 14 + 44 + 14 = 72 ✓ = remaining body sts.
Right Shoulder: Row 1 (RS): ch 1, sc BLO in first 12 (13, 14, 16, 18, 20) sts, turn — leave remaining sts unworked. → Count: shoulder sts as above. Rows 2–8: ch 1, turn, sc BLO across. Work until shoulder measures 2" (≈ 13 rows) tall. Fasten off.
Left Shoulder: With RS facing, sk the center neckline sts, join yarn to next st. Row 1 (RS): ch 1, sc BLO across last 12 (13, 14, 16, 18, 20) sts. Rows 2–8: ch 1, turn, sc BLO across to match right shoulder height. Fasten off.
The center 40 (42, 44, 50, 54, 60) sts form the straight neckline edge.
Make the second panel identical (front and back are the same for a symmetrical camisole).
FINISHING
1. Side Seams
Block both panels to size. With RS together, use tapestry needle and mattress stitch (or sl st join) to seam sides from top of waistband to underarm. Ribbing seams should align. Weave in ends.
2. Neckline & Armhole Scalloped Edging
The scallop is a 6-st repeat: sk 2 sts, 5 dc in next st, sk 2 sts, sl st in next st. Wait—verify multiple: each scallop consumes 6 sts (2 + 1 + 2 + 1) and produces one 5-dc fan.
Because both neckline and armhole edges need scallops, first work a foundation round of sc to normalize counts, then scallop.
Scallop math (neckline, M): 44 center sts ÷ 6 = 7.33. Work a sc foundation and adjust to a multiple of 6. Add/subtract via the sc round: on the sc round, evenly work to reach the nearest multiple of 6.
Target multiples of 6 per neckline:
| Size | Neckline sc adjusted to |
|---|---|
| XS | 40 → 42 |
| S | 42 → 42 |
| M | 44 → 42 |
| L | 50 → 48 |
| XL | 54 → 54 |
| XXL | 60 → 60 |
Neckline edging: Rnd 1 (sc): With smaller hook, RS facing, join at a shoulder corner. Sc evenly across the straight neckline, working increases/decreases as needed to reach the target multiple of 6 above. Sl st to join if working around; otherwise work as a row along the front and separately along the back. Rnd 2 (scallop): ch 1. sk 2, 5 dc in next st, sk 2, sl st in next st; rep from * across. Fasten off.
Check (M): 42 sts ÷ 6 = 7 scallops. ✓
Armhole edging (optional scallop or plain): For a clean fit, work 1 round of sc around each armhole (reverse single crochet/crab stitch also works beautifully). Scallops on armholes are optional; keep plain sc for a sleeker look.
3. Thin Shoulder Straps
Straps are thin chained-and-worked cords connecting front and back shoulder ledges.
For each strap (make 2):
- With smaller hook, join yarn to top of a front shoulder ledge (RS).
- Row 1: ch 1, sc BLO in each st across shoulder top. → 12 (13, 14, 16, 18, 20) sts.
- Row 2: ch 1, turn, sc2tog, sc across to last 2, sc2tog. → 10 (11, 12, 14, 16, 18) sts.
- Row 3: rep Row 2. → 8 (9, 10, 12, 14, 16) sts.
- Rows 4+: ch 1, turn, sc BLO across (no more decreases) until strap measures desired length to reach the matching back shoulder (typically 8–10"; try on to confirm).
- Fasten off leaving a long tail.
Attach: Seam strap end to the matching back shoulder ledge using the tail. Adjust length before securing.
Optional adjustable straps: Instead of seaming, sew a small button to the back shoulder and work a ch-loop at the strap end for adjustable/removable straps.
4. Final Steps
Weave in all remaining ends. Wet-block the finished camisole to even out the sc ridges and relax the ribbing.
Customization Tips
- Cropped look: Reduce lower body rows from 58 to ~40 (≈6" torso).
- Longer/tunic: Add rows in Part 2 before armhole shaping (each inch ≈ 6.5 rows).
- More stretch at waist: Add 4 rows to the ribbing height (ch more in foundation, keeping it even).
- Fuller bust: Add 2–3 extra even rows to the front panel only before neckline shaping, and/or use short rows.
- No scallops (ultra-minimal): Replace scallop rounds with a single row of reverse single crochet (crab stitch).
- Wider straps: Skip the decrease Rows 2–3 to keep straps full shoulder width.
- Color: Though written in black, any solid sport-weight cotton works; a subtle heathered gray keeps the minimalist aesthetic.
Enjoy your Midnight Camisole — a clean, fitted staple with just enough texture and a whisper of scalloped detail.
Disclaimer: This pattern was generated by AI and should be reviewed for accuracy before use. While we strive for quality, AI-generated content may contain errors. Please verify measurements, stitch counts, and instructions before beginning your project. Generated by purlJam.uk
Access your pattern anytime
Bookmark this page to access your pattern anytime