Type
Crochet
Difficulty
beginner
Category
blanket
AI Thinking Process
Planning
Verification
Pattern
Nursery Granny Baby Blanket
Skill level: Beginner
Construction: Traditional granny squares, joined, with optional border
Yarn weight: DK
Terminology: UK crochet terms
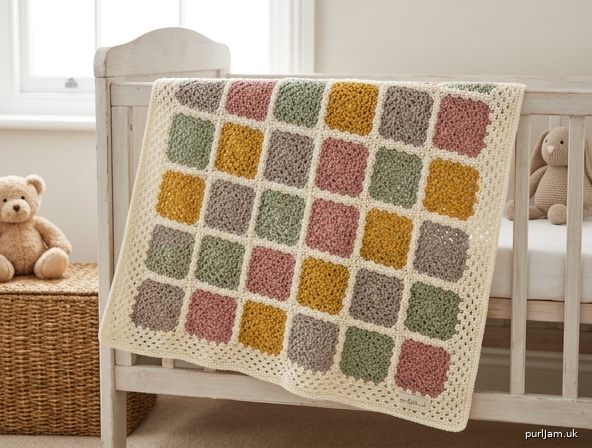
A classic granny-square cot blanket worked in DK yarn. Each square is a solid colour, so you only change yarn when you start a new square. Join with a simple whip stitch, or use join-as-you-go if you prefer to assemble as you crochet. A three-round granny border is included and may be omitted.
Finished size
| Metric | Imperial | |
|---|---|---|
| Each square (blocked) | 12.5 × 12.5 cm | 5 × 5 in |
| Blanket before border (6 × 6 squares) | 75 × 75 cm | 29½ × 29½ in |
| Blanket with border | approx. 82 × 82 cm | 32¼ × 32¼ in |
To change the size, add or remove rounds on every square (each round adds about 2.5 cm / 1 in) or add or remove a row of squares (each row adds 12.5 cm / 5 in).
Materials
Yarn: DK (double knitting), approx. 250–300 m per 100 g. Soft acrylic, cotton, or superwash merino are all suitable for a baby blanket.
| Colour | Use | Amount |
|---|---|---|
| Yarn A | Joining and border | 200 g (approx. 500–600 m) |
| Yarn B | Squares | 100 g (approx. 250–300 m) |
| Yarn C | Squares | 100 g (approx. 250–300 m) |
| Yarn D | Squares | 100 g (approx. 250–300 m) |
| Yarn E | Squares | 100 g (approx. 250–300 m) |
Suggested palette (gender-neutral): A cream or natural; B sage; C mustard; D warm grey; E dusty rose. Pastel lemon, mint, peach and sky also work well.
One-colour version: 500 g (approx. 1,250–1,500 m) of a single DK shade.
Hook: 4 mm (UK 8)
Notions: Yarn needle, scissors, blocking mats and rust-proof pins (recommended). Stitch markers optional.
Tension (gauge)
One 5-round granny square measures 12.5 × 12.5 cm (5 × 5 in) after light blocking, using DK yarn and a 4 mm hook.
Check tension before you begin the blanket. If your square is larger than 12.5 cm, try a 3.5 mm hook. If it is smaller, try a 4.5 mm hook. Matching square size matters more than matching a stitch-per-10 cm figure, because the squares must sit together evenly.
Abbreviations (UK)
| Abbreviation | Meaning |
|---|---|
| ch | chain |
| ch-sp | chain space |
| dc | double crochet (US sc) |
| htr | half treble (US hdc) |
| tr | treble (US dc) |
| sl st | slip stitch |
| st(s) | stitch(es) |
| sp(s) | space(s) |
| rnd | round |
| RS | right side |
| WS | wrong side |
| beg | beginning |
| rep | repeat |
UK/US stitch note: This pattern uses UK names throughout. UK dc = US sc; UK htr = US hdc; UK tr = US dc.
Pattern notes
- The blanket is worked in UK terms.
- Each square is worked in joined rounds with the RS always facing. Do not turn at the end of a round.
- Beg ch-3 counts as 1 tr at the start of every round.
- Corner spaces are ch-2. Side spaces between 3-tr groups are ch-1.
- Join every round with a sl st in the top of the beg ch-3, unless a joining method says otherwise.
- Fasten off at the end of each square and weave in ends as you go — 36 squares produce a lot of tails if left until last.
- For a baby item, weave each tail through several stitches in different directions so it cannot work loose.
- Do not add buttons, beads, or other detachable trims.
- Magic ring may replace the starting ch-4 ring if you prefer a tighter centre. Pull the ring closed after Round 1.
Granny square
Make 36 squares: 9 in Yarn B, 9 in Yarn C, 9 in Yarn D, 9 in Yarn E.
(If you are using join-as-you-go, work Rounds 1–4 on all squares first, then work Round 5 as the joining round — see Joining Method 2.)
Foundation: With square colour, ch 4, sl st in first ch to form a ring.
Round 1: Ch 3 (counts as 1 tr here and throughout), 2 tr in ring, ch 2, [3 tr in ring, ch 2] 3 times, sl st in top of beg ch-3.
(4 groups of 3 tr, 4 ch-2 corners = 12 tr ✓)
Round 2: Sl st in next 2 tr and into the first ch-2 sp, ch 3, (2 tr, ch 2, 3 tr) in same sp (first corner made), ch 1, *(3 tr, ch 2, 3 tr) in next ch-2 sp, ch 1; rep from * twice more, sl st in top of beg ch-3.
(8 groups of 3 tr = 24 tr ✓; 4 ch-1 sps)
Round 3: Sl st in next 2 tr and into the first corner ch-2 sp, ch 3, (2 tr, ch 2, 3 tr) in same sp, ch 1, 3 tr in next ch-1 sp, ch 1, *(3 tr, ch 2, 3 tr) in next corner ch-2 sp, ch 1, 3 tr in next ch-1 sp, ch 1; rep from * twice more, sl st in top of beg ch-3.
(12 groups of 3 tr = 36 tr ✓; 1 side group on each side)
Round 4: Sl st in next 2 tr and into the first corner ch-2 sp, ch 3, (2 tr, ch 2, 3 tr) in same sp, ch 1, [3 tr in next ch-1 sp, ch 1] twice, *(3 tr, ch 2, 3 tr) in next corner ch-2 sp, ch 1, [3 tr in next ch-1 sp, ch 1] twice; rep from * twice more, sl st in top of beg ch-3.
(16 groups of 3 tr = 48 tr ✓; 2 side groups on each side)
Round 5: Sl st in next 2 tr and into the first corner ch-2 sp, ch 3, (2 tr, ch 2, 3 tr) in same sp, ch 1, [3 tr in next ch-1 sp, ch 1] 3 times, *(3 tr, ch 2, 3 tr) in next corner ch-2 sp, ch 1, [3 tr in next ch-1 sp, ch 1] 3 times; rep from * twice more, sl st in top of beg ch-3.
(20 groups of 3 tr = 60 tr ✓; 3 side groups on each side)
Fasten off, leaving a 10 cm tail. Weave in both tails on the WS.
Check: After Round 5 you should have, on each side, two corner 3-tr groups with three 3-tr groups between them, separated by ch-1 sps.
Blocking the squares
Pin each square to 12.5 × 12.5 cm, spray lightly with water (or steam without resting the iron on acrylic), and leave to dry. Even squares make joining much easier. If you are using join-as-you-go, block the finished blanket instead of the individual squares.
Colour layout
Arrange the 36 blocked squares in a 6 × 6 grid on a flat surface, mixing Yarns B–E so the same colour does not sit side-by-side too often. A simple approach is to place the four colours in a repeating sequence that shifts by one square on each new row.
Photograph or sketch the layout before you join, so you can put any square back in its place.
Row 6:  B  C  D  E  B  C
Row 5:  D  E  B  C  D  E
Row 4:  B  C  D  E  B  C
Row 3:  D  E  B  C  D  E
Row 2:  B  C  D  E  B  C
Row 1:  D  E  B  C  D  E
         ↑ starting corner (bottom right or as you prefer)
This is only a suggestion — scatter the colours freely if you prefer a more random granny look.
Joining
Use one of the following methods. Whip stitch is the most straightforward for a first blanket. Join-as-you-go avoids a separate seaming stage.
Method 1 — Whip stitch (recommended for beginners)
You will join with Yarn A and a yarn needle, working on the WS.
- Block all 36 squares to 12.5 cm and lay them out in your 6 × 6 arrangement.
- Join horizontal rows first. Take two neighbouring squares from Row 1, hold them RS together so the edges to be joined line up (cluster opposite cluster, corner opposite corner).
- Thread Yarn A. Starting at one corner ch-2, whip stitch through both loops of each corresponding stitch and chain along the edge, keeping the tension firm but not tight — the seam should lie flat, not pucker.
- Fasten off and weave in the joining tail.
- Continue until all six squares of Row 1 are joined in a strip. Repeat for Rows 2–6 (six strips of six squares).
- Join the strips to each other in the same way, matching seams so the vertical joins line up. Work each long seam from one edge of the blanket to the other.
Tip: Count as you sew — each square edge has two corner 3-tr groups and three side 3-tr groups. Matching group to group keeps the grid straight.
Method 2 — Join-as-you-go (JAYG)
Work Rounds 1–4 of every square as written and fasten off. You will join on Round 5.
First square: Work Round 5 in the square colour exactly as written. Fasten off. This is the bottom-right square of your layout (or whichever corner you start from).
Squares that join along one side only (the rest of the first row, and the first square of each new row):
Work Round 5 in the square colour until you reach the side that must join to a finished square. On that joining side, replace the usual chains as follows:
- Between 3-tr groups (normally ch 1): ch 1, sl st in the corresponding ch-1 sp of the adjacent square, ch 1.
(Alternatively, work a single sl st into that ch-1 sp instead of ch 1 — both are correct; stay consistent.) - At a corner that meets the adjacent square (normally ch 2): 3 tr in the corner sp, ch 1, sl st in the adjacent square’s corner ch-2 sp, ch 1, 3 tr in the same corner sp of the square you are working.
Complete any remaining unjoined sides of Round 5 as normal (ch 1 between groups, ch 2 at free corners). Fasten off.
Squares that join along two sides (all interior squares of Rows 2–6):
Work Round 5, joining the first side as above. At the shared corner where two already-joined squares meet, work: 3 tr in the corner sp, ch 1, sl st in the corner join of the two adjacent squares, ch 1, 3 tr in the same corner sp. Then join the second side in the same way as a single-side join. Finish any free sides as normal.
Work across each row from right to left (or left to right — stay consistent), completing one row before starting the next, so you always have a finished edge to join into.
Border (optional)
The border is worked in Yarn A, RS facing, around the assembled blanket. If you omit the border, weave in remaining ends and go to Finishing.
Join Yarn A with a sl st in any blanket-corner ch-2 sp.
Border Round 1: Ch 3, (2 tr, ch 2, 3 tr) in the same corner sp, ch 1.
Working along the side: *3 tr in the next ch-1 sp, ch 1; rep from * to the next blanket corner, working 3 tr, ch 1 into the join between two squares (treat the two meeting corner spaces as one place to put a 3-tr group so the granny pattern stays continuous).
At each blanket corner: (3 tr, ch 2, 3 tr) in the corner sp, ch 1.
Continue in this way around all four sides. Sl st in top of beg ch-3.
Border Round 2: Sl st to the first corner ch-2 sp, ch 3, (2 tr, ch 2, 3 tr) in same sp, ch 1, *3 tr in next ch-1 sp, ch 1; rep from * to next corner, (3 tr, ch 2, 3 tr) in corner ch-2 sp, ch 1; continue around. Sl st in top of beg ch-3.
(Standard granny round: 3-tr group in every ch-1 sp, (3 tr, ch 2, 3 tr) in every corner ✓)
Border Round 3: Repeat Border Round 2.
Fasten off.
Neater edge (optional extra round): Join Yarn A in any st, ch 1 (does not count as a st), dc in each tr around, working 1 dc in each ch-1 sp and 3 dc in each corner ch-2 sp. Sl st in first dc. Fasten off.
Finishing
- Weave in every remaining end on the WS, taking each tail through at least 4–5 stitches in one direction, then back through 2–3 stitches the other way. Tug the fabric gently; the tail should not slip.
- Block the finished blanket to 82 × 82 cm (32¼ × 32¼ in), or to 75 × 75 cm if you omitted the border. Pin the edges straight, paying attention to the four corners so they stay square. Spray or steam as appropriate for your fibre and leave to dry fully.
- Check once more for loose ends before gifting or using.
Care
Follow the ball-band for your yarn. Most acrylic DK baby blankets are machine-washable on a gentle cycle at 30 °C and can be tumble-dried on low. Wool or wool-blend versions should be washed by hand in cool water and dried flat. Do not iron acrylic at heat; a light hover-steam is enough to refresh the fabric.
Quick reference — square maths
| Round | 3-tr groups | Treble stitches | Side groups (between corners) |
|---|---|---|---|
| 1 | 4 | 12 | 0 |
| 2 | 8 | 24 | 0 |
| 3 | 12 | 36 | 1 |
| 4 | 16 | 48 | 2 |
| 5 | 20 | 60 | 3 |
Each round adds one 3-tr group to every side (4 extra groups = 12 extra tr per round ✓).
End of pattern.
Disclaimer: This pattern was generated by AI and should be reviewed for accuracy before use. While we strive for quality, AI-generated content may contain errors. Please verify measurements, stitch counts, charts, and instructions before beginning your project. Generated by purlJam.uk
Love this pattern?
Save this pattern to your free PurlJam libraryAccess your pattern anytime
Bookmark this page to access your pattern anytime