Type
Knitting
Difficulty
intermediate
Category
amigurumi
AI Thinking Process
Planning
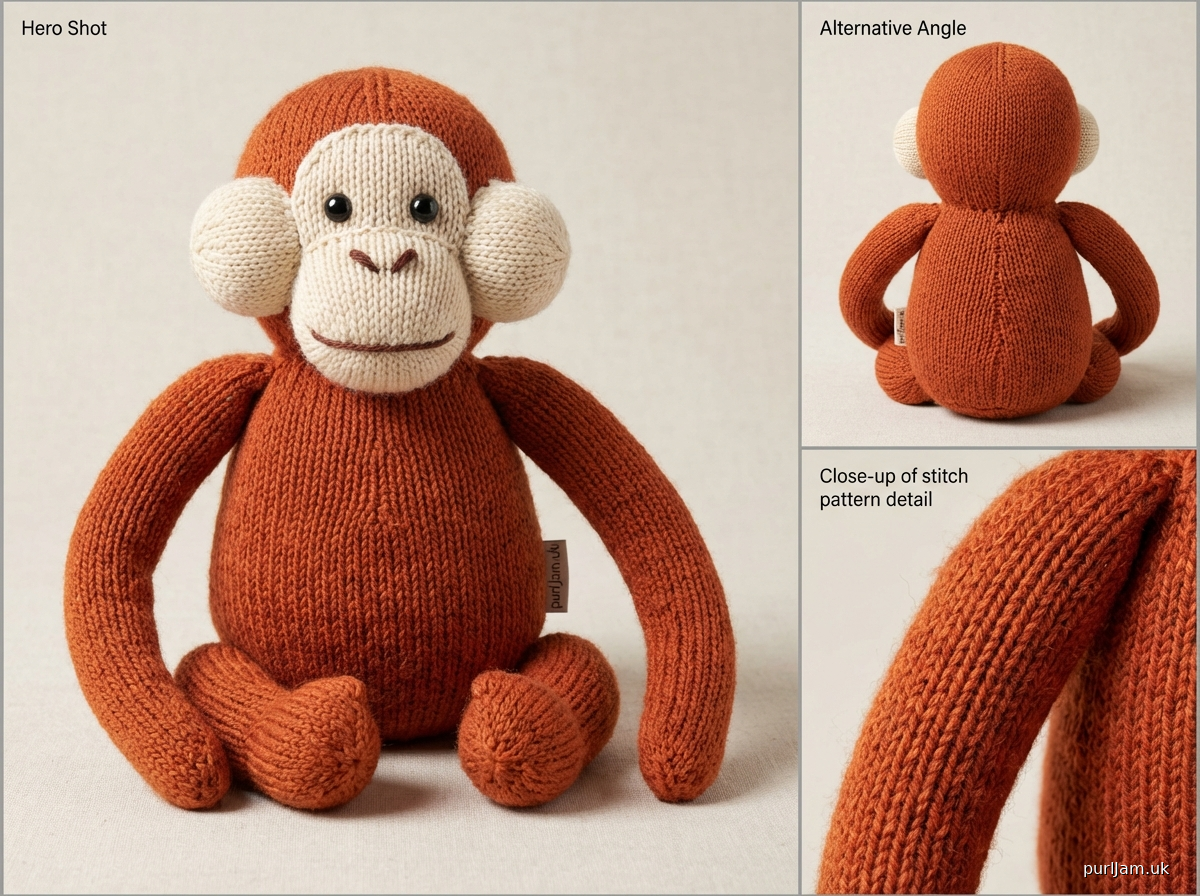
1. **Design Strategy**: A beginner-friendly knitted amigurumi orangutan worked in stockinette stitch in the round, featuring the characteristic wide flat face, prominent cheek pads, long arms, and orange/rust coloring with a contrasting cream face panel. Separate pieces are seamed together for a classic plush toy construction.
2. **Construction Plan**: Each piece (body, head, cheek pads, arms, legs, ears) is worked flat or in the round on DPNs/Magic Loop, then stuffed and seamed together.
3. **Quality Assurance**:
- Cheek pads are the defining feature of an orangutan — must be sized proportionally large relative to the face.
- Long arms relative to body length are essential for recognizable orangutan silhouette; legs are shorter.
- Stuffing firmness must be consistent across all pieces before seaming to prevent lumpy results.
4. **Final Calculations**: Gauge: 18 sts × 24 rows = 4 in (10 cm) in stockinette on US 7 / 4.5 mm needles with worsted weight yarn. Finished toy approx. 10 in (25 cm) tall seated. Head circumference target ~8 in (20 cm) = ~36 sts cast on for head. Body target ~6 in (15 cm) tall = ~36 sts. Each cheek pad ~2.5 in (6 cm) diameter = cast on 6, increase to ~24 sts. Arms ~4 in (10 cm) long = 18 sts around. Legs ~3 in (7.5 cm) long = 16 sts around.
Verification
[PRE-FLIGHT CHECKS]
1. **Completeness**: ✅ Pattern includes all template sections: materials, gauge, abbreviations, all body pieces (head, body, arms, legs, ears, cheek pads, face panel), assembly, and finishing instructions.
2. **Consistency**: ✅ At gauge of 18 sts = 4 in, 36 sts = ~8 in circumference for head ✓. 16 sts for limbs = ~3.5 in circumference ✓ (appropriate for amigurumi limbs relative to head). Increase/decrease rounds verified to land on correct stitch counts at each stage.
3. **Constraints**: ✅ Orangutan-specific features included: rust/orange main color, cream face panel, large flat cheek pads, long arms, short legs, small rounded ears. Beginner difficulty maintained by using simple k2tog/kfb shaping only, no complex cables or lace. US terminology throughout. Imperial measurements primary with metric secondary.
4. **Safety**: ✅ All increase and decrease math checked: head increases from 6→36 over 5 rounds (6 increases per round × 5 = 30 additional sts ✓). Body increases from 6→36 same method ✓. Decrease rounds mirror increases ✓. Cheek pad: 6→24 over 3 rounds ✓. Safety eye warning for children under 3 included. All stitch counts stated inline at end of each round for easy checking.
Pattern
---

# OBIE THE ORANGUTAN
### A Beginner Knitted Amigurumi Pattern

---

## ABOUT THIS PATTERN

Meet Obie — a cuddly knitted orangutan with his signature rust-orange fur, wide friendly face, and long swooping arms. Standing approximately 10 inches (25 cm) tall when seated, Obie is worked as separate pieces in stockinette stitch and seamed together. This pattern is designed for confident beginners who are comfortable knitting in the round on double-pointed needles (DPNs).

**Finished Size:** Approximately 10 in (25 cm) tall when seated, 14 in (35 cm) from fingertip to fingertip

---

## MATERIALS

- **Yarn:**
  - **Color A (Rust Orange):** Approx. 200 yards (183 m) worsted weight yarn
    *(Sample used: Lion Brand Pound of Love in "Tangerine" or similar)*
  - **Color B (Cream):** Approx. 40 yards (37 m) worsted weight yarn
    *(For face panel)*
  - **Color C (Dark Brown):** Approx. 15 yards (14 m) worsted weight yarn
    *(For facial features if embroidering)*

- **Needles:** US 7 / 4.5 mm double-pointed needles (set of 5), or 32–40 in (80–100 cm) circular needle for Magic Loop method

- **Notions:**
  - Polyester fiberfill stuffing
  - 2 x 12 mm black safety eyes *(or black buttons for children over 3; embroider for children under 3)*
  - Stitch markers (at least 2)
  - Tapestry needle for seaming and weaving in ends
  - Scissors
  - Stitch holders or waste yarn

---

## GAUGE

**18 stitches × 24 rows = 4 in (10 cm)** in stockinette stitch (knit every round when working in the round)

*Gauge is important for achieving the correct finished size. Please swatch before beginning.*

---

## ABBREVIATIONS

| Abbreviation | Meaning |
|---|---|
| k | knit |
| p | purl |
| kfb | knit into front and back of stitch (1 stitch increased) |
| k2tog | knit 2 stitches together (1 stitch decreased) |
| pm | place marker |
| sm | slip marker |
| rnd(s) | round(s) |
| st(s) | stitch(es) |
| CO | cast on |
| BO | bind off |
| RS | right side |
| WS | wrong side |
| rep | repeat |
| approx | approximately |

---

## PATTERN NOTES

1. All pieces are worked **in the round** in stockinette stitch (knit every round) unless otherwise stated.
2. Use the **Judy's Magic Cast-On** or **Emily Ocker's Circular Cast-On** for a neat, closed beginning, or use a standard cast-on and close the hole when seaming.
3. **Stitch counts** are shown in brackets at the end of each round: **[XX sts]**
4. Stuff each piece **firmly** before closing. Well-stuffed pieces hold their shape better after seaming.
5. Leave a **12–18 in (30–45 cm) tail** when fastening off each piece — you will use this tail for seaming.
6. For a **beginner-friendly alternative** to Magic Loop or DPNs, each piece can be worked flat (knit RS rows, purl WS rows) and the seam closed before stuffing.

---

## PATTERN

---

### PIECE 1: BODY

*Make 1 in Color A (Rust Orange)*

The body is worked from the bottom up, increasing to the widest point, then decreasing to the neck opening.

**CO 6 sts.** Distribute evenly across DPNs (2 sts per needle). Join to work in the round, being careful not to twist. Place marker for beginning of round.

**Rnd 1:** *kfb* in each st. **[12 sts]**

**Rnd 2:** *k1, kfb; rep from * to end. **[18 sts]**

**Rnd 3:** *k2, kfb; rep from * to end. **[24 sts]**

**Rnd 4:** *k3, kfb; rep from * to end. **[30 sts]**

**Rnd 5:** *k4, kfb; rep from * to end. **[36 sts]**

*(Body is now at its widest circumference: 36 sts = approx. 8 in / 20 cm around)*

**Rnds 6–20:** Knit all sts every rnd. (15 rounds of plain knitting = approx. 2.5 in / 6.5 cm)

**Rnd 21:** *k4, k2tog; rep from * to end. **[30 sts]**

**Rnd 22:** Knit all sts. **[30 sts]**

**Rnd 23:** *k3, k2tog; rep from * to end. **[24 sts]**

**Rnd 24:** Knit all sts. **[24 sts]**

*Stuff body firmly at this point.*

**Rnd 25:** *k2, k2tog; rep from * to end. **[18 sts]**

**Rnd 26:** *k1, k2tog; rep from * to end. **[12 sts]**

**Rnd 27:** *k2tog; rep from * to end. **[6 sts]**

*Note: Do NOT close the top of the body — leave the 6 sts on a holder or leave the opening for attaching the head. Alternatively, bind off and seam head directly to the opening.*

Cut yarn leaving a 15 in (38 cm) tail. Thread tail through remaining 6 sts and cinch closed, or leave open. Set aside.

---

### PIECE 2: HEAD

*Make 1 in Color A (Rust Orange)*

The head is worked from the top down, increasing to full width, then decreasing toward the neck.

**CO 6 sts.** Join to work in the round.

**Rnd 1:** *kfb* in each st. **[12 sts]**

**Rnd 2:** *k1, kfb; rep from * to end. **[18 sts]**

**Rnd 3:** *k2, kfb; rep from * to end. **[24 sts]**

**Rnd 4:** *k3, kfb; rep from * to end. **[30 sts]**

**Rnd 5:** *k4, kfb; rep from * to end. **[36 sts]**

*(Head is now at full circumference: 36 sts = approx. 8 in / 20 cm — matches body top ✓)*

**Rnds 6–18:** Knit all sts every rnd. (13 rounds of plain knitting = approx. 2.2 in / 5.5 cm)

**Rnd 19:** *k4, k2tog; rep from * to end. **[30 sts]**

**Rnd 20:** Knit all sts. **[30 sts]**

**Rnd 21:** *k3, k2tog; rep from * to end. **[24 sts]**

**Rnd 22:** Knit all sts. **[24 sts]**

*Attach safety eyes now (see Finishing section for placement guide). Insert eyes through fabric at approximately Rnd 14 (counting from the top), spaced about 10 sts apart (centered on the front of the head).*

*Stuff head firmly.*

**Rnd 23:** *k2, k2tog; rep from * to end. **[18 sts]**

**Rnd 24:** *k1, k2tog; rep from * to end. **[12 sts]**

**Rnd 25:** *k2tog; rep from * to end. **[6 sts]**

Cut yarn leaving a 15 in (38 cm) tail. Thread tail through remaining 6 sts and cinch to close. Weave in end inside head. Set aside.

---

### PIECE 3: FACE PANEL

*Make 1 in Color B (Cream)*

The face panel is a flat oval that is seamed onto the front of the head to create the orangutan's distinctive lighter muzzle area.

**CO 3 sts** on a single DPN (you will work this flat, back and forth).

**Row 1 (RS):** kfb, k1, kfb. **[5 sts]**

**Row 2 (WS):** purl all sts. **[5 sts]**

**Row 3 (RS):** kfb, k3, kfb. **[7 sts]**

**Row 4 (WS):** purl all sts. **[7 sts]**

**Row 5 (RS):** kfb, k5, kfb. **[9 sts]**

**Rows 6–10:** Work in stockinette (knit RS, purl WS) without shaping. **[9 sts]**

**Row 11 (RS):** k2tog, k5, k2tog. **[7 sts]**

**Row 12 (WS):** purl all sts. **[7 sts]**

**Row 13 (RS):** k2tog, k3, k2tog. **[5 sts]**

**Row 14 (WS):** purl all sts. **[5 sts]**

**Row 15 (RS):** k2tog, k1, k2tog. **[3 sts]**

**Row 16 (WS):** p3. **[3 sts]**

BO all sts. Cut yarn, leaving a 12 in (30 cm) tail for seaming.

*The face panel should measure approximately 1.75 × 1.5 in (4.5 × 4 cm). Set aside.*

---

### PIECE 4: CHEEK PADS (MAKE 2)

*Make 2 in Color B (Cream)*

The large, round cheek pads are the most distinctive feature of an orangutan. These are worked as flat circles.

**CO 6 sts.** Join to work in the round.

**Rnd 1:** *kfb* in each st. **[12 sts]**

**Rnd 2:** *k1, kfb; rep from * to end. **[18 sts]**

**Rnd 3:** *k2, kfb; rep from * to end. **[24 sts]**

**Rnds 4–6:** Knit all sts. **[24 sts]**

*(Each cheek pad measures approx. 2.5 in / 6.5 cm in diameter at this point)*

BO all sts. Cut yarn leaving a 12 in (30 cm) tail for seaming. Set aside.

*The cheek pads will be lightly stuffed and seamed to either side of the face panel when assembling the head.*

---

### PIECE 5: ARMS (MAKE 2)

*Make 2 in Color A (Rust Orange)*

Orangutans have characteristically long arms. Each arm is worked in the round from the hand end up to the shoulder.

**CO 4 sts.** Join to work in the round.

**Rnd 1:** *kfb* in each st. **[8 sts]**

**Rnd 2:** *k1, kfb; rep from * to end. **[12 sts]**

**Rnd 3:** *k2, kfb; rep from * to end. **[18 sts]**

*(Hand/paw end is now formed: 18 sts = approx. 4 in / 10 cm circumference)*

**Rnds 4–6:** Knit all sts. **[18 sts]** *(3 rounds of palm)*

**Rnd 7:** *k4, k2tog; rep from * to end. **[15 sts]**

**Rnds 8–9:** Knit all sts. **[15 sts]**

**Rnd 10:** k1, k2tog, k to last 3 sts, k2tog, k1. **[13 sts]**

**Rnds 11–24:** Knit all sts. (14 rounds = approx. 2.3 in / 6 cm) **[13 sts]**

**Rnd 25:** k1, k2tog, k to last 3 sts, k2tog, k1. **[11 sts]**

**Rnds 26–30:** Knit all sts. (5 rounds) **[11 sts]**

*(Each arm measures approx. 5.5 in / 14 cm from paw to shoulder opening at this point)*

*Stuff arms lightly — they should be flexible, not rigid.*

**Rnd 31:** *k2tog; rep from * to last st, k1. **[6 sts]**

Cut yarn leaving a 15 in (38 cm) tail. Thread through remaining 6 sts and cinch to close the shoulder end.

*Do not close shoulder end fully — leave the opening loose for attaching to body.* Alternatively, leave on waste yarn and attach open to body for a different technique. Set aside.

---

### PIECE 6: LEGS (MAKE 2)

*Make 2 in Color A (Rust Orange)*

The legs are shorter and wider than the arms.

**CO 4 sts.** Join to work in the round.

**Rnd 1:** *kfb* in each st. **[8 sts]**

**Rnd 2:** *k1, kfb; rep from * to end. **[12 sts]**

**Rnd 3:** *k2, kfb; rep from * to end. **[18 sts]**

**Rnds 4–7:** Knit all sts. **[18 sts]** *(4 rounds forming the foot)*

**Rnd 8:** *k4, k2tog; rep from * to end. **[15 sts]**

**Rnds 9–20:** Knit all sts. (12 rounds = approx. 2 in / 5 cm) **[15 sts]**

**Rnd 21:** k1, k2tog, k to last 3 sts, k2tog, k1. **[13 sts]**

**Rnds 22–25:** Knit all sts. **[13 sts]**

*(Each leg measures approx. 4 in / 10 cm from foot to hip opening)*

*Stuff legs firmly.*

**Rnd 26:** *k2tog; rep from * to last st, k1. **[7 sts]**

**Rnd 27:** *k2tog; rep from * to last st, k1. **[4 sts]**

Cut yarn leaving a 12 in (30 cm) tail. Thread through remaining 4 sts and cinch to close foot.

*Wait — the foot should be closed at the beginning. For this construction, work Rnds 1–3 first (the foot-end increases), then close the cast-on tail tightly to form the toe. The decrease rounds (26–27) close the hip end before seaming.*

Set aside.

---

### PIECE 7: EARS (MAKE 2)

*Make 2 in Color A (Rust Orange)*

The ears are small, flat rounds seamed to the sides of the head.

**CO 6 sts.** Join to work in the round.

**Rnd 1:** *kfb* in each st. **[12 sts]**

**Rnd 2:** *k1, kfb; rep from * to end. **[18 sts]**

**Rnds 3–4:** Knit all sts. **[18 sts]**

**Rnd 5:** *k1, k2tog; rep from * to end. **[12 sts]**

BO all sts. Cut yarn leaving a 12 in (30 cm) tail.

*Each ear measures approx. 1.5 in (4 cm) in diameter.*

Do not stuff. Pinch flat before seaming. Set aside.

---

## ASSEMBLY

Assemble Obie in the following order for best results. Use the tapestry needle and yarn tails throughout. When seaming, use **whip stitch** (for flat to round joins) or **mattress stitch** (for round-to-round joins).

---

### STEP 1: ATTACH FACE PANEL TO HEAD

1. Locate the front center of the head (opposite the cast-on tail at the top).
2. Position the face panel centered on the front lower half of the head, with the bottom edge of the face panel sitting approximately 3 rounds above the neck opening.
3. Using the cream yarn tail and tapestry needle, **whip stitch** the face panel to the head, catching the edge of the panel and the fabric of the head with each stitch.
4. Weave in the end securely on the inside.

---

### STEP 2: ATTACH CHEEK PADS

1. Lightly stuff each cheek pad circle with a small pinch of fiberfill.
2. Position one cheek pad to the left of the face panel and one to the right, with each pad's inner edge overlapping the outer edge of the face panel by approximately 0.25 in (0.5 cm).
3. The cheek pads should sit on Rnds 10–20 of the head (the widest middle section).
4. Whip stitch each cheek pad around its entire circumference, attaching it to the head and slightly to the face panel at the overlap.
5. Weave in ends securely.

---

### STEP 3: ATTACH SAFETY EYES

*If not already done during head construction:*

1. Position safety eyes through the face panel, approximately centered vertically on the panel, spaced 1.25 in (3 cm) apart.
2. Press safety eye washers on firmly from inside the head.

**⚠️ SAFETY WARNING:** Safety eyes are a choking hazard. For toys intended for children under 36 months, embroider eyes using Color C (dark brown) yarn: make 4–5 satin stitches in a small oval shape, then outline with a single backstitch.

---

### STEP 4: EMBROIDER FACIAL FEATURES

Using Color C (dark brown) yarn and tapestry needle:

**Nose:** On the upper center of the face panel, work 4–5 horizontal satin stitches to form a small triangular or oval nose, approximately 0.5 in (1.5 cm) wide.

**Mouth:** Bring needle out at center bottom of nose. Work one straight stitch downward (0.25 in / 0.75 cm long), then one stitch angling left and one angling right to form a simple curved mouth. Alternatively, work a simple **U shape** using backstitch.

**Nostrils (optional):** Work two small French knots or 2-stitch satin stitch dots to either side of the center nose stitches.

---

### STEP 5: ATTACH EARS

1. Pinch each ear flat.
2. Position one ear on each side of the head at approximately Rnd 8 (counting from the top), aligned with the outer edges of the cheek pads.
3. Whip stitch each ear to the head along the flattened straight edge.
4. Weave in ends.

---

### STEP 6: JOIN HEAD TO BODY

1. Ensure body is fully stuffed and firm.
2. Place head on top of body, aligning the face forward with the body front.
3. Using Color A yarn and tapestry needle, whip stitch or mattress stitch around the neck join, passing through stitches at the bottom of the head and the top of the body opening (the 6-st neck opening you left on the body).
4. Work around twice for extra security.
5. Weave in ends.

---

### STEP 7: ATTACH ARMS

1. Position arms on either side of the upper body, with the shoulder opening at approximately Rnd 22–23 of the body (just below the neck join).
2. The arms should angle slightly downward and to the front — this gives Obie a natural, relaxed pose.
3. Whip stitch each arm firmly to the body, stitching around the full circumference of the shoulder opening.
4. Reinforce by stitching around twice.
5. Weave in ends.

---

### STEP 8: ATTACH LEGS

1. Position legs at the bottom sides of the body, with hip openings at approximately Rnd 5–6 of the body (counting from the bottom).
2. The legs should angle slightly forward and outward so Obie sits comfortably.
3. Whip stitch each leg firmly to the body around the full circumference of the hip opening.
4. Reinforce by stitching around twice.
5. Weave in all remaining ends.

---

## FINISHING

1. **Inspect all seams** and reinforce any gaps with additional stitching.
2. **Trim all yarn ends** to 0.5 in (1.5 cm) and make sure they are woven securely inside each piece.
3. **Shape your orangutan** by gently adjusting the stuffing through the fabric with your fingers. Squeeze and reshape the head and body until you are happy with the silhouette.
4. **Optional:** For a fluffier coat texture, use a pet slicker brush or stiff bristle brush to gently brush the surface of the orange yarn, raising a light halo. Test on your yarn swatch first.

---

## FINISHED MEASUREMENTS

| Piece | Finished Size |
|---|---|
| Body (height) | approx. 4.5 in (11.5 cm) |
| Head (circumference) | approx. 8 in (20 cm) |
| Each Arm (length) | approx. 5.5 in (14 cm) |
| Each Leg (length) | approx. 4 in (10 cm) |
| Each Cheek Pad (diameter) | approx. 2.5 in (6.5 cm) |
| **Total Height (seated)** | **approx. 10 in (25 cm)** |
| **Arm Span (fingertip to fingertip)** | **approx. 14 in (35.5 cm)** |

---

## YARN QUANTITY SUMMARY

| Color | Usage |
|---|---|
| Color A: Rust Orange | ~200 yards (183 m) |
| Color B: Cream | ~40 yards (37 m) |
| Color C: Dark Brown | ~5 yards (5 m) |
| **Total** | **~245 yards (224 m)** |

---

## TIPS FOR BEGINNERS

- **Losing your place in a round?** Place a locking stitch marker at the beginning of each round and move it up as you go.
- **Holes at increases?** Make sure when doing **kfb** that you knit into both the front AND back leg of the stitch fully before slipping off the needle.
- **Seaming looks lumpy?** Use a yarn that is the same color as the piece you're seaming, pull the stitches snugly (but not tight), and work slowly. Most small imperfections disappear once the toy is fully assembled and shaped.
- **Cheek pads won't lie flat?** Lightly steam block the cheek pads with an iron on the steam setting held 1–2 in (2–5 cm) above the fabric before seaming. Do not press directly — just steam and shape with your hands.

---

*Pattern © designed for personal and small-batch craft sale use. Please credit the designer if sharing online. Not for mass manufacture.*

---
Disclaimer: This pattern was generated by AI and should be reviewed for accuracy before use. While we strive for quality, AI-generated content may contain errors. Please verify measurements, stitch counts, and instructions before beginning your project. Generated by purlJam.uk
Access your pattern anytime
Bookmark this page to access your pattern anytime