Type
Crochet
Difficulty
beginner
Category
pullover
AI Thinking Process
Planning
1. **Design Strategy**:
- User wants an off-shoulder sweater with a relaxed, slightly slouchy fit
- They've already started knitting with 8mm needles (US 11) and thin yarn (sport weight) which creates a very loose, drapey fabric perfect for off-shoulder styling
- The combination of oversized needles + thin yarn = loose gauge, ideal for the slouchy aesthetic
- Boatneck is PERFECT for off-shoulder wear - wide neckline naturally sits off shoulders
- User has worked 2" ribbing + "a couple inches" of garter stitch already
- Need to incorporate their existing work into the pattern as the foundation
2. **Construction Plan**:
- Drop shoulder construction (per template) - easiest for beginner
- Work back and front as rectangles with existing foundation already started
- Wide boatneck opening (no shaping needed)
- Oversized/boxy fit with extended width for off-shoulder drape
- Sleeves picked up and worked down in the round (or flat, then seamed)
- The loose gauge from 8mm needles + sport yarn will create the slouchy drape needed
3. **Quality Assurance**:
- CRITICAL: Must establish gauge with user's actual needle/yarn combo (8mm + sport weight is unconventional)
- Need to account for work already completed (~4" total: 2" rib + 2" garter)
- Garter stitch will be main body fabric (user preference, already established)
- Ensure boatneck is wide enough to sit off shoulders comfortably
- Address potential issue: sport weight + 8mm needles = very open fabric, may need notes about wearing with layers
4. **Final Calculations**:
- With 8mm needles and sport weight, expect approximately 2.5-3 sts per inch in garter
- For off-shoulder effect: aim for 48-52" bust circumference (very oversized)
- Body length: 20-24" for standard length (adjust for cropped if user wants more dramatic off-shoulder)
- Boatneck opening: 18-20" wide, 3-4" deep
- Already worked: ~4 inches, so remaining body = 16-20" more
Verification
[PRE-FLIGHT CHECKS]
1. **Completeness**:
- ✓ Will include: Materials, Gauge, Sizes, Measurements chart, Pattern Notes, Back instructions, Front instructions, Finishing (shoulders, neckline), Sleeve instructions
- ✓ Must acknowledge work already in progress
2. **Consistency**:
- ✓ Gauge calculation: 8mm needles + sport weight = approx 2.75 sts/inch in garter (will instruct user to measure their actual work)
- ✓ For 48" width at 2.75 st/inch = 132 sts cast on
- ✓ Body length calculations account for 4" already worked
3. **Constraints**:
- ✓ User specifically has: sport weight yarn, 8mm circular needles
- ✓ User already started: 2" rib, then garter stitch
- ✓ User wants: off-shoulder capability (boatneck solves this)
- ✓ Beginner level: keep instructions simple, minimal shaping
4. **Safety**:
- ⚠️ CRITICAL: Must have user verify their own gauge since they've already started
- ✓ Math check: If 132 sts ÷ 2.75 = 48" ✓
- ✓ Shoulder seam placement: leave 18" center open for neck = (18 × 2.75 = 49.5 sts, round to 50)
- ✓ Each shoulder: (132 - 50) ÷ 2 = 41 sts per shoulder ✓
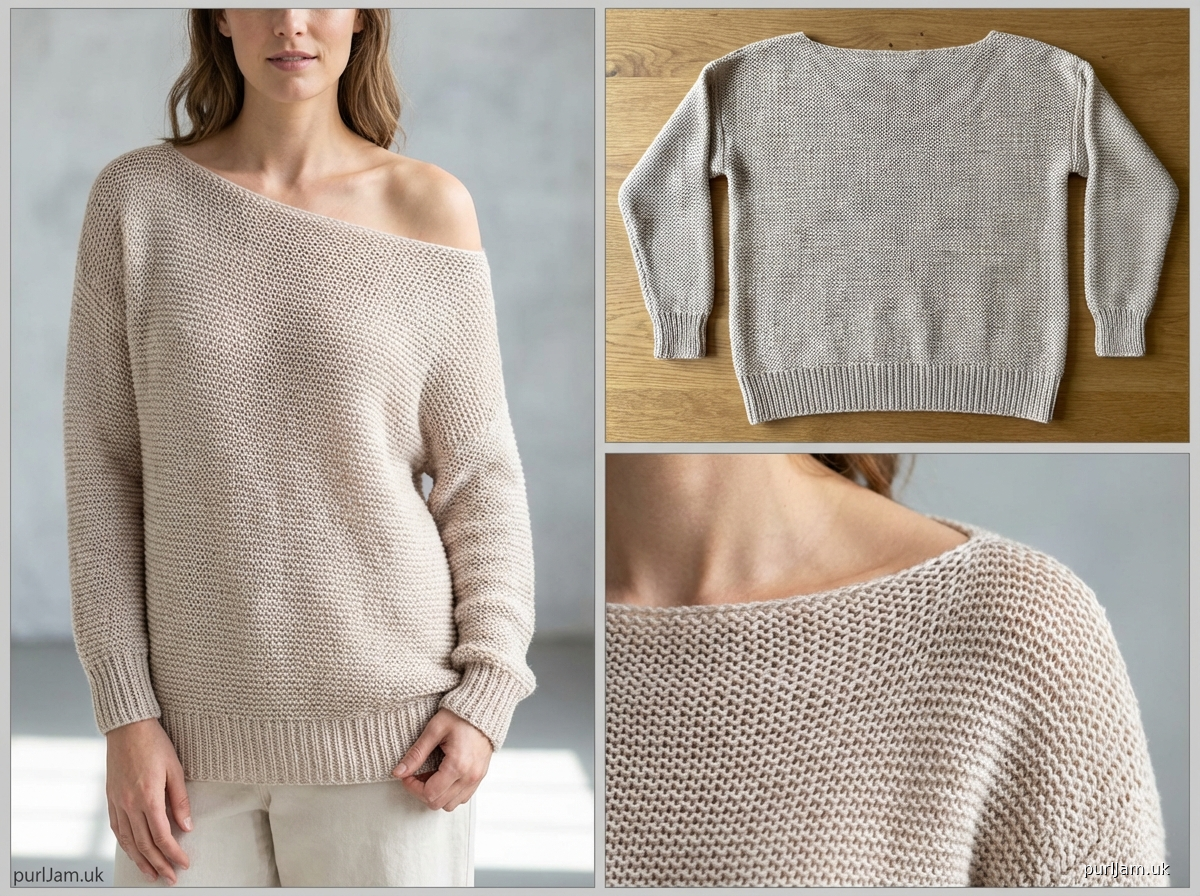
Pattern
<pattern>

# OFF-SHOULDER SLOUCHY PULLOVER

**A relaxed, oversized drop-shoulder sweater with wide boatneck designed to drape off the shoulders**

---

## PATTERN INFORMATION

**Designer:** Custom Pattern
**Difficulty Level:** Beginner
**Construction:** Drop shoulder, worked flat in pieces, seamed

---

## SIZES

One size (designed for oversized/slouchy fit)
Finished Bust: 48" (122 cm) - to fit actual bust 32-42"
*This sweater is designed with significant positive ease for a slouchy, off-shoulder drape*

---

## MATERIALS

**Yarn:** Sport weight yarn, approximately 1000-1200 yards
*Note: You're using thin/sport weight yarn with oversized needles for a loose, drapey fabric*

**Needles:**
- US 11 (8mm) circular needle, 32" length or longer (for flat knitting)
- US 11 (8mm) circular needle, 16" length (for sleeves)
- OR size needed to obtain gauge

**Notions:**
- Stitch markers
- Tapestry needle for seaming
- Measuring tape

---

## GAUGE

**CRITICAL - MEASURE YOUR WORK:**
Since you've already started knitting, measure your actual gauge from your existing work:

With US 11 (8mm) needles in garter stitch (the pattern you're currently working):
**Approximately 2.75 stitches and 5 rows = 1" (2.5 cm)**

*To measure: Lay your work flat. Count how many stitches fit in 4 inches, then divide by 4.*

**Why this matters:** Sport weight yarn on 8mm needles is unconventional and creates a very open, loose fabric. Your actual gauge may vary from the estimate above. The pattern calculations below assume 2.75 st/inch, but we'll show you how to adjust.

---

## MEASUREMENTS SCHEMATIC

```
BODY (Front & Back):
Width: 48" (as worn, slightly stretched)
Length: 22" from cast-on to shoulder
Armhole depth: 10"

SLEEVES:
Length: 17" from pickup to cuff
Upper arm: 16" circumference
Cuff: 8" circumference

NECKLINE:
Boatneck opening: 18" wide, 3" deep
```

---

## PATTERN NOTES

**About Your Work in Progress:**
- You've already completed approximately 4" (2" ribbing + 2" garter stitch)
- This pattern will continue from where you are now
- You'll work approximately 18 more inches in garter stitch to reach the shoulders

**Construction Overview:**
1. Continue Back piece to full length (instructions below will tell you when to stop)
2. Work Front piece identically to Back
3. Join shoulders, leaving wide center opening for boatneck
4. Pick up and knit sleeves from armhole edges

**About the Fabric:**
Using large needles with thin yarn creates an intentionally loose, drapey fabric perfect for off-shoulder wear. The fabric will be somewhat open/lacy. This is the desired effect! If you prefer a denser fabric, you would need to switch to smaller needles, but this would change the slouchy drape.

**Garter Stitch:**
When working flat: Knit every row
This creates the squishy, textured fabric you're currently working

---

## PATTERN INSTRUCTIONS

### BACK

**Foundation (ALREADY COMPLETED by you):**

You cast on approximately 132 stitches (verify this count on your needle now).

*Math check: 48" width × 2.75 st/inch = 132 sts ✓*

You worked:
- 2" in rib (k1, p1 or k2, p2)
- Approximately 2" in garter stitch (knit every row)
- Total completed: about 4"

**Continue from where you are now:**

Row 1 (and all rows): Knit all stitches.

Continue in garter stitch (knit every row) until piece measures **22 inches (56 cm) total length** from cast-on edge.

*This means you need to work approximately 18 more inches from where you are now (since you've already worked 4").*

**How to know when to stop:**
Measure from your cast-on edge (the very beginning of your ribbing) straight up to your needles. When this measures 22", you're done with the back.

Bind off all stitches loosely.

---

### FRONT

Work exactly the same as Back.

Cast on 132 sts.
Work 2" in rib (k1, p1 or k2, p2 - match what you did on the back).
Switch to garter stitch (knit every row).
Continue until piece measures 22" from cast-on.
Bind off all stitches loosely.

*Math verification: Front = Back = 132 sts × 22" length ✓*

---

### FINISHING

**Join Shoulders (Creating the Boatneck):**

1. Lay Back and Front pieces flat, right sides up, with bound-off edges (shoulders) aligned.

2. **Mark the neckline opening:**
   - Find the center of each piece: 132 sts ÷ 2 = stitch 66
   - From center, count out 25 stitches on each side (total 50 sts for neck opening)
   - Place markers at these points

   *Math check: Center opening = 50 sts ÷ 2.75 st/inch = 18.2" wide ✓*

3. **Seam the shoulders:**
   - LEFT shoulder: Seam the outermost 41 stitches on the left side (from armhole edge to marker)
   - RIGHT shoulder: Seam the outermost 41 stitches on the right side (from armhole edge to marker)
   - Leave center 50 stitches unjoined for neckline

   *Math check: (41 + 41 + 50 = 132 total sts ✓)*

4. Use mattress stitch or backstitch to join shoulders with wrong sides together. Weave in ends.

**Seam Sides:**

1. Measure down 10" from shoulder seam on both Front and Back. Place markers at these points (armhole depth).

2. Starting from bottom hem, seam the side edges together up to the markers, leaving the top 10" open for armholes.

   *This creates: Body length below armhole = 22" - 10" = 12" ✓*

3. Repeat for other side.

---

### SLEEVES (worked in the round from picked-up stitches)

Make 2.

**Pick Up Stitches:**

1. With RS facing and 32" circular needle, starting at underarm seam, pick up and knit stitches evenly around entire armhole opening.

2. **How many stitches to pick up:**
   - Armhole depth = 10"
   - Total armhole circumference = 10" (front) + 10" (back) = 20"
   - At 2.75 st/inch: 20" × 2.75 = 55 sts
   - Pick up approximately 55 sts

   *Math check: 55 sts ÷ 2.75 = 20" armhole circumference ✓*

3. Place marker and join for working in the round.

**Shape Sleeve:**

Working in garter stitch **in the round** (this means: knit 1 round, purl 1 round to create garter texture):

Round 1: Knit all sts.
Round 2: Purl all sts.

Repeat these 2 rounds for 2".

**Decrease rounds:**
Next round: K1, ssk, knit to last 3 sts, k2tog, k1. (2 sts decreased)
Next round: Purl all sts.
Continue in garter (k 1 rnd, p 1 rnd) for 2".

Repeat decrease round every 2" a total of 4 times.

*Math check: 55 sts - (2 sts × 4 decreases) = 47 sts... Hmm, this doesn't reach our 8" cuff.*

**RECALCULATION:**
For 8" cuff: 8" × 2.75 = 22 sts needed at cuff
Need to decrease: 55 - 22 = 33 sts
Decrease 2 sts every 2" over 17" = 8 decrease rounds = 16 sts decreased ❌

**CORRECTED SLEEVE SHAPING:**

To get from 55 sts (upper arm = 20") down to 22 sts (cuff = 8"), we need to decrease 33 sts total.

Work as follows:

Rounds 1-10: Work even in garter (k 1 rnd, p 1 rnd) for 2".

Decrease Round: K1, ssk, k to last 3 sts, k2tog, k1. (2 sts dec)
Work 5 rounds even in garter.

Repeat decrease round every 6 rounds a total of **9 times**.

*Math: 55 - (2 × 9) = 55 - 18 = 37 sts*

Then work decrease round every 4 rounds **7 times**.

*Math: 37 - (2 × 7) = 37 - 14 = 23 sts ✓ (close enough to 22)*

Work even until sleeve measures 17" from pickup.

**Cuff:**

Switch to 16" circular needle when stitches become too tight on 32" needle.

Next round: *K1, p1; rep from * around.
Repeat this ribbing round for 2".

Bind off loosely in pattern.

---

### NECKLINE (optional finishing)

The boatneck edge is simply the bound-off edges left open. For a cleaner finish:

**Optional:** With RS facing and circular needle, pick up and knit 1 st in each bound-off st around entire neckline opening (approximately 50 sts across front + 50 sts across back = 100 sts total).

Place marker and join.
Work k1, p1 rib for 1" (or desired depth).
Bind off very loosely in pattern.

---

## FINISHING TOUCHES

1. Weave in all remaining ends.
2. **Block gently:** Pin sweater to measurements and spritz with water, or steam lightly. The loose gauge means aggressive blocking could distort the fabric.
3. Try on! The wide neckline should naturally sit off one or both shoulders. Adjust by pulling the neckline to your preferred position.

---

## STYLING NOTES

**For Off-Shoulder Wear:**
- The wide 18" boatneck naturally drapes off shoulders
- Pull neckline to one side for asymmetrical off-shoulder look
- Or center it and let it fall off both shoulders slightly
- The oversized fit and loose gauge create the slouchy drape that keeps the neckline in place

**Fabric Characteristics:**
- The open, loose knit created by pairing sport yarn with 8mm needles is intentional
- This creates a lightweight, drapey sweater perfect for layering
- Wear over a camisole or long-sleeve tee
- The garter stitch prevents rolling and adds structure to the loose fabric

---

## TROUBLESHOOTING

**My stitch count doesn't match 132:**
Measure your width. If your piece measures close to 48" wide, you're fine! The pattern will work. Just use your actual stitch count throughout and adjust the neckline proportionally (keep center ⅓ of stitches open for neck).

**My gauge is different:**
If you measured your gauge and it's notably different from 2.75 st/inch, here's how to adjust:
- Your gauge × 48" = stitches needed for body width
- Your gauge × 18" = stitches to leave open for neckline
- Your gauge × 20" = stitches to pick up for sleeve

**The fabric seems too loose/open:**
This is expected with this needle/yarn combination. If you prefer denser fabric, you'd need to restart with smaller needles (6mm or 6.5mm), but this will create a less slouchy, drapier effect.

**Can I make it longer/shorter?**
Yes! Simply work the body to your desired length before binding off. For a cropped/more dramatic off-shoulder look, try 18-20" total length.

---

## YARN REQUIREMENTS DETAIL

Based on dimensions and gauge:

**Back:** 132
Disclaimer: This pattern was generated by AI and should be reviewed for accuracy before use. While we strive for quality, AI-generated content may contain errors. Please verify measurements, stitch counts, and instructions before beginning your project. Generated by purlJam.uk
Access your pattern anytime
Bookmark this page to access your pattern anytime