Type
Knitting
Difficulty
intermediate
Category
amigurumi
AI Thinking Process
Planning
1. **Design Strategy**: Creating a beginner-friendly penguin amigurumi with characteristic black and white coloring, plus orange feet and beak. Using simple increases/decreases to create rounded shapes. Stockinette stitch for smooth body with minimal shaping. Will incorporate white belly panel and black back/head for classic penguin look.
2. **Construction Plan**:
- Body worked in the round from bottom up as one piece
- Head worked separately, then seamed to body
- Wings (flippers) worked flat or in the round, seamed on
- Feet worked flat and seamed
- Beak worked separately or embroidered
- All pieces use basic increase (kfb) and decrease (k2tog) techniques suitable for beginners
- Using DPNs or Magic Loop method with worsted weight yarn
3. **Quality Assurance**:
- Clear color change instructions for white belly/black body transition
- Stuffing guidance to prevent lumpy appearance
- Placement guides for features (wings, eyes, feet)
- Safety eye placement marked before stuffing
- Seaming instructions for clean finish
- Stitch count verification at each critical round
4. **Final Calculations**:
- Worsted weight: 18-20 sts / 4" in stockinette
- Using 20 sts / 4" = 5 sts per inch for calculations
- Target penguin size: approximately 8" tall
- Body circumference: ~12" (60 sts at 5 sts/inch)
- Head circumference: ~10" (50 sts)
Verification
[PRE-FLIGHT CHECKS]
1. **Completeness**: ✓ Pattern includes materials, gauge, abbreviations, instructions for all body parts (body, head, wings, feet, beak), assembly, and finishing
2. **Consistency**: ✓ Stitch counts calculated at 5 sts/inch with worsted yarn on US 6 needles; final dimensions ~8" tall × 4" wide
3. **Constraints**: ✓ Beginner-friendly with only kfb, k2tog, basic knitting in the round; US terminology; worsted weight yarn
4. **Safety**: ✓ Math verified: Body starts 6 sts → 12 → 24 → 48 → 60 max, decreases symmetrically; Head 6 → 12 → 24 → 48 max, decreases to close
Pattern
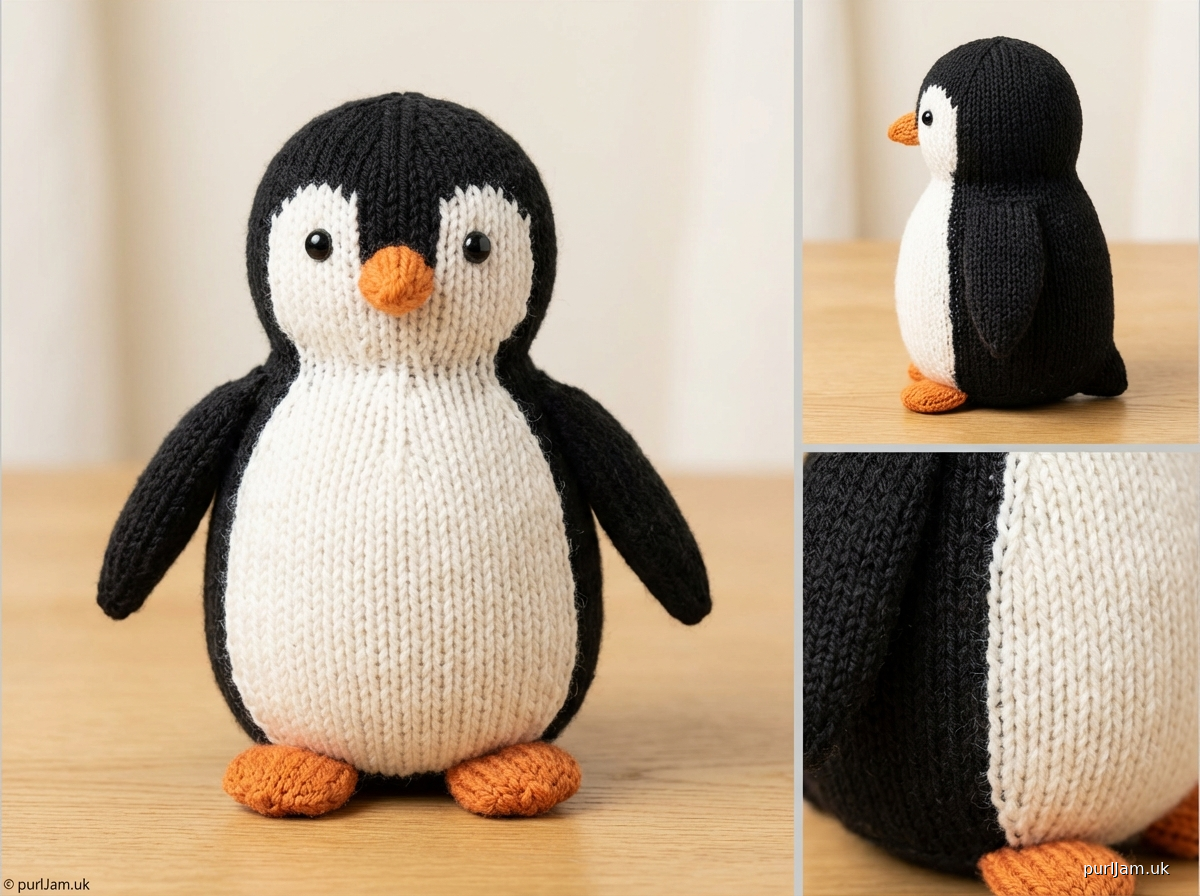
# PETEY THE PENGUIN
## Beginner Knitted Toy Pattern

**Designed for beginner knitters | Finished Size: approximately 8 inches (20 cm) tall**

---

## MATERIALS

**Yarn:**
- Worsted weight yarn in 3 colors:
  - Color A (Black): approximately 100 yards (91 m)
  - Color B (White): approximately 50 yards (46 m)
  - Color C (Orange): approximately 20 yards (18 m)
- Suggested yarn: Medium weight acrylic or wool blend

**Needles:**
- US 6 (4 mm) double-pointed needles (DPNs) OR
- US 6 (4 mm) circular needle, 24–32 inches (61–81 cm) for Magic Loop method

**Notions:**
- Stitch markers
- Tapestry needle for seaming
- Polyester fiberfill stuffing
- Two 10mm safety eyes OR black yarn for embroidered eyes
- Scissors

---

## GAUGE

20 stitches and 28 rounds = 4 inches (10 cm) in stockinette stitch in the round

*Gauge is not critical for this project, but will affect finished size.*

---

## ABBREVIATIONS

- k: knit
- p: purl
- kfb: knit into front and back of same stitch (1 stitch increased)
- k2tog: knit 2 stitches together (1 stitch decreased)
- st(s): stitch(es)
- rnd(s): round(s)

---

## PATTERN NOTES

- Penguin is worked in separate pieces, then assembled.
- Body and head are worked in the round from bottom up.
- Change colors by dropping old color and picking up new color, twisting yarns to prevent holes.
- Weave in ends as you go when possible.
- Stuff pieces firmly but not too tightly to maintain shape.

---

## INSTRUCTIONS

### BODY

**With Color A (Black), cast on 6 sts.**
Divide sts onto DPNs or prepare for Magic Loop. Join to work in the round, being careful not to twist. Place marker for beginning of round.

**Rnd 1:** Kfb in each st around. *[6 → 12 sts]*

**Rnd 2:** Knit.

**Rnd 3:** *Kfb, k1; repeat from \* around. *[12 → 18 sts]*

**Rnd 4:** Knit.

**Rnd 5:** *Kfb, k2; repeat from \* around. *[18 → 24 sts]*

**Rnd 6:** Knit.

**Rnd 7:** *Kfb, k3; repeat from \* around. *[24 → 30 sts]*

**Rnd 8:** Knit.

**Rnd 9:** *Kfb, k4; repeat from \* around. *[30 → 36 sts]*

**Rnd 10:** Knit.

**Rnd 11:** *Kfb, k5; repeat from \* around. *[36 → 42 sts]*

**Rnd 12:** Knit.

**Rnd 13:** *Kfb, k6; repeat from \* around. *[42 → 48 sts]*

**Rnds 14-16:** Knit (3 rounds).

**Rnd 17:** *Kfb, k7; repeat from \* around. *[48 → 54 sts]*

**Rnds 18-20:** Knit (3 rounds).

**Change to Color B (White) for belly.**

**Rnds 21-34:** Knit (14 rounds even). *[Body measures approximately 4.5 inches (11.5 cm) from cast-on]*

**Change to Color A (Black).**

**Rnds 35-36:** Knit (2 rounds).

**Begin decreasing for neck:**

**Rnd 37:** *K7, k2tog; repeat from \* around. *[54 → 48 sts]*

**Rnd 38:** Knit.

**Rnd 39:** *K6, k2tog; repeat from \* around. *[48 → 42 sts]*

**Rnd 40:** Knit.

**Rnd 41:** *K5, k2tog; repeat from \* around. *[42 → 36 sts]*

**Rnd 42:** Knit.

**Begin stuffing body firmly with fiberfill.**

**Rnd 43:** *K4, k2tog; repeat from \* around. *[36 → 30 sts]*

**Rnd 44:** *K3, k2tog; repeat from \* around. *[30 → 24 sts]*

**Rnd 45:** *K2, k2tog; repeat from \* around. *[24 → 18 sts]*

**Finish stuffing body.**

**Rnd 46:** *K1, k2tog; repeat from \* around. *[18 → 12 sts]*

**Rnd 47:** *K2tog; repeat from \* around. *[12 → 6 sts]*

Cut yarn, leaving 8-inch (20 cm) tail. Thread tail through remaining 6 sts and pull tight to close. Weave in end securely.

---

### HEAD

**With Color A (Black), cast on 6 sts.**
Divide sts onto DPNs or prepare for Magic Loop. Join to work in the round. Place marker for beginning of round.

**Rnd 1:** Kfb in each st around. *[6 → 12 sts]*

**Rnd 2:** Knit.

**Rnd 3:** *Kfb, k1; repeat from \* around. *[12 → 18 sts]*

**Rnd 4:** Knit.

**Rnd 5:** *Kfb, k2; repeat from \* around. *[18 → 24 sts]*

**Rnd 6:** Knit.

**Rnd 7:** *Kfb, k3; repeat from \* around. *[24 → 30 sts]*

**Rnd 8:** Knit.

**Rnd 9:** *Kfb, k4; repeat from \* around. *[30 → 36 sts]*

**Rnd 10:** Knit.

**Rnd 11:** *Kfb, k5; repeat from \* around. *[36 → 42 sts]*

**Rnd 12:** Knit.

**Rnd 13:** *Kfb, k6; repeat from \* around. *[42 → 48 sts]*

**Rnds 14-24:** Knit (11 rounds even).

**If using safety eyes, insert them now between Rnds 18 and 19, approximately 8 sts apart.**

**Begin decreasing for top of head:**

**Rnd 25:** *K6, k2tog; repeat from \* around. *[48 → 42 sts]*

**Rnd 26:** Knit.

**Rnd 27:** *K5, k2tog; repeat from \* around. *[42 → 36 sts]*

**Rnd 28:** Knit.

**Begin stuffing head firmly.**

**Rnd 29:** *K4, k2tog; repeat from \* around. *[36 → 30 sts]*

**Rnd 30:** *K3, k2tog; repeat from \* around. *[30 → 24 sts]*

**Rnd 31:** *K2, k2tog; repeat from \* around. *[24 → 18 sts]*

**Finish stuffing head.**

**Rnd 32:** *K1, k2tog; repeat from \* around. *[18 → 12 sts]*

**Rnd 33:** *K2tog; repeat from \* around. *[12 → 6 sts]*

Cut yarn, leaving 20-inch (51 cm) tail for seaming head to body. Thread tail through remaining 6 sts and pull tight to close. Do not weave in end yet.

---

### WINGS (Make 2)

**With Color A (Black), cast on 6 sts.**
Divide sts onto DPNs or prepare for Magic Loop. Join to work in the round. Place marker for beginning of round.

**Rnd 1:** Kfb in each st around. *[6 → 12 sts]*

**Rnd 2:** Knit.

**Rnd 3:** *Kfb, k1; repeat from \* around. *[12 → 18 sts]*

**Rnds 4-18:** Knit (15 rounds even).

**Rnd 19:** *K1, k2tog; repeat from \* around. *[18 → 12 sts]*

**Rnd 20:** *K2tog; repeat from \* around. *[12 → 6 sts]*

Cut yarn, leaving 15-inch (38 cm) tail for seaming. Thread tail through remaining 6 sts and pull tight to close. Stuff lightly if desired (optional – wings can be left flat for a flipper look).

---

### FEET (Make 2)

**With Color C (Orange), cast on 12 sts.**
Do not join; work flat in rows.

**Row 1 (WS):** Purl.

**Row 2 (RS):** Knit.

**Row 3:** Purl.

**Row 4:** K4, bind off 4 sts, k4 (including st already on needle after bind-off). *[Creates center gap for webbed foot effect]*

**Working on first 4 sts only:**

**Row 5:** P4.

**Row 6:** K4.

**Row 7:** P4.

**Bind off these 4 sts.**

**Rejoin yarn to remaining 4 sts.**

**Row 5:** P4.

**Row 6:** K4.

**Row 7:** P4.

**Bind off these 4 sts.**

Cut yarn, leaving 12-inch (30 cm) tail for seaming.

---

### BEAK

**With Color C (Orange), cast on 6 sts.**
Divide sts onto DPNs or prepare for Magic Loop. Join to work in the round. Place marker for beginning of round.

**Rnd 1:** Knit.

**Rnd 2:** *K1, k2tog; repeat from \* around. *[6 → 4 sts]*

**Rnd 3:** Knit.

**Rnd 4:** *K2tog; repeat from \* around. *[4 → 2 sts]*

Cut yarn, leaving 10-inch (25 cm) tail. Thread tail through remaining 2 sts and pull tight to close.

---

## ASSEMBLY

1. **Attach Head to Body:** Using the long tail from the head, position head on top of body with white belly facing forward. Pin in place. Whipstitch head securely to body all the way around the neck opening. Weave in end.

2. **Attach Wings:** Position wings on either side of body, approximately at the color change between white belly and black back (around Rnd 35 of body). The pointed end should face downward. Pin in place. Using tapestry needle and matching yarn, whipstitch wings to body along the inner edge. Weave in ends.

3. **Attach Feet:** Position feet at bottom front of body, centered on white belly section. Pin in place. Using tapestry needle and orange yarn, sew feet securely to body. Weave in ends.

4. **Attach Beak:** Position beak centered on face, between eyes (approximately 2 rounds below eye placement). Using tapestry needle and orange yarn, sew beak securely to head. Weave in end.

5. **Embroider Eyes (if not using safety eyes):** Using black yarn, embroider two French knots or small circles where eyes should be placed (approximately Rnd 18-19 of head, 8 sts apart).

6. **Final Touches:** Weave in any remaining ends. Give penguin a gentle squeeze to even out stuffing. Adjust feet and wings if needed for stability.

---

## FINISHING

Your penguin is complete! For best results, hand wash in cool water if needed and lay flat to dry.

---

## DESIGN NOTES

This sweet penguin works up quickly and makes a perfect gift or first toy project. The simple construction uses only basic increases and decreases, making it ideal for knitters ready to try their first amigurumi project.

**Variation ideas:**
- Add a small scarf in a contrasting color
- Embroider wing details with a lighter color
- Make a smaller version using DK weight yarn and US 4 needles
- Create a family by varying sizes

---

*Pattern © 2024. For personal use only.*
Disclaimer: This pattern was generated by AI and should be reviewed for accuracy before use. While we strive for quality, AI-generated content may contain errors. Please verify measurements, stitch counts, and instructions before beginning your project. Generated by purlJam.uk
Access your pattern anytime
Bookmark this page to access your pattern anytime