Type
Crochet
Difficulty
intermediate
Category
amigurumi
AI Thinking Process
Planning
Verification
Pattern
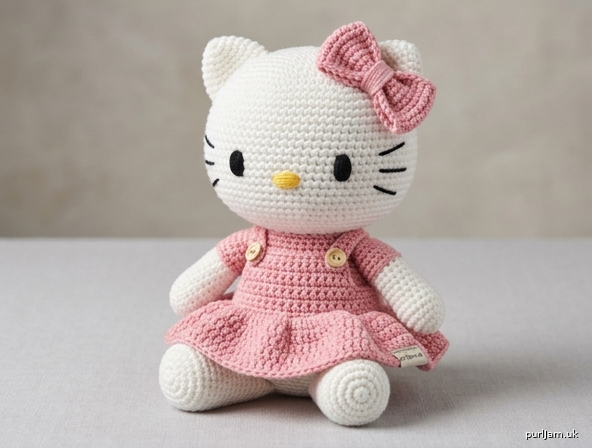
Pink-Bow Kitty Doll
Intermediate Amigurumi Pattern (US Terms)
A cuddly white cat doll with a big round head, tiny ears, oval eyes, a yellow oval nose, and embroidered whiskers. She wears a pink dress with short sleeves, a ruffled skirt, and buttoned straps, with a large pink bow on one ear. Designed to sit.
Skill level: Intermediate (tight even gauge, invisible decreases, simple garment construction, multi-part assembly, embroidery).
Finished size: About 7.5" (19 cm) tall sitting, including ears, in worsted weight yarn.
Materials
- Worsted weight (4) yarn
- White (MC): 85 yd / 78 m
- Pink (CC): 55 yd / 50 m
- Yellow: 5 yd / 5 m (nose)
- Black: 5 yd / 5 m or 2 strands of black embroidery floss (eyes and whiskers)
- Hook: US E-4 / 3.5 mm (go down a size if your fabric shows stuffing)
- Polyester fiberfill, about 2–3 oz (55–85 g)
- Yarn needle
- Stitch marker
- 2 small wooden buttons, ¼" / 6–8 mm (or crochet the button alternative below)
- Pins for assembly
- Optional: black felt for eyes, yellow felt for nose, pink pastel or yarn for cheeks
Yarn note: Any worsted acrylic or cotton-blend works. Cotton gives crisper stitches; acrylic gives a softer hug.
Gauge
5 sc and 5 rnds = 1" (2.5 cm) in single crochet worked in the round, unstuffed.
Work a tight fabric so stuffing does not show. If you have fewer than 5 sc per inch, go down a hook size.
Abbreviations (US)
| Abbreviation | Meaning |
|---|---|
| MC / CC | main color (white) / contrast color (pink) |
| MR | magic ring |
| ch | chain |
| sc | single crochet |
| hdc | half double crochet |
| dc | double crochet |
| inc | 2 sc in the same stitch |
| dec | invisible decrease (see Notes) |
| sl st | slip stitch |
| st(s) | stitch(es) |
| rnd(s) | round(s) |
| FLO / BLO | front loop only / back loop only |
| FO | fasten off |
| yo | yarn over |
| RS | right side |
Notes
- Amigurumi pieces (head, body, ears, arms, legs) are worked in a continuous spiral. Do not join rounds unless told to. Mark the first stitch of every round.
- Dress, sleeves, straps, and bow are worked in joined rounds or rows as written.
- Invisible decrease: Insert hook through the front loop of the next st, then through the front loop of the following st (2 loops on hook + 2 front loops). Yo, pull through both front loops (2 loops on hook). Yo, pull through both loops.
- Increase: 2 sc in the same stitch.
- Stuff as you go. Stuff the head and body firmly; stuff limbs lightly to moderately.
- Magic ring alternative: ch 2, work the Rnd 1 stitches into the 2nd ch from the hook, then pull the tail to close.
- Stitch counts appear in brackets at the end of each round, with a math check on shaping rounds.
- Put the dress on the body before sewing on the head.
Head (MC, white)
Worked in a spiral. Stuff firmly as you decrease.
Rnd 1: 6 sc in MR. [6]
Rnd 2: inc in each st around. [12] (6 increases → 6 + 6 = 12 ✓)
Rnd 3: (sc in next st, inc) 6 times. [18] (6 increases → 12 + 6 = 18 ✓)
Rnd 4: (sc in next 2 sts, inc) 6 times. [24] (6 increases → 18 + 6 = 24 ✓)
Rnd 5: (sc in next 3 sts, inc) 6 times. [30] (6 increases → 24 + 6 = 30 ✓)
Rnd 6: (sc in next 4 sts, inc) 6 times. [36] (6 increases → 30 + 6 = 36 ✓)
Rnd 7: (sc in next 5 sts, inc) 6 times. [42] (6 increases → 36 + 6 = 42 ✓)
Rnd 8: (sc in next 6 sts, inc) 6 times. [48] (6 increases → 42 + 6 = 48 ✓)
Rnds 9–16: sc in each st around. [48] (8 even rounds)
Eye placement mark: between Rnds 12 and 13, leaving about 8 sts (1½" / 4 cm) between the inner edges of the two ovals. Embroider after stuffing.
Rnd 17: (sc in next 6 sts, dec) 6 times. [42] (6 decreases → 48 − 6 = 42 ✓)
Rnd 18: (sc in next 5 sts, dec) 6 times. [36] (6 decreases → 42 − 6 = 36 ✓)
Rnd 19: (sc in next 4 sts, dec) 6 times. [30] (6 decreases → 36 − 6 = 30 ✓)
Rnd 20: (sc in next 3 sts, dec) 6 times. [24] (6 decreases → 30 − 6 = 24 ✓)
Stuff the head firmly, rounding the sides as you fill.
Rnd 21: (sc in next 2 sts, dec) 6 times. [18] (6 decreases → 24 − 6 = 18 ✓)
Rnd 22: (sc in next st, dec) 6 times. [12] (6 decreases → 18 − 6 = 12 ✓)
Add a last bit of stuffing. FO, leaving a 18" (46 cm) tail. Do not cinch fully closed; the 12-st opening sews to the body.
Ears (make 2, MC)
Rnd 1: 6 sc in MR. [6]
Rnd 2: (sc in next st, inc) 3 times. [9] (3 increases → 6 + 3 = 9 ✓)
Rnd 3: (sc in next 2 sts, inc) 3 times. [12] (3 increases → 9 + 3 = 12 ✓)
Rnds 4–5: sc in each st around. [12]
Rnd 6: (sc in next 2 sts, dec) 3 times. [9] (3 decreases → 12 − 3 = 9 ✓)
FO, leaving a 12" (30 cm) tail. Do not stuff (or add a pea-sized bit of fill). Flatten each ear into a small rounded triangle.
Body (MC)
Rnd 1: 6 sc in MR. [6]
Rnd 2: inc in each st around. [12] (6 increases → 6 + 6 = 12 ✓)
Rnd 3: (sc in next st, inc) 6 times. [18] (6 increases → 12 + 6 = 18 ✓)
Rnd 4: (sc in next 2 sts, inc) 6 times. [24] (6 increases → 18 + 6 = 24 ✓)
Rnd 5: (sc in next 3 sts, inc) 6 times. [30] (6 increases → 24 + 6 = 30 ✓)
Rnd 6: (sc in next 4 sts, inc) 6 times. [36] (6 increases → 30 + 6 = 36 ✓)
Rnds 7–15: sc in each st around. [36] (9 even rounds)
Rnd 16: (sc in next 4 sts, dec) 6 times. [30] (6 decreases → 36 − 6 = 30 ✓)
Rnd 17: (sc in next 3 sts, dec) 6 times. [24] (6 decreases → 30 − 6 = 24 ✓)
Stuff the lower body very firmly so the doll sits without tipping. Keep the base slightly flattened as you stuff.
Rnd 18: (sc in next 2 sts, dec) 6 times. [18] (6 decreases → 24 − 6 = 18 ✓)
Rnd 19: (sc in next st, dec) 6 times. [12] (6 decreases → 18 − 6 = 12 ✓)
Rnd 20: dec 6 times. [6] (6 decreases → 12 − 6 = 6 ✓)
FO. Thread the tail through the remaining 6 sts and pull closed. Weave in.
Arms (make 2, MC)
Rnd 1: 6 sc in MR. [6]
Rnd 2: inc in each st around. [12] (6 increases → 6 + 6 = 12 ✓)
Rnds 3–4: sc in each st around. [12]
Rnd 5: (sc in next 4 sts, dec) 2 times. [10] (2 decreases → 12 − 2 = 10 ✓)
Rnds 6–12: sc in each st around. [10] (7 even rounds)
Stuff the rounded end (hand) lightly; leave the top ½" (1.3 cm) unstuffed so the arm sews flat at the shoulder. FO, leaving a 12" (30 cm) tail. Flatten the open edge.
Legs (make 2, MC)
Rnd 1: 6 sc in MR. [6]
Rnd 2: inc in each st around. [12] (6 increases → 6 + 6 = 12 ✓)
Rnd 3: (sc in next st, inc) 6 times. [18] (6 increases → 12 + 6 = 18 ✓)
Rnds 4–5: sc in each st around. [18]
Rnd 6: (sc in next 4 sts, dec) 3 times. [15] (3 decreases → 18 − 3 = 15 ✓)
Rnds 7–13: sc in each st around. [15] (7 even rounds)
Stuff the foot firmly and the leg moderately. FO, leaving a 14" (36 cm) tail. Flatten the open edge.
Dress (CC, pink)
The dress is a separate garment: waist chain, bodice worked up, skirt worked down from the opposite side of the chain, sleeves in the armholes, straps with buttons. Use joined rounds for the dress (ch 1 at the start of sc rounds does not count as a stitch; join with sl st to the first sc).
Waist and bodice
Ch 40. Join with sl st to the first ch, taking care not to twist. [40 ch]
Rnd 1: Ch 1, sc in each ch around, join. [40]
Rnds 2–5: Ch 1, sc in each st around, join. [40] (4 more rounds; 5 bodice rounds total below the armholes)
Do not fasten off.
Front bib
Row 1 (RS): Ch 1, sc in next 14 sts, turn. [14]
Rows 2–4: Ch 1, sc in each st across, turn. [14]
FO.
Skip the next 6 sts of Rnd 5 (first armhole).
Back bib
Join CC with sl st in the next st of Rnd 5.
Row 1: Ch 1, sc in the same st and in the next 13 sts, turn. [14]
Rows 2–4: Ch 1, sc in each st across, turn. [14]
FO. The remaining 6 unworked sts of Rnd 5 are the second armhole. (14 + 6 + 14 + 6 = 40 ✓)
Straps (make 2)
Ch 13.
Row 1: Sc in 2nd ch from hook and in each ch across, turn. [12]
Row 2: Ch 1, sc in each st across. [12]
FO, leaving a 10" (25 cm) tail.
Sew one short end of each strap to a top corner of the back bib. Sew the other short end to the matching top corner of the front bib, so the straps will sit at the sides of the neck. Sew a wooden button on the front of each strap where it meets the bib (decorative; or leave the front end free and use the button as a working closure through the strap fabric).
Crocheted button alternative (make 2): With CC, 6 sc in MR, sl st to first sc, FO. Sew in place of wooden buttons.
Ruffled skirt
Turn the bodice upside down. Join CC with sl st in any unused loop on the opposite side of the foundation chain.
Rnd 1: Ch 1, sc in each foundation-chain loop around, join. [40]
Rnd 2 (ruffle): Ch 3 (counts as dc), 2 dc in the same st, 3 dc in each remaining st around, join to top of ch-3. [120] (40 × 3 = 120 ✓)
Rnd 3: Ch 3 (counts as dc), dc in each dc around, join. [120]
Rnd 4: Ch 1, sc in each st around, join. [120]
FO. Weave in ends. The skirt should hang in a full ruffle over the lower body and the tops of the legs.
Sleeves (make 2, worked in the armholes)
With the bodice RS out, join CC at the underarm of one armhole.
Rnd 1: Ch 1, work 16 sc evenly around the armhole (6 skipped bodice sts + 4 sc along the bib side edge + 6 sts along the other bib side / chain path, adjusting by 1 st if needed so you land on 16), join. [16]
Rnds 2–4: Ch 1, sc in each st around, join. [16]
FO. Repeat for the second armhole. Weave in ends.
Large Pink Bow (CC)
Ch 14.
Row 1: Hdc in 3rd ch from hook and in each ch across, turn. [12 hdc]
Rows 2–6: Ch 2 (does not count as a st), hdc in each st across, turn. [12]
FO, leaving a 24" (61 cm) tail. Pinch the rectangle tightly at the center to form two loops. Wrap the tail around the center 10–12 times. Knot securely at the back. Bow measures about 2½" (6.5 cm) wide.
Tails (make 2): Ch 10. Sl st in 2nd ch from hook, sc in next ch, hdc in next, dc in next 3 ch, hdc in next, sc in next, sl st in last ch. FO, leaving a tail. Sew both tails behind the wrapped center, pointing down and slightly apart.
Face
Work on the stuffed head before sewing on the ears (easier to hold). Use photos of your preferred expression as a placement guide, and pin first.
Eyes (black ovals): Using black yarn or 2 strands of embroidery floss, satin-stitch two vertical ovals between Rnds 12 and 13. Each oval is about ½" (1.3 cm) tall and ¼" (6 mm) wide. Leave about 8 sts (1½" / 4 cm) between inner edges so the eyes sit wide on the face.
Felt option: Cut two black felt ovals ½" × ¼" (13 × 6 mm) and whip-stitch in the same placement.
Nose (yellow oval): Centered between the eyes, 1–2 rounds lower (about Rnd 14–15), satin-stitch a horizontal yellow oval about ⅜" (1 cm) wide and ¼" (6 mm) tall.
Crochet option: With yellow, ch 5. Sc in 2nd ch from hook, hdc in next, hdc in next, 3 sc in last ch; working along the other side of the chain, hdc in next, hdc in next, sc in last. Sl st to first sc, FO. Sew in place, covering the oval.
Whiskers: With one strand of black yarn or embroidery floss, stitch 3 whiskers on each cheek. Each whisker is 2–3 straight stitches, about ½–⅝" (1.3–1.6 cm) long. Angle the top whisker slightly up, the middle one horizontal, and the bottom one slightly down. Start just outside each eye, level with the nose.
Do not embroider a mouth unless you want one; the classic look is mouth-free.
Assembly
Pin every piece before sewing. Use matching yarn and a yarn needle. Ladder stitch or whip stitch through both loops for strong, tidy seams. Pull snug, but do not gather the fabric.
1. Ears. Flatten. Sew to the top of the head, spanning about Rnds 4–10, with 6–8 sts between inner edges. Angle them slightly outward.
2. Bow. Sew the wrapped center firmly to the base of the ear on the left as you face the doll, so the bow sits on that ear without covering the face. Stitch through the bow wraps and into the ear and head so it cannot be pulled off.
3. Legs (sitting pose). Sew the open edge of each leg to the lower front of the body, covering about Rnds 16–19. Angle the legs forward and slightly out (a shallow V). This splayed, horizontal placement keeps the doll from rolling.
4. Dress on. Slide the dress onto the body now, while the neck is still open. Settle the waist at about Rnd 10–11 of the body. The ruffled skirt covers the hips and the tops of the legs. The bibs sit on the chest and upper back.
5. Arms. Pass each arm through a sleeve. Sew the flattened top of each arm to the body at about Rnds 7–8, just below where the head will sit, slightly forward of the side “seam.” The sleeve cuff should cover the shoulder join. Tack the underarm of each sleeve to the bodice with 2–3 small stitches so the sleeves stay put.
6. Head. Add a last pinch of stuffing at the neck. Sew the 12-st head opening to the top of the body (Rnds 6–8 area), matching the face forward over the dress bib. Go around the neck twice for strength.
7. Straps and buttons. Check that the straps sit at the sides of the neck, not across the face. Stitch the strap ends down if they were only pinned. Sew the wooden (or crocheted) buttons on the front of the straps.
8. Weave in every remaining tail. Tug each sewn part gently; restitch anything that shifts.
Finishing
- Steam the skirt ruffle lightly from the wrong side if it needs to flare (do not crush the stuffed pieces).
- Optional cheeks: a tiny circle of pink yarn satin stitch, or a dab of pastel, just below and outside each eye.
- Shape the head with your thumbs so the face is smooth and the cheeks are round.
Safety
- This doll uses small buttons. Do not give a buttoned version to children under 3. For a baby-safe doll, use the crocheted button alternative, or embroider two small pink circles and omit hard buttons.
- Embroidered or felt eyes are better than hard safety eyes for this oval look; if you substitute 8 mm safety eyes, install them between Rnds 12 and 13 before stuffing the head, and only use true locking safety eyes.
- Sew ears, bow, limbs, and head through several stitches, then knot and bury the yarn. Tug-test every part.
- Not a toy for children under 3 unless all hard parts are omitted and every piece is sewn on to toy standard.
Pattern checklist (counts)
| Piece | Max sts | Closing | Color |
|---|---|---|---|
| Head | 48 | leave 12 open | white |
| Body | 36 | close to 6 | white |
| Ear × 2 | 12 | flatten at 9 | white |
| Arm × 2 | 12, then 10 | flatten open | white |
| Leg × 2 | 18, then 15 | flatten open | white |
| Dress waist | 40 | — | pink |
| Skirt ruffle | 120 | — | pink |
| Sleeve × 2 | 16 | — | pink |
| Strap × 2 | 12 | sewn | pink |
| Bow | 12 hdc wide | cinched | pink |
Enjoy your kitty doll.
Disclaimer: This pattern was generated by AI and should be reviewed for accuracy before use. While we strive for quality, AI-generated content may contain errors. Please verify measurements, stitch counts, charts, and instructions before beginning your project. Generated by purlJam.uk
Love this pattern?
Save this pattern to your free PurlJam libraryAccess your pattern anytime
Bookmark this page to access your pattern anytime