Type
Crochet
Difficulty
intermediate
Category
amigurumi
AI Thinking Process
Planning
Verification
Pattern
Pop-Up Cat Coaster
A 3D Amigurumi Animal Coaster
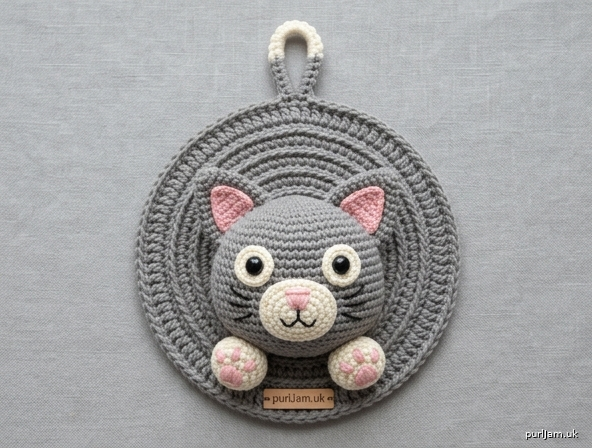
A round, textured gray coaster with a raised cat face on the lower front, pointed ears, cream eyes, a tiny pink nose, cream muzzle and paws, and a hanging loop with a cream tip.
Skill Level: Easy
Finished Size
- Coaster base: 4¾ in (12 cm) diameter
- Overall height (including hanging loop): about 6 in (15 cm)
- Head: about 2½ in (6.5 cm) across
Size will vary slightly with yarn, hook, and stuffing.
Materials
Yarn: Worsted weight (Category 4), cotton strongly recommended so the base stays firm and heat-safe.
| Color | Role | Amount |
|---|---|---|
| Gray (MC) | Base, head, outer ears, loop | 55 yd / 50 m (about 1.1 oz / 30 g) |
| Cream or white (CC) | Eyes, muzzle, paws, loop tip | 25 yd / 23 m (about 0.5 oz / 15 g) |
| Pink (A) | Inner ears, nose, paw pads | 10 yd / 9 m (about 0.2 oz / 5 g) |
| Black (B) | Mouth/whiskers (optional if using safety eyes) | small scrap |
Hook: US G-6 (4.0 mm), or size needed to obtain gauge. If the base feels loose or holey, go down to US F-5 (3.75 mm).
Notions:
- Pair of 8 mm black safety eyes (pupils)
- Small amount of polyester fiberfill
- Yarn needle
- Stitch marker
- Pins
- Scissors
Optional: Black embroidery floss for whiskers.
Gauge
18 sc and 20 rnds = 4 in (10 cm) in single crochet worked in the round.
Work a gauge swatch in the round: magic ring, 6 sc, then increase 6 sts each rnd through Rnd 6 (36 sts). The piece should measure about 2½ in (6.5 cm) across.
Gauge is important for a flat coaster. If your circle ruffles, go down a hook size; if it cups into a bowl, go up a hook size or block the finished base flat before assembly.
Abbreviations (US)
- BLO — back loop only
- ch — chain
- CC — contrast color (cream/white)
- dec — decrease: sc2tog (insert hook in next st, yo, pull up a loop; insert hook in following st, yo, pull up a loop; yo, draw through all 3 loops)
- FO — fasten off
- hdc — half double crochet
- inc — increase: 2 sc in the same stitch
- MC — main color (gray)
- MR — magic ring
- rnd(s) — round(s)
- sc — single crochet
- sc2tog — single crochet 2 stitches together
- sl st — slip stitch
- st(s) — stitch(es)
- yo — yarn over
Pattern Notes
- US crochet terminology throughout.
- Circles are worked in continuous spirals unless stated. Do not join or chain at the start of a round. Mark the first stitch of every round and move the marker up.
- Magic ring substitute: Ch 2, work the stated number of sc into the 2nd ch from the hook, then pull the tail to close the hole.
- Leave long tails (8–10 in / 20–25 cm) on pieces that will be sewn.
- The coaster base is the “body.” The head is a separate 3D piece, lightly stuffed and sewn onto the lower front only, so the back stays flat.
- Safety eyes are a choking hazard. Do not give this coaster to children under 3 years. To make a child-safe version, embroider the pupils with black yarn instead of using safety eyes.
- Light stuffing only. Overstuffing will rock the coaster and lift mugs.
Coaster Base (Body)
With MC (gray). Work in a spiral. For a lightly ridged, textured fabric, work BLO sc from Rnd 4 through Rnd 12.
Rnd 1: MR, 6 sc. (6 sts)
Rnd 2: Inc in each st around. (6 increases → 6 + 6 = 12 ✓)
Rnd 3: *Sc in next st, inc in next st; repeat from * around. (6 increases → 12 + 6 = 18 ✓)
Rnd 4: *Sc in next 2 sts, inc in next st; repeat from * around. (6 increases → 18 + 6 = 24 ✓)
Rnd 5: *Sc in next 3 sts, inc in next st; repeat from * around. (6 increases → 24 + 6 = 30 ✓)
Rnd 6: *Sc in next 4 sts, inc in next st; repeat from * around. (6 increases → 30 + 6 = 36 ✓)
Rnd 7: *Sc in next 5 sts, inc in next st; repeat from * around. (6 increases → 36 + 6 = 42 ✓)
Rnd 8: *Sc in next 6 sts, inc in next st; repeat from * around. (6 increases → 42 + 6 = 48 ✓)
Rnd 9: *Sc in next 7 sts, inc in next st; repeat from * around. (6 increases → 48 + 6 = 54 ✓)
Rnd 10: *Sc in next 8 sts, inc in next st; repeat from * around. (6 increases → 54 + 6 = 60 ✓)
Rnd 11: *Sc in next 9 sts, inc in next st; repeat from * around. (6 increases → 60 + 6 = 66 ✓)
Rnd 12 (textured rim): Hdc in each st around. (66 sts)
Rnd 13 (firm edge): Sc in BLO of each st around. (66 sts)
Sl st in the next st. FO and weave in ends. The base should measure about 4¾ in (12 cm) across and lie flat.
Head
With MC (gray). Worked in a spiral. Do not close the last round — the open edge is sewn to the coaster.
Rnd 1: MR, 6 sc. (6 sts)
Rnd 2: Inc in each st around. (6 increases → 6 + 6 = 12 ✓)
Rnd 3: *Sc in next st, inc in next st; repeat from * around. (6 increases → 12 + 6 = 18 ✓)
Rnd 4: *Sc in next 2 sts, inc in next st; repeat from * around. (6 increases → 18 + 6 = 24 ✓)
Rnd 5: *Sc in next 3 sts, inc in next st; repeat from * around. (6 increases → 24 + 6 = 30 ✓)
Rnd 6: *Sc in next 4 sts, inc in next st; repeat from * around. (6 increases → 30 + 6 = 36 ✓)
Rnds 7–12: Sc in each st around. (36 sts; 6 even rounds ✓)
Sl st in the next st. FO, leaving a 18 in (45 cm) tail for sewing.
The open edge is 36 sts and should measure about 2½ in (6.5 cm) across. Set aside; do not stuff yet. Safety eyes must go in first.
Outer Ears (make 2)
With MC (gray). Worked flat in rows, starting at the wide base and decreasing to a point.
Row 1: Ch 7, sc in 2nd ch from hook and in each ch across. (6 sts)
Row 2: Ch 1, turn, sc2tog, sc in next 2 sts, sc2tog. (2 decreases → 6 − 2 = 4 ✓)
Row 3: Ch 1, turn, sc2tog, sc2tog. (2 decreases → 4 − 2 = 2 ✓)
Row 4: Ch 1, turn, sc2tog. (1 st ✓)
Do not FO. Rotate the triangle and work a neat edge: ch 1, sc evenly down the first side (3 sc), 3 sc in the starting-chain end (base), sc evenly up the other side (3 sc), sl st in the tip. FO, leaving a 10 in (25 cm) tail.
Inner Ears (make 2)
With A (pink). Smaller pointed triangle.
Row 1: Ch 5, sc in 2nd ch from hook and in each ch across. (4 sts)
Row 2: Ch 1, turn, sc2tog, sc2tog. (2 decreases → 4 − 2 = 2 ✓)
Row 3: Ch 1, turn, sc2tog. (1 st ✓)
FO, leaving a 8 in (20 cm) tail. Sew each pink inner ear onto the center of a gray outer ear, matching the point and leaving a gray border all around. Set paired ears aside.
Eye Discs (make 2)
With CC (cream). These are the large whites of the eyes. Worked in a spiral.
Rnd 1: MR, 6 sc. (6 sts)
Rnd 2: Inc in each st around. (6 increases → 6 + 6 = 12 ✓)
Rnd 3: *Sc in next st, inc in next st; repeat from * around. (6 increases → 12 + 6 = 18 ✓)
Sl st in the next st. FO, leaving a 10 in (25 cm) tail. Each disc should measure about 1¼ in (3.2 cm) across.
Muzzle
With CC (cream). Worked as a small oval in a spiral.
Rnd 1: Ch 5, sc in 2nd ch from hook, sc in next 2 ch, 3 sc in last ch; rotate to work along the opposite side of the chain, sc in next 2 ch, 2 sc in the remaining end. (10 sts ✓)
Rnd 2: Inc in next st, sc in next 2 sts, inc in next 3 sts, sc in next 2 sts, inc in next 2 sts. (6 increases → 10 + 6 = 16 ✓)
Sl st in the next st. FO, leaving a 10 in (25 cm) tail. The oval is about 1¼ in (3.2 cm) wide and ¾ in (2 cm) tall.
Nose
With A (pink). Tiny triangle.
Ch 3, sl st in 2nd ch from hook, hdc in last ch. FO, leaving a 6 in (15 cm) tail.
(Alternative: skip this piece and embroider a small pink triangle onto the muzzle during assembly.)
Front Paws / Limbs (make 2)
With CC (cream). Small ovals.
Rnd 1: Ch 4, sc in 2nd ch from hook, sc in next ch, 3 sc in last ch; rotate to work along the opposite side of the chain, sc in next ch, 2 sc in the remaining end. (8 sts ✓)
Rnd 2: Sc in each st around. (8 sts)
Sl st in the next st. FO, leaving a 8 in (20 cm) tail. Each paw is about ¾ in (2 cm) wide.
Pink paw details: With A (pink) and a yarn needle, embroider one small oval pad in the center of each paw and three tiny French knots (or small straight stitches) above it for the toe beans.
Hanging Loop / Tab
A short vertical loop with a cream tip at the apex. Worked flat in rows.
With MC (gray):
Row 1: Ch 5, sc in 2nd ch from hook and in each ch across. (4 sts)
Rows 2–5: Ch 1, turn, sc in each st across. (4 sts; 4 more gray rows → 5 gray rows total ✓)
Change to CC (cream) in the last yarn-over of Row 5.
Rows 6–8: Ch 1, turn, sc in each st across. (4 sts; 3 cream rows ✓)
Change to MC (gray) in the last yarn-over of Row 8.
Rows 9–13: Ch 1, turn, sc in each st across. (4 sts; 5 gray rows ✓)
FO, leaving a 12 in (30 cm) tail.
The strip is 5 gray + 3 cream + 5 gray = 13 rows and about 2½ in (6.5 cm) long. When folded, the cream section sits at the top of the loop.
Assembly
Pin every piece before sewing. Use matching yarn tails and small whipstitches unless noted. Sew through both loops of the stitches.
1. Eyes and safety pupils (do this before stuffing the head)
Place the two cream eye discs on the front of the head, on Rnds 5–8, spaced about 2 sts apart at the inner edges and centered left-to-right.
Push one 8 mm safety eye through the center of a cream disc, then through the head fabric. Repeat for the second eye. Check that the eyes look even from the front, then snap the washers onto the posts inside the head. Pull gently to confirm they are locked.
If you are not using safety eyes, sew the cream discs in the same position and embroider an 8 mm black pupil in the center of each.
With the CC tails, tack the outer edge of each cream disc to the head so the whites lie flat and cannot curl.
2. Muzzle, nose, and mouth
Pin the cream muzzle onto the lower front of the head, just below the eyes, covering Rnds 8–12 and centered. The long axis of the oval should run left-to-right. Sew around the edge.
Sew (or embroider) the pink nose at the top center of the muzzle, point facing down.
With black yarn or floss, embroider a small vertical line down from the nose and a shallow inverted “V” or “W” for the mouth.
Optional whiskers: three short straight stitches on each side of the muzzle in black.
3. Ears
Pin the paired ears to the top of the head (Rnds 3–6), points up and slightly outward, about 4–5 sts apart at the inner bases, like a cat’s ears. The pink inners face forward. Sew the base of each ear firmly to the head. A few extra stitches at the front of each base help the ears stand.
4. Stuff the head
Add a small amount of fiberfill — enough for a softly rounded, raised face, not a hard ball. Keep the open back edge in a neat circle. Do not overstuff; the head should still flatten slightly against the coaster.
5. Sew the head to the coaster (lower front)
Lay the coaster base flat, textured/front side up. Place the stuffed head on the lower half, so the chin sits about ⅜ in (1 cm) up from the bottom edge of the coaster and the ears point toward the top. The face looks forward (out from the coaster), not up.
Using the long gray tail, sew the open edge of the head to the coaster all the way around, catching a base stitch with every head stitch (36 sts around). Add a few extra stitches under the chin and at each side so the 3D face cannot shift. The back of the coaster must remain smooth.
6. Paws
Pin the two cream paws at the bottom of the head, overlapping the head/coaster seam, about ½ in (1.3 cm) apart, pads facing forward. They should look like resting front paws. Sew around each paw.
7. Hanging loop
Fold the loop strip in half so the cream rows form the top (apex) and the two gray ends sit together. Pin both gray short ends to the top edge of the coaster (12 o’clock), centered, on the front just inside the rim. Sew both ends down securely through the coaster, then weave the tail to the back and fasten. The loop stands vertically with a cream tip.
8. Weave in remaining ends
Take all remaining tails to the back of the coaster or into the head stuffing and trim. Do not leave knots on the mug surface.
Finishing
- Steam-block the base only if it does not lie flat: hover a steam iron over the gray circle (do not press the stuffed head) and pin the rim until dry.
- Check that safety-eye washers are fully snapped.
- The finished piece is a decorative coaster. Use under mugs on the flat gray base; wipe cotton with a damp cloth. Do not machine-wash if safety eyes are installed.
Your pop-up cat coaster is ready: a textured gray circle, a raised gray face on the lower front, pink-lined pointed ears, large cream eyes with black pupils, a pink nose on a cream muzzle, cream paws with pink pads, and a gray hanging loop with a cream tip.
Disclaimer: This pattern was generated by AI and should be reviewed for accuracy before use. While we strive for quality, AI-generated content may contain errors. Please verify measurements, stitch counts, charts, and instructions before beginning your project. Generated by purlJam.uk
Love this pattern?
Save this pattern to your free PurlJam libraryAccess your pattern anytime
Bookmark this page to access your pattern anytime