Type
Crochet
Difficulty
intermediate
Category
amigurumi
AI Thinking Process
Planning
Verification
Pattern
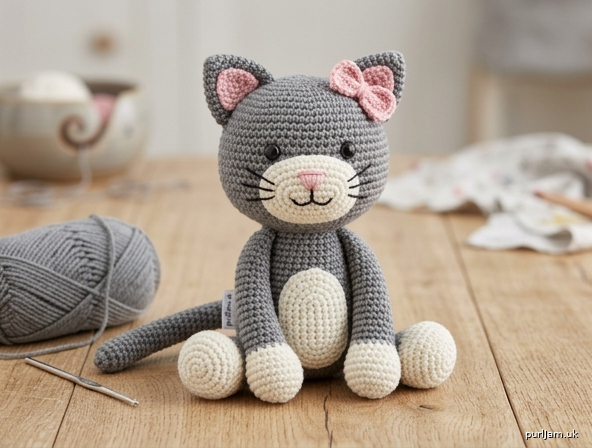
Cute Sitting Cat Amigurumi
A chubby sitting cat worked in continuous rounds. Tight single crochet creates a dense fabric that holds stuffing and keeps the toy stable on its haunches. Intermediate: consistent gauge, invisible decreases, color changes, multi-piece assembly, and embroidered features.
Skill level: Intermediate
Finished size: About 6½" (16.5 cm) tall sitting and 4½" (11.5 cm) wide, in worsted weight with a US E-4 (3.5 mm) hook.
Materials
- Worsted weight (4) yarn
- Main color (MC): 90 yd (82 m) — gray, orange, black, cream, or brown
- Contrast color (CC): 30 yd (27 m) — white or cream for muzzle, paws, and belly
- Pink: 10 yd (9 m) — inner ears and nose
- Optional bow color: 5 yd (5 m)
- US E-4 (3.5 mm) crochet hook (one size smaller than the yarn label for a tight fabric)
- 9 mm safety eyes (1 pair)
- Polyester fiberfill
- Yarn needle
- Stitch marker
- Black embroidery floss (mouth and whiskers)
- Pink embroidery floss or yarn (nose)
- Pins for assembly
- Scissors
For a solid-color cat, work every piece in MC and skip the color changes.
Safety: Use safety eyes only if the toy is for ages 3+. For younger children, embroider the eyes with black yarn and embroider the whiskers (do not use loose thread whiskers). Sew every piece on firmly and tug-test limbs.
Gauge
5 sc and 5 rnds = 1" (2.5 cm) in single crochet, worked tightly in continuous rounds.
Gauge is for density, not fit. If stuffing shows through, go down a hook size.
Abbreviations (US)
- MR — magic ring (adjustable ring)
- ch — chain
- sc — single crochet
- hdc — half double crochet
- dc — double crochet
- inc — 2 sc in the same stitch
- dec — invisible decrease: insert hook through the front loop only of the next 2 sts, yarn over, pull through both loops, yarn over, pull through both loops on hook
- st(s) — stitch(es)
- rnd(s) — round(s)
- sl st — slip stitch
- FO — fasten off
- MC / CC — main color / contrast color
Pattern Notes
- Work in a continuous spiral unless a row is specified. Do not join rounds.
- Place a stitch marker in the first stitch of every round and move it up as you go.
- Keep stitches tight so the fabric hides the stuffing.
- Stuff as you go, especially before the opening gets small.
- Color change: work the last yarn over of the last stitch with the new color.
- Leave long tails (12"/30 cm) on pieces that will be sewn on.
- Pin every piece in place and check the sit of the cat before sewing.
Head (MC)
Stuff firmly as you decrease. Insert the eyes before the opening is too small.
Rnd 1: 6 sc in MR. [6]
Rnd 2: Inc in each st around. [12] (6 increases → 6 + 6 = 12 ✓)
Rnd 3: (Sc, inc) 6 times. [18] (6 increases → 12 + 6 = 18 ✓)
Rnd 4: (2 sc, inc) 6 times. [24] (6 increases → 18 + 6 = 24 ✓)
Rnd 5: (3 sc, inc) 6 times. [30] (6 increases → 24 + 6 = 30 ✓)
Rnd 6: (4 sc, inc) 6 times. [36] (6 increases → 30 + 6 = 36 ✓)
Rnds 7–13: Sc in each st around. [36] — 7 rounds
Place eyes: Between Rnds 11 and 12, with 6 stitches between the posts. The 6-st gap is the center front of the face. Do not fasten the washers until you are happy with the spacing.
Rnd 14: (4 sc, dec) 6 times. [30] (6 decreases → 36 − 6 = 30 ✓)
Rnd 15: (3 sc, dec) 6 times. [24] (6 decreases → 30 − 6 = 24 ✓)
Stuff the head firmly, filling the crown.
Rnd 16: (2 sc, dec) 6 times. [18] (6 decreases → 24 − 6 = 18 ✓)
Rnd 17: (Sc, dec) 6 times. [12] (6 decreases → 18 − 6 = 12 ✓)
Finish stuffing.
Rnd 18: Dec 6 times. [6] (6 decreases → 12 − 6 = 6 ✓)
FO, leaving a 8" (20 cm) tail. Weave the tail through the front loops of the remaining 6 sts and pull closed. Weave in the end.
Outer Ears (make 2, MC)
Do not stuff. The ear is flattened into a triangle.
Rnd 1: 4 sc in MR. [4]
Rnd 2: (Sc, inc) 2 times. [6] (2 increases → 4 + 2 = 6 ✓)
Rnd 3: (2 sc, inc) 2 times. [8] (2 increases → 6 + 2 = 8 ✓)
Rnd 4: (3 sc, inc) 2 times. [10] (2 increases → 8 + 2 = 10 ✓)
Rnd 5: (4 sc, inc) 2 times. [12] (2 increases → 10 + 2 = 12 ✓)
Rnd 6: Sc in each st around. [12]
FO, leaving a 12" (30 cm) tail. Flatten so Rnd 1 forms the tip.
Inner Ears (make 2, pink)
Worked flat.
Ch 5.
Row 1: Sc in 2nd ch from hook, sc in next ch, hdc in next ch, dc in last ch. [4]
FO, leaving a 10" (25 cm) tail. The dc end is the base. Sew each inner ear onto the front of an outer ear, matching the triangle and leaving a MC border showing all around. Weave in pink ends.
Muzzle (CC)
Worked as a small oval around a starting chain.
Ch 5.
Rnd 1: Sc in 2nd ch from hook, sc in next 2 ch, 3 sc in last ch; rotate and work along the other side of the chain: sc in next 2 ch, 2 sc in the remaining ch. [10] (3 + 2 + 3 + 2 = 10 ✓)
Rnd 2: Inc, 2 sc, inc in next 3 sts, 2 sc, inc in next 2 sts. [16] (1 + 2 + 3 + 2 + 2 = 10 increases of 1 extra st each → 10 + 6 = 16 ✓)
Rnd 3: Sc in each st around. [16]
FO, leaving a 14" (35 cm) tail. Lightly stuff just before sewing.
Body (MC)
Start at the base so the bottom is fuller and the cat sits. Stuff very firmly, especially the first 10 rounds.
Rnd 1: 6 sc in MR. [6]
Rnd 2: Inc in each st around. [12] (6 increases → 6 + 6 = 12 ✓)
Rnd 3: (Sc, inc) 6 times. [18] (6 increases → 12 + 6 = 18 ✓)
Rnd 4: (2 sc, inc) 6 times. [24] (6 increases → 18 + 6 = 24 ✓)
Rnd 5: (3 sc, inc) 6 times. [30] (6 increases → 24 + 6 = 30 ✓)
Rnd 6: (4 sc, inc) 6 times. [36] (6 increases → 30 + 6 = 36 ✓)
Rnd 7: (5 sc, inc) 6 times. [42] (6 increases → 36 + 6 = 42 ✓)
Rnd 8: (6 sc, inc) 6 times. [48] (6 increases → 42 + 6 = 48 ✓)
Rnds 9–15: Sc in each st around. [48] — 7 rounds
Rnd 16: (6 sc, dec) 6 times. [42] (6 decreases → 48 − 6 = 42 ✓)
Rnds 17–18: Sc in each st around. [42] — 2 rounds
Rnd 19: (5 sc, dec) 6 times. [36] (6 decreases → 42 − 6 = 36 ✓)
Rnd 20: Sc in each st around. [36]
Rnd 21: (4 sc, dec) 6 times. [30] (6 decreases → 36 − 6 = 30 ✓)
Rnd 22: (3 sc, dec) 6 times. [24] (6 decreases → 30 − 6 = 24 ✓)
Stuff the body very firmly, pushing fill into the base so the cat will sit flat.
Rnd 23: (2 sc, dec) 6 times. [18] (6 decreases → 24 − 6 = 18 ✓)
FO, leaving an 18" (45 cm) tail for sewing on the head. Do not close the 18-st opening. Add a last bit of stuffing at the neck just before you sew.
Belly Patch (CC)
Worked flat.
Ch 7.
Row 1: Sc in 2nd ch from hook and in each ch across. [6]
Row 2: Ch 1, turn, inc, 4 sc, inc. [8] (2 increases → 6 + 2 = 8 ✓)
Row 3: Ch 1, turn, inc, 6 sc, inc. [10] (2 increases → 8 + 2 = 10 ✓)
Rows 4–8: Ch 1, turn, sc in each st across. [10] — 5 rows
Row 9: Ch 1, turn, dec, 6 sc, dec. [8] (2 decreases → 10 − 2 = 8 ✓)
Row 10: Ch 1, turn, dec, 4 sc, dec. [6] (2 decreases → 8 − 2 = 6 ✓)
FO, leaving a 14" (35 cm) tail.
Front Legs (make 2)
Paw in CC, leg in MC. Stuff the paw firmly and the rest of the leg lightly.
With CC:
Rnd 1: 6 sc in MR. [6]
Rnd 2: Inc in each st around. [12] (6 increases → 6 + 6 = 12 ✓)
Rnds 3–4: Sc in each st around. [12] — 2 rounds
Change to MC. Fasten off CC.
With MC:
Rnds 5–11: Sc in each st around. [12] — 7 rounds
FO, leaving a 12" (30 cm) tail. Flatten the last round (6 sts against 6 sts). The opening is sewn shut as you attach the leg.
Hind Legs (make 2)
Paw in CC, thigh in MC. These are sewn on their sides so the cat sits. Stuff the thigh (wider section) firmly and the paw moderately.
With CC:
Rnd 1: 6 sc in MR. [6]
Rnd 2: Inc in each st around. [12] (6 increases → 6 + 6 = 12 ✓)
Rnd 3: (Sc, inc) 6 times. [18] (6 increases → 12 + 6 = 18 ✓)
Rnd 4: Sc in each st around. [18]
Change to MC. Fasten off CC.
With MC:
Rnds 5–7: Sc in each st around. [18] — 3 rounds
Rnd 8: (Sc, dec) 6 times. [12] (6 decreases → 18 − 6 = 12 ✓)
Rnds 9–10: Sc in each st around. [12] — 2 rounds
FO, leaving a 14" (35 cm) tail. Flatten the last round.
Tail (MC)
Rnd 1: 6 sc in MR. [6]
Rnds 2–18: Sc in each st around. [6] — 17 rounds
Stuff lightly in the first two-thirds only (use the end of a hook or a chopstick). Leave the last ½" (1.5 cm) unstuffed so it sews flat. FO, leaving a 10" (25 cm) tail.
Optional Tiny Bow
Ch 8.
Row 1: Sc in 2nd ch from hook and in each ch across. [7]
FO. Pinch the strip at the center and wrap matching yarn tightly around the pinch 6–8 times. Tie off on the back. Leave a tail for sewing to one ear.
Assembly
Use matching yarn and a yarn needle. Whip stitch or ladder stitch. Pin everything first and sit the cat on a table before you sew.
1. Ears to head
Sew the inner ears to the outer ears if you have not already. Pin the ears over Head Rnds 4–8, inner corners 3–4 sts apart, tips tilting slightly outward and a little back. Whip stitch through both layers of each ear.
2. Muzzle and face
Center the muzzle on the face covering Head Rnds 12–16, just under the eyes, with the longer axis of the oval horizontal. Stuff it lightly as you sew, keeping it a shallow bump — not a ball.
With pink yarn or floss, embroider a small inverted triangle nose on the upper center of the muzzle. With black floss, stitch a short vertical line down from the nose, then a shallow V or two small curves for the mouth (a tiny “w”).
Optional blush: a few small satin stitches in pink on each cheek, or a very light brush of pink pastel.
3. Head to body
Add extra stuffing through the body’s 18-st neck so there is no dent. Pin the head onto the opening, rotating it so the face looks slightly down (cuter than a straight stare). Whip stitch Head Rnd 18 area to Body Rnd 23 all the way around. The seam should sit at the neck crease.
4. Belly patch
Center the patch on the front of the body from about Rnd 10 up toward the chest. The wider rows sit on the tummy. Whip stitch around the edge.
5. Front legs
Sew the flattened tops to the upper front of the body, just below the neck, about 4 sts apart and 4 sts out from the belly patch. Angle them so the paws rest on the “ground” in front, slightly together. Sew around the entire flattened opening, catching both layers.
6. Hind legs (sitting pose)
This is what makes the cat sit. Place each hind leg on a lower side of the body, spanning about Body Rnds 8–14. The thigh (18-st section) lies against the body; the paw points forward and a little out. The legs should be almost horizontal, like a sitting cat’s haunches, not hanging down. Sew all around the contact edge. After both legs are on, set the cat on a table — it should rest on the body base plus the two thighs without rolling. Add a few extra stitches if one side tips.
7. Tail
Sew the open end to the lower back, just above the base, slightly off-center so it can curve around one hip. Tack the tail in a gentle S-curve with two or three tiny stitches on the underside if you want it to stay wrapped.
8. Optional bow
Sew to the base of one ear.
9. Whiskers
For display only: Thread three 4" (10 cm) lengths of black floss through each side of the muzzle, 3 per side. Trim to 1–1¼" (2.5–3 cm).
For children: Embroider three straight stitches on each side of the muzzle instead — no loose ends.
Finishing
Weave in every remaining tail. Roll the cat between your hands to round the stuffing. Tug-test ears, legs, and tail. If a limb shifts, add stitches rather than more stuffing.
Shape the ears so they stand; a tiny bit of extra yarn inside the ear base can help them perk.
Color ideas
- Classic gray: MC gray, CC white, pink inner ears
- Orange tabby: MC orange; after assembly, embroider a few short MC-darker or brown stripes on forehead, cheeks, and tail
- Tuxedo: MC black, CC white muzzle/paws/belly
- Calico: MC cream with random orange and gray surface-crochet or embroidered patches
- Siamese look: MC cream body, darker MC (brown or gray) for ears, muzzle, legs, and tail — work those pieces in the dark shade instead of using CC for paws
Care
Surface-clean with a damp cloth. If you must wash, use a mesh bag, cold gentle cycle, and reshape while damp. Air dry. Do not machine-dry; safety eyes and dense stuffing do not respond well to heat.
Disclaimer: This pattern was generated by AI and should be reviewed for accuracy before use. While we strive for quality, AI-generated content may contain errors. Please verify measurements, stitch counts, charts, and instructions before beginning your project. Generated by purlJam.uk
Love this pattern?
Save this pattern to your free PurlJam libraryAccess your pattern anytime
Bookmark this page to access your pattern anytime