Type
Crochet
Difficulty
intermediate
Category
amigurumi
AI Thinking Process
Planning
Verification
Pattern
Sitting Fox Amigurumi
Looking Over Its Shoulder
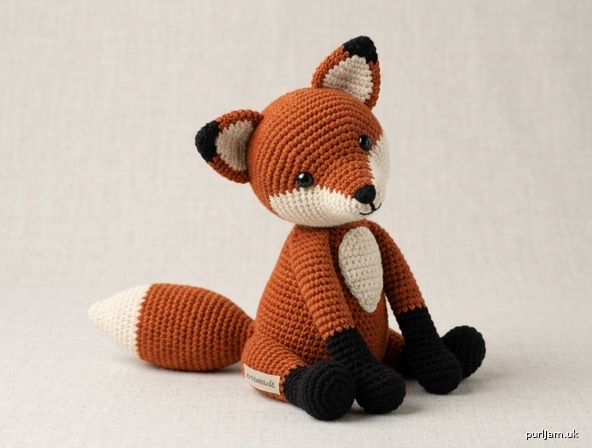
A sitting fox with a pointed white muzzle, black-tipped ears, and a bushy tail, posed as if it has just glanced back over its right shoulder. Worked in separate pieces and assembled. Intermediate: color changes, a BLO sitting base, and a rotated head join.
Skill level: Intermediate
Finished size: About 7 inches (18 cm) tall sitting; about 4 inches (10 cm) wide at the base; tail about 4½ inches (11.5 cm) long.
Yarn weight: Worsted (category 4)
Materials
- MC (rust orange): 120 yd (110 m) worsted
- CC1 (white or cream): 40 yd (37 m) worsted
- CC2 (black): 25 yd (23 m) worsted
- US E-4 / 3.5 mm hook, or size needed for a tight fabric
- Pair of 9 mm safety eyes
- Polyester stuffing
- Yarn needle
- Stitch marker
- Pins
- Black embroidery floss or a short length of CC2 for nose and mouth
- Optional: black sewing thread for whiskers
Safety note: Safety eyes are a choking hazard. Do not use them on toys for children under 3 years; embroider eyes instead.
Gauge
5 sc and 5 rnds = 1 inch (2.5 cm) in single crochet worked in the round.
Gauge is for fabric density, not fit. The fabric should be tight enough that stuffing does not show. If stitches look loose, drop to US D-3 / 3.25 mm.
Abbreviations (US)
| Abbrev. | Meaning |
|---|---|
| BLO | back loop only |
| CC1, CC2 | contrasting colors |
| ch | chain |
| dec | invisible single-crochet decrease (sc2tog) |
| FO | fasten off |
| inc | 2 sc in the same stitch |
| MC | main color |
| MR | magic ring |
| rnd(s) | round(s) |
| sc | single crochet |
| sl st | slip stitch |
| st(s) | stitch(es) |
Pattern Notes
- Use US crochet terms throughout.
- Work in a continuous spiral unless stated. Do not join rounds. Mark the first stitch of every round and move the marker up.
- Invisible decrease: insert hook through the front loop only of the next 2 stitches, yarn over, pull through both front loops, yarn over, pull through 2.
- Change color in the last yarn-over of the last stitch of the old color.
- Stuff as you go. The sitting base must be very firm or the turned head will tip the fox.
- This pattern is written for a fox looking over its right shoulder. Reverse every left/right instruction to look over the left shoulder.
- Pin every piece before sewing. The pose depends on placement, not on extra shaping.
Head (MC)
Stuff firmly as you decrease. Identify the face (eye line) before closing and mark it with a pin — you will need that mark when you rotate the head.
Rnd 1: 6 sc in MR. (6)
Rnd 2: Inc in each st around. (6 increases → 6 + 6 = 12 ✓)
Rnd 3: (Sc, inc) 6 times. (6 increases → 12 + 6 = 18 ✓)
Rnd 4: (2 sc, inc) 6 times. (6 increases → 18 + 6 = 24 ✓)
Rnd 5: (3 sc, inc) 6 times. (6 increases → 24 + 6 = 30 ✓)
Rnd 6: (4 sc, inc) 6 times. (6 increases → 30 + 6 = 36 ✓)
Rnds 7–13: Sc in each st around. (36) — 7 rounds
Safety eyes: Insert between Rnds 8 and 9, 7 stitches apart, centered on the face you marked. Do not snap the washers until you are happy with spacing. The eyes sit on the upper half of the head; the muzzle will cover the lower half.
Rnd 14: (4 sc, dec) 6 times. (6 decreases → 36 − 6 = 30 ✓)
Rnd 15: Sc in each st around. (30)
Rnd 16: (3 sc, dec) 6 times. (6 decreases → 30 − 6 = 24 ✓)
Stuff the head firmly, pushing extra filling into the cheeks.
Rnd 17: (2 sc, dec) 6 times. (6 decreases → 24 − 6 = 18 ✓)
Rnd 18: (Sc, dec) 6 times. (6 decreases → 18 − 6 = 12 ✓)
Rnd 19: Dec 6 times. (6 decreases → 12 − 6 = 6 ✓)
FO, leaving a 6 inch (15 cm) tail. Thread through the remaining 6 front loops, pull closed, and weave in. The closed bottom of the head is the neck join.
Muzzle (CC1)
Rnd 1: 6 sc in MR. (6)
Rnd 2: (Sc, inc) 3 times. (3 increases → 6 + 3 = 9 ✓)
Rnd 3: (2 sc, inc) 3 times. (3 increases → 9 + 3 = 12 ✓)
Rnd 4: (3 sc, inc) 3 times. (3 increases → 12 + 3 = 15 ✓)
Rnds 5–6: Sc in each st around. (15) — 2 rounds
FO, leaving a 12 inch (30 cm) tail for sewing. Stuff firmly into a short, blunt cone.
Cheeks (CC1, make 2)
Rnd 1: 6 sc in MR. (6)
Rnd 2: Inc in each st around. (6 increases → 6 + 6 = 12 ✓)
FO, leaving an 8 inch (20 cm) tail. Do not stuff; these are sewn flat.
Outer Ears (make 2)
Begin with CC2 (black) for the tip, then change to MC.
Rnd 1 (CC2): 6 sc in MR. (6)
Rnd 2 (CC2): (Sc, inc) 3 times. (3 increases → 6 + 3 = 9 ✓)
Rnd 3 (MC): (2 sc, inc) 3 times. (3 increases → 9 + 3 = 12 ✓)
Rnd 4: (3 sc, inc) 3 times. (3 increases → 12 + 3 = 15 ✓)
Rnd 5: (4 sc, inc) 3 times. (3 increases → 15 + 3 = 18 ✓)
Rnds 6–8: Sc in each st around. (18) — 3 rounds
FO, leaving a 10 inch (25 cm) tail. Do not stuff. Flatten into a triangle with the black tip at the point. The starting tail can be used to close the MR; the ending tail sews the ear to the head.
Inner Ears (CC1, make 2)
Rnd 1: 6 sc in MR. (6)
Rnd 2: (Sc, inc) 3 times. (3 increases → 6 + 3 = 9 ✓)
Rnd 3: (2 sc, inc) 3 times. (3 increases → 9 + 3 = 12 ✓)
Rnd 4: Sc in each st around. (12)
FO, leaving an 8 inch (20 cm) tail. Flatten. Do not stuff.
Body (MC)
The BLO round forms a ridge so the fox sits on a flat base. Stuff the base (Rnds 1–16) very firmly; stuff the chest moderately so the head join stays shapely.
Rnd 1: 6 sc in MR. (6)
Rnd 2: Inc in each st around. (6 increases → 6 + 6 = 12 ✓)
Rnd 3: (Sc, inc) 6 times. (6 increases → 12 + 6 = 18 ✓)
Rnd 4: (2 sc, inc) 6 times. (6 increases → 18 + 6 = 24 ✓)
Rnd 5: (3 sc, inc) 6 times. (6 increases → 24 + 6 = 30 ✓)
Rnd 6: (4 sc, inc) 6 times. (6 increases → 30 + 6 = 36 ✓)
Rnd 7: (5 sc, inc) 6 times. (6 increases → 36 + 6 = 42 ✓)
Rnd 8: (6 sc, inc) 6 times. (6 increases → 42 + 6 = 48 ✓)
Rnd 9: BLO sc in each st around. (48)
Rnds 10–16: Sc in each st around. (48) — 7 rounds
Rnd 17: (6 sc, dec) 6 times. (6 decreases → 48 − 6 = 42 ✓)
Rnds 18–19: Sc in each st around. (42) — 2 rounds
Rnd 20: (5 sc, dec) 6 times. (6 decreases → 42 − 6 = 36 ✓)
Rnds 21–22: Sc in each st around. (36) — 2 rounds
Rnd 23: (4 sc, dec) 6 times. (6 decreases → 36 − 6 = 30 ✓)
Rnd 24: Sc in each st around. (30)
Rnd 25: (3 sc, dec) 6 times. (6 decreases → 30 − 6 = 24 ✓)
Rnd 26: Sc in each st around. (24)
Rnd 27: (2 sc, dec) 6 times. (6 decreases → 24 − 6 = 18 ✓)
Rnd 28: Sc in each st around. (18)
FO, leaving an 18 inch (46 cm) tail for sewing the head. Leave the neck open. Finish stuffing through the neck: extra-firm in the bottom third so the fox stands (sits) without rocking.
Chest Patch (CC1)
Rnd 1: 6 sc in MR. (6)
Rnd 2: Inc in each st around. (6 increases → 6 + 6 = 12 ✓)
Rnd 3: (Sc, inc) 6 times. (6 increases → 12 + 6 = 18 ✓)
Rnd 4: (2 sc, inc) 6 times. (6 increases → 18 + 6 = 24 ✓)
Rnd 5: (3 sc, inc) 6 times. (6 increases → 24 + 6 = 30 ✓)
FO, leaving a 14 inch (36 cm) tail. Do not stuff. When sewing, pinch the top into a teardrop (narrow toward the neck, wide toward the belly).
Front Legs (make 2)
Begin with CC2 (black), change to MC.
Rnd 1 (CC2): 6 sc in MR. (6)
Rnd 2: Inc in each st around. (6 increases → 6 + 6 = 12 ✓)
Rnds 3–8: Sc in each st around. (12) — 6 rounds, still CC2
Rnds 9–15 (MC): Sc in each st around. (12) — 7 rounds
FO, leaving a 12 inch (30 cm) tail. Stuff the paw (Rnds 1–8) firmly and the upper leg lightly so the leg can angle at the body.
Hind Legs (make 2)
The 18-st section is the haunch; the 12-st end is sewn to the body.
Rnd 1 (CC2): 6 sc in MR. (6)
Rnd 2: Inc in each st around. (6 increases → 6 + 6 = 12 ✓)
Rnd 3: (Sc, inc) 6 times. (6 increases → 12 + 6 = 18 ✓)
Rnds 4–8: Sc in each st around. (18) — 5 rounds, still CC2
Rnds 9–10 (MC): Sc in each st around. (18) — 2 rounds
Rnd 11: (Sc, dec) 6 times. (6 decreases → 18 − 6 = 12 ✓)
Rnds 12–14: Sc in each st around. (12) — 3 rounds
FO, leaving a 14 inch (36 cm) tail. Stuff firmly, with slightly more filling in the haunch than in the 12-st end.
Tail
Begin with CC1 (white tip), change to MC.
Rnd 1 (CC1): 6 sc in MR. (6)
Rnd 2: (Sc, inc) 3 times. (3 increases → 6 + 3 = 9 ✓)
Rnd 3: (2 sc, inc) 3 times. (3 increases → 9 + 3 = 12 ✓)
Rnd 4: Sc in each st around. (12)
Rnd 5 (MC): (3 sc, inc) 3 times. (3 increases → 12 + 3 = 15 ✓)
Rnd 6: (4 sc, inc) 3 times. (3 increases → 15 + 3 = 18 ✓)
Rnd 7: (5 sc, inc) 3 times. (3 increases → 18 + 3 = 21 ✓)
Rnd 8: (6 sc, inc) 3 times. (3 increases → 21 + 3 = 24 ✓)
Rnds 9–16: Sc in each st around. (24) — 8 rounds
Rnd 17: (6 sc, dec) 3 times. (3 decreases → 24 − 3 = 21 ✓)
Rnd 18: (5 sc, dec) 3 times. (3 decreases → 21 − 3 = 18 ✓)
Rnd 19: (4 sc, dec) 3 times. (3 decreases → 18 − 3 = 15 ✓)
Rnd 20: (3 sc, dec) 3 times. (3 decreases → 15 − 3 = 12 ✓)
Rnd 21: Sc in each st around. (12)
FO, leaving a 12 inch (30 cm) tail. Stuff lightly — firm enough to hold a curve, soft enough to wrap around the hip. Leave the 12-st end open for sewing.
Assembly
Sew with matching yarn unless noted. Use pins and check the sitting balance after every major piece.
1. Ears
Sew each inner ear onto the orange portion of an outer ear, leaving a small MC border all around and the black tip uncovered. Sew the assembled ears to the head over Rnds 4–8, inner ears facing forward (toward the marked face). Bases sit about 4 stitches apart at the crown, with a slight forward tilt.
2. Muzzle and cheeks
Sew the stuffed muzzle to the lower face, centered under the eyes, covering approximately Head Rnds 12–17. The top edge of the muzzle should sit 2–3 rounds below the eyes. Sew the cheeks flat on either side of the muzzle, just under the outer corners of the eyes, overlapping the muzzle slightly.
3. Face
With CC2, embroider a filled inverted triangle on the tip of the muzzle, about ⅜ inch (1 cm) wide. Add a short vertical stitch down from the triangle and a tiny horizontal mouth. Optional: three whiskers per side with sewing thread, anchored inside the muzzle seam.
4. Chest
Pin the chest patch to the front of the body as a teardrop, narrow end at the neck (Rnd 27–28), wide end over Rnds 14–18. Sew around the edge.
5. Hind legs (sitting)
Sit the body on its BLO ridge. Sew the 12-st open end of each hind leg to the side of the body over Rnds 10–16, toward the back half. The 18-st haunch lies against the body; the black foot points forward and slightly out so the fox sits on its rear with both feet on the “ground.” The two feet should be about 1½ inches (4 cm) apart at the toes.
6. Front legs
Sew the open ends to the upper front of the body over Rnds 22–26, just outside the chest patch, about 4 stitches apart. Angle them down and slightly forward so the paws rest on the same plane as the hind feet and help the fox sit. The light stuffing in the upper legs lets you set this angle.
7. Tail
Sew the open 12-st end to center back, just above the BLO ridge (Rnds 10–13). Curve the tail around the fox’s left hip (the side it is turning away from) so it rests beside the left hind leg. This balances the weight and silhouette of the head turning right.
8. Head — looking over the right shoulder (the pose)
Do not sew the head facing forward.
- Set the body upright. The chest is “front.”
- Place the closed base of the head over the 18-st neck opening.
- Rotate the head about 75 degrees to the fox’s right (clockwise if you are looking down on the fox). The muzzle points over the right shoulder, not straight ahead. From the chest, you should see more of the left eye and the left inner ear; the right eye and right ear sit farther back.
- Add a slight downward tilt, as if glancing back, not staring at the ceiling.
- Pin densely all the way around. Check the sit: if the fox tips toward the muzzle, add more stuffing through the neck on the side opposite the snout, then re-pin.
- Using the long body tail, sew the head to the neck with small, firm stitches through Rnd 28 of the body and the closed base of the head. Go around twice. Add 3–4 extra anchoring stitches on the right-front of the neck (under the chin) where the turn puts the most strain.
The head’s chin will sit closer to the right front of the chest; the back of the head will sit over the left shoulder. That offset is correct.
Finishing
Weave in every remaining end, burying them inside stuffed pieces. Roll the body between your palms to round the stuffing, then set the fox on a flat surface and adjust the feet and tail until it sits without a hand. Steam is not required; if you block at all, use only light steam held above the fabric — do not crush the stuffing.
To look over the left shoulder instead, rotate the head to the fox’s left and wrap the tail around the right hip.
Disclaimer: This pattern was generated by AI and should be reviewed for accuracy before use. While we strive for quality, AI-generated content may contain errors. Please verify measurements, stitch counts, charts, and instructions before beginning your project. Generated by purlJam.uk
Love this pattern?
Save this pattern to your free PurlJam libraryAccess your pattern anytime
Bookmark this page to access your pattern anytime