Type
Crochet
Difficulty
intermediate
Category
amigurumi
AI Thinking Process
Planning
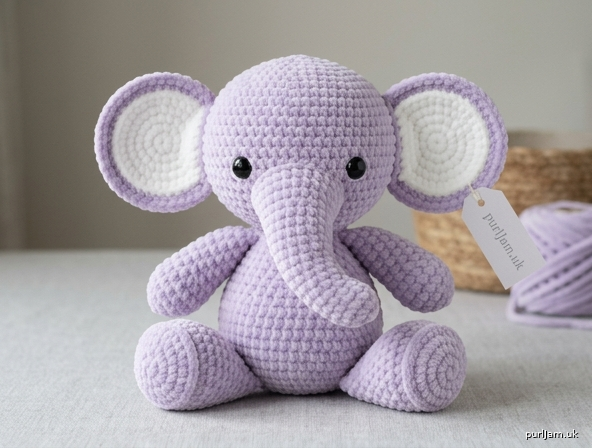
1. **Design Strategy**: Minimalist kawaii sitting baby elephant in super bulky chenille yarn worked in tight continuous spirals of single crochet for a dense plush fabric. Oversized circular ears (lavender + white), long tapered curved trunk, chunky legs, and a head slightly larger than the body for cute proportions.
2. **Construction Plan**: Seamless amigurumi worked bottom-up in continuous rounds for each separate piece (head, trunk, ears, body, legs, arms, tail), then assembled with whip stitch in the specified order.
3. **Quality Assurance**:
- Chenille yarn splits/hides stitch definition — emphasize stitch markers and counting by feel.
- Flat bottoms on body and legs needed for upright sitting — instruct stuffing and shaping.
- Eye placement low and 9–10 sts apart for kawaii expression — give exact round/spacing.
4. **Final Calculations**: Gauge in chenille with 5 mm hook ≈ 11 sc x 12 rnds = 4" (10 cm). Head max 36 sts → ~3.3" diameter. Body max 30 sts → ~2.7" wide, slightly smaller than head. Finished height ~6–8" (15–20 cm). Eyes 14 mm placed Rnd 13, 9 sts apart.
Verification
[PRE-FLIGHT CHECKS]
1. **Completeness**: All template sections present — Head, Trunk, Ears, Body, Legs, Arms, Tail, Assembly, materials, gauge, safety. ✓
2. **Consistency**: Head increases 6→12→18→24→30→36 (5 inc rounds) verified; body 6→12→18→24→30 verified; decreases mirror increases and reach 6 before closing. Eye spacing of 9 sts fits within 36-st head. ✓
3. **Constraints**: Lavender main + white inner ears, low eyes 9–10 sts apart, head larger than body, flat bottoms for sitting, legs spread for trunk to rest between, tiny tail at back — all addressed. ✓
4. **Safety**: All stitch counts re-checked; increase/decrease math balances per round; safety eyes inserted before closing head. ✓
Pattern
# Plush Sitting Baby Elephant — Amigurumi Pattern

A minimalist kawaii sitting baby elephant made in soft super bulky chenille (velvet) yarn. Rounded silhouette, oversized ears, long tapered trunk, and chunky legs. **Finished size: approximately 6–8 inches (15–20 cm) tall.**

**Difficulty:** Advanced (chenille yarn is harder to count; precise shaping and assembly required)

---

## Materials

- **Main color (MC):** Soft lavender super bulky (weight 6) chenille/velvet yarn — approx. 110–130 yds
  (e.g., Himalaya Dolphin Baby, Premier Parfait Chunky, Bernat Baby Velvet)
- **Contrast color (CC):** White chenille yarn — approx. 15–20 yds (inner ears)
- **Hook:** 4.0–5.0 mm (start with 5 mm; size down to 4 mm if your gauge is loose)
- **Safety eyes:** 14 mm glossy black (range 12–16 mm)
- Polyester fiberfill stuffing
- Yarn needle (large-eye, blunt)
- 2 stitch markers
- Optional: small scrap of light scrap yarn for marking eye placement

## Gauge

11 sc x 12 rounds = 4 inches (10 cm) in single crochet, worked tightly.
*Tip: With chenille yarn, gauge is forgiving but tension must be tight enough that stuffing does not peek through. Use a smaller hook if needed.*

## Abbreviations (US terms)

- **sc** = single crochet
- **inc** = 2 sc in same stitch
- **dec** = invisible decrease (insert hook in FLO of next 2 sts, yo, pull through both, yo, pull through all)
- **st(s)** = stitch(es)
- **rnd** = round
- **MR** = magic ring
- **FLO** = front loops only
- **( ) x n** = repeat sequence n times
- **[ ]** = total stitch count at end of round

## Notes

- Work in **continuous spirals** — do NOT join or turn unless stated. Move your marker up each round.
- Because chenille hides stitches, **count by feel** and re-place your marker often.
- Stuff firmly as directed before closing each piece.
- Use a stitch marker in the first stitch of each round.

---

## HEAD (MC) — nearly spherical, slightly wider than tall

- **Rnd 1:** 6 sc in MR **[6]**
- **Rnd 2:** inc in each st around **[12]** *(6 inc = 6+6=12 ✓)*
- **Rnd 3:** (sc, inc) x6 **[18]** *(12+6=18 ✓)*
- **Rnd 4:** (2 sc, inc) x6 **[24]** *(18+6=24 ✓)*
- **Rnd 5:** (3 sc, inc) x6 **[30]** *(24+6=30 ✓)*
- **Rnd 6:** (4 sc, inc) x6 **[36]** *(30+6=36 ✓)*
- **Rnds 7–14:** sc in each st around (8 rounds even) **[36]**

**Insert safety eyes now:** Place eyes between **Rnd 12 and Rnd 13**, positioned **low on the face**, spaced **9 sts apart** (count 9 stitches across the front between posts). This low, wide placement gives the baby/kawaii look. Secure backings firmly.

- **Rnd 15:** (4 sc, dec) x6 **[30]** *(36−6=30 ✓)*
- **Rnd 16:** (3 sc, dec) x6 **[24]** *(30−6=24 ✓)*

**Stuff the head FIRMLY** now and continue stuffing as you close.

- **Rnd 17:** (2 sc, dec) x6 **[18]** *(24−6=18 ✓)*
- **Rnd 18:** (sc, dec) x6 **[12]** *(18−6=12 ✓)*
- **Rnd 19:** dec x6 **[6]** *(12−6=6 ✓)*

Fasten off, leaving a 6-inch tail. Weave through remaining 6 sts and pull closed. **Set aside.**

---

## TRUNK (MC) — narrow tip widening to face, gently curved

Begins at the rounded tip.

- **Rnd 1:** 5 sc in MR **[5]**
- **Rnd 2:** sc in each st **[5]**
- **Rnd 3:** (sc, inc) x2, sc **[7]** *(5+2=7 ✓)*
- **Rnds 4–5:** sc in each st (2 rounds) **[7]**
- **Rnd 6:** (2 sc, inc) x2, sc **[9]** *(7+2=9 ✓)*
- **Rnds 7–8:** sc in each st (2 rounds) **[9]**
- **Rnd 9:** (2 sc, inc) x3 **[12]** *(9+3=12 ✓)*
- **Rnds 10–11:** sc in each st (2 rounds) **[12]**

To create the **downward curve**, work the following 2 rounds with extra-tight tension on one side (work 2 sc into the last 2 sts as half-height by pulling snug):

- **Rnds 12–13:** sc in each st **[12]**

**Stuff lightly** (the trunk should stay soft and flexible to hold its curve). Do not close — leave the final round open for sewing.

Fasten off, leaving a 12-inch tail. The natural curve forms from light stuffing and the slight tension difference. **Set aside.**

*Trunk length should be roughly equal to the height of the face (~2.5–3 in / 6–7.5 cm).*

---

## EARS (Make 2) — very large circular flat discs

Each ear is a flat circle worked in two colors: white center, lavender outer border.

### Inner ear (CC – white)

- **Rnd 1:** 6 sc in MR **[6]**
- **Rnd 2:** inc in each st around **[12]** *(6+6=12 ✓)*
- **Rnd 3:** (sc, inc) x6 **[18]** *(12+6=18 ✓)*

Fasten off, leaving a short tail. Do not stuff (flat piece).

### Outer ear (MC – lavender) — continue around the white center

Attach MC to any stitch on the edge of the white inner ear.

- **Rnd 4:** (2 sc, inc) x6 **[24]** *(18+6=24 ✓)*
- **Rnd 5:** (3 sc, inc) x6 **[30]** *(24+6=30 ✓)*

Slip stitch to next st to even the edge. Fasten off, leaving a 10-inch tail for sewing.

The finished ear is a flat disc with white sitting **slightly inside** the lavender border. Diameter ≈ half the head height. **Set aside both ears.**

---

## BODY (MC) — oval, slightly smaller than head, flat bottom

Start at the flat bottom.

- **Rnd 1:** 6 sc in MR **[6]**
- **Rnd 2:** inc in each st around **[12]** *(6+6=12 ✓)*
- **Rnd 3:** (sc, inc) x6 **[18]** *(12+6=18 ✓)*
- **Rnd 4:** (2 sc, inc) x6 **[24]** *(18+6=24 ✓)*
- **Rnd 5:** (3 sc, inc) x6 **[30]** *(24+6=30 ✓)*
- **Rnds 6–13:** sc in each st around (8 rounds even) **[30]**

This straight section creates the rounded belly. To keep the **flat bottom**, do not over-stuff the base — press it flat on a table as you stuff.

- **Rnd 14:** (3 sc, dec) x6 **[24]** *(30−6=24 ✓)*
- **Rnd 15:** (2 sc, dec) x6 **[18]** *(24−6=18 ✓)*

**Stuff medium-firm** (firmer at the base for stability, softer at the top so the head can nestle).

- **Rnd 16:** (sc, dec) x6 **[12]** *(18−6=12 ✓)*

Fasten off, leaving a long 14-inch tail for attaching the head. Do NOT close fully — leave the 12-st opening at the top for stuffing adjustment and seating the head. **Set aside.**

---

## LEGS (Make 2 – MC) — thick oval tubes, flat bottom

Start at the flat bottom of the foot.

- **Rnd 1:** 6 sc in MR **[6]**
- **Rnd 2:** inc in each st around **[12]** *(6+6=12 ✓)*
- **Rnd 3:** (sc, inc) x6 **[18]** *(12+6=18 ✓)*
- **Rnd 4:** working in **FLO**, sc in each st around **[18]** *(creates a crease to flatten the foot base)*
- **Rnds 5–8:** sc in each st around (4 rounds even) **[18]**
- **Rnd 9:** (sc, dec) x6 **[12]** *(18−6=12 ✓)*

**Stuff firmly at the foot, lightly toward the top.** Flatten the opening.

Fasten off, leaving a 10-inch tail for sewing. **Set aside both legs.**

---

## ARMS (Make 2 – MC) — short rounded cylinders

Start at the rounded end.

- **Rnd 1:** 5 sc in MR **[5]**
- **Rnd 2:** inc in each st around **[10]** *(5+5=10 ✓)*
- **Rnds 3–6:** sc in each st around (4 rounds even) **[10]**

**Stuff lightly.** Flatten the opening slightly.

Fasten off, leaving an 8-inch tail for sewing. **Set aside both arms.**

---

## TAIL (MC) — tiny nub

- **Rnd 1:** 4 sc in MR **[4]**
- **Rnds 2–3:** sc in each st around (2 rounds) **[4]**

Do not stuff. Fasten off, leaving a 6-inch tail. *(Alternative: chain 5 and fasten off for a thin tail.)* **Set aside.**

---

## ASSEMBLY

Pin every piece before sewing. Use matching yarn and whip stitch for invisible seams. Follow this order:

1. **Trunk to face:** Center the open end of the trunk on the lower-center of the face, just below and between the eyes. Sew all around with the 12-inch tail, easing in light stuffing so the trunk curves gently downward. The tip should point down and slightly forward.

2. **Confirm eyes:** Verify the safety eyes (already inserted at Rnd 12/13) sit low and 9 sts apart, flanking the top of the trunk.

3. **Ears:** Pin the two large discs to each side of the head, near the top, with a **slight forward tilt**. The white center faces forward. Sew the lower half of each ear edge to the head so the top edge stands slightly free. Use the 10-inch MC tails.

4. **Body:** Make sure the body's flat bottom sits level. Adjust stuffing to medium-firm.

5. **Legs:** Attach both legs to the **lower front** of the body, flat foot bottoms down. **Spread them apart** just enough to leave a small gap in the center — this is where the trunk tip rests when the elephant sits. Sew securely with the 10-inch tails.

6. **Arms:** Attach one arm to each side of the **upper body**, pointing slightly forward. Sew with the 8-inch tails.

7. **Head to body:** Add extra stuffing through the body's top opening if needed for a firm, stable neck. Position the head directly on top of the body so the neck is nearly invisible (head appears to rest right on the body). Pin, then sew all around with the long 14-inch head/body tail. Sew twice around for strength.

8. **Tail:** Sew the small nub to the **back center** of the body, low and out of sight from the front.

9. Weave in all remaining ends, burying them inside the stuffing.

---

## Finishing & Safety Tips

- Tug each limb gently to confirm it is firmly attached (no choking hazards).
- Use **safety eyes** (not buttons) for children under 3, and double-check the backings are locked.
- For an even softer plush look, lightly brush the chenille seams with your fingers to blend the pile over the stitches.
- The elephant should sit unaided on its flat body base and flat-bottomed legs.

**Stitch-count summary (verified):**
- Head max **36 sts**, closes to 6 ✓
- Body max **30 sts** (smaller than head ✓), closes to 12-st opening
- Legs **18 sts**, Arms **10 sts**, Trunk widens 5 → 12 sts, Ears 18 (white) → 30 (full disc), Tail 4 sts.

Enjoy your cuddly kawaii baby elephant! 🐘
Disclaimer: This pattern was generated by AI and should be reviewed for accuracy before use. While we strive for quality, AI-generated content may contain errors. Please verify measurements, stitch counts, and instructions before beginning your project. Generated by purlJam.uk
Access your pattern anytime
Bookmark this page to access your pattern anytime