Type
Crochet
Difficulty
intermediate
Category
amigurumi
AI Thinking Process
Planning
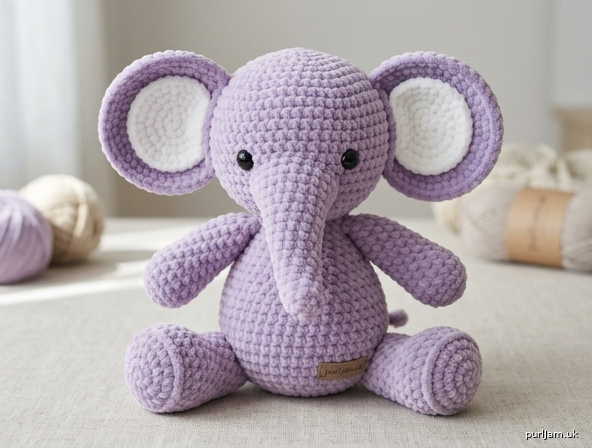
1. **Design Strategy**: Minimalist kawaii sitting baby elephant in super bulky chenille velvet, worked seamlessly in continuous spirals with tight sc for a plush, dense fabric. Oversized circular ears, tapered curved trunk, chunky legs, and a head larger than body for cute baby proportions.
2. **Construction Plan**: All pieces worked bottom-up/in-the-round separately (head, trunk, 2 ears, body, 2 legs, 2 arms, tail), stuffed, then sewn together per the specified assembly order.
3. **Quality Assurance**:
- Chenille hides stitch markers — use a contrasting scrap yarn marker and count carefully.
- Eyes must sit LOW (rnd 9–10) for baby expression; insert before closing head.
- Flat-bottom body + spread legs needed for stable sitting; sew legs to lower front.
4. **Final Calculations**: Gauge: 4mm hook, ~14 sc x 15 rnds = 4"x4" in chenille. Head max 36 sts (~5"/13cm diameter). Body max 30 sts (~4"). Legs 12 sts, arms 8 sts. Finished height ~7" (18cm). Eyes 14mm, ~9 sts apart.
Verification
[PRE-FLIGHT CHECKS]
1. **Completeness**: All template sections present — Head, Trunk, Ears, Body, Legs, Arms, Tail, Assembly. ✓
2. **Consistency**: Head increases 6→12→18→24→30→36 (multiples of 6, verified). Body 6→12→18→24→30. Limbs verified even counts. ✓
3. **Constraints**: Lavender main, white inner ears, 14mm eyes low/9 sts apart, sitting pose with flat body base, trunk between spread legs, forward-tilted ears, tiny tail — all addressed. ✓
4. **Safety**: All decrease/increase math sums to round totals; safety eyes specified; firm assembly noted. ✓
Pattern
# Plush Baby Elephant — Sitting Amigurumi
### A Minimalist Kawaii Velvet Elephant

**Difficulty:** Advanced
**Finished Size:** Approximately 7 in (18 cm) tall, seated
**Style:** Soft plush, oversized ears, long tapered trunk, chunky legs

---

## Materials

- **Main Color (MC):** Soft lavender — Super Bulky (Weight 6) chenille/velvet yarn (~100 g)
  *(e.g., Himalaya Dolphin Baby, Premier Parfait Chunky, Bernat Baby Velvet)*
- **Contrast Color (CC):** White — same weight, small amount for inner ears
- **Hook:** 4.0 mm (recommended for tight gauge) — up to 5.0 mm if you crochet very tightly
- **Safety eyes:** 14 mm glossy black (2)
- **Stuffing:** Polyester fiberfill
- **Yarn needle** for assembly
- **Stitch marker** (use bright scrap yarn — plastic markers slip out of chenille)
- Optional: long doll/sculpture needle for eye placement

---

## Gauge

14 sc × 15 rounds = 4 × 4 in (10 × 10 cm) in continuous sc.
**Gauge is approximate** with velvet yarn — the priority is a **tight, dense fabric** so stuffing never shows. If you see gaps, drop a hook size.

---

## Abbreviations (US Terms)

- **MR** – magic ring
- **sc** – single crochet
- **inc** – 2 sc in same stitch (increase)
- **dec** – invisible decrease (insert in FLO of next 2 sts, yo, pull through both, yo, pull through all 3)
- **st(s)** – stitch(es)
- **rnd** – round
- **FLO/BLO** – front/back loop only
- **( )×n** – repeat instructions in parentheses n times
- **[ ]** – total stitch count at end of round

**Notes:**
- Work in **continuous spirals** (do not join) unless stated.
- Move your marker up each round.
- Velvet yarn is slippery — count stitches every 2–3 rounds.

---

## HEAD
*(Make 1 in MC. The head is nearly spherical, slightly wider than tall. Start here per assembly order.)*

- **Rnd 1:** 6 sc in MR **[6]**
- **Rnd 2:** inc ×6 **[12]**
- **Rnd 3:** (sc, inc) ×6 **[18]**
- **Rnd 4:** (2 sc, inc) ×6 **[24]**
- **Rnd 5:** (3 sc, inc) ×6 **[30]**
- **Rnd 6:** (4 sc, inc) ×6 **[36]**
  *Math check: 6→12→18→24→30→36, +6 each round ✓*
- **Rnds 7–13:** sc in each st **[36]** (7 even rounds for height)

> **EYE PLACEMENT — DO THIS NOW (low, baby expression):**
> Between **Rnd 9 and Rnd 10**, insert the two 14 mm safety eyes **9–10 stitches apart**, centered on the front. Placing them low (around rnd 9–10 of a 13-round head) gives the cute baby look. Secure backings now.

- **Rnd 14:** (4 sc, dec) ×6 **[30]**
- **Rnd 15:** (3 sc, dec) ×6 **[24]**
  **→ Begin firm stuffing now. Stuff head FIRMLY.**
- **Rnd 16:** (2 sc, dec) ×6 **[18]**
- **Rnd 17:** (sc, dec) ×6 **[12]**
  **→ Top up stuffing firmly.**
- **Rnd 18:** dec ×6 **[6]**

Fasten off, leaving a long tail. Weave through remaining 6 sts and pull closed. Set aside.

---

## TRUNK
*(Make 1 in MC. Narrow at tip, widening toward face, gently curving. Length ≈ face height, ~2.5 in / 6 cm.)*

- **Rnd 1:** 5 sc in MR **[5]**
- **Rnd 2:** sc in each st **[5]**
- **Rnd 3:** sc in each st **[5]**
- **Rnd 4:** (4 sc, inc) ×1 **[6]**
- **Rnd 5:** sc in each st **[6]**
- **Rnd 6:** (2 sc, inc) ×2 **[8]**
- **Rnd 7:** sc in each st **[8]**
- **Rnd 8:** (3 sc, inc) ×2 **[10]**
- **Rnd 9:** sc in each st **[10]**
- **Rnd 10:** (4 sc, inc) ×2 **[12]**
- **Rnds 11–12:** sc in each st **[12]**
  *Math check: tip 5 → widens to 12 at face end ✓*

**Lightly** stuff the wider half only (leave the tip soft so it curves). Flatten the open end slightly and fasten off, leaving a long tail.

> **Curve tip:** While stuffing, push fill toward the underside so the trunk naturally bends downward.

**Sew the trunk now** to the center of the face, just below and between the eyes, base end against the face, tip pointing down. Use the long tail and whip stitch all the way around the opening.

---

## EARS
*(Make 2. Very large flat circles ≈ half the head height. Each ear = white inner disc + lavender outer ring.)*

### Inner Ear (CC – white) — Make 2
- **Rnd 1:** 6 sc in MR **[6]**
- **Rnd 2:** inc ×6 **[12]**
- **Rnd 3:** (sc, inc) ×6 **[18]**

Fasten off, leave a short tail. Do not stuff (flat piece).

### Outer Ear (MC – lavender) — Make 2
- **Rnd 1:** 6 sc in MR **[6]**
- **Rnd 2:** inc ×6 **[12]**
- **Rnd 3:** (sc, inc) ×6 **[18]**
- **Rnd 4:** (2 sc, inc) ×6 **[24]**
  *Math check: lavender 24 sts > white 18 sts, so white sits inside the border ✓*

Do not fasten off yet — **place the white inner ear on top of the lavender disc** (white sits slightly inside the lavender border) and work **Rnd 5 joining them**:
- **Rnd 5 (join):** Holding white disc against the lavender, sc evenly around through **both** edges where they overlap, then continue single sc around the lavender edge to even it. Fasten off, leaving a long tail.

Flatten each ear. Pinch the base slightly to create a gentle cup.

**Attach ears** high on each side of the head, **tilted slightly forward**, using the long tails and whip stitch across the pinched base. Ears should stand large and round.

---

## BODY
*(Make 1 in MC. Oval, slightly smaller than head, rounded belly, FLAT bottom so it sits.)*

- **Rnd 1:** 6 sc in MR **[6]**
- **Rnd 2:** inc ×6 **[12]**
- **Rnd 3:** (sc, inc) ×6 **[18]**
- **Rnd 4:** (2 sc, inc) ×6 **[24]**
- **Rnd 5:** (3 sc, inc) ×6 **[30]**
  *Math check: 30 < head's 36 — body is smaller than head ✓*
- **Rnd 6:** sc in **BLO** each st **[30]**
  *(Working this round in BLO creates a crisp edge for a flatter, stable bottom.)*
- **Rnds 7–13:** sc in each st **[30]** (7 even rounds — gives oval height)
- **Rnd 14:** (3 sc, dec) ×6 **[24]**
  **→ Stuff medium-firm. Keep the base flat by pressing stuffing toward the bottom.**
- **Rnd 15:** (2 sc, dec) ×6 **[18]**
- **Rnd 16:** (sc, dec) ×6 **[12]**
  **→ Top up stuffing.**
- **Rnd 17:** dec ×6 **[6]**

Fasten off, leaving a long tail for sewing to the head. Weave through remaining sts to close the top neatly.

---

## LEGS
*(Make 2 in MC. Thick oval tubes, flat on the bottom, large relative to body.)*

- **Rnd 1:** 6 sc in MR **[6]**
- **Rnd 2:** inc ×6 **[12]**
- **Rnd 3:** sc in **BLO** each st **[12]**
  *(BLO gives a flat foot pad/base.)*
- **Rnds 4–7:** sc in each st **[12]** (4 even rounds for chunky length)
- **Rnd 8:** (4 sc, dec) ×2 **[10]**
  *Math check: 12 → 10, slight taper at top ✓*

**Lightly–medium** stuff (keep the bottom flat). Flatten the open top and fasten off, leaving a long tail.

**Attach legs** to the **lower front** of the body, **spread apart just enough that the trunk rests between them** when seated. Whip stitch securely so the foot pads sit flat and the elephant balances upright.

---

## ARMS
*(Make 2 in MC. Short rounded cylinders, lightly stuffed.)*

- **Rnd 1:** 6 sc in MR **[6]**
- **Rnd 2:** (2 sc, inc) ×2 **[8]**
- **Rnds 3–6:** sc in each st **[8]** (4 even rounds)
  *Math check: rounded closed end (rnd 1) + 8-st tube ✓*

**Lightly** stuff. Flatten the open end and fasten off, leaving a long tail.

**Attach arms** to each side of the **upper body**, **pointing slightly forward**, whip stitching across the flattened end.

---

## TAIL
*(Make 1 in MC. Tiny nub, not visible from front.)*

- **Rnd 1:** 4 sc in MR **[4]**
- **Rnds 2–3:** sc in each st **[4]**

Do not stuff (or barely). Fasten off, leaving a tail.
*(Alternative: chain 5, fasten off, for a thin tail.)*

**Attach** to the **back center**, lower body.

---

## ASSEMBLY ORDER (Recap)

1. Crochet the **head**; insert safety eyes low (rnd 9–10); stuff firmly and close.
2. Crochet the **trunk**; sew to center of face below the eyes.
3. Confirm **eyes** are secure and 9–10 sts apart.
4. Make and sew **ears** high on the sides, tilted forward.
5. Crochet the **body**; stuff medium-firm with a flat bottom.
6. Crochet and attach both **legs** to the lower front, spread for the trunk to rest between.
7. Crochet and attach both **arms** to the upper sides, pointing slightly forward.
8. **Sew the head to the body.** Add a little extra stuffing at the neck join for a firm, upright head that appears to rest directly on the body (almost no visible neck). Whip stitch all around.
9. Add the **tail** to the back center.

---

## Finishing Tips

- **Velvet yarn shedding:** Work slowly; weave ends in twice and trim flush.
- **Stability:** Before final head attachment, test that the seated elephant balances on its flat body base + leg pads. Adjust leg placement forward/back to correct any tipping.
- **Expression:** If the eyes look too high after assembly, the head can be tilted slightly forward when sewing to the body to enhance the baby look.
- **No nostrils** on the trunk tip — keep it smooth and rounded per the kawaii style.

Enjoy your cuddly plush baby elephant! 🐘
Disclaimer: This pattern was generated by AI and should be reviewed for accuracy before use. While we strive for quality, AI-generated content may contain errors. Please verify measurements, stitch counts, and instructions before beginning your project. Generated by purlJam.uk
Access your pattern anytime
Bookmark this page to access your pattern anytime