Type
Crochet
Difficulty
intermediate
Category
amigurumi
AI Thinking Process
Planning
Verification
Pattern
Plush Sitting Baby Elephant — Amigurumi Pattern
Advanced • Super Bulky Chenille (Velvet) Yarn
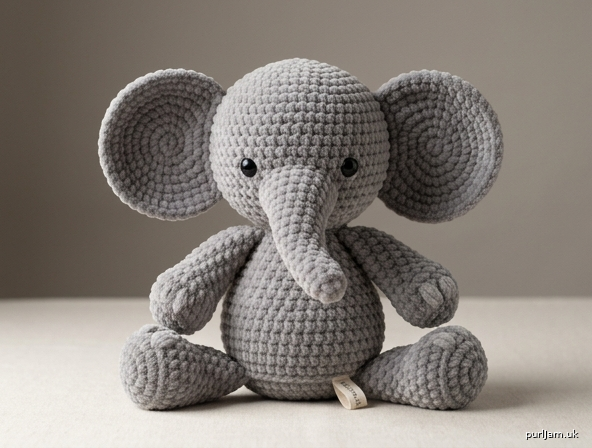
A soft, round baby elephant with a nearly spherical head, oversized circular ears, a gently curving trunk, and chunky legs arranged in a stable sitting pose. Finished height approximately 7 in (18 cm).
MATERIALS
- Yarn: Super bulky (6) chenille/velvet yarn in gray — approx. 120–150 yd (110–140 m). Small amount of light pink or white optional for inner ears.
- Hook: US H-8 / 5 mm (go down to G-6 / 4 mm if your gauge is loose — velvet stretches).
- Safety eyes: 2 × 14 mm black (locked backs).
- Fiberfill polyester stuffing.
- Yarn needle (blunt, large eye for chenille).
- Stitch markers (at least 2).
- Optional: dark gray or black embroidery floss for subtle detail.
GAUGE
4 sc × 4.5 rounds = 1 in (2.5 cm) in single crochet, worked tightly in a spiral. Chenille is forgiving on gauge but must be worked tightly so stuffing does not show.
ABBREVIATIONS (US TERMS)
- sc – single crochet
- inc – 2 sc in same stitch
- dec – invisible decrease (insert in FLO of next 2 sts, yo, pull through both, yo, pull through all 3)
- st(s) – stitch(es)
- [ ] – total stitch count at end of round
- ( ) around – repeat sequence to end of round
- Work in a continuous spiral unless told to join. Move your marker up each round.
HEAD
Worked bottom-up as a sphere; slightly wider than tall. Gray.
- Rnd 1: 6 sc in magic ring [6]
- Rnd 2: inc in each st around [12] (6 inc → 6 + 6 = 12 ✓)
- Rnd 3: (sc, inc) around [18] (6 inc → 12 + 6 = 18 ✓)
- Rnd 4: (2 sc, inc) around [24] (6 inc → 18 + 6 = 24 ✓)
- Rnd 5: (3 sc, inc) around [30] (6 inc → 24 + 6 = 30 ✓)
- Rnd 6: (4 sc, inc) around [36] (6 inc → 30 + 6 = 36 ✓)
- Rnds 7–14: sc in each st around [36] (8 even rounds for a rounded, tall forehead)
Insert safety eyes between Rnd 12 and Rnd 13, placed low on the head for a baby expression, spaced 9 sts apart across the front. (9 sts on a 36-st round ≈ one quarter of the circumference — correct spacing ✓.) Lock the backs.
- Rnd 15: (4 sc, dec) around [30] (6 dec → 36 − 6 = 30 ✓)
- Rnd 16: (3 sc, dec) around [24] (6 dec → 30 − 6 = 24 ✓)
Stuff firmly now (velvet shows lumps — pack evenly, rounding the sphere).
- Rnd 17: (2 sc, dec) around [18] (6 dec → 24 − 6 = 18 ✓)
- Rnd 18: (sc, dec) around [12] (6 dec → 18 − 6 = 12 ✓)
- Rnd 19: dec around [6] (6 dec → 12 − 6 = 6 ✓)
Add a little more stuffing, then fasten off leaving a long tail. Weave the tail through the FLO of the last 6 sts and cinch closed. Set aside.
BODY
Worked bottom-up, wider than the head, with a wide flattened base for a stable sitting pose. Gray.
- Rnd 1: 6 sc in magic ring [6]
- Rnd 2: inc in each st around [12] (+6 = 12 ✓)
- Rnd 3: (sc, inc) around [18] (+6 = 18 ✓)
- Rnd 4: (2 sc, inc) around [24] (+6 = 24 ✓)
- Rnd 5: (3 sc, inc) around [30] (+6 = 30 ✓)
- Rnd 6: (4 sc, inc) around [36] (+6 = 36 ✓)
- Rnd 7: (5 sc, inc) around [42] (+6 = 42 ✓)
- Rnd 8: working in BLO, sc in each st around [42] (the BLO round creates a defined flat base edge so the elephant sits without rolling)
- Rnds 9–15: sc in each st around [42] (7 even rounds for body height)
- Rnd 16: (5 sc, dec) around [36] (6 dec → 42 − 6 = 36 ✓)
- Rnd 17: sc in each st around [36]
- Rnd 18: (4 sc, dec) around [30] (6 dec → 36 − 6 = 30 ✓)
- Rnd 19: (3 sc, dec) around [24] (6 dec → 30 − 6 = 24 ✓)
Stuff very firmly, keeping the base flat and wide.
- Rnd 20: (2 sc, dec) around [18] (6 dec → 24 − 6 = 18 ✓)
Fasten off leaving a long tail (about 24 in / 60 cm) for sewing the head on. Do not close fully — leave the 18-st opening as the neck; add stuffing during assembly.
TRUNK
Worked from the tip upward, narrow to wide, then shaped to curve. Gray.
- Rnd 1: 5 sc in magic ring [5]
- Rnd 2: sc in each st around [5] (rounded tip, no nostrils)
- Rnd 3: (sc, inc) twice, sc [7] (2 inc → 5 + 2 = 7 ✓)
- Rnds 4–5: sc in each st around [7]
- Rnd 6: (2 sc, inc) twice, sc [9] (2 inc → 7 + 2 = 9 ✓)
- Rnds 7–8: sc in each st around [9]
- Rnd 9: (3 sc, inc) twice, sc [11] (2 inc → 9 + 2 = 11 ✓)
- Rnds 10–11: sc in each st around [11]
Creating the curve: In Rnds 5, 8, and 11, work the last 2 sc of each of those rounds slightly tighter than the rest. This subtly shortens one side and bends the trunk downward.
Stuff lightly (leave the top third soft so it curves and sews flat). Fasten off leaving a long tail. Flatten the top opening slightly.
EARS (make 2)
Very large, flat, circular — about half the height of the head. Worked flat in joined rounds, then folded. Gray (with optional pink center).
If using a pink center, work Rnds 1–2 in pink, then switch to gray.
- Rnd 1: 6 sc in magic ring, join with sl st [6]
- Rnd 2: ch 1, inc in each st around, join [12] (+6 = 12 ✓)
- Rnd 3: ch 1, (sc, inc) around, join [18] (+6 = 18 ✓)
- Rnd 4: ch 1, (2 sc, inc) around, join [24] (+6 = 24 ✓)
- Rnd 5: ch 1, (3 sc, inc) around, join [30] (+6 = 30 ✓)
- Rnd 6: ch 1, sc in each st around, join [30] (even round to firm up the disc)
Fasten off leaving a long tail. Do not stuff. The 30-st disc measures roughly 1.8 in (4.5 cm) across — about half the head's finished height of ~3.5 in, matching the oversized look. ✓
Fold each ear slightly in half at the base before sewing to create a gentle cup and forward flare.
LEGS (make 4)
Chunky, short. Worked from the foot up. Gray. Two are positioned as front legs and two as back/sitting legs, both sewn to support the seated pose.
- Rnd 1: 6 sc in magic ring [6]
- Rnd 2: inc in each st around [12] (+6 = 12 ✓)
- Rnd 3: (sc, inc) around [18] (+6 = 18 ✓)
- Rnd 4: working in BLO, sc in each st around [18] (defines a flat foot pad so front legs rest forward)
- Rnd 5: sc in each st around [18]
- Rnd 6: (4 sc, dec) around [15] (3 dec → 18 − 3 = 15 ✓)
- Rnds 7–8: sc in each st around [15]
Stuff moderately (firm feet, softer top so the leg can flex into position). Fasten off leaving a long tail. Flatten the top opening for sewing.
ASSEMBLY
Lay out all pieces before sewing. Pin, check symmetry, then sew with matching gray yarn using a whip stitch. Because velvet hides stitches, sew slowly and keep tension even.
-
Attach the head to the body. Add extra stuffing into both the neck opening (18 sts) and the head base. Center the head on top of the body and whip stitch the full circumference twice around for strength. Ensure the eyes face forward and sit low on the head.
-
Attach the trunk. Pin the wide top of the trunk to the center of the face, just below and between the eyes. Angle the trunk so its curve sweeps downward. Sew all around the flattened opening. The trunk length should reach roughly to the bottom of the face — approximately equal to face height. ✓
-
Attach the ears. Pin one ear on each side of the head, set high and wide, angled slightly forward. Sew along the folded base of each ear (about 6–8 sts) so the large disc flares outward. They should frame the face and reach about halfway down the head.
-
Attach the legs for the sitting pose.
- Front legs (2): Sew flat against the lower front of the body, pointing forward and slightly down, feet resting on the surface. Sew the top opening flat to the body.
- Back legs (2): Sew to the lower sides of the body, splayed outward and slightly forward, feet flat, to widen the base and prevent rolling. The flat BLO foot pads keep the elephant stable when seated.
-
Tail (optional). Chain 6, sl st back down the chain, fasten off, and sew to the center back. Add a small tuft of frayed yarn at the tip.
-
Finishing. Weave in all ends into the stuffed interior. Gently steam or finger-shape the trunk curve. Fluff the velvet nap with your hand.
FINISHED MEASUREMENTS
- Height (seated): ~7 in (18 cm)
- Head width: ~3.5 in (9 cm)
- Body width: ~4.5 in (11 cm)
- Ear diameter: ~1.8 in (4.5 cm)
DESIGNER NOTES
- Chenille tip: If your yarn "worms" (twists), let the working strand dangle to untwist every few rounds.
- Safety: Safety eyes with locked washers are essential for children under 3; for infants, embroider the eyes with black yarn instead.
- Stability check: Before final sewing, seat the elephant with legs pinned; adjust leg splay until it balances without support, then sew.
Enjoy your plush baby elephant!
Disclaimer: This pattern was generated by AI and should be reviewed for accuracy before use. While we strive for quality, AI-generated content may contain errors. Please verify measurements, stitch counts, and instructions before beginning your project. Generated by purlJam.uk
Love this pattern?
Save this pattern to your free PurlJam libraryAccess your pattern anytime
Bookmark this page to access your pattern anytime