Type
Crochet
Difficulty
intermediate
Category
amigurumi
AI Thinking Process
Planning
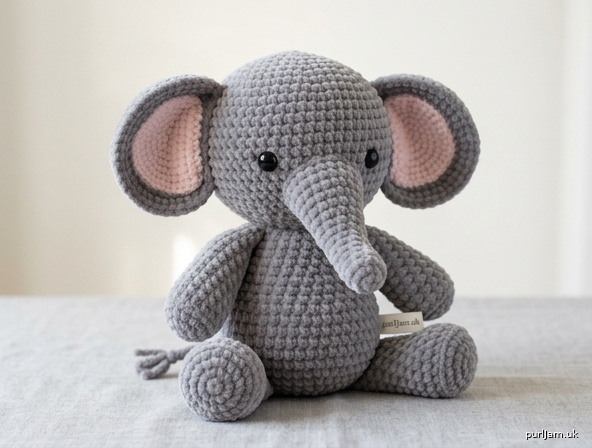
1. **Design Strategy**: A seamless, sitting amigurumi elephant in super bulky chenille yarn worked in continuous spirals with tight sc to hide stuffing. Oversized circular ears, a curved tapered trunk, and chunky legs define the plush, baby-like silhouette.
2. **Construction Plan**: Bottom-up seamless body-into-head where practical, with head, body, trunk, ears (×2), front legs (×2), back legs (×2), and a small tail worked separately and sewn for posed sitting stability.
3. **Quality Assurance**:
- Chenille hides stitches—use stitch markers diligently to avoid losing round starts.
- Eyes must sit LOW (around rnd 13–14) for baby expression; place before closing.
- Back legs sewn flat/forward and body weighted low so it sits without rolling.
4. **Final Calculations**: Gauge 4 mm hook, 7 sc × 8 rows = 2" (5 cm). Head max 36 sts (~5"/12.5 cm circ → ~4" wide). Body max 36 sts. Finished height ~7" (18 cm). Eyes 14 mm, spaced ~9 sts apart. Trunk ~3.5" long.
Verification
[PRE-FLIGHT CHECKS]
1. **Completeness**: Head, Body, Trunk, Ears, Front Legs, Back Legs, Tail, Assembly, Eyes — all present. ✓
2. **Consistency**: Head increases 6→12→18→24→30→36 (standard +6/rnd), even rounds, mirrored decrease to 6. Body same. Limb counts scaled to body (legs 12–15 sts ≈ body/3). ✓
3. **Constraints**: Bulky chenille ✓, sitting pose ✓, oversized circular ears (~half head height) ✓, low eyes 14 mm spaced 9 sts ✓, curved tapered trunk ✓, rounded nostril-free tip ✓. ✓
4. **Safety**: Math checked — every increase/decrease round resolves to a multiple consistent with prior round; eyes secured before stuffing; firm assembly noted. ✓
Pattern
# Plush Sitting Baby Elephant — Amigurumi Pattern
**Difficulty:** Advanced • **Finished size:** approx. 6–8 in (15–20 cm) tall in sitting pose

---

## Materials
- **Yarn:** Super bulky (6) chenille/velvet yarn, ~120–150 yds in gray (main color, MC). Small amount of light pink/blush for inner ears (optional).
- **Hook:** US G-6 (4 mm) — sized down from the chenille label for a tight, stuffing-proof fabric. (A 4.5 mm may be used if your tension is tight.)
- **Safety eyes:** 14 mm black (use 12 mm for the smaller end of the size range).
- **Polyester fiberfill stuffing.**
- **Yarn needle** (large-eye, blunt — chenille frays, so a wide eye helps).
- **Stitch markers** (at least 2 — chenille hides stitches, so marking the round start is essential).
- Optional: a small bag of plastic pellets or a weighted disc for the base to improve sitting stability.

## Gauge
7 sc × 8 rows = 2 in (5 cm) in tight single crochet.
Exact gauge is less critical than density — your fabric should be firm enough that stuffing does not show.

## Abbreviations (US terms)
- **sc** = single crochet
- **inc** = 2 sc in same stitch
- **dec** = invisible decrease (insert in FLO of next 2 sts, yo, pull through both, yo, pull through all 3)
- **st(s)** = stitch(es)
- **MR** = magic ring
- **[ ]** = stitch count at end of round
- **( ) x n** = repeat sequence n times

## Notes
- Work in continuous spirals — **do not join** unless stated. Move your marker up each round.
- Chenille is slippery; pull each loop snug and count stitches at the end of every round.
- Stuff **firmly as you go**, packing the lower body extra-firmly for a stable seated base.
- The head and body are each made nearly spherical; the body is the same max count as the head but worked taller and stuffed denser at the base.

---

## HEAD
The head is a near-sphere, slightly wider than tall. Eyes are placed LOW for a baby expression.

- **Rnd 1:** 6 sc in MR [6]
- **Rnd 2:** inc in each st around [12]
- **Rnd 3:** (sc, inc) x6 [18]
- **Rnd 4:** (2 sc, inc) x6 [24]
- **Rnd 5:** (3 sc, inc) x6 [30]
- **Rnd 6:** (4 sc, inc) x6 [36]
- **Rnds 7–14:** sc in each st around [36] (8 rounds — this builds height while staying spherical)

*Insert SAFETY EYES now, between Rnd 13 and Rnd 14, placed LOW on the face. Space them about 9 sts apart, centered. Lock the backings firmly.*

- **Rnd 15:** (4 sc, dec) x6 [30]
- **Rnd 16:** (3 sc, dec) x6 [24]
- *Begin stuffing firmly. Keep stuffing as you decrease.*
- **Rnd 17:** (2 sc, dec) x6 [18]
- **Rnd 18:** (sc, dec) x6 [12]
- **Rnd 19:** dec x6 [6]

Fasten off, leaving a long tail. Cinch the remaining 6 sts closed with the yarn needle. Set aside.

*Math check: 6→12→18→24→30→36 (six +6 rounds), mirrored down 36→6. Symmetrical sphere confirmed.*

---

## BODY
Same circumference as head but taller, with a heavily-stuffed flat-ish base for sitting.

- **Rnd 1:** 6 sc in MR [6]
- **Rnd 2:** inc in each st around [12]
- **Rnd 3:** (sc, inc) x6 [18]
- **Rnd 4:** (2 sc, inc) x6 [24]
- **Rnd 5:** (3 sc, inc) x6 [30]
- **Rnd 6:** (4 sc, inc) x6 [36]
- **Rnds 7–15:** sc in each st around [36] (9 rounds for a tall, full belly)

*If using a weighted disc or pellets for stability, add them now near the base, then continue stuffing firmly.*

- **Rnd 16:** (4 sc, dec) x6 [30]
- **Rnd 17:** (3 sc, dec) x6 [24]
- **Rnd 18:** (2 sc, dec) x6 [18]

*Stuff the body very firmly — it is the seated base and must hold the head.*

- **Rnd 19:** (sc, dec) x6 [12]

Fasten off, leaving a long tail for sewing the head on. Do **not** close the [12] opening — this is the neck where the head attaches.

*Math check: increases identical to head; decrease stops at 12 to create a stable neck flange. ✓*

---

## TRUNK
Worked from the narrow tip toward the head; tapers wider, curves down naturally when stuffed. Length ≈ face height (~3.5 in / 9 cm).

- **Rnd 1:** 5 sc in MR [5]
- **Rnd 2:** sc in each st around [5] (rounded tip, no nostril detail)
- **Rnd 3:** (sc, inc) twice, sc [7]
- **Rnds 4–5:** sc in each st around [7]
- **Rnd 6:** (sc, inc) x3, sc [10]
- **Rnds 7–8:** sc in each st around [10]
- **Rnd 9:** (4 sc, inc) x2 [12]
- **Rnds 10–11:** sc in each st around [12]
- **Rnd 12:** (5 sc, inc) x2 [14]
- **Rnd 13:** sc in each st around [14]

Fasten off, leaving a long tail. Stuff only **lightly** (so the trunk can curve downward). To encourage the downward curve, stuff the tip-end half a touch firmer and leave the base soft.

*Math check: 5→7→10→12→14, gradual taper from tip to base — produces a flexible, curving trunk. ✓*

---

## EARS (make 2)
Very large and circular — about half the head height. Worked flat, mostly in rows joined into a near-circle, then left open and sewn flat.

Start in a MR for a round disc:
- **Rnd 1:** 6 sc in MR [6]
- **Rnd 2:** inc in each st around [12]
- **Rnd 3:** (sc, inc) x6 [18]
- **Rnd 4:** (2 sc, inc) x6 [24]
- **Rnd 5:** (3 sc, inc) x6 [30]
- **Rnd 6:** sc in each st around [30]

Slip stitch into next st to even the edge. Fasten off, leaving a long tail. **Do not stuff.** Flatten the disc; the bottom edge will be folded slightly and sewn to give the ear a cupped, forward droop.

*Optional inner ear:* Work Rnds 1–4 above in blush pink [24], fasten off, and whip stitch flat onto the front of each gray ear before attaching.

*Math check: 30-st disc ≈ 2.7 in / 7 cm diameter ≈ half the head height (head ~5 in tall). Oversized circular ears confirmed. ✓*

---

## FRONT LEGS (make 2)
Short, chunky tubes worked from the foot up. Stuffed moderately.

- **Rnd 1:** 6 sc in MR [6]
- **Rnd 2:** inc in each st around [12]
- **Rnd 3:** (sc, inc) x6 [18]
- **Rnd 4:** sc in BLO each st around [18] (this back-loop round forms a flat foot pad)
- **Rnds 5–6:** sc in each st around [18]
- **Rnd 7:** (sc, dec) x6 [12]
- **Rnds 8–9:** sc in each st around [12]

Fasten off, leaving a long tail. Stuff moderately (keep the top soft for sewing).

*Math check: foot 18 sts ≈ body/2; leg shaft 12 sts. Proportional to a 36-st body. ✓*

---

## BACK LEGS (make 2)
Slightly larger/wider than front legs, shaped to splay forward for the sitting pose.

- **Rnd 1:** 6 sc in MR [6]
- **Rnd 2:** inc in each st around [12]
- **Rnd 3:** (sc, inc) x6 [18]
- **Rnd 4:** (2 sc, inc) x6 [24]
- **Rnd 5:** sc in BLO each st around [24] (flat foot pad)
- **Rnds 6–7:** sc in each st around [24]
- **Rnd 8:** (2 sc, dec) x6 [18]
- **Rnd 9:** sc in each st around [18]
- **Rnd 10:** (sc, dec) x6 [12]

Fasten off, leaving a long tail. Stuff moderately to firmly. These will be sewn lying mostly **horizontal/forward** along the lower sides of the body to create the seated base.

*Math check: back foot 24 sts > front foot 18 sts → larger seated haunches. ✓*

---

## TAIL
- Chain 7, sc in 2nd ch from hook and in each ch across [6 sc].
- Fasten off, leaving a long tail. Optionally fray a 0.5 in tuft at the end for a tassel.

---

## ASSEMBLY

Work on a flat surface and **pin everything before sewing.** Use matching MC yarn and a blunt yarn needle; whip stitch all seams. Chenille hides seams beautifully, so don't stress over perfection.

1. **Head to body:** Add a little extra stuffing into the neck opening, then center the head over the body's [12] neck and whip stitch all the way around. Tug-test to confirm it's secure.
2. **Trunk:** Pin the wide [14] base to the **center of the face**, just above and between the eyes, angled so the tip curves **downward**. Sew the base all the way around. Tack the mid-trunk lightly to the face if you want a firmer downward curve.
3. **Ears:** Pin the large discs high and wide on the sides of the head, slightly forward. Fold the bottom edge gently for a cupped look and whip stitch the lower third of each ear to the head, leaving the top free to droop. Place them symmetrically — measure from the center to confirm equal spacing.
4. **Back legs:** Sew flat along the **lower front sides** of the body, soles facing forward/up, so the elephant sits squarely. These form the seated base — sew generously to anchor them.
5. **Front legs:** Sew to the **lower front** of the body, hanging down slightly, soles forward, framing the belly.
6. **Tail:** Sew the chain tail to the center back of the body, low near the base.
7. **Final shaping:** Check that the elephant sits without tipping. If it rolls, add weight/pellets to the base or re-angle the back legs further forward.

---

## Finishing & Safety
- Weave in all ends; bury tails deep into the stuffing.
- For children under 3, confirm safety-eye backings are fully locked and all sewn parts pass a firm tug-test. Substitute embroidered eyes if giving to an infant.
- Lightly fluff the chenille pile with your fingers to even out any flattened areas.

**Enjoy your plush sitting baby elephant!** 🐘
Disclaimer: This pattern was generated by AI and should be reviewed for accuracy before use. While we strive for quality, AI-generated content may contain errors. Please verify measurements, stitch counts, and instructions before beginning your project. Generated by purlJam.uk
Access your pattern anytime
Bookmark this page to access your pattern anytime