Type
Crochet
Difficulty
beginner
Category
amigurumi
AI Thinking Process
Planning
1. **Design Strategy**: Creating a simplified porch goose decoration (the popular lawn goose) using basic amigurumi techniques. The goose will be stylized and beginner-friendly, featuring a rounded body (sphere/oval), a cylindrical neck, a simple head (small sphere), and basic wings/tail. Will use white/cream for body with orange for beak and feet. The design focuses on recognizable goose silhouette rather than realistic detail.
2. **Construction Plan**:
- Body: Modified oval/egg shape (wider at bottom, narrower at top) worked in continuous rounds
- Head: Small sphere attached to neck
- Neck: Short cylinder connecting head to body
- Beak: Small cone in orange
- Wings: Two flat teardrop shapes worked in rows, sewn to sides
- Tail: Optional small fan shape at back
- Feet: Simple orange ovals or flat pieces
- Assembly: Body stuffed firmly to stand upright, head/neck attached, wings and feet sewn on
3. **Quality Assurance**:
- Ensure body is bottom-heavy so goose stands upright
- Clear stuffing instructions at appropriate points
- Simple stitch counts that are easy to track for beginners
- Minimize small fiddly pieces
- Clear assembly order to prevent confusion
- Verify all stitch counts match round-to-round
4. **Final Calculations**:
- Worsted weight (4) yarn with 3.5mm (E) hook
- Gauge: ~5 sc = 1 inch (not critical for toys)
- Finished size: approximately 5-6 inches tall
- Body max circumference: 30 sts = ~6 inches around
- Head: 18 sts = ~3.5 inches around
Verification
[PRE-FLIGHT CHECKS]
1. **Completeness**: Pattern includes materials, abbreviations, gauge note, all component instructions (body, head, neck, beak, wings, feet), assembly, and finishing
2. **Consistency**:
- Body increases: 6→12→18→24→30, holds at 30, decreases back down ✓
- Head increases: 6→12→18, holds, decreases ✓
- All stitch counts verified for each round
3. **Constraints**:
- Beginner-friendly: uses only sc, inc, dec ✓
- Worsted weight specified ✓
- Simple shapes from template adapted ✓
- US terminology ✓
4. **Safety**: All increase/decrease math verified, stuffing reminders included, parts proportionate to each other
Pattern
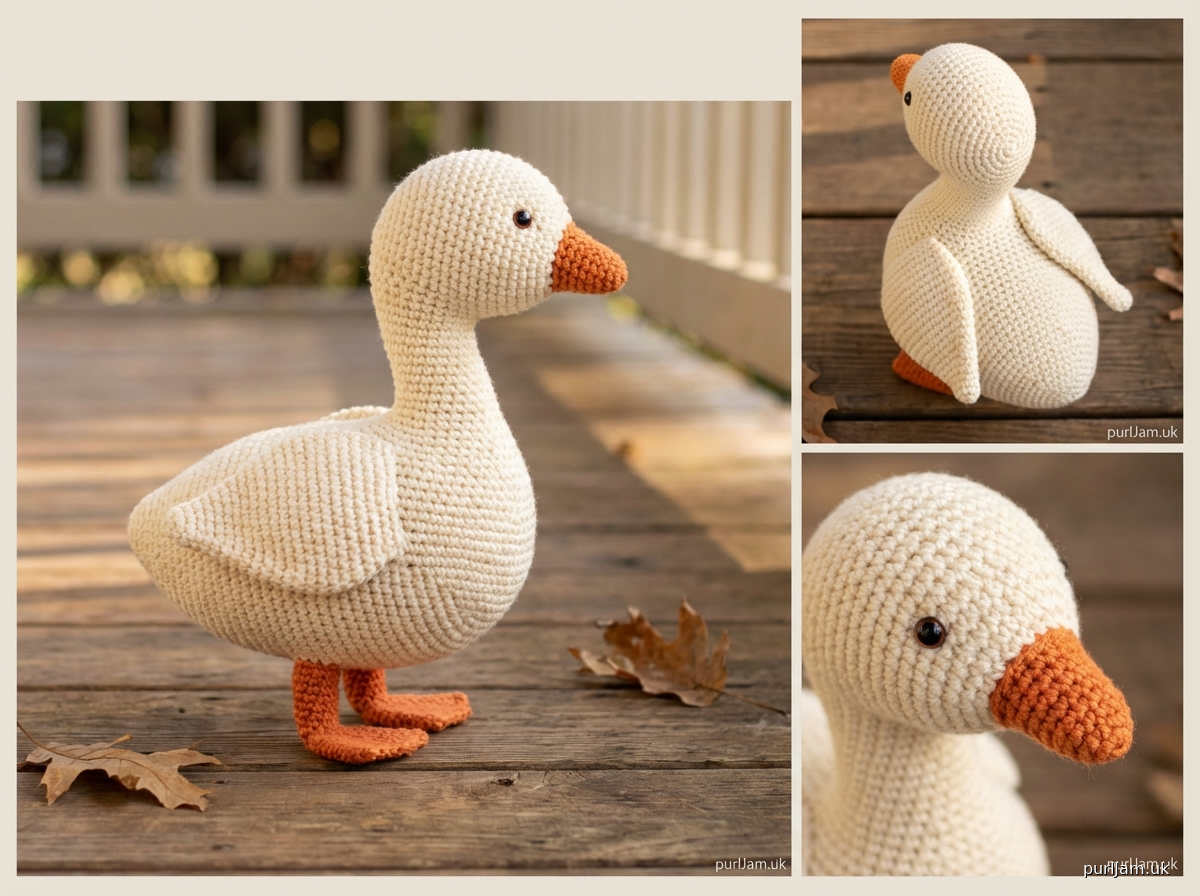
# Porch Goose Crochet Pattern

A charming beginner-friendly amigurumi goose perfect as a decorative porch companion or desk buddy. This simplified design uses basic crochet stitches and simple shaping to create an adorable goose approximately 5-6 inches tall.

**Skill Level:** Beginner
**Finished Size:** Approximately 5-6 inches (12.5-15 cm) tall

---

## MATERIALS

**Yarn:**
- Worsted weight (4) yarn in the following colors:
  - White or Cream: approximately 100 yards (main body and head)
  - Orange: approximately 20 yards (beak and feet)
  - Optional: Yellow can substitute for orange
  - Optional: Black embroidery thread or yarn for eyes

**Hook:**
- US E-4 (3.5mm) crochet hook

**Other Supplies:**
- Fiberfill stuffing (polyester)
- Yarn needle for sewing and weaving in ends
- Stitch marker
- Optional: 9mm black safety eyes (2) OR black embroidery thread for eyes
- Scissors

---

## ABBREVIATIONS

- ch = chain
- sc = single crochet
- inc = increase (2 sc in same stitch)
- dec = invisible decrease (insert hook in front loops of next 2 sts, yarn over, pull through both, yarn over, pull through 2 loops)
- st(s) = stitch(es)
- rnd(s) = round(s)
- [ ] = total stitch count at end of round

---

## GAUGE

Gauge is not critical for this project. Worked tightly, worsted weight yarn with E hook creates approximately 5 sc = 1 inch. The key is to crochet tightly enough that stuffing doesn't show through stitches.

---

## PATTERN NOTES

- Work in continuous rounds (spiral) unless otherwise noted. Use a stitch marker to track the beginning of each round.
- Do not join or turn at the end of rounds unless instructed.
- Stuff pieces firmly as you go, especially before decrease rounds.
- For invisible decrease: insert hook through front loop only of next 2 stitches, yarn over and pull through both loops, yarn over and pull through 2 loops on hook.

---

## INSTRUCTIONS

### BODY (White/Cream)

The body is worked from bottom to top in an egg shape.

**Rnd 1:** 6 sc in magic ring [6]

**Rnd 2:** inc in each st around [12]
*Math check: 6 × 2 = 12 ✓*

**Rnd 3:** (sc, inc) around [18]
*Math check: 12 ÷ 2 = 6 repeats, 6 × 3 = 18 ✓*

**Rnd 4:** (2 sc, inc) around [24]
*Math check: 18 ÷ 3 = 6 repeats, 6 × 4 = 24 ✓*

**Rnd 5:** (3 sc, inc) around [30]
*Math check: 24 ÷ 4 = 6 repeats, 6 × 5 = 30 ✓*

**Rnds 6-12:** sc in each st around [30]
*(7 rounds of even stitches to create body height)*

**Rnd 13:** (3 sc, dec) around [24]
*Math check: 30 ÷ 5 = 6 repeats, 6 × 4 = 24 ✓*

**Rnd 14:** sc in each st around [24]

**Rnd 15:** (2 sc, dec) around [18]
*Math check: 24 ÷ 4 = 6 repeats, 6 × 3 = 18 ✓*

**Begin stuffing body firmly now. Continue to add stuffing as you decrease.**

**Rnd 16:** sc in each st around [18]

**Rnd 17:** (sc, dec) around [12]
*Math check: 18 ÷ 3 = 6 repeats, 6 × 2 = 12 ✓*

**Rnd 18:** sc in each st around [12]

**Do not fasten off.** This opening will connect to the neck. Set aside.

---

### NECK (White/Cream)

The neck is a simple cylinder that connects the head to the body.

**Rnd 1:** 6 sc in magic ring [6]

**Rnd 2:** inc in each st around [12]
*Math check: 6 × 2 = 12 ✓*

**Rnds 3-6:** sc in each st around [12]
*(4 rounds for neck length)*

**Fasten off, leaving a long tail (approximately 12 inches) for sewing.**

Stuff neck lightly to moderately (don't overstuff or it won't bend naturally).

---

### HEAD (White/Cream)

**Rnd 1:** 6 sc in magic ring [6]

**Rnd 2:** inc in each st around [12]
*Math check: 6 × 2 = 12 ✓*

**Rnd 3:** (sc, inc) around [18]
*Math check: 12 ÷ 2 = 6 repeats, 6 × 3 = 18 ✓*

**Rnds 4-7:** sc in each st around [18]
*(4 rounds for head height)*

**If using safety eyes:** Insert eyes between rnds 5 and 6, approximately 6 stitches apart. Secure backings.

**Rnd 8:** (sc, dec) around [12]
*Math check: 18 ÷ 3 = 6 repeats, 6 × 2 = 12 ✓*

**Begin stuffing head firmly now.**

**Rnd 9:** dec around [6]
*Math check: 12 ÷ 2 = 6 ✓*

**Fasten off, leaving a long tail (approximately 10 inches) for sewing.** Thread yarn needle through remaining 6 stitches and pull tight to close hole. Weave in end inside head.

---

### BEAK (Orange)

**Rnd 1:** 4 sc in magic ring [4]

**Rnd 2:** (sc, inc) around [6]
*Math check: 4 ÷ 2 = 2 repeats, 2 × 3 = 6 ✓*

**Rnd 3:** sc in each st around [6]

**Fasten off, leaving a long tail (approximately 8 inches) for sewing.**

Stuff beak very lightly (just a tiny pinch of stuffing to give it shape). Flatten slightly.

---

### WINGS (make 2, White/Cream)

Wings are worked in rows to create a teardrop/oval shape.

**Row 1:** Ch 6, sc in 2nd ch from hook and in each ch across [5 sc], ch 1, turn

**Row 2:** inc, sc 3, inc [7], ch 1, turn
*Math check: 5 + 2 = 7 ✓*

**Row 3:** sc in each st across [7], ch 1, turn

**Row 4:** sc in each st across [7], ch 1, turn

**Row 5:** dec, sc 3, dec [5], ch 1, turn
*Math check: 7 - 2 = 5 ✓*

**Row 6:** dec, sc, dec [3]
*Math check: 5 - 2 = 3 ✓*

**Fasten off, leaving a long tail (approximately 10 inches) for sewing.**

Weave in starting tail. Do not stuff wings; keep them flat.

---

### FEET (make 2, Orange)

Feet are simple flat ovals.

**Rnd 1:** Ch 5, sc in 2nd ch from hook, sc 2, 3 sc in last ch, working back along other side of chain: sc 2, inc in last st [10]

**Rnd 2:** inc, sc 2, inc 3 times, sc 2, inc 2 times [16]
*Math check: 10 + 6 = 16 ✓*

**Fasten off, leaving a long tail (approximately 10 inches) for sewing.**

Do not stuff feet; keep them flat. These create a stable base for the goose to stand.

---

## ASSEMBLY

**Step 1: Attach Neck to Body**
- Position the open end of the neck at the top opening of the body (Rnd 18).
- Using the long tail from the neck and a yarn needle, whip stitch the neck to the body, working through the stitches of both pieces all the way around.
- Secure and weave in end.

**Step 2: Attach Head to Neck**
- Position the head on top of the neck opening.
- Using the long tail from the head and a yarn needle, whip stitch the head to the neck, working all the way around.
- Secure and weave in end.

**Step 3: Attach Beak to Head**
- Position the beak on the front of the head, centered between the eyes (or where eyes will be), approximately at Rnd 4-5 of the head.
- Using the long tail from the beak and a yarn needle, sew the beak securely to the head, stitching all around the opening.
- Secure and weave in end.

**Step 4: Add Eyes (if not using safety eyes)**
- With black embroidery thread or yarn, embroider two small circles or French knots for eyes between Rnds 5 and 6 of the head, approximately 6 stitches apart (about 3 stitches on either side of the beak).

**Step 5: Attach Wings**
- Position wings on either side of the body, approximately at Rnds 10-14, angled slightly back and down.
- Pin in place to check positioning before sewing.
- Using the long tails from the wings and a yarn needle, sew the straight edge (Row 1) of each wing to the body, stitching through multiple points for security.
- Secure and weave in ends.

**Step 6: Attach Feet**
- Position feet at the bottom of the body, slightly overlapping the base, angled forward so the goose tilts slightly back (this helps it stand).
- Pin in place to check positioning before sewing.
- Using the long tails from the feet and a yarn needle, sew the feet securely to the bottom of the body.
- Secure and weave in all remaining ends.

---

## FINISHING

- Weave in any remaining yarn ends.
- Gently shape the goose, bending the neck slightly if desired.
- If the goose doesn't stand well, check that:
  - The body is stuffed firmly
  - The feet are positioned to create a stable base
  - The body/neck/head are well secured

---

## VARIATIONS & CUSTOMIZATION

**Size Variations:**
- **Larger Goose:** Use bulky weight yarn with a larger hook (H-8/5mm) for a goose approximately 8-10 inches tall.
- **Smaller Goose:** Use DK weight yarn with a smaller hook (D-3/3.25mm) for a goose approximately 3-4 inches tall.

**Color Options:**
- Traditional white or cream body with orange beak/feet
- Gray body for a more realistic goose
- Add a colored bow or scarf around the neck for decoration

**Details:**
- Embroider nostrils on the beak with black thread
- Add tail feathers by sewing 3-4 small pointed pieces at the back
- Create texture on wings with surface slip stitch lines

**Display:**
- Add a small wire armature in the neck before stuffing for a poseable goose
- Sew a loop on top of the head to create an ornament
- Make a family of geese in different sizes

---

## CARE INSTRUCTIONS

- Spot clean only with damp cloth
- Do not machine wash (stuffing may clump)
- Keep away from small children if using safety eyes
- Store in a cool, dry place

---

## TROUBLESHOOTING

**Goose won't stand upright:**
- Ensure body is stuffed very firmly
- Check that feet are positioned to create a stable base
- Weight the bottom with a small bag of poly pellets before finishing stuffing

**Stuffing shows through stitches:**
- Use a smaller hook size
- Crochet more tightly
- Use lighter-colored stuffing with light yarn

**Neck is floppy:**
- Stuff neck more firmly
- Work the neck with tighter tension
- Consider adding a small wire or pipe cleaner inside neck for structure

**Pieces won't stay attached:**
- Use longer tails for sewing (at least 10 inches)
- Sew through multiple points on each piece
- Make sure you're sewing through both pieces securely

---

## PATTERN NOTES & CREDITS

This beginner-friendly porch goose pattern uses basic amigurumi techniques to create a charming decorative goose. Perfect for beginners learning to work in rounds, shape with increases and decreases, and assemble multiple pieces.

**Estimated Time:** 3-4 hours
**Yarn Used:** Approximately 120 yards total

---

**Happy Crocheting!** 🦢

Your porch goose is ready to greet visitors or brighten up any space. Don't forget to share your finished goose!
Disclaimer: This pattern was generated by AI and should be reviewed for accuracy before use. While we strive for quality, AI-generated content may contain errors. Please verify measurements, stitch counts, and instructions before beginning your project. Generated by purlJam.uk
Access your pattern anytime
Bookmark this page to access your pattern anytime