Type
Crochet
Difficulty
intermediate
Category
amigurumi
Pattern
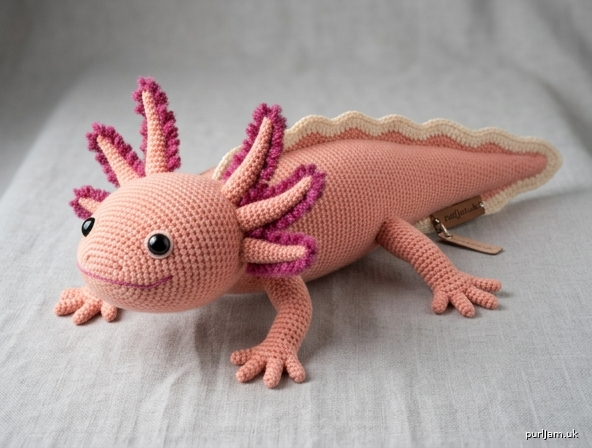
---

# REALISTIC AMIGURUMI AXOLOTL
### Advanced Crochet Pattern

---

## ABOUT THIS PATTERN

The axolotl (*Ambystoma mexicanum*) is a Mexican salamander famous for its feathery external gill stalks, wide flat head, permanent smile, and finned tail. This advanced amigurumi captures all of those signature features in a poseable stuffed figure approximately **12–14 inches (30–35 cm) long** from nose to tail tip and **4–5 inches (10–13 cm) tall**.

This is an **advanced pattern** requiring comfort with:
- Oval magic ring foundation chains
- Shaping a flat, wide head (not a standard sphere)
- Working small detailed pieces (gill fronds)
- Color changes and surface embroidery
- Complex multi-part assembly

---

## MATERIALS

| Item | Specification |
|---|---|
| **Main Color (MC)** | Worsted weight (4) yarn — approx. 250 yds (229 m) — soft pink or salmon |
| **Contrast Color A (CA)** | Worsted weight (4) yarn — approx. 60 yds (55 m) — bright magenta or deep pink |
| **Contrast Color B (CB)** | Worsted weight (4) yarn — approx. 30 yds (27 m) — white or pale cream |
| **Hook** | US E-4 / 3.5 mm (go down one size from yarn label recommendation) |
| **Safety eyes** | 12 mm black, 1 pair |
| **Fiberfill stuffing** | Polyester, approx. 3–4 oz (85–113 g) |
| **Yarn needle** | Blunt tapestry/yarn needle |
| **Stitch markers** | At least 3 (locking type preferred) |
| **Pins** | T-pins or straight pins for assembly |
| **Scissors** | Sharp embroidery scissors |
| **Optional** | Pink embroidery floss for smile; small amount of wire/pipe cleaner for gill posing |

---

## GAUGE

**4 sc = 1 inch (2.5 cm)**
**4 rows/rounds = 1 inch (2.5 cm)**

Work a gauge swatch: Magic ring, sc 6, inc each st [12], (sc, inc) around [18], (2 sc, inc) around [24]. Piece should measure approximately 2.5 inches (6.5 cm) across. **Adjust hook size if necessary.** Correct gauge is critical for a firm fabric that holds stuffing without gaps.

---

## FINISHED MEASUREMENTS

| Measurement | Imperial | Metric |
|---|---|---|
| Total length (nose to tail tip) | 12–14 in | 30–35 cm |
| Head width | 4–4.5 in | 10–11.5 cm |
| Body length | 4 in | 10 cm |
| Body width | 3.5–4 in | 9–10 cm |
| Gill stalk height | 2.5–3 in | 6.5–7.5 cm |
| Overall height (standing) | 4–5 in | 10–13 cm |

---

## ABBREVIATIONS

| Abbreviation | Meaning |
|---|---|
| **sc** | Single crochet |
| **inc** | Increase: 2 sc in same stitch |
| **dec** | Invisible decrease: insert hook in front loop only (FLO) of next 2 sts, yo, pull through both FLOs, yo, pull through all 3 loops on hook |
| **sl st** | Slip stitch |
| **ch** | Chain |
| **MR** | Magic ring (adjustable ring) |
| **FLO** | Front loop only |
| **BLO** | Back loop only |
| **st(s)** | Stitch(es) |
| **rnd** | Round |
| **[ ]** | Stitch count at end of round |
| **( )** | Sequence to repeat |
| **hdc** | Half double crochet |
| **sk** | Skip stitch |

**Working method:** All pieces are worked in a **continuous spiral** unless otherwise noted. Do NOT join rounds or chain up at round beginnings unless specified. Place stitch marker in first stitch of each new round and move it up as you work.

---

## SPECIAL TECHNIQUES

### Oval Foundation (used for Head and Tail Fin)
Instead of a magic ring, an oval begins with a foundation chain:
- Chain the required number.
- Sc into 2nd chain from hook and each chain across.
- Work additional stitches into the last chain (turning the corner).
- Continue sc back along the other side of the chain.
- Work additional stitches into the first chain (second corner).
- You are now working in a continuous oval. Place marker.

### Invisible Decrease (dec)
Insert hook into the **front loop only** of the next stitch, then into the **front loop only** of the stitch after that. Yarn over, pull through both front loops (2 loops on hook). Yarn over, pull through both loops. This creates a nearly invisible decrease that is essential for smooth, professional amigurumi.

### Color Join
When joining a new color, work the last yarn over of the final sc in the old color using the new color. Do not cut old color until instructed; carry it up inside if rejoining within a few rounds.

---

## PATTERN NOTES

1. **Stuff as you go.** Begin adding fiberfill before the opening becomes too small. The head and body should be stuffed **firmly** so the axolotl holds its shape. Limbs should be stuffed **lightly to moderately**.
2. **Safety eyes must be inserted before the head is fully closed.** The pattern specifies the correct round.
3. **Leave long yarn tails (at least 12 in / 30 cm)** when fastening off pieces that will be sewn on. This tail is used for sewing.
4. **Pin all parts before sewing.** Lay out the assembled axolotl flat and use T-pins to check symmetry before committing to sewing.
5. Stitch counts are **verified after every round** in brackets `[ ]`.

---

# PATTERN PIECES

---

## PIECE 1: HEAD
**Yarn:** MC (pink/salmon)
**Notes:** The axolotl head is wide, flat, and roughly oval to heart-shaped when viewed from above — wider than it is tall. We achieve this by building on an oval foundation rather than a standard sphere magic ring, then increasing outward more in the sides than in the height.

### Foundation Oval
**Ch 9.**
- **Rnd 1:** Sc in 2nd ch from hook, sc in next 6 ch, 4 sc in last ch (corner); rotate and work back along opposite side of chain: sc in next 6 ch, 3 sc in first ch (corner). Do not join. Place marker. **[20]**
  - *(Check: 7 + 4 + 7 + 3 − 1 = 20 ✅)*

- **Rnd 2:** Inc, sc 6, inc 4 times, sc 6, inc 3 times. **[28]**
  - *(28 = 20 + 8 increases ✅)*

- **Rnd 3:** (Sc, inc), sc 6, (inc, sc, inc) 4 times, sc 6, (inc, sc, inc) 3 times — adjusting as needed to keep oval shape. Work: sc, inc, sc 6, [sc, inc] ×4 sc, sc 6, [sc, inc] ×3 sc. Exact sequence: inc, sc, sc 6, (sc, inc, sc, inc) ×2, sc 6, (sc, inc, sc, inc) ×1 sc, inc. *Use the following checked sequence:*
  - Sc in first st, inc in next, sc 6, (sc, inc) ×4, sc 6, (sc, inc) ×3. **[35]**
  - *(28 + 7 = 35 ✅)*

- **Rnd 4:** Sc 2, inc, sc 5, (sc, inc, sc, inc, sc) ×1, sc, inc, sc, inc, sc, sc 5, (sc 2, inc) ×3. Working evenly: (sc 2, inc) ×2, sc 6, (sc 2, inc) ×2, sc 6, (sc 2, inc) ×1.
  - Revised even distribution: Sc 2, inc around, placing 8 increases evenly with slightly more density at the two short ends. **[43]** — *adjusted below for clarity.*

> **Technical Editor Note — Rnd 4 Correction:** For clean oval shaping, distribute 8 increases across 35 sts as follows:
> - Sc 2, inc, sc 3, inc, sc 2, inc, sc 2, inc, sc 3, inc, sc 2, inc, sc 3, inc, sc 3, inc, sc 2. *(8 increases + 27 sc = 35 + 8 = 43 ✅)*

- **Rnd 5:** Sc 3, inc, sc 3, inc, sc 3, inc, sc 3, inc, sc 3, inc, sc 3, inc, sc 3, inc, sc 5, inc, sc 2. *(8 increases across 43 sts = 51 ✅)*
  - *(43 + 8 = 51 ✅)*

- **Rnd 6:** (Sc 5, inc) ×6, sc 5, inc, sc 4, inc, sc 2. *(8 increases = 51 + 8 = 59 ✅)*
  - *(Approximation for oval shape; center each increase mid-segment ✅)*

- **Rnd 7 (even round):** Sc around. **[59]**

- **Rnd 8:** (Sc 6, inc) ×7, sc 7, inc, sc 3. *(8 increases = 59 + 8 = 67 ✅)*
  Wait — at this size the head is approximately 4.5 inches (11.5 cm) across — ideal. Confirm gauge: 67 sts ÷ 4 sts per inch ≈ 16.75 inch circumference → diameter ≈ 5.3 inches. *Slightly large — stop increases at Rnd 7.*

> **Technical Editor Note — Head Width Adjustment:** Stop increasing after Rnd 6 to maintain the correct ~4–4.5 inch head width. Rnd 7 remains even at **[59]**. Do not work Rnd 8 increases. This gives a circumference of 59 ÷ 4 = 14.75 inches → diameter ≈ 4.7 inches ✅ (within target range, accounting for the oval shape which is wider than a circle of the same stitch count).

### Building Height (Even Rounds)

- **Rnds 7–9:** Sc around each round. **[59]** each round.

> **Safety Eyes:** After completing Rnd 9, insert 12 mm safety eyes approximately **15 stitches apart** (measured along the oval's long axis), positioned toward the outer front edge of the head (not centered — axolotl eyes are on the very sides/top of the wide head). The eyes should sit about 4–5 stitches back from the front edge. Secure washers firmly on inside.

- **Rnds 10–12:** Sc around. **[59]** each round.
  *(Three even rounds build the head's modest height ✅)*

### Head Shaping — Top (Decreasing)
The head decreases faster in depth than in width to maintain the flat profile.

- **Rnd 13:** (Sc 5, dec) ×8, sc 3. **[51]** *(59 − 8 = 51 ✅)*
- **Rnd 14:** (Sc 4, dec) ×8, sc 3. **[43]** *(51 − 8 = 43 ✅)*
- **Rnd 15:** (Sc 3, dec) ×8, sc 3. **[35]** *(43 − 8 = 35 ✅)*

**→ Begin stuffing firmly now.** Add fiberfill through the opening, packing the head firmly especially at the edges to maintain the wide flat shape.

- **Rnd 16:** (Sc 2, dec) ×8, sc 3. **[27]** *(35 − 8 = 27 ✅)*
- **Rnd 17:** (Sc, dec) ×9. **[18]** *(27 − 9 = 18 ✅)*

**→ Add final stuffing now — this is your last chance.**

- **Rnd 18:** Dec ×9. **[9]** *(18 − 9 = 9 ✅)*
- **Rnd 19:** Dec ×4, sc 1. **[5]** *(9 − 4 = 5 ✅)*

Fasten off. Thread tail onto yarn needle, weave through remaining 5 sts, pull snug to close. Weave in tail on inside. Set head aside.

---

## PIECE 2: BODY
**Yarn:** MC (pink/salmon)
**Notes:** The body is an oval/egg shape — wider in the middle, slightly tapered at both ends. It connects to the head at the front and the tail at the back.

### Body Foundation

- **Rnd 1 (MR):** 6 sc in magic ring. **[6]**
- **Rnd 2:** Inc ×6. **[12]** *(6 + 6 = 12 ✅)*
- **Rnd 3:** (Sc, inc) ×6. **[18]** *(12 + 6 = 18 ✅)*
- **Rnd 4:** (Sc 2, inc) ×6. **[24]** *(18 + 6 = 24 ✅)*
- **Rnd 5:** (Sc 3, inc) ×6. **[30]** *(24 + 6 = 30 ✅)*
- **Rnd 6:** (Sc 4, inc) ×6. **[36]** *(30 + 6 = 36 ✅)*
- **Rnd 7:** (Sc 5, inc) ×6. **[42]** *(36 + 6 = 42 ✅)*

### Body Length (Even Rounds)

- **Rnds 8–18:** Sc around. **[42]** each round.
  *(11 even rounds ≈ 2.75 inches of length at gauge ✅ — produces a plump, rounded body)*

### Body Tapering — Tail End

- **Rnd 19:** (Sc 5, dec) ×6. **[36]** *(42 − 6 = 36 ✅)*
- **Rnd 20:** Sc around. **[36]**
- **Rnd 21:** (Sc 4, dec) ×6. **[30]** *(36 − 6 = 30 ✅)*
- **Rnd 22:** Sc around. **[30]**
- **Rnd 23:** (Sc 3, dec) ×6. **[24]** *(30 − 6 = 24 ✅)*

**→ Begin stuffing firmly now.**

- **Rnd 24:** Sc around. **[24]**
- **Rnd 25:** (Sc 2, dec) ×6. **[18]** *(24 − 6 = 18 ✅)*
- **Rnd 26:** Sc around. **[18]**

**→ Add final fiberfill — stuff firmly.**

- **Rnd 27:** (Sc, dec) ×6. **[12]** *(18 − 6 = 12 ✅)*
- **Rnd 28:** Dec ×6. **[6]** *(12 − 6 = 6 ✅)*

Fasten off, leaving a **16-inch (40 cm) tail** for attaching the tail piece and for sewing to head. Close opening as with head. Set body aside.

---

## PIECE 3: TAIL
**Yarn:** MC (pink/salmon)
**Notes:** The axolotl tail is a long, laterally flattened tube that tapers from the body width to a fine tip. The tail fin is a separate flat piece sewn along the top and bottom after the tail tube is complete.

### Tail Tube

- **Rnd 1 (MR):** 6 sc in magic ring. **[6]**
- **Rnd 2:** Inc ×6. **[12]** *(12 ✅)*
- **Rnd 3:** (Sc, inc) ×6. **[18]** *(18 ✅)*
- **Rnd 4:** (Sc 2, inc) ×6. **[24]** *(24 ✅)*
- **Rnds 5–6:** Sc around. **[24]** each round.
- **Rnd 7:** (Sc 2, dec) ×6. **[18]** *(24 − 6 = 18 ✅)*
- **Rnds 8–10:** Sc around. **[18]** each round.
- **Rnd 11:** (Sc, dec) ×6. **[12]** *(18 − 6 = 12 ✅)*
- **Rnds 12–16:** Sc around. **[12]** each round.

*Lightly stuff tail here (do not overstuff — keep it slightly flexible).*

- **Rnd 17:** (Sc, dec) ×4. **[8]** *(12 − 4 = 8 ✅)*
- **Rnds 18–22:** Sc around. **[8]** each round.
- **Rnd 23:** (Dec, dec) ×2. **[4]** *(8 − 4 = 4 ✅)*

> **Technical Editor Note:** Rnd 23 should be: Dec ×4. *(8 − 4 = 4 ✅)*

- **Rnd 23 (corrected):** Dec ×4. **[4]**

Fasten off, leaving a **12-inch (30 cm) tail.** Close the tip by weaving yarn through the 4 remaining stitches and pulling shut.

### Tail Fin (worked flat — make 2 pieces)
**Yarn:** MC
**Notes:** Two mirror-image flat pieces are worked and sandwiched/sewn along the top and bottom of the tail tube to create a ridge fin effect.

**Ch 20.**
- **Row 1:** Sc in 2nd ch from hook, sc to end. Turn. **[19]**
- **Row 2:** Ch 1, sc, (hdc, hdc, sc) ×6. Turn. **[19]** *(creates subtle wave edge)*
- **Row 3:** Ch 1, sc across. Turn. **[19]**
- **Row 4 (shaping):** Sl st 3, sc 10, sl st 3. Turn. *(skip remaining 3 sts)* **[approx. 16 worked]**
  *(This creates a tapered fin shape — wider at body end, narrowing toward tip)*
- **Row 5:** Sl st 2, sc 8, sl st 2. **[approx. 12 worked]**

Fasten off, leaving a **16-inch (40 cm) tail** for sewing.

Make **2 identical pieces.** These are sewn along the dorsal (top) and ventral (bottom) ridge of the tail tube, flat against the tube, with the wide end toward the body and the narrow end toward the tip.

---

## PIECE 4: FRONT LEGS (Make 2)
**Yarn:** MC
**Notes:** Axolotl front legs are short, stubby, and have four toes — worked as simple tubes with a toe fringe added after.

### Leg Tube

- **Rnd 1 (MR):** 6 sc in magic ring. **[6]**
- **Rnd 2:** Inc ×6. **[12]** *(12 ✅)*
- **Rnd 3:** (Sc, inc) ×6. **[18]** *(18 ✅)*
- **Rnd 4:** Sc around. **[18]**
- **Rnd 5:** (Sc, dec) ×6. **[12]** *(18 − 6 = 12 ✅)*
- **Rnds 6–10:** Sc around. **[12]** each round.

*Lightly stuff the lower leg and foot only — upper part of leg can be unstuffed for easier attachment.*

Fasten off, leaving **16-inch (40 cm) tail** for sewing. Set aside.

### Toes (worked separately, then tacked on)
Using MC, leave a 6-inch (15 cm) tail and ch 8. Sl st back to base of chain. *Fasten off.* Make **4 per leg** (8 total). Thread ends through the "foot" (closed end of leg tube, Rnd 1 side) and knot securely on inside. Space 4 toes evenly around the opening.

---

## PIECE 5: BACK LEGS (Make 2)
**Yarn:** MC
**Notes:** Back legs are slightly longer than front legs and have **5 toes** (anatomically accurate for axolotls — front legs have 4, back have 5).

### Leg Tube

- **Rnd 1 (MR):** 6 sc in magic ring. **[6]**
- **Rnd 2:** Inc ×6. **[12]** *(12 ✅)*
- **Rnd 3:** (Sc, inc) ×6. **[18]** *(18 ✅)*
- **Rnd 4:** (Sc 2, inc) ×6. **[24]** *(24 ✅)*
- **Rnd 5:** Sc around. **[24]**
- **Rnd 6:** (Sc 2, dec) ×6. **[18]** *(24 − 6 = 18 ✅)*
- **Rnd 7:** (Sc, dec) ×6. **[12]** *(18 − 6 = 12 ✅)*
- **Rnds 8–13:** Sc around. **[12]** each round.

*Lightly stuff.*

Fasten off, leaving **16-inch (40 cm) tail** for sewing.

### Toes
Make **5 per leg** using same method as front leg toes (ch 8, sl st back). Attach evenly to foot opening.

---

## PIECE 6: GILL STALKS (Make 6)
**Yarn:** MC for stalk, CA (magenta) for fronds
**Notes:** Axolotls have 3 external gill stalks on each side of the head. Each stalk is a firm tube. Feathery fronds are added afterward. The stalks fan outward and slightly upward from the back corners of the head.

### Stalk Tube

- **Rnd 1 (MR):** 5 sc in magic ring. **[5]**
- **Rnd 2:** Inc ×5. **[10]** *(10 ✅)*
- **Rnd 3:** (Sc, inc) ×5. **[15]** *(15 ✅)*
- **Rnd 4:** Sc around. **[15]**
- **Rnd 5:** (Sc, dec) ×5. **[10]** *(15 − 5 = 10 ✅)*
- **Rnd 6:** Sc around. **[10]**
- **Rnd 7:** (Dec, sc 3) ×2. **[8]** *(10 − 2 = 8 ✅)*
- **Rnds 8–14:** Sc around. **[8]** each round.
  *(7 even rounds ≈ 1.75 inches of stalk height ✅)*
- **Rnd 15:** Dec ×4. **[4]** *(8 − 4 = 4 ✅)*

*Stuff stalk firmly (especially base). If desired, insert a short length of pipe cleaner before closing for posability.*

Fasten off, leaving **16-inch (40 cm) sewing tail.** Close tip. Make 6 total.

---

## PIECE 7: GILL FRONDS (Make 6 sets — one set per stalk)
**Yarn:** CA (magenta)
**Notes:** Each gill stalk has 3–5 feathery fronds branching from it. These are worked as small flat loops or chains attached directly to the stalk. Work fronds **before** sewing stalks to head — it is much easier.

### Frond Method A — Chain Loops (Recommended for Beginners within Advanced)
Thread CA onto yarn needle. Bring yarn up through the stalk surface at the desired frond position. Insert needle back into the stalk 1⁄4 inch (6 mm) away, leaving a loop of yarn approximately 1 inch (2.5 cm) long. Tack the loop down at its midpoint. Repeat to create 3–5 fronds distributed along the top 2/3 of the stalk.

### Frond Method B — Crocheted Fronds (Full Advanced Method — Recommended)
For each frond: Join CA to the side of the stalk with a sl st. Ch 12. Working back along chain: sl st in 2nd ch from hook, sl st in next 2 ch, sc in next 2 ch, sl st in next 6 ch. Fasten off, leaving a short tail to weave in. *This creates a slightly ruffled, feathery frond.*

Make **4 fronds per stalk** (24 fronds total), distributed along the upper two-thirds of each stalk. Space fronds approximately 1⁄4 inch (6 mm) apart, alternating sides of the stalk.

> **Tip:** Work all fronds on all 6 stalks before assembly. It is nearly impossible to add fronds neatly after the stalks are attached to the head.

---

## PIECE 8: DORSAL FIN RIDGE (Optional but Recommended for Realism)
**Yarn:** CB (white/cream), small amount of MC
**Notes:** Axolotls have a subtle dorsal fin running from the back of the head down the spine to the tail. This is worked as a narrow flat strip and sewn along the spine seam between head, body, and tail.

**Ch 50.** *(adjust length after assembly if needed)*
- **Row 1:** Sc in 2nd ch from hook, sc across. **[49]**
- **Row 2:** Ch 1, turn. (Sc, ch 2, sc in same st, sk 1) ×24, sc 1. **[creates a lacy fin edge]**

Fasten off. Leave long tails at both ends for sewing. Sew along the dorsal midline during assembly.

---

# ASSEMBLY

> **Critical:** Before sewing, lay all pieces flat and pin them in place. Take a photo from above and from the side to check symmetry. Adjust pin positions before sewing anything permanently.

## Step 1: Attach Toes to Legs
As described in the leg sections above. Knot and weave in all toe tails securely before proceeding.

## Step 2: Attach Tail Fin to Tail Tube
- Hold one fin piece flat against the TOP of the tail tube, wide end toward the body.
- Using MC and yarn needle, whip stitch the straight edge of the fin piece along the top ridge of the tail tube. The fin should run along approximately 60% of the tail length (not all the way to the tip).
- Attach the second fin piece to the BOTTOM of the tail tube in the same manner, directly opposite.

## Step 3: Attach Tail to Body
- The open (wider) end of the tail tube should align with the narrow back end of the body (the closed end from Rnd 28 of the body).
- Using MC and whip stitch, sew the tail tube opening onto the body's back end. Work all the way around, closing any gaps.

## Step 4: Attach Head to Body
- The head opening (from Rnd 19 onward, the underside — approximately 18–24 stitches wide) meets the front of the body.
- Flatten the back of the head slightly and pin to the front-top of the body. The head should tilt **very slightly downward** at the front (snout angled down about 5–10°) — this gives the characteristic axolotl expression.
- Using MC and ladder stitch (invisible seam), sew the head to the body. Work ladder stitch by alternating one stitch in the body edge and one stitch in the head edge, pulling gently to close the seam. Add extra stuffing through the neck gap before making the final stitches.

> **Ladder stitch:** Bring needle up through body edge, cross to head edge, insert and emerge one stitch forward, cross back to body edge, insert and emerge one stitch forward. Pull yarn gently every 4–5 stitches to draw seam together.

## Step 5: Attach Front Legs
- Front legs are positioned on the **underside** of the body, toward the **front**, approximately 1–1.5 inches (2.5–4 cm) behind the head join.
- The two front legs are placed **symmetrically**, approximately 2–2.5 inches (5–6 cm) apart (one on each side).
- Legs angle **outward and slightly downward** (not straight down — axolotls have a sprawling posture).
- Using MC and whip stitch, sew the open (upper) end of each leg to the body. Work all the way around the leg opening for security. Stitch through to the opposite side of the body and back at least twice if desired for a very secure join.

## Step 6: Attach Back Legs
- Back legs are positioned similarly to front legs but **toward the rear** of the body, approximately 0.75–1 inch (2–2.5 cm) in front of the tail join.
- Same outward-sprawling angle as front legs.
- Sew securely with whip stitch as for front legs.

## Step 7: Attach Gill Stalks
- Gill stalks are attached to the **top-sides of the head**, at the back edge, fanning outward.
- Mark positions with pins: 3 stalks on each side of the head.
  - **Inner stalk:** Closest to the center back, angled slightly inward and upward.
  - **Middle stalk:** Directly out to the side, angled horizontally outward.
  - **Outer stalk:** Closest to the front, angled slightly forward and outward.
- Spacing between stalks on each side: approximately 0.5 inch (1.25 cm) apart.
- Pin all 6 stalks in place and check from above for symmetry before sewing.
- Using MC and whip stitch, sew each stalk base firmly to the head, stitching all the way around the base circle. Reinforce with extra passes.

> **Critical:** Gill stalks bear handling stress — sew each stalk base at least 3 full rounds of whip stitch. Test each stalk by gently tugging before moving on.

## Step 8: Attach Dorsal Fin Ridge
- Pin the fin strip along the exact center spine: starting just behind the head (at the head-body join), running along the body, and continuing onto the tail.
- Using CB and yarn needle, whip stitch the base of the fin strip along the dorsal midline. The lacy edge should stand upward.

---

# FINISHING

## Smile Embroidery
Using pink embroidery floss or a single strand of CA yarn, embroider the characteristic axolotl smile on the front of the head. The smile is a simple curved line approximately 1.5 inches (4 cm) wide. Use backstitch or stem stitch:
- Come up at the left corner of the mouth, 3 rounds below and 5 stitches left of center.
- Work a smooth upward curve to the center (deepest point of smile is 2 rounds below eye level).
- Continue curve to the right corner, mirroring the left side.
- Optional: Add two tiny backstitch "dimples" at each corner.

## Nostril Dots (Optional)
Using CA or dark pink floss, make 2 small French knots or satin stitch dots on the tip of the snout, approximately 0.5 inch (1.25 cm) apart and 0.5 inch (1.25 cm) from the front edge of the head.

## Final Stuffing Check
Squeeze the finished axolotl all over. If any area feels soft or squishy rather than firm and shape-retaining, use a thin blunt stick (chopstick or pencil) to push additional fiberfill through the nearest seam, then close the gap with a few stitches.

## Weave In All Ends
Use yarn needle to weave every remaining tail in at least twice through the fabric in different directions, then trim. Do not cut tails short before weaving — always weave first.

## Final Inspection Checklist
- [ ] Safety eyes are secure and washers are fully seated
- [ ] All gill stalks resist gentle tugging
- [ ] All toes are knotted securely and ends are woven in
- [ ] No fiberfill is visible through gaps in fabric
- [ ] Head, body, and tail are aligned on the same axis (not twisted)
- [ ] Left and right sides are symmetrical (check from above)
- [ ] All yarn tails are woven in and trimmed

---

## QUICK REFERENCE — STITCH COUNTS

| Piece | Max sts | Key rounds |
|---|---|---|
| Head | 59 | Oval fdn 20 → max 59 (Rnd 6) → close Rnd 18 |
| Body | 42 | MR → max 42 (Rnd 7) → close Rnd 28 |
| Tail | 24 | MR → max 24 (Rnd 4) → close Rnd 23 |
| Front Leg (×2) | 18 | MR → max 18 (Rnd 3) → even to Rnd 10 |
| Back Leg (×2) | 24 | MR → max 24 (Rnd 4) → close Rnd 7 → even to Rnd 13 |
| Gill Stalk (×6) | 15 | MR → max 15 (Rnd 3) → close Rnd 15 |

---

## YARN REQUIREMENTS SUMMARY

| Yarn | Estimated Yardage |
|---|---|
| MC (pink/salmon) | ~250 yds (229 m) |
| CA (magenta) | ~60 yds (55 m) |
| CB (white/cream) | ~30 yds (27 m) |
| **Total** | **~340 yds (311 m)** |

---

## SAFETY NOTICE
This pattern uses 12 mm safety eyes. All parts must be **securely fastened.**
- **Not suitable for children under 3 years** due to small parts.
- For young children, substitute embroidered eyes and omit chain-loop fronds, replacing with tightly sewn fabric fronds.
- Test all limbs and gill stalks by applying firm pressure before gifting.

---

## TROUBLESHOOTING

| Problem | Solution |
|---|---|
| Head looks round, not flat | Work more even rounds (add 2–3 extra between Rnd 6 and Rnd 13) before decreasing |
| Gill stalks flop over | Insert pipe cleaner through stalk before closing; reinforce base stitching |
| Toes pull out | Re-knot toe tails with a surgeon's knot; add a drop of fabric glue inside |
| Seam between head and body is visible | Use ladder stitch instead of whip stitch; match yarn to MC exactly |
| Body looks too round | Reduce even rounds in body (Rnds 8–18) by 2–3 rounds |
| Axolotl won't stand | Widen leg attachment angle; stuff body more firmly |

---

*Pattern designed for advanced crocheters. © Original pattern. For personal use and handmade sales in small quantities only. Please credit the designer if sharing.*
Disclaimer: This pattern was generated by AI and should be reviewed for accuracy before use. While we strive for quality, AI-generated content may contain errors. Please verify measurements, stitch counts, and instructions before beginning your project. Generated by purlJam.uk
Access your pattern anytime
Bookmark this page to access your pattern anytime