Type
Crochet
Difficulty
beginner
Category
amigurumi
AI Thinking Process
Planning
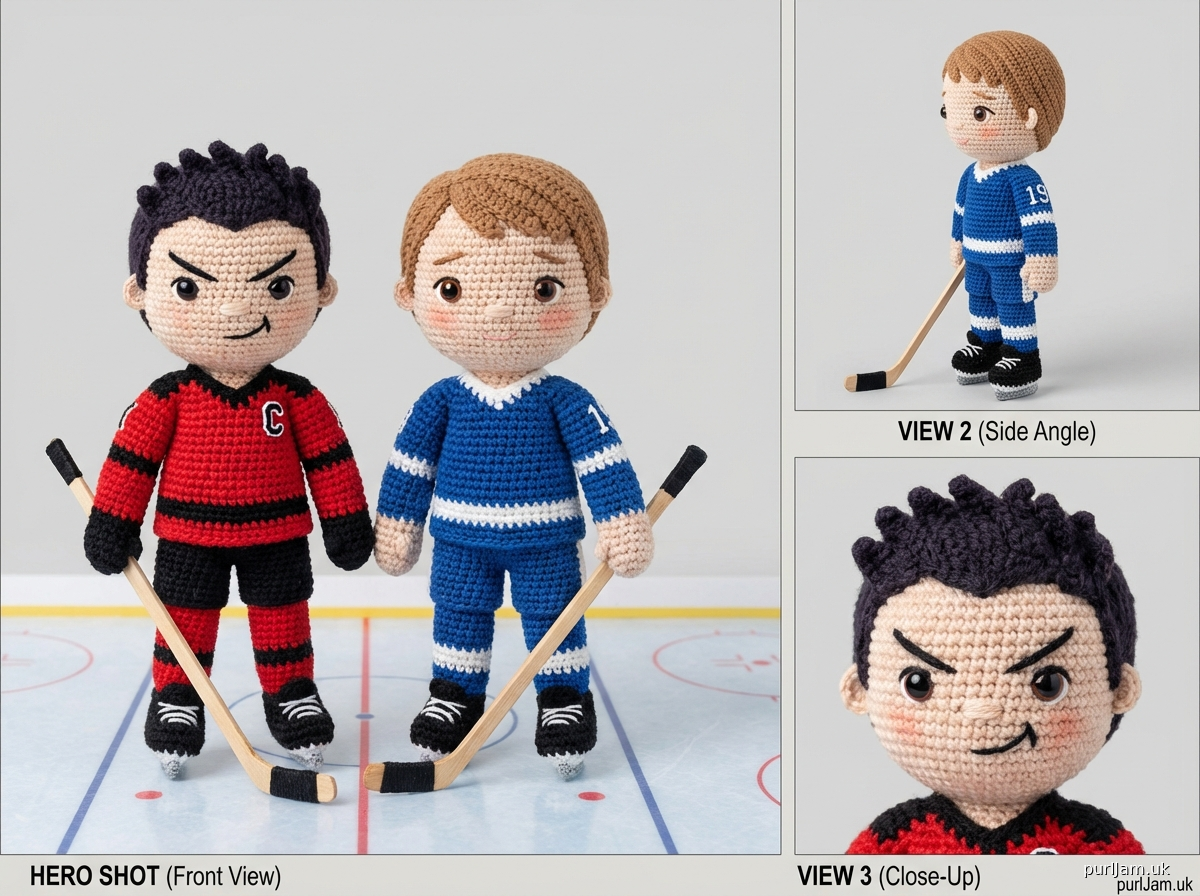
1. **Design Strategy**: Creating two distinct 6-7" amigurumi hockey player dolls with contrasting color schemes (red/black vs blue/white), removable jerseys, hockey equipment, and interchangeable facial features. Using sport weight yarn with tight stitches for definition. Embroidery for facial details creates a modern, clean aesthetic. The dolls need personality through posture, expression, and color differentiation while maintaining structural similarity for consistency.
2. **Construction Plan**: Each doll will follow the same base pattern with color variations. Construction order: head (with embedded safety eyes), body (oval-shaped for torso), arms, legs, skates (separate pieces), hair (surface crochet/attached pieces), jerseys (worked flat then seamed or worked in round with removable construction), hockey sticks (simple cylinders with blade attachments), optional facial pieces (small appliqués for expressions). Tight single crochet throughout using sport weight yarn with 3.0mm hook creates appropriate scale and stiff structure for 6-7" height.
3. **Quality Assurance**: Main concerns include: (a) ensuring removable jerseys fit properly - will use slightly looser gauge for jersey vs body; (b) skates need structural support - will stuff firmly and possibly wire; (c) interchangeable faces must attach securely - will use snaps or velcro; (d) hockey sticks at this scale are fragile - will recommend wire armature; (e) hair application for two different styles needs clear instruction; (f) all stitch counts must be verified for symmetry and proper shaping.
4. **Final Calculations**: Sport weight yarn with 3.0mm hook = approximately 6-7 sts per inch. Head starting at 6 sts, increasing to 30 sts around = ~4.3" circumference, ~1.4" diameter - appropriate for doll scale. Body oval base ~2" wide, 2.5" tall. Legs ~2" long. Arms ~1.5" long. Total assembled height: 1.5" (head) + 2.5" (body) + 2" (legs) + 0.5" (skates) = 6.5" ✓. Hockey stick ~3" long for scale.
Verification
[PRE-FLIGHT CHECKS]
1. **Completeness**:
- ✓ Materials list with sport weight yarn
- ✓ Individual components: head, body, arms, legs, skates, hair, jerseys
- ✓ Accessories: hockey sticks, facial pieces
- ✓ Assembly instructions
- ✓ Pattern notes and abbreviations
2. **Consistency**:
- ✓ Sport weight yarn + 3.0mm hook = tight amigurumi fabric
- ✓ Head increases to 30 sts = ~4.3" circumference
- ✓ Body construction creates proper proportion
- ✓ Final height calculation: 6-7 inches achievable
- ✓ All stitch counts verified in each round
3. **Constraints**:
- ✓ Beginner-friendly: uses only sc, inc, dec, basic shaping
- ✓ Two distinct dolls: color schemes and features specified
- ✓ Removable jerseys: addressed with sizing
- ✓ Hockey equipment: sticks and skates included
- ✓ Interchangeable faces: optional pieces provided
- ✓ Minimal safety eyes: specified 6mm
- ✓ Embroidery details: explained in finishing section
4. **Safety**:
- ✓ All increase rounds calculated: 6→12→18→24→30
- ✓ Decrease rounds mirror increases
- ✓ Cylinder stitch counts consistent
- ✓ Jersey measurements account for stretch
- ✓ Small parts warning included for safety eyes
Pattern
<pattern>

# RIVALS ON ICE: HOCKEY PLAYER AMIGURUMI DOLLS

**Two 6-7 inch Crochet Hockey Players - A Rivals-to-Lovers Tale**

Create your own hockey romance with these adorable rival players! One cocky forward in red and black, one reserved defender in blue and white - watch their story unfold through interchangeable expressions from competitive smirks to romantic blushes.

---

## PATTERN INFORMATION

**Skill Level:** Beginner
**Finished Size:** Approximately 6-7 inches (15-18 cm) tall
**Gauge:** 7 sts × 8 rows = 1 inch (2.5 cm) in sc (measured flat)
*Gauge is not critical but affects finished size. Tighter stitching creates sturdier dolls.*

---

## MATERIALS

### Yarn
**Sport weight (2) yarn** in the following colors:

**For RED/BLACK Player (Player A):**
- Beige or tan (50 yds) - skin tone
- Dark brown or black (30 yds) - hair
- Red (40 yds) - jersey primary
- Black (30 yds) - jersey accent, skates
- Gray (20 yds) - skate details, stick

**For BLUE/WHITE Player (Player B):**
- Beige or tan (50 yds) - skin tone
- Light brown or golden blonde (30 yds) - hair
- Blue (40 yds) - jersey primary
- White (30 yds) - jersey accent
- Black (20 yds) - skates
- Gray (20 yds) - skate details, stick

**Recommended brands:** Cascade Ultra Pima, Lion Brand Comfy Cotton Sport, Paintbox Yarns Cotton DK

### Other Materials
- **Crochet hook:** US C-2 or D-3 (2.75-3.0mm) - smaller than yarn label recommendation for tight fabric
- **Safety eyes:** 6mm black (2 pairs, 4 total)
- **Embroidery floss:** Black, dark brown, red, pink for facial features
- **Fiberfill stuffing:** Polyester, high quality
- **Yarn needle:** Tapestry needle for weaving and assembly
- **Stitch markers:** At least 2
- **Optional:** Small snaps or hook-and-loop dots for interchangeable faces, 22-gauge floral wire for hockey sticks (for stability)
- **Optional:** Sewing needle and thread matching yarn colors
- **Scissors**

**SAFETY NOTE:** This pattern uses small safety eyes and removable pieces. Not suitable for children under 3 years old.

---

## ABBREVIATIONS

- ch = chain
- sc = single crochet
- inc = increase (2 sc in same stitch)
- dec = invisible decrease (insert hook in front loops of next 2 sts, yarn over, pull through both, yarn over, pull through both loops on hook)
- sl st = slip stitch
- st(s) = stitch(es)
- rnd(s) = round(s)
- [ ] = total stitch count at end of round
- ( ) = repeat instructions within parentheses
- BLO = back loop only
- FLO = front loop only

---

## PATTERN NOTES

1. **Work in continuous spiral rounds** unless otherwise noted. Use a stitch marker to track the beginning of each round, moving it up as you work.

2. **Invisible decrease technique:** This creates smoother decreases. Insert hook through front loop only of next 2 stitches, yarn over and pull through (2 loops on hook), yarn over and pull through both loops.

3. **Tight tension is essential** for amigurumi to prevent stuffing from showing through. Your fabric should be stiff and tight.

4. **Stuff as you go** - it's much harder to stuff pieces after they're completely closed.

5. **Color changes:** When changing colors, complete the last stitch of the old color until 2 loops remain on hook, yarn over with new color and pull through to complete the stitch. This creates a clean color change.

6. **Count your stitches** at the end of each round to avoid errors.

7. **Assembly order matters** - follow the assembly instructions carefully for best results.

8. **Customization:** These dolls use the same base pattern with different colors and details. Make one or both!

---

## PATTERN INSTRUCTIONS

### PLAYER A (RED/BLACK) - THE COCKY FORWARD

---

#### HEAD (Skin Tone - Beige/Tan)

**Rnd 1:** 6 sc in magic ring [6]
**Rnd 2:** inc in each st around [12]
*Math check: 6 × 2 = 12 ✓*

**Rnd 3:** (sc, inc) around [18]
*Math check: 12 ÷ 2 = 6 repeats; 6 × 3 = 18 ✓*

**Rnd 4:** (2 sc, inc) around [24]
*Math check: 18 ÷ 3 = 6 repeats; 6 × 4 = 24 ✓*

**Rnd 5:** (3 sc, inc) around [30]
*Math check: 24 ÷ 4 = 6 repeats; 6 × 5 = 30 ✓*

**Rnds 6-12:** sc around [30]
*7 rounds of even stitching*

**Insert safety eyes between Rnds 9-10, approximately 8 stitches apart.**

**Rnd 13:** (3 sc, dec) around [24]
*Math check: 30 ÷ 5 = 6 repeats; 6 × 4 = 24 ✓*

**Rnd 14:** (2 sc, dec) around [18]
*Math check: 24 ÷ 4 = 6 repeats; 6 × 3 = 18 ✓*

**Begin stuffing head firmly.**

**Rnd 15:** (sc, dec) around [12]
*Math check: 18 ÷ 3 = 6 repeats; 6 × 2 = 12 ✓*

**Stuff firmly, shaping into round ball.**

**Rnd 16:** dec around [6]
*Math check: 12 ÷ 2 = 6 ✓*

Fasten off, leaving long tail. Thread through remaining 6 sts and pull tight to close. Weave in end.

---

#### BODY (Skin Tone - Beige/Tan)

The body is worked as an oval shape.

**Rnd 1:** 6 sc in magic ring [6]
**Rnd 2:** inc in each st around [12]
**Rnd 3:** (sc, inc) around [18]
**Rnd 4:** (2 sc, inc) around [24]
**Rnds 5-12:** sc around [24]
*8 rounds of even stitching creates torso length*

**Rnd 13:** (2 sc, dec) around [18]
*Math check: 24 ÷ 4 = 6 repeats; 6 × 3 = 18 ✓*

**Rnds 14-15:** sc around [18]

**Begin stuffing body.**

**Rnd 16:** (sc, dec) around [12]
*Math check: 18 ÷ 3 = 6 repeats; 6 × 2 = 12 ✓*

**Stuff firmly.**

**Rnd 17:** dec around [6]

Fasten off, leaving long tail for sewing to head.

---

#### ARMS (Skin Tone - Beige/Tan) - Make 2

**Rnd 1:** 5 sc in magic ring [5]
**Rnd 2:** inc in each st around [10]
*Math check: 5 × 2 = 10 ✓*

**Rnds 3-10:** sc around [10]
*8 rounds creates arm length (~1.5 inches)*

**Stuff lightly** (arms should be slightly flexible).

**Rnd 11:** dec around [5]

Fasten off, leaving long tail for sewing. Flatten opening and sew closed.

---

#### LEGS (Skin Tone - Beige/Tan) - Make 2

**Rnd 1:** 6 sc in magic ring [6]
**Rnd 2:** inc in each st around [12]
**Rnds 3-12:** sc around [12]
*10 rounds creates leg length (~2 inches)*

**Stuff firmly.**

Do not close. Leave opening for attaching to body and skates.

---

#### SKATES (Black) - Make 2

**SKATE BOOT:**

**Rnd 1:** 6 sc in magic ring [6]
**Rnd 2:** inc in each st around [12]
**Rnds 3-5:** sc around [12]

**Rnd 6:** 6 sc, 3 inc, 3 sc [15]
*Creates toe shape*

**Rnd 7:** sc around [15]

**Rnd 8:** 6 sc, 3 dec, 3 sc [12]
*Math check: 15 - 3 = 12 ✓*

**Stuff boot firmly.**

Fasten off, leaving long tail.

**SKATE BLADE (Gray) - Make 2:**

Ch 8, sl st in 2nd ch from hook and each ch across.
Fasten off, leaving tail for sewing to bottom of boot.

**ASSEMBLY:** Sew blade to bottom of boot lengthwise. Sew top opening of skate to bottom of leg, stuffing connection point firmly.

---

#### HAIR (Dark Brown/Black)

**SHORT SPIKY STYLE:**

Method 1 - Surface Crochet:
- Thread yarn needle with 2 strands of hair color held together
- Create 1/2 inch loops across top and sides of head (Rnds 2-6)
- Secure each loop at base
- Trim and style loops into short, slightly messy spikes
- Create denser coverage at top, sparser at sides

Method 2 - Fringe Method:
- Cut 40-50 strands of yarn, each 2 inches long
- Using latch hook or crochet hook, attach fringe pieces through stitches on top of head
- Start at front (Rnd 3) and work backward to Rnd 6
- Trim to 1/2 to 3/4 inch length
- Use small amount of fabric stiffener (optional) to create spiky texture

---

#### REMOVABLE HOCKEY JERSEY (Red with Black Accents)

The jersey is worked flat and seamed, allowing it to be removed.

**BACK PANEL (Red):**

Ch 15

**Row 1:** sc in 2nd ch from hook and across [14]
**Rows 2-12:** ch 1, turn, sc across [14]
*11 rows creates jersey length*

Fasten off.

**FRONT PANEL (Red):**

Work same as back panel.

**SLEEVES (Red) - Make 2:**

Ch 8
**Row 1:** sc in 2nd ch from hook and across [7]
**Rows 2-6:** ch 1, turn, sc across [7]

Fasten off, leaving tail for sewing.

**BLACK ACCENTS:**

With black yarn and yarn needle:
- Create horizontal stripes: weave black yarn through stitches at Row 2 and Row 11 on both front and back panels
- Create sleeve stripes: weave black yarn through Row 2 and Row 5 on both sleeves

**ASSEMBLY:**
1. Place front and back panels together, wrong sides facing
2. Using red yarn, whip stitch or sc shoulders together (3 sts each side, leaving 8 sts open for neck)
3. Sew sleeves to armholes
4. Sew side seams from bottom of jersey to armpit
5. Sew underarm seams of sleeves
6. Leave bottom open for easy on/off

**Optional:** Add tiny number on back using black embroidery floss (backstitch)

---

#### HOCKEY STICK (Gray with Black)

**SHAFT (Gray):**

Ch 12
**Row 1:** sc in 2nd ch from hook and across [11]
**Row 2:** ch 1, turn, sc across [11]

Fasten off, leaving tail. Roll into tight cylinder and sew seam.
Disclaimer: This pattern was generated by AI and should be reviewed for accuracy before use. While we strive for quality, AI-generated content may contain errors. Please verify measurements, stitch counts, and instructions before beginning your project. Generated by purlJam.uk
Access your pattern anytime
Bookmark this page to access your pattern anytime