Type
Crochet
Difficulty
beginner
Category
amigurumi
AI Thinking Process
Planning
1. **Design Strategy**: Creating a chibi-style amigurumi hockey player with oversized head (main feature), small body, and detailed hockey uniform. Using basic sphere and cylinder shapes from template. Head will be largest component with embroidered facial features. Hockey stick will be a simple thin cylinder. The red jersey with stripes, detailed gloves, striped socks, and skates require color changes but maintain beginner-friendly construction.
2. **Construction Plan**:
- Head: Large sphere (increase to 36 sts for chibi proportion)
- Body: Small oval/cylinder in red
- Arms: Small cylinders with blue glove ends
- Legs: Cylinders in red with striped sock section
- Skates: Small ovals in black
- Hockey stick: Very thin cylinder/tube
- Assembly: Head sewn to body, limbs attached with yarn needle
- Details: Embroidered facial features, jersey number, stripes using surface crochet or embroidery
3. **Quality Assurance**:
- Chibi proportions: Head should be ~2x diameter of body
- Stripe placement: Plan color changes for jersey and socks
- Stability: Small body needs firm stuffing to support large head
- Limbs: Keep proportionally small, stuff lightly for posability
- Hockey stick: Reinforce with wire or stuff firmly to prevent bending
- Number 24: Use embroidery or felt appliqué for clarity
4. **Final Calculations**:
- Sport weight yarn with 3.25mm hook = ~6 sts per inch
- Head: 36 sts around = ~6" circumference, ~2" diameter
- Body: 24 sts around = ~4" circumference, ~1.3" diameter
- Total height: approximately 5-6 inches (chibi style)
- Arms/legs: 12 sts around = thin limbs appropriate for scale
Verification
[PRE-FLIGHT CHECKS]
1. **Completeness**: ✓ Pattern includes all body parts, materials list, assembly instructions, and finishing details
2. **Consistency**: ✓ Stitch counts verified for each round, increases/decreases balanced
3. **Constraints**: ✓ Chibi style with large head, hockey uniform details, specific colors, beginner-friendly techniques
4. **Safety**: ✓ All increase/decrease math checked, stuffing safety notes included, no small detachable parts
Pattern
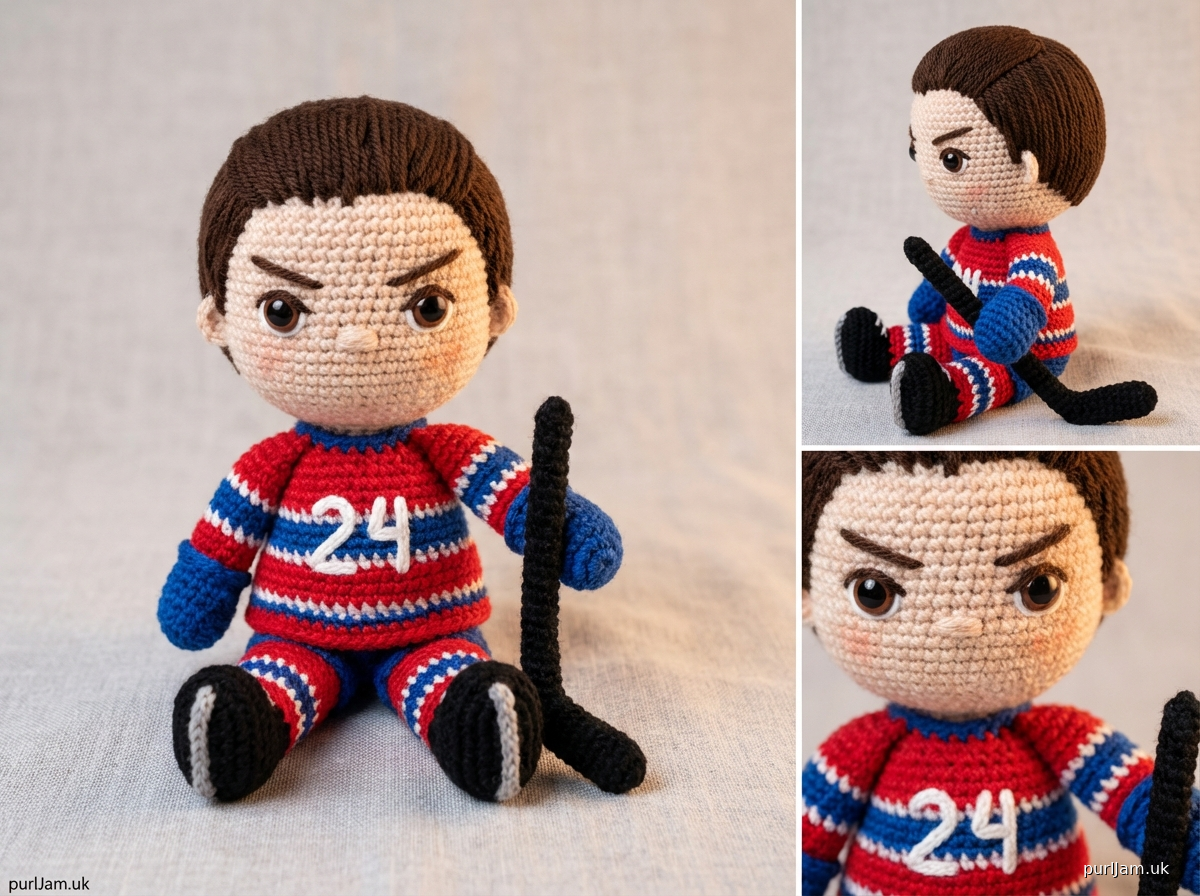
<pattern>
# Ilya Rozanov Hockey Player Chibi Amigurumi

**Designed for sport weight yarn | Chibi style with oversized head**

## FINISHED MEASUREMENTS
- Height: Approximately 5.5-6 inches (14-15 cm) seated
- Head diameter: Approximately 2 inches (5 cm)
- Perfect handheld size for display or play

## MATERIALS

**Yarn:**
- Sport weight (#2 Fine) yarn in the following colors:
  - Beige/light tan (skin tone) - 40 yards
  - Dark brown or black (hair) - 15 yards
  - Red (jersey, pants) - 35 yards
  - Blue (jersey stripes, gloves, sock stripes) - 20 yards
  - White (jersey stripes, sock stripes) - 15 yards
  - Black (skates, hockey stick) - 15 yards
  - Brown (eyes) - small amount for embroidery

**Hook & Notions:**
- US D-3 (3.25mm) crochet hook
- Polyester fiberfill stuffing
- Yarn needle for sewing
- Stitch marker
- Embroidery needle
- Optional: small amount of wire for hockey stick reinforcement
- Pins for assembly

## GAUGE
Not critical for amigurumi, but approximate gauge:
6 sc x 6 rounds = 1 inch (2.5 cm) in single crochet

*Note: Work tightly for best amigurumi results. Your stitches should not show gaps where stuffing could peek through.*

## ABBREVIATIONS
- ch = chain
- sc = single crochet
- inc = increase (2 sc in same stitch)
- dec = invisible decrease (insert hook through front loops of next 2 sts, yarn over, pull through both, yarn over, pull through all loops)
- st(s) = stitch(es)
- rnd(s) = round(s)
- [ ] = total stitch count at end of round
- ( ) = repeat instructions within parentheses

## SPECIAL TECHNIQUES

**Magic Ring:** Wrap yarn around fingers, insert hook and pull up loop, ch 1, work stitches into ring, pull tail to close.

**Invisible Decrease:** Insert hook in front loop only of next 2 sts, yo, pull through both loops (2 loops on hook), yo, pull through both loops. Creates smoother decrease than standard sc2tog.

**Color Changes:** Complete last stitch of old color until 2 loops remain on hook, yarn over with new color and pull through to complete stitch. Carry unused color inside if working stripes.

**Surface Slip Stitch (for details):** Insert hook from front to back, pull up loop, insert hook in next st, pull through st and loop on hook. Creates embroidered line effect.

## PATTERN NOTES
- Work in continuous spiral rounds unless otherwise noted. Use stitch marker to track beginning of round.
- Do not join or turn unless instructed.
- Stuff pieces firmly as you go, especially the head.
- All pieces are worked in beige/skin tone unless color is specified.
- Weave in ends as you work when possible.

---

## HEAD (Beige/Skin Tone)

Rnd 1: 6 sc in magic ring [6]

Rnd 2: inc in each st around [12]
*Math check: 6 × 2 = 12 ✓*

Rnd 3: (sc, inc) around [18]
*Math check: 12 ÷ 2 = 6 repeats, 6 × 3 = 18 ✓*

Rnd 4: (2 sc, inc) around [24]
*Math check: 18 ÷ 3 = 6 repeats, 6 × 4 = 24 ✓*

Rnd 5: (3 sc, inc) around [30]
*Math check: 24 ÷ 4 = 6 repeats, 6 × 5 = 30 ✓*

Rnd 6: (4 sc, inc) around [36]
*Math check: 30 ÷ 5 = 6 repeats, 6 × 6 = 36 ✓*

Rnds 7-14: sc in each st around [36]
*8 rounds of even stitches for chibi head height*

Rnd 15: (4 sc, dec) around [30]
*Math check: 36 ÷ 6 = 6 repeats, 6 × 5 = 30 ✓*

Rnd 16: (3 sc, dec) around [24]
*Math check: 30 ÷ 5 = 6 repeats, 6 × 4 = 24 ✓*

Rnd 17: (2 sc, dec) around [18]
*Math check: 24 ÷ 4 = 6 repeats, 6 × 3 = 18 ✓*

**STOP and stuff head firmly. This is important for chibi structure.**

Rnd 18: (sc, dec) around [12]
*Math check: 18 ÷ 3 = 6 repeats, 6 × 2 = 12 ✓*

Rnd 19: dec around [6]
*Math check: 12 ÷ 2 = 6 ✓*

Fasten off, leaving long tail. Thread tail through remaining 6 sts and pull tight to close. Weave in end.

**Face Embroidery (complete before assembly):**
- Position eyes between Rnds 10-11, approximately 6 sts apart
- Embroider brown oval eyes (3-4 horizontal stitches, 2 rows tall)
- Add black horizontal line above each eye for strong brows (2 sts wide, slightly angled)
- Embroider small curved line for slight frown or neutral mouth below eyes
- Add small highlights to eyes with white yarn (optional)

---

## HAIR (Dark Brown or Black)

The hair is worked as a cap that sits on top of head.

Rnd 1: 6 sc in magic ring [6]

Rnd 2: inc in each st around [12]

Rnd 3: (sc, inc) around [18]

Rnd 4: (2 sc, inc) around [24]

Rnd 5: (3 sc, inc) around [30]

Rnd 6: (4 sc, inc) around [36]

Rnds 7-11: sc in each st around [36]
*5 rounds creates cap that covers top and sides of head*

Fasten off, leaving long tail for sewing. Do not stuff hair piece.

---

## BODY (Red)

The body is worked in red for the hockey jersey.

Rnd 1: 6 sc in magic ring [6]

Rnd 2: inc in each st around [12]

Rnd 3: (sc, inc) around [18]

Rnd 4: (2 sc, inc) around [24]

Rnds 5-10: sc in each st around [24]
*6 rounds for small chibi body*

Rnd 11: (2 sc, dec) around [18]

Rnd 12: sc in each st around [18]

Fasten off, leaving long tail for assembly. Stuff body firmly (body needs firm stuffing to support large head).

**Jersey Stripes (add after body is complete):**
Using blue yarn, work surface slip stitch horizontally around Rnd 6.
Using white yarn, work surface slip stitch horizontally around Rnd 7.
This creates the blue and white stripe detail on jersey.

**Number 24 (add after stripes):**
Using white yarn and embroidery needle, stitch number "24" on front of body between Rnds 8-9. Each number should be approximately 4-5 sts tall. You can also cut numbers from white felt and glue/sew in place.

---

## ARMS (Make 2)

Start with beige for arm, change to blue for gloves.

Rnd 1: 6 sc in magic ring [6]

Rnd 2: inc in each st around [12]

Rnds 3-5: sc in each st around [12]
*3 rounds in beige for arm*

Rnd 6: Change to blue, sc in each st around [12]

Rnds 7-9: sc in each st around [12]
*3 rounds in blue for glove*

Fasten off, leaving long tail. Stuff lightly (arms should be slightly flexible). The blue gloves should be more firmly stuffed than the arms.

---

## LEGS (Make 2)

Start with red for pants portion.

Rnd 1: 6 sc in magic ring [6]

Rnd 2: inc in each st around [12]

Rnds 3-7: sc in each st around [12]
*5 rounds in red for pants*

**Now work striped sock section:**

Rnd 8: Change to red, sc in each st around [12]

Rnd 9: Change to blue, sc in each st around [12]

Rnd 10: Change to white, sc in each st around [12]

Rnd 11: Change to blue, sc in each st around [12]

Rnd 12: Change to red, sc in each st around [12]

Fasten off, leaving long tail. Stuff firmly to knee area, then lightly stuff sock section.

---

## SKATES (Make 2 - Black)

The skate is a small oval shape.

Ch 5

Rnd 1: Starting in 2nd ch from hook, 3 sc, 3 sc in last ch (working around to other side of chain), 2 sc, inc in same st as first sc [10]

Rnd 2: inc, 2 sc, inc 3 times, 2 sc, inc 2 times [16]

Rnd 3: sc in each st around [16]

Rnd 4: sc in each st around [16]

Fasten off, leaving long tail. Stuff skate lightly.

**Blade (Make 2):**
With black yarn, ch 8. Fasten off.
Sew blade to bottom of skate lengthwise.

---

## HOCKEY STICK (Black)

Ch 3, join with sl st to form ring (or 3 sc in magic ring)

Rnds 1-20: sc in each st around [3]
*Creates thin stick - 20 rounds = approximately 3.5 inches*

Fasten off.

**Optional:** Thread thin wire through center before stuffing to help stick hold shape.

**Blade attachment:**
Ch 6, fasten off. Fold in half and sew to bottom end of stick at right angle to create blade shape.

---

## ASSEMBLY

Use photos of hockey players as reference for positioning. Pin pieces before sewing for best results.

**Step 1: Attach Hair to Head**
Position hair cap on top half of head, with edge around Rnds 11-12. The hair should cover top and sides but leave face exposed. Pin in place, then sew around edge with whipstitch using tail from hair piece.

**Step 2: Attach Head to Body**
Position head centered on top of body. The head should sit directly on body with no neck gap (chibi style). Pin in place, then sew securely with whipstitch, going around twice for stability. The large head is heavy, so secure attachment is essential.

**Step 3: Attach Arms**
Position arms on sides of body at Rnd 8-9 (just below jersey stripes). Blue gloves should point downward. Sew in place with several stitches through body for security.

**Step 4: Attach Legs to Body**
Position legs at bottom front of body. Sew securely to bottom opening of body. Legs should angle slightly forward for seated/standing position.

**Step 5: Attach Skates to Legs**
Position each skate at bottom of leg, perpendicular to leg (foot pointing forward). Sew top of skate to bottom of striped sock section. Blade should point forward.

**Step 6: Add Hockey Stick**
Position stick in one hand/glove. You can sew it in place or leave it removable by tacking it lightly with a few stitches.

---

## FINISHING DETAILS

**Jersey Accents:**
- If desired, add small shoulder details with blue yarn
- Ensure number "24" is clearly visible on front

**Face Details:**
- Review face embroidery and add any final details
- Ensure intense expression is visible with strong brows
- You can add small nose stitches if desired

**Skates:**
- Add lace details with white embroidery thread in X pattern on top of skates (optional)

**Final Check:**
- Weave in all remaining ends securely
- Check that all pieces are firmly attached
- Ensure doll can sit or stand with support

---

## CARE INSTRUCTIONS

- Spot clean only with damp cloth
- Do not machine wash
- Keep away from small children if embroidered eyes are used (choking hazard)
- Store in cool, dry place

---

## CUSTOMIZATION IDEAS

**Different Players:**
- Change jersey colors for different teams
- Modify jersey number
- Adjust hair color and style

**Size Variations:**
- Larger doll: Use worsted weight yarn and 4.0mm hook
- Smaller doll: Use fingering weight yarn and 2.75mm hook

**Pose Options:**
- Bend arms to hold stick in playing position
- Create seated pose on bench
- Add small puck (black oval)

---

## SKILL LEVEL
**Easy** - Requires knowledge of basic amigurumi techniques including magic ring, single crochet, increases, and decreases. Perfect for adventurous beginners who have completed at least one simple amigurumi project.

---

## ABBREVIATION QUICK REFERENCE
- ch = chain
- sc = single crochet
- inc = increase (2 sc in 1 st)
- dec = decrease
- st(s) = stitch(es)
- rnd(s) = round(s)
- sl st
Disclaimer: This pattern was generated by AI and should be reviewed for accuracy before use. While we strive for quality, AI-generated content may contain errors. Please verify measurements, stitch counts, and instructions before beginning your project. Generated by purlJam.uk
Access your pattern anytime
Bookmark this page to access your pattern anytime