Type
Crochet
Difficulty
beginner
Category
amigurumi
AI Thinking Process
Planning
Verification
Pattern
Round Lime Monster Amigurumi
Skill level: Beginner
Construction: Separate pieces in continuous rounds, stuffed and sewn
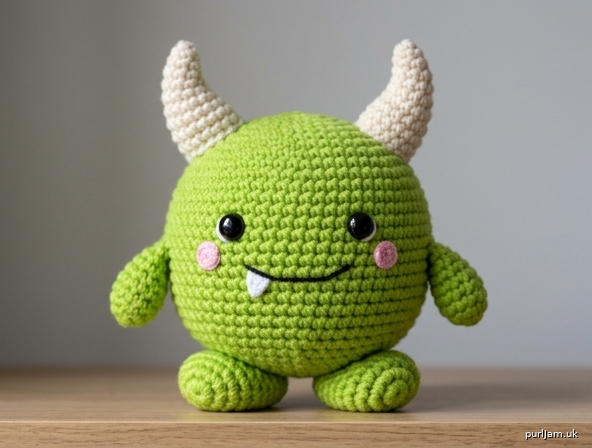
View: Front-facing kawaii plush
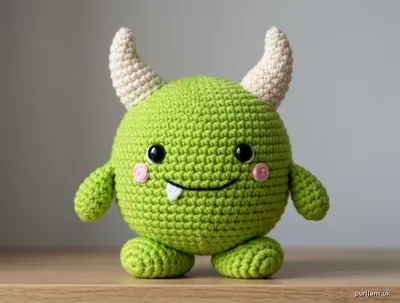
A soft, chunky, densely crocheted round monster with a bright lime-green body, small rounded arms and feet, two upright cream textured horns, glossy black safety eyes, pink circular cheeks, a simple black smile, and one tiny white triangular tooth.
Finished Measurements
- Height (feet to horn tips): 7 inches (18 cm)
- Body diameter: 4½ inches (11.5 cm)
- Width including arms: about 5½ inches (14 cm)
Size will change if gauge or yarn weight changes. Gauge is not critical for a toy, but matching it gives the measurements above.
Materials
Yarn: Bulky weight (5), acrylic or acrylic blend recommended
- Lime green (MC): 90 yards (82 m) — body, arms, feet
- Cream (CC1): 20 yards (18 m) — horns
- Pink (CC2): 8 yards (7 m) — cheeks
- White (CC3): 5 yards (5 m) — tooth (bulky or worsted)
- Black (CC4): 3 yards (3 m) worsted-weight yarn or 6-strand embroidery floss — mouth
Hook: US H-8 / 5.0 mm (go down to US G-6 / 4.0 mm if your fabric looks loose or stuffing shows)
Notions:
- Polyester fiberfill stuffing
- 2 glossy black safety eyes, 12 mm (½ inch)
- Stitch marker
- Yarn needle
- Straight pins
- Scissors
Safety note: Safety eyes are a choking hazard. Do not use them on toys for children under 3 years. Embroider the eyes with black yarn instead.
Gauge
14 sc and 14 rnds = 4 inches (10 cm) in single crochet worked in the round, unstuffed.
Work tightly enough that stuffing does not show through. If a 4-inch (10 cm) swatch has fewer than 14 sc, go down a hook size.
Abbreviations (US)
- BLO — back loop only
- ch — chain
- dec — invisible decrease (see Notes)
- FO — fasten off
- inc — increase (2 sc in the same stitch)
- MR — magic ring (magic circle)
- rnd(s) — round(s)
- sc — single crochet
- sl st — slip stitch
- st(s) — stitch(es)
- yo — yarn over
Notes
- Use US crochet terms throughout. The fabric is single crochet in a spiral unless a join is written.
- Do not join rounds and do not turn unless instructed. Mark the first stitch of every round and move the marker up as you go.
- Invisible decrease: Insert the hook under the front loop of the next st, then under the front loop of the following st (2 loops on hook + 2 front loops). Yo, pull through the 2 front loops (2 loops on hook). Yo, pull through both loops. This keeps the lime body smooth.
- Stuff as you go. A round kawaii body needs firm, even stuffing — add extra at the equator so the sphere does not flatten or turn pear-shaped.
- Leave long tails (10–12 inches / 25–30 cm) on pieces that will be sewn on.
- Pin every piece and check the front view before sewing.
Body (lime green)
Worked as a sphere. Do not join rounds.
Rnd 1: 6 sc in MR. [6]
Rnd 2: Inc in each st around. [12] (6 increases → 6 + 6 = 12 ✓)
Rnd 3: (Sc, inc) around. [18] (6 increases → 12 + 6 = 18 ✓)
Rnd 4: (2 sc, inc) around. [24] (6 increases → 18 + 6 = 24 ✓)
Rnd 5: (3 sc, inc) around. [30] (6 increases → 24 + 6 = 30 ✓)
Rnd 6: (4 sc, inc) around. [36] (6 increases → 30 + 6 = 36 ✓)
Rnd 7: (5 sc, inc) around. [42] (6 increases → 36 + 6 = 42 ✓)
Rnd 8: (6 sc, inc) around. [48] (6 increases → 42 + 6 = 48 ✓)
Rnds 9–16: Sc around for 8 rounds. [48]
Place the face now, while the opening is still wide:
- Insert the safety eyes between Rnds 10 and 11, with 7 stitches between the posts, centered on the front.
- Do not snap the washers until you like the spacing. The eyes should sit on the upper half of the sphere for a kawaii look.
- If this toy is for a child under 3, skip safety eyes and embroider them later.
Begin stuffing. Keep adding stuffing after every decrease round.
Rnd 17: (6 sc, dec) around. [42] (6 decreases → 48 − 6 = 42 ✓)
Rnd 18: (5 sc, dec) around. [36] (6 decreases → 42 − 6 = 36 ✓)
Rnd 19: (4 sc, dec) around. [30] (6 decreases → 36 − 6 = 30 ✓)
Rnd 20: (3 sc, dec) around. [24] (6 decreases → 30 − 6 = 24 ✓)
Rnd 21: (2 sc, dec) around. [18] (6 decreases → 24 − 6 = 18 ✓)
Rnd 22: (Sc, dec) around. [12] (6 decreases → 18 − 6 = 12 ✓)
Stuff firmly until the body is a full, round ball. Push extra stuffing into the sides so the front stays chubby.
Rnd 23: Dec around. [6] (6 decreases → 12 − 6 = 6 ✓)
FO, leaving a 8-inch (20 cm) tail. Thread the tail through the front loops of the remaining 6 sts, pull closed, and weave in. The closed hole is the bottom of the monster.
Arms (make 2, lime green)
Small rounded tubes, lightly stuffed.
Rnd 1: 6 sc in MR. [6]
Rnd 2: Inc in each st around. [12] (6 increases → 6 + 6 = 12 ✓)
Rnds 3–5: Sc around for 3 rounds. [12]
Rnd 6: (Sc, dec) around. [8] (4 repeats × 3 sts each = 12 sts used; 4 decreases → 12 − 4 = 8 ✓)
Stuff lightly — arms should stay soft and squishy, not stiff. FO, leaving a 12-inch (30 cm) tail. Do not close the hole; the open edge is sewn to the body.
Feet (make 2, lime green)
Slightly larger rounded pads so the monster sits.
Rnd 1: 6 sc in MR. [6]
Rnd 2: Inc in each st around. [12] (6 increases → 6 + 6 = 12 ✓)
Rnd 3: (Sc, inc) around. [18] (6 increases → 12 + 6 = 18 ✓)
Rnds 4–6: Sc around for 3 rounds. [18]
Stuff firmly so each foot is a plump little bun. FO, leaving a 12-inch (30 cm) tail. Leave the hole open; sewing the open edge to the body makes a flat, stable seat.
Horns (make 2, cream)
Upright cones worked in BLO from Rnd 3 so the surface has spiral ridges.
Rnd 1: 4 sc in MR. [4]
Rnd 2: (Sc, inc) twice. [6] (2 increases → 4 + 2 = 6 ✓)
Rnd 3: BLO sc around. [6]
Rnd 4: BLO (2 sc, inc) twice. [8] (2 increases → 6 + 2 = 8 ✓)
Rnd 5: BLO sc around. [8]
Rnd 6: BLO sc around. [8]
Rnd 7: BLO (3 sc, inc) twice. [10] (2 increases → 8 + 2 = 10 ✓)
Rnd 8: BLO sc around. [10]
Stuff firmly all the way into the tip so the horn stands up. FO, leaving a 12-inch (30 cm) tail. Leave the base open for sewing.
Each horn measures about 2 inches (5 cm) tall.
Cheeks (make 2, pink)
Small circles.
Rnd 1: 6 sc in MR, sl st in first sc to join. [6]
FO, leaving a 8-inch (20 cm) tail. The circle is about ¾ inch (2 cm) across. Do not stuff.
Tooth (white)
A tiny triangle.
Ch 4.
Row 1: Sc in 2nd ch from hook, hdc in next ch, dc in last ch. [3 sts, forming a triangle]
FO, leaving a 6-inch (15 cm) tail. Weave the starting tail into the back of the tooth so only the sewing tail remains.
Facial Features (before or during assembly)
Eyes: Already placed between Body Rnds 10 and 11, 7 sts apart. Snap washers on the inside only after the spacing looks even from the front. For an embroidered option, stitch two close satin-stitch ovals in black at the same spot.
Mouth: With black yarn or 3 strands of embroidery floss and a yarn needle, embroider a shallow curved smile on Rnds 13–14, centered under the eyes and about 5 stitches wide. Use backstitch or split stitch. Keep the line simple — one clean curve, no extra expression lines.
Tooth: After the mouth is stitched, sew the white triangle so it hangs from the left side of the smile (your left as you look at the front), with the wide edge along the mouth and the point down. Tack all three corners so it lies flat.
Cheeks: Sew one pink circle on each side, on Rnds 12–13, just outside and slightly below each eye. A few whipstitches around the edge are enough; pull snug so the cheek sits flush but still looks round.
Assembly
Pin every piece with the monster sitting in front of you. Adjust until the face looks centered, then sew with matching yarn and small whipstitches.
1. Horns (cream), top of head
Sew the open bases over Rnds 3–6, slightly in front of the true top so they read well in front view. Leave about 4 stitches between the inner edges. Angle each horn a little outward. Sew all the way around the base twice so they stay upright.
2. Feet (lime), bottom
Turn the body so Rnd 23 (the closed hole) is down. Sew the open edge of each foot over Rnds 19–22, at about 5 o’clock and 7 o’clock, slightly toward the front. The feet should be close together and flattened against the table so the monster sits without rolling. Check the sit, then sew firmly around each opening, adding a pinch of stuffing if a foot looks dented.
3. Arms (lime), sides
Sew the open edges over Rnds 13–15, at 3 o’clock and 9 o’clock, just below eye level. Aim the arms slightly forward. Do not overstuff the join — a small rounded stub looks cutest.
4. Face
If you have not already done so, embroider the mouth, sew on the tooth, and sew on the cheeks using the placements in Facial Features.
5. Shape
Roll the body between your hands to even the stuffing. Tug the horns so they stand. If a limb looks lopsided, snip the sewing yarn, restuff, and resew — easier now than after weaving in.
Finishing
- Weave in every remaining tail on the inside or under a sewn piece.
- If any stuffing shows, go back with matching lime yarn and close the gap with a few extra stitches.
- Optional: with the very tip of your needle, add a tiny straight stitch of white next to each safety eye for a kawaii highlight.
- Steam is not needed. Do not iron. Shape with your hands only.
Care
Spot clean or hand wash cold, squeeze (do not wring), and air dry. Reshape while damp. If the toy has safety eyes, do not machine wash.
Placement Quick Guide (front view)
| Feature | Color | Location |
|---|---|---|
| Safety eyes | Black, 12 mm | Between Rnds 10–11, 7 sts apart |
| Cheeks | Pink circles | Rnds 12–13, outside each eye |
| Smile | Black | Rnds 13–14, centered, 5 sts wide |
| Tooth | White triangle | Left corner of smile, point down |
| Horns | Cream, BLO texture | Rnds 3–6, 4 sts apart, angled out |
| Arms | Lime | Rnds 13–15, sides, slightly forward |
| Feet | Lime | Rnds 19–22, front-bottom, sitting pose |
You now have a dense, round, lime-green kawaii monster, about 7 inches tall, ready to sit facing forward.
Disclaimer: This pattern was generated by AI and should be reviewed for accuracy before use. While we strive for quality, AI-generated content may contain errors. Please verify measurements, stitch counts, charts, and instructions before beginning your project. Generated by purlJam.uk
Love this pattern?
Save this pattern to your free PurlJam libraryAccess your pattern anytime
Bookmark this page to access your pattern anytime