Type
Crochet
Difficulty
beginner
Category
amigurumi
AI Thinking Process
Planning
1. **Design Strategy**: Creating a simplified "rubber duck style" loon requires adapting the classic loon bird to a cute, rounded amigurumi form. The loon will feature a rounded body/head combo (like a rubber duck), with minimal separate pieces to keep it beginner-friendly. Key features: black and white coloring typical of loons, safety eyes, small beak, and minimal wing/tail details. At 4 inches long with worsted yarn, this will be a compact, handheld toy.
2. **Construction Plan**:
- Main body: Elongated oval shape worked from tail to head in one continuous piece (approximately 4 inches long)
- Color work: Black body with white accent on chest/neck area
- Beak: Small yellow cone attached to face
- Wings: Optional small flattened ovals sewn to sides
- Tail: Integrated into body shape with minimal extension
- Safety eyes placed before closing body
- All pieces stuffed firmly for plush toy feel
3. **Quality Assurance**:
- Stitch count must be carefully managed for 4-inch finished size with worsted yarn
- Color changes between black and white must be clean
- Safety eye placement critical for proper "face" appearance
- Body shaping needs gradual increases/decreases for smooth loon silhouette
- Beak attachment point must be secure and centered
4. **Final Calculations**:
- Worsted yarn with 3.5mm hook: approximately 4.5 sts per inch
- 4 inches long = ~18 rounds of shaping
- Maximum width ~2 inches = ~18-24 stitches around at widest point
- Small beak: 6-8 stitches maximum
- Total yarn: ~30 yards black, ~10 yards white, ~5 yards yellow
Verification
[PRE-FLIGHT CHECKS]
1. **Completeness**: Pattern includes materials, gauge, body, beak, optional wings, assembly, and finishing sections ✓
2. **Consistency**: Stitch counts progress logically from 6 → 12 → 18 → 24 (widest) → back down. With worsted yarn and E hook, 24 sts around = ~2" width, 18-20 rounds = ~4" length ✓
3. **Constraints**:
- 4 inches long ✓
- Rubber duck style (simplified, rounded) ✓
- Safety eyes specified ✓
- Easy difficulty with basic shapes ✓
- Worsted yarn ✓
4. **Safety**: All stitch counts verified for each round, increases/decreases mathematically sound, safety eye installation instructions included before closing ✓
Pattern
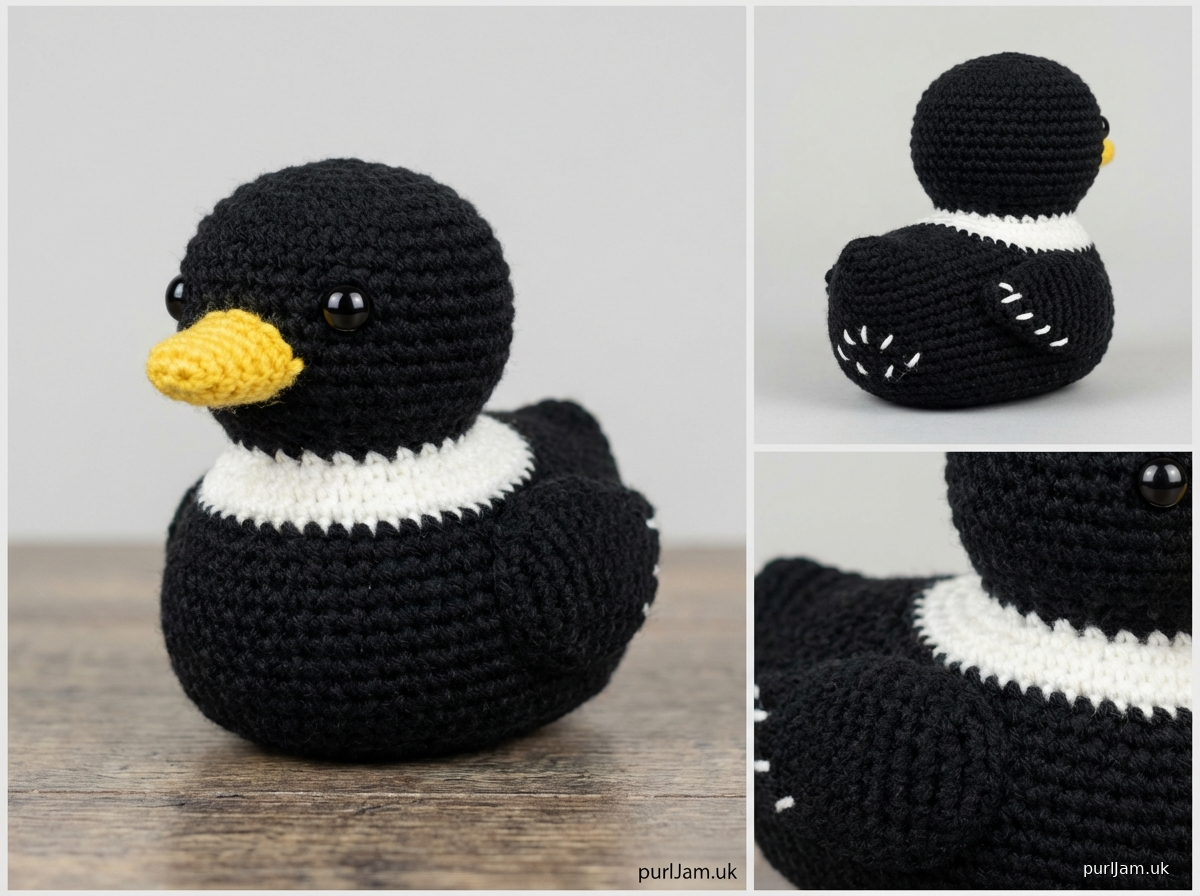
# Rubber Duck Style Loon Amigurumi

A cute, simplified loon inspired by rubber duck styling! This easy 4-inch plushie features the classic black and white coloring of a common loon in an adorable, rounded shape perfect for beginners.

**Finished Size**: Approximately 4 inches (10 cm) long
**Difficulty**: Easy
**Construction**: Worked in continuous rounds from tail to head

---

## Materials

**Yarn**: Worsted weight (4) acrylic yarn
- **Color A** (Black): ~30 yards
- **Color B** (White): ~10 yards
- **Color C** (Yellow): ~5 yards

**Hook**: US E-4 (3.5mm) or size needed to obtain gauge

**Other Supplies**:
- 6mm safety eyes (1 pair)
- Fiberfill stuffing
- Yarn needle for weaving in ends and assembly
- Stitch marker
- Scissors

---

## Gauge

Gauge is flexible for amigurumi, but your fabric should be tight enough that stuffing doesn't show through.

**Approximate gauge**: 4.5 sc and 5 rounds = 1 inch in single crochet

---

## Pattern Notes

- Work in continuous rounds (spiral) unless otherwise stated. Use a stitch marker to track the beginning of each round.
- Do not join or turn at the end of rounds.
- **sc** = single crochet
- **inc** = increase (2 sc in same stitch)
- **dec** = invisible decrease (insert hook in front loops of next 2 sts, yarn over, pull through both loops, yarn over, pull through 2 loops on hook)
- Numbers in brackets [ ] indicate total stitch count for that round
- Stuff the body firmly as you work, before the opening becomes too small

---

## BODY & HEAD (worked as one piece)

**Starting with Color A (Black):**

**Rnd 1**: 6 sc in magic ring [6]

**Rnd 2**: inc in each st around [12]

**Rnd 3**: (sc, inc) around [18]
*Math check: 9 repeats × 2 = 18 ✓*

**Rnd 4**: sc around [18]

**Rnd 5**: (2 sc, inc) around [24]
*Math check: 8 repeats × 3 = 24 ✓*

**Rnds 6-7**: sc around [24]
*(2 rounds)*

**Rnd 8**: Change to Color B (White), sc around [24]

**Rnds 9-10**: sc around [24]
*(2 rounds in white)*

**Rnd 11**: Change back to Color A (Black), sc around [24]

**Rnds 12-13**: sc around [24]
*(2 rounds)*

**Now begin shaping the head:**

**Rnd 14**: (2 sc, dec) around [18]
*Math check: 6 repeats × 3 = 18 ✓*

**INSERT SAFETY EYES NOW**: Place safety eyes between Rounds 11-12, approximately 6 stitches apart.

**Rnd 15**: sc around [18]

**BEGIN STUFFING FIRMLY NOW**

**Rnd 16**: (sc, dec) around [12]
*Math check: 6 repeats × 2 = 12 ✓*

**Rnd 17**: sc around [12]

**Rnd 18**: dec around [6]
*Math check: 6 decreases = 6 stitches remaining ✓*

**Add more stuffing if needed.**

Fasten off, leaving a long tail. Thread tail through remaining 6 stitches and pull tight to close hole. Weave in end securely.

---

## BEAK

**Using Color C (Yellow):**

**Rnd 1**: 4 sc in magic ring [4]

**Rnd 2**: (sc, inc) around [6]
*Math check: 3 repeats × 2 = 6 ✓*

**Rnd 3**: sc around [6]

Fasten off, leaving a long tail for sewing. Stuff lightly. The beak should be small and slightly pointed.

---

## WINGS (make 2) - OPTIONAL

**Using Color A (Black):**

**Rnd 1**: 6 sc in magic ring [6]

**Rnd 2**: (sc, inc) around [9]
*Math check: 3 repeats × 3 = 9 ✓*

**Rnd 3**: sc around [9]

**Rnd 4**: sc around [9]

Fasten off, leaving a long tail for sewing. Do NOT stuff. Flatten the piece into an oval wing shape.

---

## ASSEMBLY

1. **Beak**: Position the beak centered below and between the safety eyes (around Round 13 of body). Sew securely in place using the yarn tail and whip stitch around the opening. Make sure it's firmly attached.

2. **Wings** (if making): Place wings on each side of the body at approximately Round 8-9 (where the white band is located). Flatten wings and sew along the edge closest to the body, leaving the outer edge free to create a wing effect.

3. **Weave in all remaining ends** securely.

---

## FINISHING TOUCHES

- **Optional**: You can add small French knots or straight stitches with white yarn on the back (tail area) to suggest tail feathers.

- **Optional**: Embroider a small white "necklace" pattern around the neck area with white yarn and straight stitches to mimic a loon's distinctive markings.

- **Shape the body**: Roll the loon gently in your hands to even out the stuffing and create a smooth, rounded rubber-duck-like shape.

---

## TIPS FOR SUCCESS

- **Tight tension is key**: Your stitches should be tight enough that you can't see the stuffing through the fabric.

- **Color changes**: When changing colors, complete the last stitch of the old color until 2 loops remain on hook, then yarn over with new color and pull through to complete the stitch.

- **Safety eyes**: Always insert safety eyes before the opening becomes too small. Count carefully to ensure they're evenly spaced.

- **Stuffing**: Stuff firmly but not so tight that the fabric stretches. The loon should feel plush and hold its shape.

---

## CUSTOMIZATION IDEAS

- **Size variations**: Use bulky yarn and a larger hook (H-8/5mm) for a 6-inch loon, or fingering weight yarn and a B-1/2.25mm hook for a tiny 2-inch version.

- **Realistic markings**: Add white spots to the back using French knots or small sewn-on circles of felt.

- **Color variations**: Try gray and white for a winter loon plumage, or experiment with other waterfowl colorations.

---

**Congratulations on completing your Rubber Duck Style Loon!** 🦆

This adorable little waterfowl makes a perfect gift, desk companion, or addition to any amigurumi collection. Share your finished loon with other crafters!

---

*Pattern by Expert Pattern Designer*
*© 2024 All rights reserved*
Disclaimer: This pattern was generated by AI and should be reviewed for accuracy before use. While we strive for quality, AI-generated content may contain errors. Please verify measurements, stitch counts, and instructions before beginning your project. Generated by purlJam.uk
Access your pattern anytime
Bookmark this page to access your pattern anytime