Type
Machine Knitting
Difficulty
advanced
Category
pullover
AI Thinking Process
Planning
Verification
Pattern
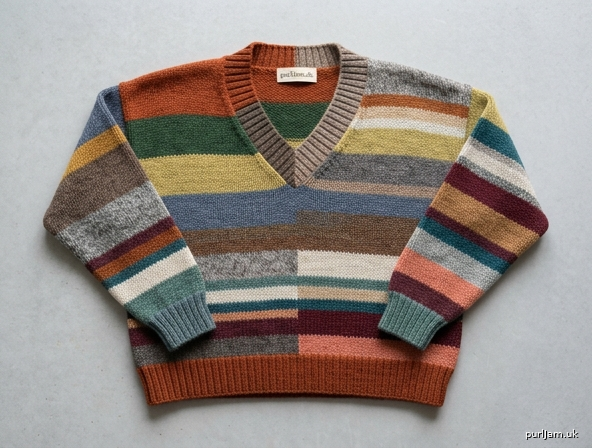
Scrap-Yarn V-Neck Drop-Shoulder Jumper
Intermediate machine-knit pullover. Straight drop-shoulder panels, fully-fashioned V-neck, 1×1 rib trims, and a stash-stripe / color-block fabric from leftover worsted yarns.
Skill level: Intermediate
Sizes: S (M, L, XL, 2X) — instructions are written with the smallest size first; larger sizes follow in parentheses.
Machine Setup
Machine: Mid-gauge 6.5–7 mm bed with at least 140 working needles (LK150, Silver Reed SK860/LK100 with extension, similar). A ribber is recommended for hems, cuffs, and neckband; a mock-rib method is given if you have no ribber.
Bed configuration: Main bed (MB) in work for stockinette. Ribber (RB), if used, in half-pitch for 1×1 rib, then dropped or aligned for transfer. No punchcard or electronic pattern is required — cam / stitch dial to stockinette (plain knit). Both part buttons cancelled (out). Russell / side levers on I (or the equivalent non-holding position) except when a section is set to hold.
Swatch first: Cast on 40 sts over waste yarn and ravel cord. Knit 40 rows stocking stitch at proposed main tension with two or three of your scrap yarns, changing color at least twice. Steam as for the garment, rest, then measure. Change the tension dial 1 click if you are not at 18 sts and 24 rows = 4 in (10 cm).
Cast-on method: Waste yarn (smooth contrast, T8–9) for 8–10 rows, 1 row ravel cord, then garment yarn. Use the cast-on comb in the ribber or MB gate pegs. Do not start on garment yarn alone — scrap stripes need a stable, rehangable edge.
Weights: Cast-on comb plus 2–3 medium claw weights under the comb. Add edge claws once the fabric is 2 in (5 cm) long. Move all weights up every 20–30 rows. When the V-neck or sleeve narrows, keep a small claw on each working edge so the end needles knit. On scrap-yarn fabric, extra edge weight prevents dropped end stitches at color changes.
Tension dial (starting points for worsted):
- Waste: T8–9
- 1×1 rib: T4 / T4 (MB/RB) or T4 on MB for mock rib
- Main stocking stitch: T6–7 (use T7 as the pattern default; shift to T6 for a firm fabric or a slightly thicker scrap)
- Neckband rib: T4 / T4
If a scrap skein is a hair thicker or thinner than the last, move the dial 1 click for that stripe only and return at the next change.
Tools on the machine: 1-prong and 2-prong transfer tools, latch tool, decker comb (optional), ravel cord, claw weights, cast-on comb, yarn clips or clothes-pegs for tails, tapestry / double-eye needle.
Scrap-yarn rules (read before RC000):
- All yarns must be worsted-weight and similar in diameter. Mix wool, wool-blend, cotton, and acrylic only if you accept mixed-fiber steaming (see Finishing).
- Change color at COR whenever possible so both side edges look the same. Minimum stripe: 2 rows (one round trip). Typical stash look: 2–12 row stripes, or 20–40 row color blocks.
- Join with a 4 in (10 cm) overlap, e-wrap the first stitch of the new yarn, knit 2 rows, then break the old yarn. Knit tails in on the WS with a double-eye needle, or leave them for mattress stitch at the side seams.
- Log RC + color if you want the front, back, and both sleeves to stripe-match. For a true scrap jumper, ignore matching and change whenever a ball ends.
- Do not steam a swatch that mixes dye-bleeding brights with white until you have tested.
Materials
Yarn: Worsted weight scraps, total 1,100 (1,250, 1,400, 1,550, 1,700) yd / 1,005 (1,145, 1,280, 1,420, 1,555) m. That is roughly 550 (625, 700, 775, 850) g of yarn at 200 yd / 100 g. Have at least 5 colors; 8–12 looks richer. No single contrast is required — the scrap pile is the palette.
Waste yarn: Smooth, strong, contrasting color, about 50 yd (45 m).
Ravel cord: 1 length longer than the needle bed.
Notions: Tapestry needle, blocking wires or pins, steamer, sweater board (optional), stitch markers or contrast yarn to mark armhole points.
Gauge and Tension
Stocking stitch on MB, T7, after steaming and resting:
18 sts and 24 rows = 4 in (10 cm)
→ 4.5 sts / in and 6 rows / in.
How to measure: Hang the swatch, steam from the WS until the fabric relaxes (wool: visible steam, no heavy press; acrylic: hover the steamer, never flatten). Dry completely. Count 18 sts and 24 rows in the center, away from color-change rows. If you have 17 sts in 4 in, go up one tension click (looser); if 19 sts, go down one click (tighter). Recheck after any tension change.
Rib gauge (reference only): 1×1 rib at T4 typically draws in about 10–15% in width and knits shorter in length; the 16-row hem is written to finish at 2 in (5 cm).
Work to stitch gauge first — width is structural. Row gauge controls length; if your steamed row gauge is off, adjust the body and sleeve RC totals proportionally rather than yanking the fabric.
Schematic and Sizes
Choose the size whose finished bust is 4–8 in (10–20 cm) larger than your actual chest (drop-shoulder ease).
| S | M | L | XL | 2X | |
|---|---|---|---|---|---|
| Finished bust | 40 in (102 cm) | 44 in (112 cm) | 48 in (122 cm) | 52 in (132 cm) | 56 in (142 cm) |
| Back / front width | 20 in (51 cm) | 22 in (56 cm) | 24 in (61 cm) | 26 in (66 cm) | 28 in (71 cm) |
| Finished length | 24 in (61 cm) | 25 in (63.5 cm) | 25.5 in (65 cm) | 26 in (66 cm) | 26.5 in (67 cm) |
| Hem depth | 2 in (5 cm) | 2 in | 2 in | 2 in | 2 in |
| Length to V split | 16 in (41 cm) | 16.5 in (42 cm) | 16.5 in (42 cm) | 16.5 in (42 cm) | 16.5 in (42 cm) |
| V depth (from split to shoulder) | 8 in (20 cm) | 8.5 in (21.5 cm) | 9 in (23 cm) | 9.5 in (24 cm) | 10 in (25.5 cm) |
| Back neck width | 7 in (18 cm) | 7.5 in (19 cm) | 8 in (20 cm) | 8.5 in (21.5 cm) | 9 in (23 cm) |
| Shoulder width each | 6.4 in (16.5 cm) | 7.3 in (18.5 cm) | 8 in (20 cm) | 8.9 in (22.5 cm) | 9.6 in (24.5 cm) |
| Sleeve length (cuff to top) | 18 in (46 cm) | 18 in (46 cm) | 18.5 in (47 cm) | 18.5 in (47 cm) | 19 in (48 cm) |
| Cuff width (unstretched) | 7.1 in (18 cm) | 7.6 in (19 cm) | 8 in (20 cm) | 8.4 in (21.5 cm) | 8.9 in (22.5 cm) |
| Upper sleeve width (flat) | 8.9 in (22.5 cm) | 9.8 in (25 cm) | 10.7 in (27 cm) | 11.6 in (29.5 cm) | 12.4 in (31.5 cm) |
| Armhole join depth | 8.9 in (22.5 cm) | 9.8 in (25 cm) | 10.7 in (27 cm) | 11.6 in (29.5 cm) | 12.4 in (31.5 cm) |
        |------ back neck ------|
       /                         \
      /         BACK / FRONT      \
     |                             |
     |          width              |
     |                             |
     |-------- hem / bust ---------|

   cuff ==== increases ==== sleeve top
                    |
                    +-- sewn to armhole depth
Needle counts (MB, garment yarn):
- Back / front: 90 (100, 108, 118, 126) sts
- Sleeve cuff: 32 (34, 36, 38, 40) sts
- Sleeve top: 40 (44, 48, 52, 56) sts
Back Panel
Needles: 90 (100, 108, 118, 126) in WP, remainder NWP. Center the work on the bed.
Hem (ribber method)
- Ribber in half-pitch, 1×1 needle selection (every other needle on MB, opposite needles on RB). Cast on with waste at T8. Knit 6–8 circular rows. 1 row ravel cord.
- Change to garment yarn (first scrap). T4 / T4. Hang the cast-on comb and 2 claw weights.
- Set RC000. Knit 1×1 rib to RC016, COL or COR. Hem should measure about 2 in (5 cm).
- Transfer all RB sts to corresponding MB needles with the transfer tool. Drop or remove ribber. All 90 (100, 108, 118, 126) sts now on MB.
Hem (no ribber — mock rib)
- Bring every other needle to WP (45 (50, 54, 59, 63) needles). Waste CO, ravel cord, garment yarn at T4.
- RC000–032 (double the rows because only half the needles knit). Hang comb and weights.
- Bring empty needles to WP. T7. Knit 1 row, picking up the purl bump of the row below onto each newly filled needle so no ladders form. You now have 90 (100, 108, 118, 126) sts.
Body
T7, stockinette, both part buttons out. Reset RC000. COR to start (knit the first row R → L if needed so RC000 begins COR after a setup row). Hang extra edge claws.
Knit even in scrap stripes to RC126 (132, 135, 138, 141), COR. Move weights up every 20–30 rows. Change colors at COR.
Check: 126 rows ÷ 6 rows/in = 21 in (53 cm) of stocking above the hem for S, plus 1 in (2.5 cm) of neck = 22 in (56 cm) stocking + 2 in (5 cm) hem = 24 in (61 cm) ✓.
Back neck and shoulders
Neck width = 32 (34, 36, 38, 40) sts. Each shoulder = 29 (33, 36, 40, 43) sts.
Check: 29 + 32 + 29 = 90 ✓; 33 + 34 + 33 = 100 ✓; 36 + 36 + 36 = 108 ✓; 40 + 38 + 40 = 118 ✓; 43 + 40 + 43 = 126 ✓.
At RC126 (132, 135, 138, 141), COR:
- Set carriage to hold (Russell levers II / holding cam).
- Push the left-hand 29 (33, 36, 40, 43) shoulder needles and the center 32 (34, 36, 38, 40) neck needles to HP. Only the right shoulder remains in UWP (upper working / knitting position).
- Knit 2 rows on the right shoulder only (RC128 / 134 / 137 / 140 / 143), wrapping the first held neck needle on the first pass so no hole forms. COR.
- At the neck edge of the right shoulder, push 4 sts to HP. Knit 2 rows. COR.
Remaining in work on the right: 29 − 4 = 25? No — the 4 sts are taken from the already-separated neck group, not the shoulder. Shoulders stay at 29 (33, 36, 40, 43) throughout; the 4-st holds shape the neck curve inside the center group.
Cleaner bind-off method (recommended): Ignore the 4-st hold above and work as follows.
At RC126 (132, 135, 138, 141), COR:
- Knit across the right 29 (33, 36, 40, 43) shoulder sts only; put all remaining needles in HP.
- Knit 6 rows even on the right shoulder to RC132 (138, 141, 144, 147). Scrap-yarn note: keep this stripe consistent with the left shoulder.
- With waste yarn, knit 8–10 rows on those shoulder sts and take off on waste (for a rehung / linked shoulder). Or latch-tool bind off around the gate pegs.
- COL. Return the left 29 (33, 36, 40, 43) shoulder needles to UWP; leave center 32 (34, 36, 38, 40) in HP.
- Rejoin yarn at the neck edge, knit 6 rows even to the same final RC, take off on waste (or bind off) to match.
- Center back neck: return 32 (34, 36, 38, 40) needles to UWP. Knit 1 row T7, then latch-tool bind off around gate pegs (or take off on waste if you prefer to rehang the neckband from live sts — recommended).
Mark each armhole point with contrast yarn: 53 (59, 64, 69, 75) rows down from the shoulder on both side edges.
Check: 53 rows ÷ 6 = 8.83 in ≈ 8.9 in sleeve top ✓.
Leave a 12 in (30 cm) tail. Do not steam yet.
Front Panel
Cast on and work the hem exactly as for the Back on 90 (100, 108, 118, 126) needles. Transfer to MB, T7.
Reset RC000. If you are matching stripes to the back, use the same color log.
Knit even in scrap stripes to RC084 (087, 087, 087, 087), COR.
Check: 84 rows ÷ 6 = 14 in (35.5 cm); + 2 in hem = 16 in (41 cm) to the V split ✓.
Divide for V-neck
There is no center stitch (even counts). The split is the gap between the two center needles.
- Right-hand needles as you face the machine: 45 (50, 54, 59, 63) sts — work this side first.
- Left-hand needles: 45 (50, 54, 59, 63) sts — put in HP now. Hang an edge claw on the held side so those stitches do not flair.
Set carriage to knit the working side only (hold on). Extra claw on the live neck edge.
Right neck (needles on the RIGHT of center)
You will decrease 16 (17, 18, 19, 20) times at the neck edge only (the left edge of this group), 1 st per decrease, every 3 rows, over 48 (51, 54, 57, 60) rows.
Check: 45 − 16 = 29 ✓; 50 − 17 = 33 ✓; 54 − 18 = 36 ✓; 59 − 19 = 40 ✓; 63 − 20 = 43 ✓.
Check: 16 × 3 = 48 rows = 8 in ✓; 17 × 3 = 51 = 8.5 in ✓; 18 × 3 = 54 = 9 in ✓; 19 × 3 = 57 = 9.5 in ✓; 20 × 3 = 60 = 10 in ✓.
Fully-fashioned decrease (every 3 rows): Using the 2-prong transfer tool at the neck edge: transfer the 2nd stitch onto the 3rd needle, then move the end stitch in to fill the gap. Push the emptied end needle to NWP. Do this before the next carriage pass over those needles; carriage may be at either end.
Work:
- From RC084 (087, 087, 087, 087), knit 3 rows, decrease at the neck on the 3rd row.
- Repeat decrease every 3 rows until 16 (17, 18, 19, 20) decreases are complete and 29 (33, 36, 40, 43) sts remain.
- Final RC of this side: RC132 (138, 141, 144, 147) — matches the back ✓.
Knit any remaining even rows (none on S; M/L/XL/2X land on the last decrease) so both fronts end on the same RC as the back.
Take the shoulder off on waste (or bind off) to match the back. Break yarn, 12 in (30 cm) tail.
Left neck (needles on the LEFT of center)
COR/COL: Return the held 45 (50, 54, 59, 63) needles to UWP. Push the completed right-side needles well back to NWP / out of the way. Rejoin scrap yarn at the neck edge (center), same color as the corresponding RC on the right side if matching.
Mirror the decreases: fully-fashioned 1 st at the neck edge (right edge of this group) every 3 rows, 16 (17, 18, 19, 20) times, to 29 (33, 36, 40, 43) sts. Same final RC.
Take off on waste. Mark armhole points 53 (59, 64, 69, 75) rows down from each shoulder, as on the back.
V-neck notes:
- Keep a small claw on the decreasing neck edge; move it every 8–10 rows.
- Do not allow empty NWP needles at the neck to drift into the carriage path.
- If a scrap change falls on a decrease row, change color at the side edge (COR/COL away from the V), then work the decrease.
Sleeves
Make 2. Scrap sequence may match the body or run independently.
Needles: 32 (34, 36, 38, 40) in WP, centered.
Cuff
Ribber 1×1 at T4 / T4 (or mock rib as for the hem, 32 rows on every other needle then fill). Waste + ravel, garment yarn. RC000–016. Transfer all sts to MB. T7.
Reset RC000. COR.
Shaping (bring needles into work)
Increase 1 st each end by bringing the next NWP needle on each side to WP and e-wrapping it so it knits. Hang an extra claw on each new edge stitch for 4 rows.
Knit in scrap stripes, increasing as follows:
- S: Increase at RC024, 048, 072, 096. (4 increases each side → 32 + 8 = 40 ✓)
- M: Increase at RC019, 038, 057, 076, 095. (5 increases each side → 34 + 10 = 44 ✓)
- L: Increase at RC016, 032, 048, 064, 080, 096, then knit even to RC099. (6 increases each side → 36 + 12 = 48 ✓)
- XL: Increase at RC014, 028, 042, 056, 070, 084, 098, then knit even to RC099. (7 increases each side → 38 + 14 = 52 ✓)
- 2X: Increase at RC012, 024, 036, 048, 060, 072, 084, 096, then knit even to RC102. (8 increases each side → 40 + 16 = 56 ✓)
Final counts: 40 (44, 48, 52, 56) sts.
Check length: 96 (96, 99, 99, 102) rows ÷ 6 = 16 (16, 16.5, 16.5, 17) in + 2 in cuff = 18 (18, 18.5, 18.5, 19) in ✓.
Take off on waste (or latch-tool BO if you will sew rather than rehang). Make the second sleeve.
Neckband
The neckband is rehung on the MB as 1×1 rib and mitered at the V so it lies flat.
Pick-up counts
Along each V slope pick up 3 sts for every 4 rows (matches 4.5 sts/in to 6 rows/in).
| Section | S | M | L | XL | 2X |
|---|---|---|---|---|---|
| Right V | 36 | 38 | 41 | 43 | 45 |
| Back neck | 32 | 34 | 36 | 38 | 40 |
| Left V | 36 | 38 | 41 | 43 | 45 |
| Extra at V point | 1 | 1 | 1 | 1 | 1 |
| Total | 105 | 111 | 119 | 125 | 131 |
Check: 36 + 32 + 36 + 1 = 105 ✓; 38 + 34 + 38 + 1 = 111 ✓; 41 + 36 + 41 + 1 = 119 ✓; 43 + 38 + 43 + 1 = 125 ✓; 45 + 40 + 45 + 1 = 131 ✓.
Rehang
- With the WS of the garment facing you (knit side away), hang the right V from the shoulder down to the point, then the extra center stitch from the V crotch, then the left V up to the shoulder, then the back-neck stitches. Distribute evenly; use the 3-in-4 rule on the slopes and rehang the live or bound-off back-neck sts 1-for-1.
- Place a removable marker on the center V needle (the extra stitch).
- T7, knit 1 row across all 105 (111, 119, 125, 131) sts to settle the pick-up, COR.
Rib
With ribber: Set 1×1 (transfer every other st to RB, half-pitch). T4 / T4.
Without ribber: Work mock rib by transferring every other st 1 needle down to create a 1×1 broken rib / latch-up later, or knit 10 rows T4 stocking and fold as a mock band (less ideal at a V). Ribber is strongly preferred here.
Reset RC000. Knit 1×1 rib, miter every row at the V:
Miter: On every row, at the center V needle, fully-fashion decrease 1 st on each side of center (2 sts decreased per row). Methods:
- Transfer the stitch just left of center onto the center needle, and the stitch just right of center onto the center needle (double-centered), then move the emptied needles in and take them to NWP; or
- Transfer 2nd-left onto 3rd-left and 2nd-right onto 3rd-right, then shift the remaining sts (including center) inward so the empty needles are at the edges of the band — only if you want the band to stay the same needle span. For a V, the first method (lose 2 sts at center, empty needles NWP) is correct: the band shortens at the point and cups.
Work RC000–010 (about 1.5 in / 4 cm), continuing the miter every row.
Check S: 10 rows × 2 sts = 20 sts decreased → 105 − 20 = 85 sts at bind-off ✓.
Bind-off
Carriage COL or COR. Convert remaining RB sts back to MB if used. Latch-tool bind off around the gate pegs at T4 (or one full tension looser than the rib) for stretch. Alternatively, sewn bind-off: take sts off on contrast waste and graft/sew with garment yarn at 1×1 rhythm.
Do not bind off tightly — the V must open. Steam the band on the machine before removing if your yarns allow.
Finishing
-
Steam panels first, WS up. Hover the steamer; do not crush acrylic or mixed-fiber stripes. Pin to schematic widths: back/front 20 (22, 24, 26, 28) in; sleeves to 8.9 (9.8, 10.7, 11.6, 12.4) in at the top, tapering to the cuff. Rest until bone-dry. Ends at color changes can be darned now on the WS.
-
Shoulder joins. Rehang front and back right-shoulder live sts, right sides together (or both knit sides together for a reverse-stocking ridge — drop-shoulder looks good either way), and bind off together with the latch tool. Repeat for the left shoulder. If you bound off the shoulders, mattress-stitch them.
-
Set the armhole marks. Confirm contrast marks 53 (59, 64, 69, 75) rows / 8.9 (9.8, 10.7, 11.6, 12.4) in down from each shoulder on front and back.
-
Join sleeves. With RS together (or mattress stitch from the RS), sew each sleeve top to the body between the armhole marks, matching the sleeve midpoint to the shoulder seam. The sleeve top width equals the marked armhole depth ✓.
-
Side and sleeve seams. One continuous mattress stitch from hem to cuff (or cuff to hem). Match rib 1×1. If stripes were logged, align RC at the side seam; if not, a staggered scrap look is expected.
-
Neckband already on — weave its join if you had to split the hang, and tack the miter WS so it does not roll.
-
Final block. Dress the jumper on a sweater board or padded form. Steam the seams and the V miter. Leave to dry. Do not stretch the drop shoulder off the board or the armhole will grow.
-
Weave remaining ends. Scrap jumpers have many; work them along color-change rows on the WS, not up the side seams.
Abbreviations
| Term | Meaning |
|---|---|
| BO | Bind off |
| COL | Carriage on left |
| COR | Carriage on right |
| HP | Holding position |
| MB | Main bed |
| NWP | Non-working position |
| RB | Ribber bed |
| RC | Row counter |
| RS | Right side (knit side of stocking stitch) |
| T | Tension dial setting |
| UWP | Upper working position |
| WP | Working position |
| WS | Wrong side |
| 1×1 | Alternate knit / purl rib |
| Fully-fashioned dec | Transfer 2nd st onto 3rd, move end st in, empty needle to NWP |
| Waste / ravel CO | Waste yarn, 1 row ravel cord, then garment yarn |
Needles in/out of work: “Bring into WP and e-wrap” = increase. “Transfer and NWP” = decrease. “HP” = short-row / section hold; always wrap the first held needle on the first pass unless the pattern says the section is simply waiting (V divide).
Carriage: Stockinette throughout the body and sleeves. Hold cam / Russell II only for the V divide, back-neck split, and any short-row wrapping. Return to I (knit all in WP) as soon as that section is finished.
Disclaimer: This pattern was generated by AI and should be reviewed for accuracy before use. While we strive for quality, AI-generated content may contain errors. Please verify measurements, stitch counts, charts, and instructions before beginning your project. Generated by purlJam.uk
Love this pattern?
Save this pattern to your free PurlJam libraryAccess your pattern anytime
Bookmark this page to access your pattern anytime