Type
Crochet
Difficulty
beginner
Category
amigurumi
AI Thinking Process
Planning
Verification
Pattern
Seamless Amigurumi Mushroom
Crochet Toy – Simple Shapes (One-Piece)
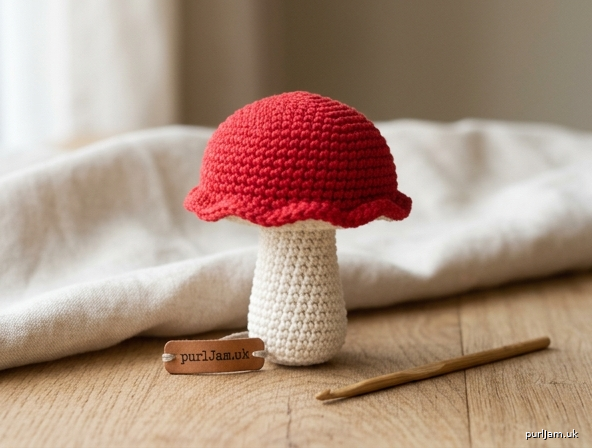
A soft, squishy toadstool approximately 3¼" (8 cm) tall, worked entirely in one continuous piece. The rounded cap flows straight into a cylindrical stem—no sewing, no joining, no embroidery. Beginner-friendly: only single crochet, increases, and decreases.
Difficulty
Beginner
Finished Size
Height: approx. 3¼" (8 cm)
Cap diameter: approx. 1¾" (4.5 cm)
Stem diameter: approx. ⅝" (1.5 cm)
Size may vary ±¼" (0.5 cm) with stuffing firmness and exact gauge.
Materials
- Sport weight (category 2) yarn:
- Color A (cap): 25 yd / 23 m (e.g., red, brown, or cream)
- Color B (stem): 15 yd / 14 m (e.g., off-white or beige)
- (One solid color may be used throughout if preferred)
- Crochet hook: US C-2 to E-4 (2.75–3.5 mm)—choose size that gives a tight fabric with no stuffing gaps (usually 1–2 sizes smaller than yarn label)
- Polyester fiberfill stuffing
- Stitch marker
- Yarn needle (for weaving in ends only)
- Scissors
Gauge
7 sc and 8 rnds = 1" (2.5 cm) worked tightly in continuous rounds.
Gauge is not critical for fit but affects final size. Adjust hook to match if you want exactly 8 cm.
Abbreviations (US Terminology)
- ch: chain
- sc: single crochet
- inc: increase (2 sc in the same stitch)
- dec: invisible decrease (insert hook in front loop only of next 2 stitches, yarn over, pull through both front loops, yarn over, pull through 2 loops on hook)
- sl st: slip stitch
- FLO: front loop only
- MR: magic ring (adjustable loop)
- rnd: round
- st(s): stitch(es)
- rep: repeat
- [ ]: total stitch count at end of round
- *****: repeat instructions between asterisks as directed
Notes
- Work in continuous spiral rounds unless stated. Do not join or turn. Place a stitch marker in the first stitch of each round and move it up as you go.
- The entire mushroom is one piece. Color change (if using two colors) is made in the last yarn-over of the stitch before the new color begins; carry or cut the old color and weave later.
- Stuff firmly as indicated—especially the cap—before the opening becomes too small.
- Tight stitches create the best amigurumi shape and hide stuffing.
- The FLO round plus the gentle inc/dec sequence forms a softly wavy cap edge that stands slightly away from the underside.
- All stitch counts have been verified for consistency (multiples of 6).
Pattern Instructions
Cap (start with Color A)
Rnd 1: 6 sc in MR. [6]
Rnd 2: inc in each st around. (6 inc → 6 + 6 = 12 ✓) [12]
Rnd 3: *sc in next st, inc in next st; rep from * around. (6 inc → 12 + 6 = 18 ✓) [18]
Rnd 4: *sc in next 2 sts, inc in next st; rep from * around. (6 inc → 18 + 6 = 24 ✓) [24]
Rnd 5: *sc in next 3 sts, inc in next st; rep from * around. (6 inc → 24 + 6 = 30 ✓) [30]
Rnd 6: *sc in next 4 sts, inc in next st; rep from * around. (6 inc → 30 + 6 = 36 ✓) [36]
Rnds 7–9: sc in each st around. [36] (3 plain rounds for rounded dome height)
Wavy Edge
Rnd 10: Working in FLO only for the entire round, *sc in next 2 sts, inc in next st, sc in next st, dec over next 2 sts; rep from * around.
(Each 6-st repeat uses 6 sts and makes 6 sts → count remains 36 ✓) [36]
This FLO undulation creates the slightly wavy, raised edge.
Underside of Cap (continue Color A, or change to Color B in last st of Rnd 10 if you want a contrasting stem)
Work these rounds through both loops again.
Rnd 11: *sc in next 4 sts, dec over next 2 sts; rep from * around. (6 dec → 36 – 6 = 30 ✓) [30]
Rnd 12: *sc in next 3 sts, dec over next 2 sts; rep from * around. (6 dec → 30 – 6 = 24 ✓) [24]
Rnd 13: *sc in next 2 sts, dec over next 2 sts; rep from * around. (6 dec → 24 – 6 = 18 ✓) [18]
Rnd 14: *sc in next st, dec over next 2 sts; rep from * around. (6 dec → 18 – 6 = 12 ✓) [12]
Pause and stuff the cap firmly with fiberfill, shaping it into a smooth round dome. Do not overstuff the very center so the stem can sit neatly.
Stem
Rnds 15–24: sc in each st around. [12] (10 plain rounds ≈ 1¼" / 3 cm stem length)
Stuff the stem lightly to moderately as you go, keeping it cylindrical. Add final stuffing just before the last two rounds.
Close Base
Rnd 25: *sc in next st, dec over next 2 sts; rep from * around. (4 dec → 12 – 4 = 8 ✓) [8]
Rnd 26: dec over next 2 sts four times. (4 dec → 8 – 4 = 4 ✓) [4]
Finishing
- Cut yarn, leaving a 6" (15 cm) tail.
- Thread tail onto yarn needle. Weave through the front loops of the remaining 4 stitches, pull tight to close the hole, and secure.
- Weave in all ends securely on the inside (or along the underside of the cap where they will not show).
- Gently roll the stem between your palms and push the cap edge outward so the wavy FLO ridge is visible and the mushroom stands upright.
No sewing, joining, or embroidery is required. Your continuous one-piece mushroom is complete!
Optional Size Tweaks (still one piece)
- Taller stem: add extra plain rounds between Rnds 15–24.
- Wider cap: after Rnd 6 work one more increase round (sc in next 5 sts, inc) [42], then add matching decrease rounds on the underside before reaching 12 sts.
- Smaller mushroom: stop increases at 30 sts and adjust decreases accordingly; use a smaller hook.
Disclaimer: This pattern was generated by AI and should be reviewed for accuracy before use. While we strive for quality, AI-generated content may contain errors. Please verify measurements, stitch counts, charts, and instructions before beginning your project. Generated by purlJam.uk
Love this pattern?
Save this pattern to your free PurlJam libraryAccess your pattern anytime
Bookmark this page to access your pattern anytime