Type
Knitting
Difficulty
intermediate
Category
amigurumi
AI Thinking Process
Planning
Verification
Pattern
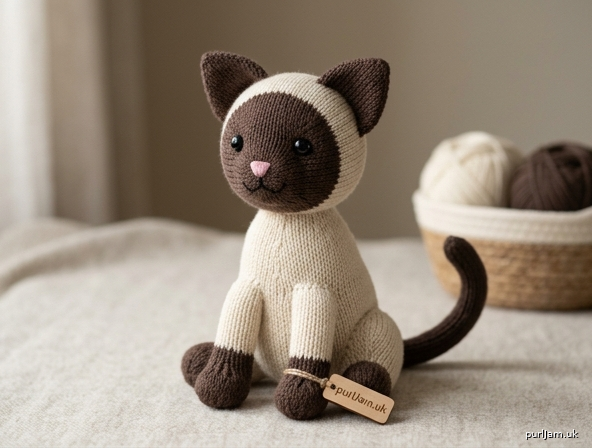
Siamese Cat Knitted Amigurumi
Beginner Soft Toy Pattern
Finished Size: Approximately 7–8 inches (18–20 cm) tall when seated.
Difficulty: Beginner
Description
A classic Siamese cat soft toy worked entirely in stockinette stitch in the round. Cream body with dark seal-brown points (head, ears, paws, tail). Separate pieces are stuffed firmly and seamed. Safety eyes and simple embroidery create the face.
Yarn
Worsted weight yarn (approx. 100–110 yd / 90–100 m total)
- MC (Main Color – cream or fawn): 55 yd / 50 m
- CC (Contrast Color – seal brown or dark chocolate): 45 yd / 40 m Small amounts of black and pink embroidery floss or scrap yarn for face details.
Needles & Notions
- US 5 (3.75 mm) double-pointed needles (DPNs) or 32–40" circular for Magic Loop (use needles 1–2 sizes smaller than yarn label for a tight fabric)
- Polyester fiberfill stuffing (approximately 2–2.5 oz / 55–70 g)
- 9 mm safety eyes (1 pair)
- Tapestry needle
- Stitch marker
- Scissors
Gauge
20 sts = 4 inches (10 cm) in stockinette stitch worked in the round. Tight, even fabric is more important than exact gauge so stuffing does not show. Adjust needle size if needed.
Abbreviations (US)
- CO: cast on
- k: knit
- kfb: knit into front and back of stitch (1 st increased)
- k2tog: knit 2 stitches together (1 st decreased)
- st(s): stitch(es)
- rnd(s): round(s)
- MC: main color
- CC: contrast color
- rep: repeat
Notes
- Worked in the round; stockinette stitch is produced by knitting every round.
- Place marker at beginning of round and slip it each round.
- Stuff each piece firmly as directed before closing.
- Color changes occur only on legs (paws); twist yarns loosely on wrong side to avoid holes.
- All seams use mattress stitch for an invisible join.
Head (make 1 in CC)
CO 6 sts. Join to work in the round, being careful not to twist. Place marker.
Rnd 1: kfb around (12 sts) Rnd 2: *k1, kfb; rep from * around (18 sts) Rnd 3: *k2, kfb; rep from * around (24 sts) Rnd 4: *k3, kfb; rep from * around (30 sts)
Rnds 5–11: knit (30 sts) — 7 rounds even
Insert safety eyes between Rnds 8 and 9, spaced approximately 6 sts apart, centered on the face. Secure backs firmly.
Rnd 12: *k3, k2tog; rep from * around (24 sts) Rnd 13: *k2, k2tog; rep from * around (18 sts)
Stuff head firmly.
Rnd 14: *k1, k2tog; rep from * around (12 sts) Rnd 15: k2tog around (6 sts)
Cut yarn, leaving a 8-inch (20 cm) tail. Thread tail through remaining 6 sts, pull tight to close, and secure. Weave end inside head.
Ears (make 2 in CC)
Worked flat.
CO 8 sts. Row 1 (WS): purl Row 2 (RS): k1, ssk, k2, k2tog, k1 (6 sts) Row 3: purl Row 4: k1, ssk, k2tog, k1 (4 sts) Row 5: purl Row 6: ssk, k2tog (2 sts) Row 7: p2tog (1 st)
Cut yarn, pull through last st. Leave long tail for seaming. Ears are triangles; light stuffing optional (usually left flat).
Body (make 1 in MC)
CO 6 sts. Join to work in the round. Place marker.
Rnd 1: kfb around (12 sts) Rnd 2: *k1, kfb; rep from * around (18 sts) Rnd 3: *k2, kfb; rep from * around (24 sts) Rnd 4: *k3, kfb; rep from * around (30 sts) Rnd 5: *k4, kfb; rep from * around (36 sts)
Rnds 6–17: knit (36 sts) — 12 rounds even
Rnd 18: *k4, k2tog; rep from * around (30 sts) Rnd 19: *k3, k2tog; rep from * around (24 sts) Rnd 20: *k2, k2tog; rep from * around (18 sts)
Stuff body firmly, shaping into an oval.
Rnd 21: *k1, k2tog; rep from * around (12 sts)
Cut yarn, leaving a 12-inch (30 cm) tail for seaming to head later. Thread through remaining 12 sts but do not pull closed yet—leave open for final stuffing adjustment and head attachment.
Legs (make 4)
Start with CC for paws.
With CC, CO 6 sts. Join to work in the round. Place marker.
Rnd 1: kfb around (12 sts) Rnds 2–5: knit (12 sts) — 4 rounds (paw)
Switch to MC. Rnds 6–14: knit (12 sts) — 9 rounds
Stuff leg firmly, especially the paw.
Rnd 15: k2tog around (6 sts)
Cut yarn, leaving an 8-inch (20 cm) tail. Thread through remaining 6 sts, pull tight to close, and secure. Weave end inside. Make three more identical legs.
Tail (make 1 in CC)
CO 6 sts. Join to work in the round. Place marker.
Rnd 1: *k2, kfb; rep from * around (8 sts) Rnds 2–18: knit (8 sts) — 17 rounds even
Stuff lightly as you go (tail should remain flexible).
Rnd 19: *k2, k2tog; rep from * around (6 sts) Rnd 20: k2tog around (3 sts)
Cut yarn, thread through remaining sts, pull tight, and secure. Weave end inside.
Finishing & Assembly
- Weave in ends: Secure all yarn tails inside the pieces except those needed for seaming.
- Attach head to body: Add any final stuffing to body through the neck opening so the cat sits upright and feels firm. Using the long MC tail from the body (or a new length of MC), mattress-stitch the open neck edge of the body to the base of the head, centering the face forward. Pull snug and secure. Weave end inside.
- Attach ears: Position ears on top of head, slightly angled outward and about 4–5 sts apart. Using the ear tails (or CC), mattress-stitch or whipstitch the cast-on edge of each ear securely to the head. Weave ends inside.
- Attach legs: Place the cat in a seated position. Sew the closed top of each leg to the underside/lower sides of the body with mattress stitch.
- Front legs: attach near the neck/chest junction, spaced evenly about 4–5 sts apart, angled slightly forward.
- Back legs: attach toward the rear underside, spaced evenly for a stable sit. Check symmetry from front and top views before final securing. Weave all ends inside.
- Attach tail: Sew the cast-on (base) end of the tail to the lower back of the body, centered, just above the back legs. Angle slightly upward or to one side for a natural look. Weave end inside.
- Face embroidery (with tapestry needle and floss/scrap yarn):
- Nose: small inverted triangle or Y-shape in pink, centered below and between the eyes (about 2 rnds below eye line).
- Mouth: simple curved or W-shaped line in black or dark brown extending down from the nose.
- Whiskers (optional): 2–3 short straight stitches on each side of the muzzle in black or gray.
- Eye accents (optional): tiny white or lighter stitches at the inner corners if desired.
- Final check: Squeeze gently to distribute stuffing evenly. Adjust any seams for symmetry. All ends must be buried securely inside so they cannot be pulled out.
Your Siamese cat is complete! The tight fabric and firm stuffing will keep its shape through gentle play and display.
Disclaimer: This pattern was generated by AI and should be reviewed for accuracy before use. While we strive for quality, AI-generated content may contain errors. Please verify measurements, stitch counts, charts, and instructions before beginning your project. Generated by purlJam.uk
Love this pattern?
Save this pattern to your free PurlJam libraryAccess your pattern anytime
Bookmark this page to access your pattern anytime