Type
Crochet
Difficulty
intermediate
Category
custom
AI Thinking Process
Planning
Verification
Pattern
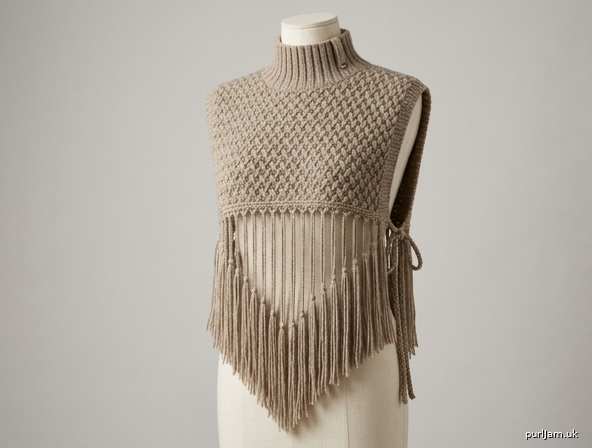
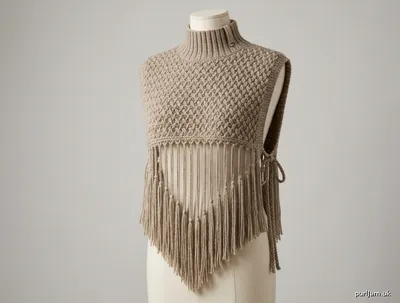
Sierra Ridge Fringe Poncho Vest
A sleeveless pullover poncho vest with a stand-up ribbed collar, deeply ridged alpine-stitch shoulders, and a body that is almost entirely fringe. Front and back 3D panels sit on the shoulders; from their lower edges, a row of chain loops is anchored to the foundation, then graduated hanging cords are worked so you can hook fringe onto them. The cords are shortest at the arm openings and longest at center front and center back, forming a V at both hems.
Skill level: Intermediate
Materials
Yarn: Fingering weight (sock/fingering; approx. 400–460 yd / 366–420 m per 100 g)
- 1650 (2050, 2450) yd / 1510 (1875, 2240) m total
- A smooth solid or semi-solid shows the alpine ridges and the fringe movement best
- About 45–55% of the yardage is used for fringe; do not skimp
Hook:
- US E-4 (3.5 mm) for panels, chains, and cords
- US D-3 (3.25 mm) for the collar (firmer stand)
Notions:
- 4 stitch markers
- Yarn needle
- Sharp scissors (for even fringe)
- Blocking mats and pins
- Optional: 2 small buttons or a collar clasp; 2 lengths of ribbon or extra yarn for side ties
Gauge
20 sts and 10 rows = 4" (10 cm) in Alpine Stitch with US E-4 (3.5 mm), blocked.
Work a swatch of at least 24 sts × 14 rows. Measure the center 20 sts / 10 rows.
Collar gauge (for reference): 22 sts and 16 rounds = 4" (10 cm) in FPhdc/BPhdc ribbing with US D-3 (3.25 mm).
Gauge is important for the shoulder width and collar. Fringe length can be adjusted later without affecting fit.
Sizes
S (M, L) — to fit bust 32–36 (38–42, 44–48)" / 81–91 (97–107, 112–122) cm
The vest is meant to hang, not fit the bust. Choose by shoulder width and how long you want the V-point.
Finished measurements (blocked, before fringe fullness):
| S | M | L | |
|---|---|---|---|
| 3D panel width | 16" (40.5 cm) | 18" (45.5 cm) | 20" (51 cm) |
| 3D panel depth | 7¼" (18.5 cm) | 8" (20.5 cm) | 8¾" (22 cm) |
| Shoulder seam each side | 3¼" (8 cm) | 3½" (9 cm) | 4¼" (11 cm) |
| Neck circumference, unstretched | 19" (48 cm) | 21" (53.5 cm) | 23" (58.5 cm) |
| Collar height | 3½" (9 cm) | 3½" (9 cm) | 3½" (9 cm) |
| Length at V-point from shoulder (including cords) | 26" (66 cm) | 29" (74 cm) | 31" (79 cm) |
| Fringe adds about | 6–7" (15–18 cm) of visual fullness, not extra pointed length if attached along the cords |
Shown schematic in words: two rectangles seamed at the outer top corners; collar sits on the open neck; cords hang from the bottom of each rectangle in a V.
Abbreviations (US)
- beg — beginning
- BPhdc — back post half double crochet
- ch — chain
- dc — double crochet
- FPdc — front post double crochet
- FPhdc — front post half double crochet
- hdc — half double crochet
- pm — place marker
- rep — repeat
- RS — right side
- sc — single crochet
- sk — skip
- sl st — slip stitch
- sp — space
- st(s) — stitch(es)
- WS — wrong side
- yo — yarn over
Special Stitches
Alpine Stitch (used for both 3D panels) Worked in rows on an even number of stitches. Ch 3 at the start of a row counts as the first dc.
- WS rows: Dc in each st across.
- RS rows: FPdc around the next st, dc in the following st, repeating across so raised ridges stack in the same columns.
FPdc: Yo, insert hook from front to back to front around the post of the indicated stitch, yo, pull up a loop, (yo, draw through 2 loops) twice.
FPhdc / BPhdc: Work hdc around the post from the front (FPhdc) or from the back (BPhdc).
Hanging cord: Ch the number given, sl st in the 2nd ch from the hook and in each remaining ch back to the base, then sl st to anchor. This makes a firm cord to hook fringe onto.
Pattern Notes
- US crochet terms throughout. Imperial measurements first; metric in parentheses.
- Two identical panels (Front and Back). The V is created in the hanging cords, not by decreasing the alpine fabric.
- Ch 3 counts as dc. Always work the last dc of a row into the top of the turning ch-3.
- Ch 2 at the start of collar rounds does not count as a stitch.
- Work through both loops unless stated otherwise.
- Stitch counts are given at the end of each row/round in parentheses. Counts that do not change are marked ✓.
- The unused loops of the starting chain are the “base.” Connecting chain loops are worked into that base, then hanging cords are worked from those loops, then fringe is hooked onto the cords.
- Wet-block the 3D panels before seaming and before adding cords or fringe. Do not block finished fringe.
- The 3D fabric is only 7¼–8¾" deep; below that the garment is chains and fringe. Side openings run the full length (open-side vest/poncho). Optional ties are given at the end.
- To lengthen or shorten the V, add or subtract 5 chains from every hanging cord (about 1" / 2.5 cm).
Tip — alpine ridges: On every RS row, each FPdc should sit around the stitch that lies in the same vertical column as the FPdc two rows below. If a ridge drifts, you are working the FPdc around the wrong stitch.
Tip — fringe weight: The starting chain plus the connecting loops carry a lot of weight. Do not skip the reinforcing sc row on the foundation.
Front and Back Panels (make 2 identical)
With US E-4 (3.5 mm), leaving a 12" (30.5 cm) tail for seaming:
Row 1 (WS): Ch 82 (92, 102), dc in the 4th ch from the hook (3 skipped ch count as first dc) and in each ch across.
(80 (90, 100) dc ✓)
Check: 82 − 3 + 1 turning-ch-as-dc = 80; 92 − 3 + 1 = 90; 102 − 3 + 1 = 100 ✓
Row 2 (RS): Ch 3 (counts as dc), *FPdc around next st, dc in next st; rep from * until 1 st remains, FPdc around last st. Turn.
(80 (90, 100) sts ✓)
Check, size S: ch-3 uses st 1; (FPdc, dc) uses 78 sts; last FPdc uses st 80 → 1 + 78 + 1 = 80 ✓
Size M: 1 + 88 + 1 = 90 ✓
Size L: 1 + 98 + 1 = 100 ✓
Row 3 (WS): Ch 3, dc in next st and in each st across, working the last dc in the top of the turning ch. Turn. (80 (90, 100) dc ✓)
Rows 4–18 (20, 22): Repeat Rows 2–3. You will end with a WS dc row (Row 18 (20, 22)). (80 (90, 100) sts ✓ every row)
Row count check: 18 (20, 22) rows at 10 rows = 4" → 7.2 (8.0, 8.8)" which is the stated 7¼ (8, 8¾)" ✓
Fasten off, leaving a 18" (45.5 cm) tail for the shoulder seam.
Mark the shoulders (do this on both panels): With RS facing and Row 18 (20, 22) at the top (neck edge), pm 16 (18, 21) sts in from the right edge and 16 (18, 21) sts in from the left edge. The 48 (54, 58) sts between markers are the neck. Check: 16 + 48 + 16 = 80 ✓; 18 + 54 + 18 = 90 ✓; 21 + 58 + 21 = 100 ✓
Reinforcing row along the foundation (lower edge): With RS facing and US E-4 (3.5 mm), join yarn in the unused loop of the first starting-ch at the lower right corner. Sc in each unused loop across. (80 (90, 100) sc ✓) Fasten off. This row is the stable base for the chain loops.
Make the second panel the same way.
Block both panels now to 16 (18, 20)" wide × 7¼ (8, 8¾)" deep. Pin the lower edge straight; do not stretch the neck edge aggressively.
Join Shoulders
Hold Front and Back with RS together, neck edges aligned, markers matching.
With the long tail (or a new length of yarn), mattress-stitch (or sl st, if you prefer a firmer ridge) the 16 (18, 21) shoulder sts on one side, working through both loops of corresponding stitches. Repeat on the other shoulder.
(16 (18, 21) sts seamed each side ✓; 48 (54, 58) sts left open on Front neck and 48 (54, 58) sts left open on Back neck ✓)
Turn RS out. The side edges of the 3D panels remain open — these are the arm openings.
Stand-Up Collar
With US D-3 (3.25 mm) and RS facing, join yarn at the left shoulder seam (as worn).
Set-up (pick-up round): Pick up and hdc 104 (116, 128) sts evenly around the neckline as follows:
- 48 (54, 58) sts across Back neck
- 4 (4, 6) sts across the left shoulder seam
- 48 (54, 58) sts across Front neck
- 4 (4, 6) sts across the right shoulder seam
Check: 48+4+48+4 = 104 ✓; 54+4+54+4 = 116 ✓; 58+6+58+6 = 128 ✓
104, 116, and 128 are all multiples of 4 ✓
Join with sl st to first hdc. Pm for beginning of round.
Round 1: Ch 2 (does not count as a st), hdc in each st around. Join with sl st to first hdc. (104 (116, 128) hdc ✓)
Round 2: Ch 2, *FPhdc around next st, BPhdc around next st; rep from * around. Join with sl st to first FPhdc. (52 (58, 64) FPhdc + 52 (58, 64) BPhdc = 104 (116, 128) sts ✓)
Rounds 3–14: Repeat Round 2. (104 (116, 128) sts ✓ every round)
Height check: 14 rounds at 16 rounds = 4" → 3.5" ✓
Fasten off loosely. Weave in the collar end on the WS. The ribbing will stand up; if it flops, it was worked too loosely — a shorter hook or one fewer yarn-over through the posts will firm it.
Optional collar finish: Fold the last 2 rounds down inside and loosely whipstitch to the pick-up round for a double-thick stand. This uses a little extra height; work Rounds 3–16 instead of 3–14 if you plan to fold.
Arm Opening Edging
With US E-4 (3.5 mm) and RS facing, join yarn at the lower Front corner of one 3D side edge (where the reinforcing sc row meets the side).
Sc evenly along the side edge of the Front panel (about 1 sc per dc-row end: 18 (20, 22) sc), then, if you want a continuous armhole ring, sc across the matching Back side edge as well and join. For a fully open-side vest, work each of the four 3D side edges separately and fasten off.
(about 18 (20, 22) sc per side edge)
Do not continue this edging onto the fringe/cord area.
Connecting Chain Loops (rows of chains on the base)
These loops are the first chain row, anchored to the reinforcing sc (the base), and they are what you will later hang cords — and then fringe — from.
Work along the lower edge of the Front panel, then repeat on the Back.
With US E-4 (3.5 mm) and RS facing, join yarn in the first reinforcing sc at the right lower corner.
Connecting row: (Sl st, ch 5, sl st) in the first sc, *sk 1 sc, (sl st, ch 5, sl st) in the next sc; rep from * across. (40 (45, 50) ch-5 loops ✓)
Check: loops sit on sts 1, 3, 5, … of 80 (90, 100) → 40 (45, 50) loops ✓
Fasten off. Repeat on the Back lower edge. (40 (45, 50) ch-5 loops on Back ✓)
You now have a row of chain loops connecting to the base on both Front and Back.
Hanging Cords (graduated V)
Each ch-5 loop gets one hanging cord. Cords are shortest at the arm edges and longest at the center, so the hem forms a V.
Cord length rule:
Number the loops 1 to 40 (45, 50) from right to left.
Starting-chain count for loop i = 16 + 4 × (distance from the nearest side), where distance = how many loops sit between this loop and the closer side edge (0 at each end).
| S | M | L | |
|---|---|---|---|
| Number of cords per panel | 40 | 45 | 50 |
| Shortest (each side) | ch 16 | ch 16 | ch 16 |
| Longest (center) | ch 92 | ch 104 | ch 112 |
| Longest length, approx. | 18½" (47 cm) | 21" (53.5 cm) | 22½" (57 cm) |
Max check: S loop 20 (and 21): 16 + 4 × 19 = 92 ✓
M loop 23: 16 + 4 × 22 = 104 ✓
L loop 25 (and 26): 16 + 4 × 24 = 112 ✓
To work one cord:
Sl st in the next ch-5 loop, ch the number required for that loop, sl st in the 2nd ch from the hook and in each ch back down the cord, sl st in the same ch-5 loop to lock. Move to the next loop.
Work all 40 (45, 50) cords across the Front, then all 40 (45, 50) cords across the Back.
Practical sequence (so you do not have to count distance each time):
- Cord 1: ch 16, sl st back, anchor.
- Each following cord toward the center: add 4 ch (20, 24, 28, …) until you reach ch 92 (104, 112).
- Size S: 20 cords climbing to 92, then 20 cords mirroring back down, starting again at 92 and ending at 16. (20 + 20 = 40 ✓)
- Size M: 22 cords climbing to 100, 1 center cord of 104, 22 cords mirroring down from 100 to 16. (22 + 1 + 22 = 45 ✓)
- Size L: 25 cords climbing to 112, then 25 cords mirroring back down, starting again at 112 and ending at 16. (25 + 25 = 50 ✓)
Tip: Write the chain counts on a slip of paper and tick them off. A locking marker on the center loop (loop 20/21 for S, 23 for M, 25/26 for L) keeps you honest.
Tip: Work the sl sts down the cord loosely enough that you can insert the hook later for fringe, but not so loose the cord stretches.
Repeat so Front and Back match. You should have 80 (90, 100) hanging cords on the whole vest.
Fringe
Add fringe after the cords are on, with the vest hanging so you can see the V.
Cut list:
- Cut strands 14" (35.5 cm) long.
- Each bundle = 2 strands held together, folded in half (lark’s head → 4 hanging ends, about 6½" / 16.5 cm).
- Along every cord, attach one bundle at the tip and one bundle every 4 sl sts up the cord.
Approximate bundles: Average cord length is about 10 (12, 13)" with roughly 2.5 bundles per 4 sl sts per inch of cord. Expect on the order of 800 (1100, 1400) bundles for the whole vest. Cut as you go in groups of 40–50 strands so you do not run short of yarn for the last panel.
To attach (lark’s head):
- Fold the 2-strand bundle in half.
- Insert the hook through a sl st (or through the tip of the cord), grab the fold, pull a loop through, then pull the cut ends through that loop and snug.
- Repeat at the tip and every 4 sl sts of every cord.
Work both Front and Back. The body should read as a curtain of fringe, with the alpine shoulders and collar as the only solid fabric.
Even the hem: Hang the vest. With sharp scissors, trim the fringe so the V is clean. Trim lightly — you can always take more off, never add it back.
If you want the piece even more fringed, add a second bundle at each attachment point (4 strands folded, 8 ends). Budget the top end of the yardage range if you do this.
Optional Side Ties
The sides are open from the lower 3D corner to the hem. If you want a little closure under the arm:
Join yarn at the lower Front corner of the 3D edging, ch 40 (45, 50), sl st in 2nd ch from hook and in each ch back, sl st to the same corner. Fasten off. Add 2–3 fringe bundles to the tie end. Repeat on the matching Back corner and on the other side. Tie Front to Back at a comfortable underarm point.
Finishing
- Weave in all remaining ends on the WS of the 3D fabric and collar. Do not weave bulky ends into the cords.
- Steam the collar lightly from the WS so it stands. Do not flatten the alpine ridges — hover the iron, or use steam only.
- Check that Front and Back V-points hang at the same length; add or remove one fringe bundle at the center cords if one side looks shy.
- Shake the fringe and trim any stray long ends.
- Store hanging, not folded, so the V does not crease.
Wear: Pull on over the head like a poncho. The ribbed collar stretches; if your head measurement is above 24" (61 cm) and the collar feels tight on the pick-up round, redo the pick-up with 8 extra sts (multiple of 4) and work the ribbing on 112 (124, 136) sts instead.
Stitch and Math Summary (for your notes)
- Alpine gauge: 20 sts × 10 rows = 4"
- Panel: 80 (90, 100) sts × 18 (20, 22) rows → 16 × 7¼" (18 × 8"; 20 × 8¾")
- Foundation: ch 82 (92, 102) → 80 (90, 100) dc ✓
- Shoulders: 16 (18, 21) + neck 48 (54, 58) + 16 (18, 21) = 80 (90, 100) ✓
- Collar pick-up: 48+4+48+4 = 104; 54+4+54+4 = 116; 58+6+58+6 = 128 ✓
- Connecting loops: 80/2 = 40; 90/2 = 45; 100/2 = 50 ✓
- Longest cord: 16 + 4×19 = 92; 16 + 4×22 = 104; 16 + 4×24 = 112 ✓
Pattern designed for intermediate crocheters using US terminology and fingering-weight yarn. Block the 3D fabric, then build the chain base, then fringe — in that order — and the V will hang true.
Disclaimer: This pattern was generated by AI and should be reviewed for accuracy before use. While we strive for quality, AI-generated content may contain errors. Please verify measurements, stitch counts, charts, and instructions before beginning your project. Generated by purlJam.uk
Love this pattern?
Save this pattern to your free PurlJam libraryAccess your pattern anytime
Bookmark this page to access your pattern anytime