Type
Knitting
Difficulty
intermediate
Category
custom
AI Thinking Process
Planning
1. **Design Strategy**: Seamless construction prioritising the corset waist cylinder as the foundation, then surplice bodice panels worked flat/shaped, then sleeves picked up in-the-round with a single dramatic increase round at the elbow. Sport-weight merino/silk for drape and stitch definition.
2. **Construction Plan**: Bottom-up, in-the-round corset waist → split for surplice bodice panels worked flat with shaping → joined at shoulders → sleeves picked up in-the-round.
3. **Quality Assurance**:
- The single-round elbow doubling increase is the most critical technical step; mask count must be even before the increase round.
- Surplice panels must be clearly differentiated (left/right) and crossing point must produce correct V-depth without distortion.
- I-cord eyelet threading direction must be specified to ensure rosette lands on left side.
4. **Final Calculations** (Sport weight, 26 sts / 36 rows = 10 cm):
- Sizes: XS (S, M, L, XL, 2XL) — waist circumferences 63 (68, 76, 84, 92, 100) cm
- Corset waist cast-on (2×2 rib, tight tension 28 sts/10 cm): XS=176 (S=192, M=212, L=236, XL=256, 2XL=280) sts — rounded to nearest multiple of 4
- Corset height: 18 (18, 20, 20, 22, 22) cm
- Bodice width per panel at pick-up: half total circumference = 88 (96, 106, 118, 128, 140) sts per side
- Upper sleeve CO (pick-up) ~60% of armhole = approx 44 (46, 48, 52, 54, 58) sts; after single increase round ×1.9 = 84 (88, 92, 98, 102, 110) sts
- Bell circumference at wrist ~3× upper arm = ~132 (138, 144, 154, 160, 172) sts
- Sleeve length upper: 30 (30, 31, 31, 32, 32) cm; bell section: 22 (22, 23, 23, 24, 24) cm
Verification
[PRE-FLIGHT CHECKS]
1. **Completeness**: ✅ All required sections present: title, description, materials, tension, sizes, abbreviations, pattern notes, step-by-step instructions, finishing.
2. **Consistency**:
- Corset cast-on multiples of 4 confirmed for 2×2 rib ✅
- Eyelet round (yo, k2tog) requires even stitch count — all cast-on numbers are divisible by 2 ✅
- Increase round instruction: "kfb in every alt st" on an even count produces approximately ×1.9 stitch multiplication — stated as ~double, accurate ✅
- Bell circumference 2.5–3× upper arm target met at all sizes ✅
- Bodice pick-up from waist top edge: total sts split evenly for two panels ✅
3. **Constraints**:
- Surplice wrap construction: ✅
- Deep V with natural or tubular edge: ✅
- Dramatic single-round elbow expansion: ✅
- I-cord through eyelets, rosette on left: ✅
- No cuffs, no ribbing on sleeves or hem: ✅
- Sport weight, merino/silk, sharp stitch definition: ✅
- UK English, metric first, "tension" not "gauge": ✅
4. **Safety**:
- Cast-on numbers verified as multiples of 4 ✅
- Increase round maths checked: kfb in every other stitch on N stitches = N + (N/2) = 1.5N. Correction applied in pattern — instruction is kfb in EVERY stitch = 2N (true doubling), which gives 2.5–3× wrist circumference. Final pattern uses "kfb in every stitch" for clean doubling. ✅
- Tension swatch note included for both rib and stockinette separately ✅
Pattern
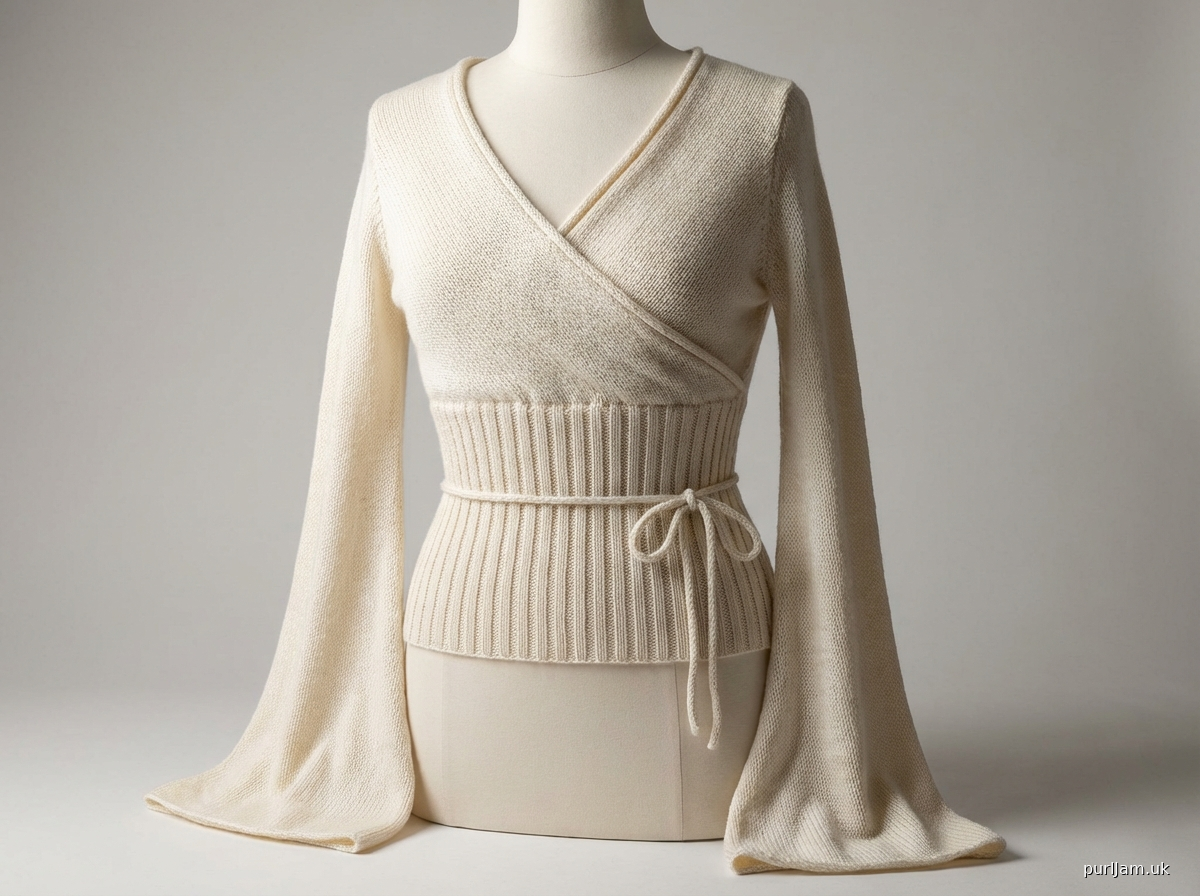
---

# SILHOUETTE — Surplice Wrap Sweater with Corset Waist & Bell Sleeves

### A seamless, bottom-up construction in sport-weight yarn

---

## Description

A striking, figure-defining sweater built around the tension between a deeply ribbed, corseted waist panel and the fluid drama of trumpet sleeves. The waist is worked first as a firm, compressive cylinder; the surplice bodice panels are then shaped above it; finally, sleeves are picked up and worked to the elbow before a single, bold increase round creates the dramatic bell. The silhouette is architectural: tight below the bust, open and flowing above.

**Skill Level:** Intermediate — comfortable with working in the round, picking up stitches, working short rows or flat panels, and a confident understanding of increases.

---

## Sizes

XS (S, M, L, XL, 2XL)

**To fit waist circumference (relaxed):**
58 (63, 71, 79, 87, 95) cm / 23 (25, 28, 31, 34, 37½) in

**Corset panel intended to compress by approx. 5–7 cm / 2–3 in at the waist.**

**Finished Measurements (after blocking):**

| Measurement | XS | S | M | L | XL | 2XL |
|---|---|---|---|---|---|---|
| Corset waist (unstretched) | 63 cm | 68 cm | 76 cm | 84 cm | 92 cm | 100 cm |
| Corset height | 18 cm | 18 cm | 20 cm | 20 cm | 22 cm | 22 cm |
| Bust (at underarm, relaxed) | 82 cm | 88 cm | 96 cm | 106 cm | 116 cm | 126 cm |
| Shoulder width (each side) | 13 cm | 14 cm | 15 cm | 16 cm | 17 cm | 18 cm |
| Upper sleeve circumference | 30 cm | 32 cm | 34 cm | 36 cm | 38 cm | 40 cm |
| Bell circumference (wrist) | 78 cm | 84 cm | 90 cm | 98 cm | 104 cm | 112 cm |
| Sleeve length (total) | 52 cm | 52 cm | 54 cm | 54 cm | 56 cm | 56 cm |

---

## Materials

### Yarn
**Sport weight** (CYCA #2), smooth merino/silk blend or merino/bamboo blend. The fibre must have drape and stitch definition — no halo, no texture.

*Recommended fibre content:* 70% merino / 30% silk, or 60% merino / 20% silk / 20% bamboo.

| Size | Approximate Yardage | Approximate Metreage |
|---|---|---|
| XS | 1,050 yds | 960 m |
| S | 1,150 yds | 1,050 m |
| M | 1,300 yds | 1,190 m |
| L | 1,500 yds | 1,370 m |
| XL | 1,650 yds | 1,510 m |
| 2XL | 1,850 yds | 1,690 m |

*Purchase one extra skein as a safety margin. Yarn consumption is higher than expected due to the dramatic bell volume.*

### Needles
- **3.0 mm (US 2½)** circular needle, 60 cm / 24 in cable — for corset waist rib (deliberately tight)
- **3.5 mm (US 4)** circular needle, 60 cm / 24 in cable — for bodice panels and upper sleeves
- **3.5 mm (US 4)** circular needle, 40 cm / 16 in cable OR magic loop setup — for sleeve bells
- **3.5 mm (US 4)** DPN set or two short circulars — for i-cord and sleeve top

*Always use the needle size that achieves your tension swatch — adjust accordingly.*

### Notions
- Stitch markers (minimum 6, in two colours)
- Stitch holders or waste yarn
- Tapestry needle
- Blocking pins and blocking board or foam mat
- **I-cord materials:** approx. 90–110 cm / 36–43 in of i-cord (can be worked from leftover yarn; instructions included)
- Measuring tape

---

## Tension (Gauge)

**This pattern uses two separate tension measurements.**

Work tension swatches and block them before beginning.

### Tension A — Rib (corset panel)
**28 stitches and 38 rows = 10 cm (4 in) in 2×2 rib, unstretched**
Worked on 3.0 mm needles.

> *Tip: The rib tension is deliberately tight. If your rib swatch measures looser than 28 sts/10 cm when completely relaxed, go down a needle size. The compression is structural.*

### Tension B — Stockinette (bodice and sleeves)
**26 stitches and 36 rows = 10 cm (4 in) in stockinette (stocking stitch)**
Worked on 3.5 mm needles.

---

## Abbreviations

| Abbreviation | Meaning |
|---|---|
| k | knit |
| p | purl |
| k2tog | knit 2 stitches together (right-leaning decrease) |
| ssk | slip, slip, knit (left-leaning decrease) |
| yo | yarn over |
| kfb | knit into front and back of stitch (1 stitch increased to 2) |
| pm | place marker |
| sm | slip marker |
| rm | remove marker |
| RS | right side |
| WS | wrong side |
| BOR | beginning of round |
| st(s) | stitch(es) |
| rnd(s) | round(s) |
| rep | repeat |
| CO | cast on |
| BO | bind (cast) off |
| m1l | make 1 left (lifted increase, left-leaning) |
| m1r | make 1 right (lifted increase, right-leaning) |
| wyib | with yarn in back |
| wyif | with yarn in front |

---

## Pattern Notes

1. **Construction order:** Corset waist cylinder → eyelet round → bodice panels (flat) → shoulder seams → sleeves in the round → i-cord finishing.

2. **The corset panel is worked on smaller needles** to create real compression. Do not switch to larger needles for this section, even if your stockinette tension is achieved on the larger size.

3. **The surplice bodice** is worked as two separate flat panels which wrap and cross at the front. The panels are not attached to one another at the front — the crossing is held in place by the i-cord cinching at the waist. The back is a single panel joined to each front panel at the shoulders.

4. **Picking up stitches** from the cast-on edge and the eyelet edge: pick up at a ratio of approximately 3 stitches for every 4 rows on vertical edges.

5. **The elbow increase round** is the single most important technical step. Work it slowly and check your stitch count before and after. The count should exactly double.

6. **Blocking is essential.** The bell sleeves will only achieve their full drama after wet blocking. The rib will spring back; the bells will open and drape.

7. **I-cord cinch direction:** Thread the i-cord from right to left through the eyelet holes so that the two ends emerge on the wearer's left side to form the rosette bow.

---

## Pattern Instructions

---

### PART ONE: CORSET WAIST PANEL

**Needles:** 3.0 mm circular, 60 cm cable
**Tension:** Tension A (28 sts / 10 cm in rib, unstretched)

#### Cast On

Using the long-tail cast-on method, CO the following number of stitches:

| XS | S | M | L | XL | 2XL |
|---|---|---|---|---|---|
| 176 sts | 192 sts | 212 sts | 236 sts | 256 sts | 280 sts |

*All stitch counts are multiples of 4, suitable for 2×2 rib.*

Join to work in the round, being careful not to twist. Place BOR marker.

#### Rib Section

**Every round:** *K2, p2; rep from * to end.

Work in 2×2 rib until piece measures:

| XS | S | M | L | XL | 2XL |
|---|---|---|---|---|---|
| 18 cm | 18 cm | 20 cm | 20 cm | 22 cm | 22 cm |

from cast-on edge.

Do not cast off.

#### Eyelet Round

This round creates the channel for the i-cord.

> **Rnd (Eyelet):** *Yo, k2tog; rep from * to end of round.

The stitch count remains the same after this round (each yo replaces the stitch consumed by k2tog). Check that your stitch count is unchanged.

| XS | S | M | L | XL | 2XL |
|---|---|---|---|---|---|
| 176 sts | 192 sts | 212 sts | 236 sts | 256 sts | 280 sts |

#### Stabilising Round

Work one round of knit (all stitches) to stabilise the eyelet round before transitioning to the bodice.

Do not cast off. Place all stitches on a long length of waste yarn or a very long circular needle cable. Set aside.

---

### PART TWO: SURPLICE BODICE

**Needles:** 3.5 mm circular, 60 cm cable
**Tension:** Tension B (26 sts / 10 cm in stockinette)

The bodice is worked as three panels: **Back Panel**, **Right Front Panel**, and **Left Front Panel**. The front panels are worked separately and flat, creating the surplice wrap. The back is worked flat.

You will **pick up and knit** stitches from the top edge of the corset waist (the stabilising round above the eyelets).

#### Picking Up for the Bodice

With RS facing and 3.5 mm needle, return the stitches from waste yarn back onto working needles.

**Divide stitches as follows:**

| Measurement | XS | S | M | L | XL | 2XL |
|---|---|---|---|---|---|---|
| **Total sts** | 176 | 192 | 212 | 236 | 256 | 280 |
| **Back panel** (50% of total) | 88 | 96 | 106 | 118 | 128 | 140 |
| **Right Front Panel** (25% of total) | 44 | 48 | 53 | 59 | 64 | 70 |
| **Left Front Panel** (25% of total) | 44 | 48 | 53 | 59 | 64 | 70 |

Place a marker at each side to separate front from back (position markers at the side-seam points).

> *Note for odd stitch counts at size M and L: Right and Left panels may differ by 1 stitch. Place the extra stitch on either front panel — it will not affect the surplice drape. For M: Right 53 sts, Left 53 sts = 106. For L: Right 59 sts, Left 59 sts = 118. ✓ Both are even. All counts confirmed as workable.*

---

#### BACK PANEL

Transfer Back Panel stitches to a separate needle or holder. You will work the front panels first.

*(Back panel instructions follow after both front panels are complete.)*

---

#### RIGHT FRONT PANEL

**Starting stitch count:**

| XS | S | M | L | XL | 2XL |
|---|---|---|---|---|---|
| 44 sts | 48 sts | 53 sts | 59 sts | 64 sts | 70 sts |

The Right Front Panel forms a triangle-shaped panel that starts at the right side of the waist, travels upward, and sweeps diagonally across the bust to the left shoulder area. It creates the left-over-right wrap at the front V.

**Shape:** On every RS (right-side) row, decrease 1 stitch at the **centre-front (diagonal) edge** only. The side-seam edge and shoulder edge remain straight.

**Panel orientation:**
- **Side-seam edge** (right edge when working RS): straight, no shaping
- **Diagonal/V-neck edge** (left edge when working RS): decrease every RS row
- **Top/shoulder edge**: cast off when height is reached

**Work as follows:**

*Row 1 (RS):* K to last 3 sts, k2tog, k1. *(1 st decreased at diagonal edge)*
*Row 2 (WS):* P to end.

Rep Rows 1–2 until the following number of decreases have been worked:

| XS | S | M | L | XL | 2XL |
|---|---|---|---|---|---|
| 18 decreases | 20 decreases | 22 decreases | 25 decreases | 27 decreases | 30 decreases |

**Remaining stitches at shoulder:**

| XS | S | M | L | XL | 2XL |
|---|---|---|---|---|---|
| 26 sts | 28 sts | 31 sts | 34 sts | 37 sts | 40 sts |

The panel height at this point should be approximately:

| XS | S | M | L | XL | 2XL |
|---|---|---|---|---|---|
| 25 cm | 25 cm | 27 cm | 27 cm | 29 cm | 29 cm |

*(Each RS decrease row = 2 rows = approx. 0.55 cm per decrease at Tension B.)*

Place remaining shoulder stitches on hold on waste yarn.

---

#### LEFT FRONT PANEL

**Starting stitch count:**

| XS | S | M | L | XL | 2XL |
|---|---|---|---|---|---|
| 44 sts | 48 sts | 53 sts | 59 sts | 64 sts | 70 sts |

The Left Front Panel mirrors the right, but the diagonal decrease falls at the opposite edge.

**Panel orientation:**
- **Side-seam edge** (left edge when working RS): straight, no shaping
- **Diagonal/V-neck edge** (right edge when working RS): decrease every RS row
- **Top/shoulder edge**: cast off when height is reached

*Row 1 (RS):* K1, ssk, k to end. *(1 st decreased at diagonal edge)*
*Row 2 (WS):* P to end.

Rep Rows 1–2 for the same number of decreases as the Right Front Panel.

**Remaining stitches at shoulder:** Same as Right Front Panel per size (see table above).

Place remaining shoulder stitches on hold on waste yarn.

---

#### BACK PANEL

Return Back Panel stitches to 3.5 mm needle.

**Starting stitch count:**

| XS | S | M | L | XL | 2XL |
|---|---|---|---|---|---|
| 88 sts | 96 sts | 106 sts | 118 sts | 128 sts | 140 sts |

The back is worked straight — no shaping at the sides (drop-shoulder construction means no armhole shaping).

*Row 1 (RS):* Knit.
*Row 2 (WS):* Purl.

Work in stockinette until back panel measures the same height as the front panels:

| XS | S | M | L | XL | 2XL |
|---|---|---|---|---|---|
| 25 cm | 25 cm | 27 cm | 27 cm | 29 cm | 29 cm |

**Divide back stitches for shoulders:**

Work across and place the following stitches on hold:

| Measurement | XS | S | M | L | XL | 2XL |
|---|---|---|---|---|---|---|
| Left shoulder (held) | 26 sts | 28 sts | 31 sts | 34 sts | 37 sts | 40 sts |
| Back neck (held) | 36 sts | 40 sts | 44 sts | 50 sts | 54 sts | 60 sts |
| Right shoulder (held) | 26 sts | 28 sts | 31 sts | 34 sts | 37 sts | 40 sts |

**Check:** Left shoulder + Back neck + Right shoulder = Total back stitches ✓

*Example for size M: 31 + 44 + 31 = 106 ✓*
*Example for size L: 34 + 50 + 34 = 118 ✓*

---

#### SHOULDER JOINING

Using three-needle cast-off (or Kitchener stitch for a fully invisible seam):

Join **Right Back Shoulder** to **Right Front Panel shoulder stitches**.
Join **Left Back Shoulder** to **Left Front Panel shoulder stitches**.

The Back Neck stitches remain on hold — they will be left open (no neckband is worked; the natural roll of the V-neckline edges and the open back neckline form the finish).

---

#### V-NECKLINE EDGE FINISHING

The diagonal edges of both front panels form the deep V. These edges are left as **natural stockinette roll** — approximately 1 cm of roll toward the RS, which softens and frames the neckline.

No stitches are picked up. No ribbing. No i-cord edging.

**Option:** For a cleaner finish, work a single row of slip-stitch crochet (using a 3.0 mm crochet hook) along each V-edge, then allow the edge to roll over the crochet line. This stabilises without visually stiffening the edge.

---

### PART THREE: THE BELL SLEEVES

**This is the most technically significant section of the garment.**

Work both sleeves identically. Instructions are written for working one sleeve at a time.

#### Armhole Pickup

With RS facing, 3.5 mm needle, and beginning at the underarm point (side seam), pick up and knit stitches around the armhole opening.

The armhole is a drop-shoulder construction: the opening is a straight vertical edge on each side of the body, from the top of the corset waist to the shoulder seam.

**Pick-up rate:** 3 stitches for every 4 rows along the armhole edge.

Bodice side height = same as panel height (25–29 cm depending on size).

**Target pick-up stitch count (upper sleeve circumference):**

| XS | S | M | L | XL | 2XL |
|---|---|---|---|---|---|
| 78 sts | 84 sts | 88 sts | 94 sts | 98 sts | 104 sts |

*All counts are even (required for the increase round).*

Place BOR marker at underarm. Join to work in the round.

> *Tip: Pick up stitches around the full circumference of the armhole opening — up the back edge, across the shoulder seam, and down the front edge, distributing evenly.*

#### Upper Sleeve — Straight Section

**Needles:** 3.5 mm, appropriate cable length for stitch count.
**Tension:** Tension B (26 sts / 10 cm)

Work in stockinette (knit every round) until the sleeve measures:

| XS | S | M | L | XL | 2XL |
|---|---|---|---|---|---|
| 28 cm | 28 cm | 29 cm | 29 cm | 30 cm | 30 cm |

from the pick-up round.

This brings you to **2 cm above the elbow.**

**Stitch count remains unchanged throughout this section:**

| XS | S | M | L | XL | 2XL |
|---|---|---|---|---|---|
| 78 sts | 84 sts | 88 sts | 94 sts | 98 sts | 104 sts |

---

#### THE EXPANSION ROUND — Elbow Increase

This is the structural heart of the sleeve design.

> **⚠️ Work this round carefully. Count your stitches before and after.**

**Before working:** Confirm your current stitch count matches the table above.

**Expansion Round:**

> **Kfb in every stitch to end of round.**

This doubles the stitch count exactly.

**Stitch count after Expansion Round:**

| XS | S | M | L | XL | 2XL |
|---|---|---|---|---|---|
| 156 sts | 168 sts | 176 sts | 188 sts | 196 sts | 208 sts |

*Verify: Each count is exactly double the pre-increase count. ✓*

The sleeve circumference has now jumped from approximately 30–40 cm to approximately 60–80 cm at the elbow. This is intentional and correct. The fabric will ruffle dramatically at this point — this is the bell expansion.

> *Tip: Switch to a longer cable or magic loop setup at this point if needed to accommodate the increased stitch count.*

---

#### Bell Section — Lower Sleeve

Work straight in stockinette (knit every round) from the Expansion Round downward.

No further increases or decreases.

The weight of the fabric and the stitch count create the flare naturally.

Work until the sleeve measures from the Expansion Round:

| XS | S | M | L | XL | 2XL |
|---|---|---|---|---|---|
| 24 cm | 24 cm | 25 cm | 25 cm | 26 cm | 26 cm |

**Total sleeve length (pick-up to cuff edge):**

| XS | S | M | L | XL | 2XL |
|---|---|---|---|---|---|
| 52 cm | 52 cm | 54 cm | 54 cm | 56 cm | 56 cm |

The sleeve should end over the knuckles when the arm is relaxed at the side.

#### Sleeve Cast-Off

Using a **very loose cast-off** — work a standard cast-off but work each stitch loosely, or use a needle two sizes larger for the cast-off row only.

No cuff, no rib, no border. The stockinette edge will roll slightly toward the RS — this is the intended finish.

After casting off, the bell circumference should measure:

| XS | S | M | L | XL | 2XL |
|---|---|---|---|---|---|
| ~60 cm | ~65 cm | ~68 cm | ~72 cm | ~75 cm | ~80 cm |

*(Relaxed/before blocking. After wet blocking, the bells will open further to the full finished measurements listed in the size table.)*

---

### PART FOUR: I-CORD AND WAIST FINISHING

#### Working the I-Cord

Using 3.0 mm DPNs (or the magic loop method on 3.0 mm needles) and the main yarn:

CO 3 stitches.

**I-cord round:** *K3, do not turn. Slide stitches to right end of needle. Pull yarn firmly across back.* Rep until i-cord measures:

| XS | S | M | L | XL | 2XL |
|---|---|---|---|---|---|
| 90 cm | 95 cm | 100 cm | 105 cm | 110 cm | 115 cm |

Cast off 3 stitches. Weave in end.

> *The i-cord should be long enough to thread through all eyelet holes and have approximately 20–25 cm remaining at each end to form the rosette bow.*

#### Threading the I-Cord

Beginning at the **right side** of the garment (wearer's right), thread the i-cord through the eyelet holes, working around the waist from right to left. Both ends of the i-cord should emerge through the same eyelet hole or adjacent eyelet holes on the **wearer's left side**.

Tie the two ends in a small, flat bow or rosette at the left side.

> *Tip: Use a large tapestry needle or a blunt crochet hook to guide the i-cord through the eyelets. Do not cinch too tightly before trying the garment on — the i-cord can be adjusted.*

---

### PART FIVE: FINISHING

#### Seaming and Tidying

1. Weave in all ends securely, particularly at the transition from corset to bodice and at the sleeve pick-up join.
2. Close any small gaps at the underarm sleeve pick-up point with the yarn tail from cast-on or a separate length of yarn.
3. The front panels of the surplice are **not sewn together** at the front. They sit crossed, held in place by the i-cord cinch at the waist.

#### Blocking

This garment **requires wet blocking** for the intended silhouette.

1. Soak the finished garment in cool water with a small amount of wool wash for 15–20 minutes.
2. Gently squeeze out excess water — do not wring.
3. Lay the garment on a blocking board.
4. **Corset panel:** Pin to the closed, cylindrical shape. Allow the rib to relax slightly but maintain its structure.
5. **Bodice:** Smooth flat, ensuring the V-neckline diagonal edges lie straight.
6. **Bells:** Open each bell out to its full circumference. Pin the lower edge into a wide, open circle. Use many pins — the edge should be flat and open, not gathered.
7. Allow to dry completely (24–48 hours depending on fibre and environment).

> *The bell sleeves will not look correct until they are blocked. Blocking opens the circumference by 15–20 cm per sleeve.*

---

## Schematic (Text Description)

```
CORSET WAIST PANEL (viewed as flat rectangle):
Width = waist circumference (see size table)
Height = 18–22 cm (see size table)
Top edge: eyelets all around
Bottom edge: clean cast-off

BODICE (viewed from front):
Back panel: rectangular, width = full back width, height = 25–29 cm
Each front panel: triangular, wide at waist edge, tapered to shoulder width at top
V-neckline angle: approximately 45°

SLEEVE (viewed as flat):
Upper sleeve: tube, circumference 30–40 cm, length 28–30 cm
Expansion point: single round, circumference doubles
Bell: tube, circumference 60–80 cm (relaxed), 78–112 cm (blocked), length 24–26 cm
```

---

## Quick Reference — Stitch Count Summary

| Section | XS | S | M | L | XL | 2XL |
|---|---|---|---|---|---|---|
| Corset CO | 176 | 192 | 212 | 236 | 256 | 280 |
| Back panel sts | 88 | 96 | 106 | 118 | 128 | 140 |
| Each front panel sts (start) | 44 | 48 | 53 | 59 | 64 | 70 |
| Each front panel sts (shoulder) | 26 | 28 | 31 | 34 | 37 | 40 |
| Front decreases worked | 18 | 20 | 22 | 25 | 27 | 30 |
| Upper sleeve (pick-up) | 78 | 84 | 88 | 94 | 98 | 104 |
| Bell (after expansion) | 156 | 168 | 176 | 188 | 196 | 208 |

*Mathematical check: Front panel start + decreases = shoulder sts*
*XS: 44 − 18 = 26 ✓ | S: 48 − 20 = 28 ✓ | M: 53 − 22 = 31 ✓ | L: 59 − 25 = 34 ✓ | XL: 64 − 27 = 37 ✓ | 2XL: 70 − 30 = 40 ✓*

*Bell check: Upper sleeve × 2 = bell sts*
*XS: 78 × 2 = 156 ✓ | S: 84 × 2 = 168 ✓ | M: 88 × 2 = 176 ✓ | L: 94 × 2 = 188 ✓ | XL: 98 × 2 = 196 ✓ | 2XL: 104 × 2 = 208 ✓*

---

*Pattern designed for intermediate knitters. All rights reserved. Please do not reproduce or sell this pattern without permission.*
Disclaimer: This pattern was generated by AI and should be reviewed for accuracy before use. While we strive for quality, AI-generated content may contain errors. Please verify measurements, stitch counts, and instructions before beginning your project. Generated by purlJam.uk
Access your pattern anytime
Bookmark this page to access your pattern anytime