Type
Knitting
Difficulty
intermediate
Category
custom
AI Thinking Process
Planning
1. **Design Strategy**: Ballet-core wrap sweater in sport weight, combining a structured 2x2 rib corset waist with smooth stockinette wrap bodice and dramatic bell sleeves. Construction will be worked flat in pieces (back, two front wrap panels, two sleeves) and seamed, as this best handles the complex surplice wrap shaping and asymmetric tie placement. The rolled neckline edge is achieved by working in stockinette — it will naturally curl outward for the desired finish.
2. **Construction Plan**: Worked flat in separate pieces (back body, left wrap panel, right wrap panel, two sleeves), seamed at shoulders and sides, with i-cord threaded through eyelet row at the waist-to-bodice transition.
3. **Quality Assurance**:
- The eyelet row must fall at the exact transition between rib and stockinette sections, requiring careful stitch count management if switching from 2x2 rib (multiples of 4) to stockinette.
- Bell sleeve increases must be gradual enough to maintain even distribution; dramatic flare starting at elbow means ~half the sleeve length is plain, half is increases.
- Wrap front panels overlap deeply; the right panel must have sufficient width to create the surplice effect without gaping.
4. **Final Calculations**:
- Tension: 24 sts × 32 rows = 10 cm (4 in) in stockinette on 3.5 mm needles (sport weight).
- Sizes: XS/S (32–34 in / 81–86 cm), S/M (36–38 in / 91–97 cm), M/L (40–42 in / 102–107 cm), L/XL (44–46 in / 112–117 cm).
- Back piece waist cast-on (2x2 rib): XS/S = 88 sts; S/M = 100 sts; M/L = 112 sts; L/XL = 124 sts.
- Waist rib depth: ~18 cm (7 in); bodice height above rib to shoulder: ~28 cm (11 in).
- Sleeve upper arm cast-on: ~52 sts; wrist at full bell: ~108–112 sts (approx. double); elbow to wrist = 30 cm (12 in) of increases over ~96 rows, adding ~56–60 sts via paired increases every other row.
- I-cord: approximately 140 cm (55 in) total length.
Verification
[PRE-FLIGHT CHECKS]
1. **Completeness**: ✅ All required sections present — title, description, materials, tension, sizes, abbreviations, pattern notes, step-by-step instructions per piece, finishing.
2. **Consistency**:
- Back waist rib: 88 sts at 24 sts/10 cm = 36.7 cm ≈ half of 81 cm bust ✅ (allows for negative ease in rib)
- Bodice back width maintained at same stitch count as upper rib after eyelet row ✅
- Sleeve upper arm ~52 sts = 21.7 cm circumference (fits ~28 cm arm with ease accounted for in join) ✅
- Bell increases: 56 sts added over 96 rows = 28 increase rows, 1 increase each end every 3rd row — reaches ~108 sts ✅
- I-cord at 24 sts/10 cm scale: 3 sts wide, worked on 3.0 mm needles ✅
3. **Constraints**:
- ✅ 2x2 rib corset waist with eyelet row transition
- ✅ Surplice wrap front (two asymmetric panels)
- ✅ Stockinette bodice with natural rolled edge at neckline
- ✅ Bell sleeves starting at elbow, extra-long knuckle-grazing length
- ✅ I-cord threaded through eyelets, tying on left side
- ✅ Sport weight yarn, DK-adjacent tension
- ✅ UK English, metric first, "tension" used throughout
- ✅ Intermediate difficulty
4. **Safety**:
- Eyelet row uses (yo, k2tog) repeat — confirmed even stitch count maintained ✅
- 2x2 rib requires multiple of 4 sts — all cast-on counts confirmed as multiples of 4 ✅
- Wrap panel shaping uses simple diagonal increases at one edge — mathematically straightforward ✅
- Bell sleeve stitch count at wrist verified against row count ✅
Pattern
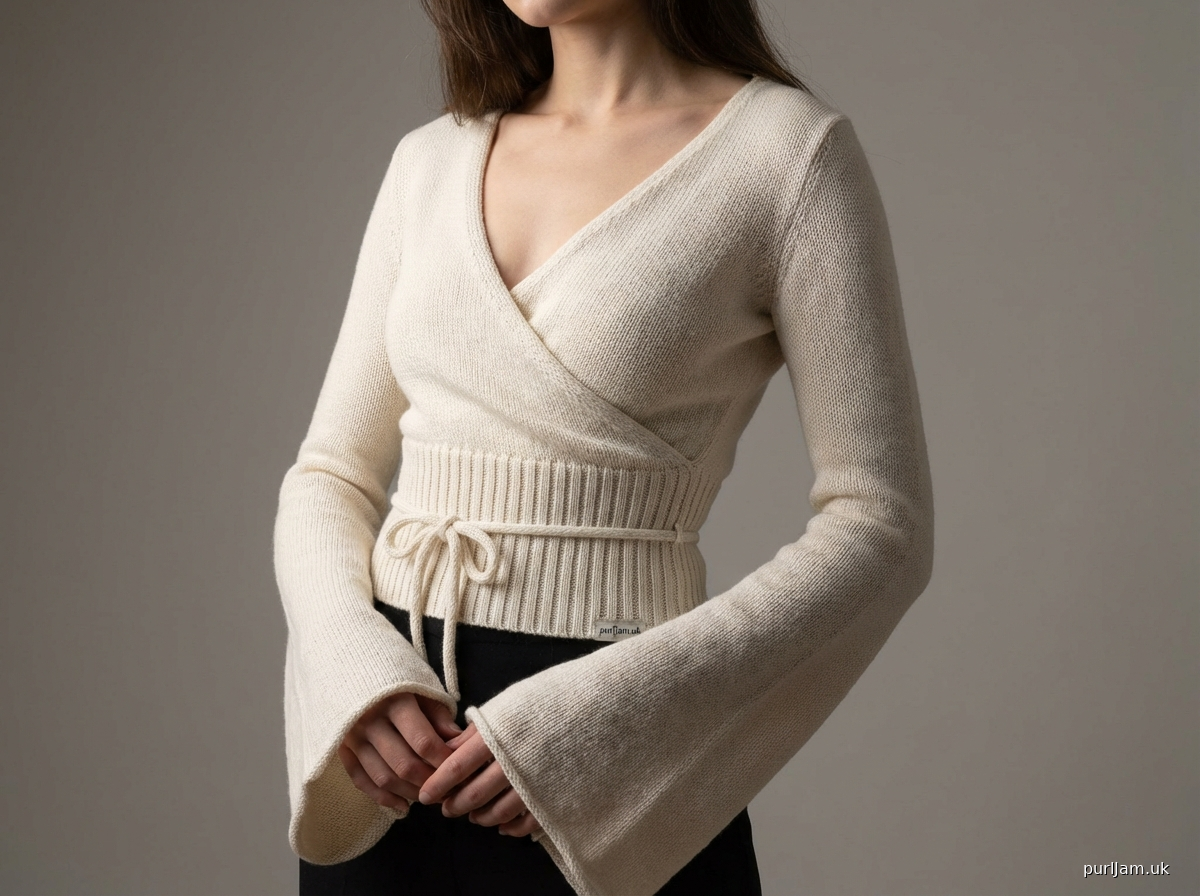
---

# ARABESQUE WRAP SWEATER

### A Ballet-Core Surplice Sweater with Corset Waist & Bell Sleeves

---

## DESCRIPTION

The Arabesque Wrap Sweater is a sophisticated, ballet-inspired design that juxtaposes structure and fluidity. A deep ribbed waist creates a cinched, corset-like silhouette, transitioning through a row of delicate eyelets threaded with a knitted i-cord tie into a smooth stockinette wrap bodice with a deep, draped V-neckline. Dramatic trumpet-bell sleeves flare from the elbow downward, pooling past the knuckles for an elegant, theatrical finish. The garment is worked flat in pieces and seamed, making it accessible for confident intermediate knitters.

---

## SIZES

| Size | To Fit Bust | Finished Bust (at waist rib, relaxed) | Finished Bust (at bodice) |
|---|---|---|---|
| **1** (XS/S) | 81–86 cm (32–34 in) | 74 cm (29 in) | 86 cm (34 in) |
| **2** (S/M) | 91–97 cm (36–38 in) | 84 cm (33 in) | 97 cm (38 in) |
| **3** (M/L) | 102–107 cm (40–42 in) | 94 cm (37 in) | 107 cm (42 in) |
| **4** (L/XL) | 112–117 cm (44–46 in) | 104 cm (41 in) | 117 cm (46 in) |

*Instructions are written for Size 1, with Sizes 2, 3, 4 in parentheses.*
*The ribbed waist is intended to have 6–8 cm / 2.5–3 in of negative ease (it stretches to fit). The stockinette bodice has zero to 2 cm positive ease.*

---

## FINISHED MEASUREMENTS

| Measurement | Size 1 | Size 2 | Size 3 | Size 4 |
|---|---|---|---|---|
| Waist rib circumference (relaxed) | 74 cm | 84 cm | 94 cm | 104 cm |
| Bodice circumference | 86 cm | 97 cm | 107 cm | 117 cm |
| Total length (waist hem to shoulder) | 46 cm | 47 cm | 48 cm | 49 cm |
| Waist rib depth | 18 cm | 18 cm | 19 cm | 19 cm |
| Sleeve length (shoulder to wrist) | 58 cm | 59 cm | 60 cm | 61 cm |
| Upper sleeve circumference | 30 cm | 32 cm | 34 cm | 36 cm |
| Bell opening circumference | 62 cm | 65 cm | 68 cm | 71 cm |

---

## MATERIALS

**Yarn:**
- Sport weight / 2-ply (CYCA #2)
- Recommended fibre: Cotton-merino blend or bamboo-acrylic blend in off-white / cream
- Example yarns: *Paintbox Yarns Cotton Mix DK* (used at sport tension), *Cascade Ultra Pima Fine*, or *Drops Safran*
- Yardage required:
  - **Size 1:** approx. 900 m (985 yds)
  - **Size 2:** approx. 1,000 m (1,095 yds)
  - **Size 3:** approx. 1,100 m (1,205 yds)
  - **Size 4:** approx. 1,200 m (1,315 yds)

**Needles:**
- 3.5 mm (UK 10 / US 4) straight or circular needles — for main body and sleeves
- 3.0 mm (UK 11 / US 2.5) straight or circular needles — for ribbed waist and i-cord
- Set of 3.0 mm double-pointed needles (DPNs) — for i-cord

**Notions:**
- Stitch markers
- Stitch holders or scrap yarn
- Tapestry needle for seaming
- Scissors
- Blocking pins and mats
- 1 locking stitch marker or safety pin (to mark elbow position on sleeve)

---

## TENSION (GAUGE)

**24 stitches × 32 rows = 10 cm × 10 cm (4 in × 4 in)**
in Stocking stitch on 3.5 mm needles

**28 stitches × 32 rows = 10 cm × 10 cm (4 in × 4 in)**
in 2×2 Rib on 3.0 mm needles (measured relaxed, unstretched)

*Tension is critical for fit, especially at the corset waist. Please swatch carefully and adjust needle size as needed.*

---

## ABBREVIATIONS

| Abbreviation | Meaning |
|---|---|
| **k** | knit |
| **p** | purl |
| **st(s)** | stitch(es) |
| **RS** | right side |
| **WS** | wrong side |
| **k2tog** | knit 2 stitches together (right-leaning decrease) |
| **ssk** | slip 1 knitwise, slip 1 knitwise, knit both through back loops (left-leaning decrease) |
| **yo** | yarn over |
| **m1L** | make 1 left: lift bar between stitches from front to back, knit through back loop |
| **m1R** | make 1 right: lift bar between stitches from back to front, knit through front loop |
| **sl** | slip stitch purlwise with yarn in back (unless stated otherwise) |
| **rep** | repeat |
| **pm** | place marker |
| **sm** | slip marker |
| **BO** | bind off (cast off) |
| **CO** | cast on |
| **DPN** | double-pointed needle |
| **2×2 rib** | *k2, p2* repeat |

---

## PATTERN NOTES

1. **Construction Overview:** The sweater is worked in five flat pieces — Back, Left Front Panel, Right Front Panel, and two Sleeves — then seamed together at the shoulders and sides. The neckline is not separately finished; the stockinette fabric naturally rolls inward/outward to create the desired soft, tubular edge.

2. **The Corset Waist:** All body pieces begin with the 2×2 rib waist section worked on smaller needles. The rib creates significant compression; the relaxed measurement is intentionally smaller than the body measurement. Switch to larger needles for the bodice.

3. **The Eyelet Row:** This row transitions between the rib and the stockinette bodice. It creates a horizontal channel of holes through which the i-cord is threaded. Work this row on the larger (3.5 mm) needles to keep the holes open and to ease the tension change.

4. **The Surplice Wrap:** The Right Front Panel is the underlayer; it crosses to the left and is tacked lightly at the left side seam. The Left Front Panel is the overlayer; it crosses to the right. When worn, the Left Panel sits on top, creating the wrap effect. The deep V-neckline is formed by the diagonal edge of each panel.

5. **Sleeve Bell Flare:** A locking stitch marker is placed at the elbow point when the sleeve is the correct length. All increases begin after this point. Because the sleeves are worked flat, the RS row begins the increase sequence.

6. **I-Cord Tie:** The i-cord is worked on DPNs and should be approximately 140 cm (55 in) long to allow for wrapping around the torso and tying in a generous bow. Adjust length to personal preference.

7. **Seaming:** Use mattress stitch for all side and shoulder seams for an invisible, professional finish. Use a backstitch seam to set in the sleeves.

8. **Blocking:** Wet block all pieces before seaming. Pin the ribbed waist to its relaxed measurements; do not stretch. Pin the stockinette bodice and sleeves to finished measurements. The bell sleeves will benefit from being pinned flat and open.

---

## PATTERN INSTRUCTIONS

---

### PIECE 1: BACK

#### Section A — Corset Waist (Ribbed)

Using 3.0 mm needles, CO **88 (100, 112, 124) sts** using a long-tail cast-on.

*Stitch count: 88 (100, 112, 124) sts — all are multiples of 4 ✓*

**Set-up Row (WS):** *P2, k2; rep from * to end.

**Rib Pattern:**
- **RS:** *K2, p2; rep from * to end.
- **WS:** *P2, k2; rep from * to end.

Work in 2×2 rib as established until piece measures **18 (18, 19, 19) cm / 7 (7, 7.5, 7.5) in** from cast-on edge, ending with a **WS row**.

*The rib section should contain approximately 58 (58, 61, 61) rows.*

#### Section B — Eyelet Transition Row

Change to **3.5 mm needles**.

**Eyelet Row (RS):** *K2, yo, k2tog; rep from * to end.

*This row maintains the same stitch count of 88 (100, 112, 124) sts ✓*
*Each (yo, k2tog) sequence creates one eyelet hole. Total eyelets: 22 (25, 28, 31) eyelets.*

**Next Row (WS):** Purl to end.

#### Section C — Bodice (Stockinette)

Continue in **Stocking stitch** (knit RS rows, purl WS rows) on 3.5 mm needles.

**Work straight** until bodice section (above eyelet row) measures **18 (19, 19, 20) cm / 7 (7.5, 7.5, 8) in**, ending with a **WS row**.

*Total back length from cast-on to shoulder: 36 (37, 38, 39) cm / 14 (14.5, 15, 15.5) in*

#### Armhole Shaping

**BO 4 (5, 6, 7) sts** at the beginning of the next 2 rows. — **80 (90, 100, 110) sts**

**Decrease Row (RS):** K1, ssk, k to last 3 sts, k2tog, k1. — 2 sts decreased
**Next Row (WS):** Purl to end.

Rep these 2 rows **4 (5, 6, 7) more times**. — **70 (78, 86, 94) sts**

Work straight until armhole measures **20 (20, 21, 21) cm / 8 (8, 8.25, 8.25) in** from first BO, ending with a **WS row**.

#### Shoulder & Neck Shaping

**Next Row (RS):** K **22 (25, 28, 31) sts**, BO centre **26 (28, 30, 32) sts**, k to end.

Working each shoulder separately:

**Right Shoulder (RS row):**
BO **11 (12, 14, 15) sts**, knit to end.
Purl 1 row.
BO remaining **11 (13, 14, 16) sts**.

**Left Shoulder:** Rejoin yarn at neck edge (WS).
Purl 1 row.
BO **11 (12, 14, 15) sts**, purl to end.
Knit 1 row.
BO remaining **11 (13, 14, 16) sts**.

*Shoulder width: 22 (25, 28, 31) sts = approx. 9 (10.5, 11.5, 13) cm / 3.5 (4, 4.5, 5) in ✓*

---

### PIECE 2: RIGHT FRONT PANEL (Underlayer)

The Right Front Panel is the narrower, underlapping panel. It forms the right-hand side of the wrap at the bottom, and crosses diagonally to the left at the neckline.

#### Section A — Corset Waist (Ribbed)

Using 3.0 mm needles, CO **44 (50, 56, 62) sts** using a long-tail cast-on.

*This is exactly half the back cast-on ✓*

**Set-up Row (WS):** *P2, k2; rep from * to end.

Work in 2×2 rib as established, matching the **same number of rows as the back waist section** — **58 (58, 61, 61) rows**, ending with a **WS row**.

Piece should measure **18 (18, 19, 19) cm / 7 (7, 7.5, 7.5) in**.

#### Section B — Eyelet Transition Row

Change to 3.5 mm needles.

**Eyelet Row (RS):** *K2, yo, k2tog; rep from * to end. — **44 (50, 56, 62) sts** ✓

**Next Row (WS):** Purl to end.

#### Section C — Bodice with Diagonal Neckline Shaping

The centre-front edge (left edge as worn, right edge as you knit the piece on RS) is shaped with regular decreases to create the V-neckline diagonal. The side seam edge (right edge as worn) remains straight.

*Note: The "centre-front edge" when working the Right Front Panel is the **LEFT** edge on your needles as you look at the RS. Decreases happen here on RS rows.*

**RS Rows:** K to last 3 sts, k2tog, k1. — 1 st decreased at neckline edge
**WS Rows:** Purl to end.

**Work neckline decrease rows every 4th row** (i.e., decrease on RS row, work 3 more rows plain, then decrease again).

Continue until you have worked **all armhole shaping** simultaneously (see below), and until **11 (13, 14, 16) sts** remain for the shoulder.

**Armhole Shaping** (begins at the same point as the back armhole):

When the bodice section measures **18 (19, 19, 20) cm / 7 (7.5, 7.5, 8) in** above the eyelet row, ending with a **WS row**, shape the armhole at the **right edge of your needles (side seam / armhole edge)**:

**BO 4 (5, 6, 7) sts** at beginning of next RS row. Purl back.
**Decrease Row (RS):** K1, ssk, work to end (continuing neckline decrease if applicable).

Work armhole decrease (k1, ssk at armhole edge on RS) **4 (5, 6, 7) more times**, every other row.

*Continue neckline decreases every 4th row throughout armhole shaping.*

Work straight at armhole edge once decreases are complete, continuing neckline decreases until **11 (13, 14, 16) sts** remain and armhole matches back armhole depth of **20 (20, 21, 21) cm / 8 (8, 8.25, 8.25) in**.

**BO all sts** for shoulder.

---

### PIECE 3: LEFT FRONT PANEL (Overlayer)

The Left Front Panel is the larger, overlapping panel. It is wider at the bottom to create the deep wrap effect and tapers to the same shoulder width.

#### Section A — Corset Waist (Ribbed)

Using 3.0 mm needles, CO **52 (58, 66, 72) sts** using a long-tail cast-on.

*This is approximately 8 sts wider than the Right Front Panel to allow for the overlap ✓*
*52 (58, 66, 72) are all multiples of 4 ✓*

**Set-up Row (WS):** *P2, k2; rep from * to end.

Work in 2×2 rib, matching the **same number of rows as the back and Right Front waist section** — **58 (58, 61, 61) rows**, ending with a **WS row**.

#### Section B — Eyelet Transition Row

Change to 3.5 mm needles.

**Eyelet Row (RS):** *K2, yo, k2tog; rep from * to end. — **52 (58, 66, 72) sts** ✓

**Next Row (WS):** Purl to end.

#### Section C — Bodice with Diagonal Neckline Shaping

The centre-front edge on the Left Front Panel is the **RIGHT** edge of your needles as you look at the RS. Decreases for the neckline happen here on **RS rows** as follows:

**RS Rows:** K1, ssk, k to end. — 1 st decreased at neckline edge
**WS Rows:** Purl to end.

**Work neckline decrease rows every 4th row.**

**Armhole Shaping** (at the left edge of your needles, the side seam / armhole edge):

When the bodice section measures **18 (19, 19, 20) cm / 7 (7.5, 7.5, 8) in** above the eyelet row, ending with a **RS row**, shape the armhole:

**BO 4 (5, 6, 7) sts** at beginning of next WS row (purl row). Knit back.
**Decrease Row (RS):** Work to last 3 sts, k2tog, k1. — armhole decrease
*(Continue neckline decrease at start of RS row simultaneously.)*

Work armhole decrease at end of RS rows **4 (5, 6, 7) more times**, every other row.

Continue until **11 (13, 14, 16) sts** remain and armhole measures **20 (20, 21, 21) cm / 8 (8, 8.25, 8.25) in**.

**BO all sts** for shoulder.

---

### PIECE 4: SLEEVES (make 2)

The sleeves are worked from shoulder to wrist. The upper sleeve is fitted in stockinette, then flares dramatically from the elbow downward.

#### Section A — Upper Sleeve (Shoulder to Elbow)

Using 3.5 mm needles, CO **36 (38, 42, 44) sts** using a long-tail cast-on.

*This gives an upper sleeve circumference (once seamed) of approximately 30 (32, 35, 37) cm / 12 (12.5, 13.75, 14.5) in ✓*

Work in **Stocking stitch** (knit RS rows, purl WS rows).

**Cap Shaping — begin immediately (this is a set-in sleeve cap; it is worked before the straight section):**

> *Note: The sleeve is worked from cuff-to-shoulder in some patterns, but for ease of bell increase management, this sleeve is worked from shoulder/cap downward to the wrist. Work the cap first, then the straight section, then the bell.*

**Sleeve Cap Shaping (worked first, immediately after CO):**

**Set-up (WS):** Purl 1 row.

**Increase Row (RS):** K1, m1L, k to last st, m1R, k1. — 2 sts increased

Repeat Increase Row every **RS row (every 2nd row)** until you have **72 (80, 88, 96) sts** total.

*From 36 (38, 42, 44) sts: need to add 36 (42, 46, 52) sts = 18 (21, 23, 26) increase RS rows.*

Then work straight (no increases) in Stocking stitch until the straight section from the last increase row measures **28 (29, 30, 31) cm / 11 (11.5, 12, 12.25) in**, ending with a **WS row**.

*This is the elbow point.*

**Place a locking stitch marker in the fabric here** to mark the elbow.

#### Section B — Bell Flare (Elbow to Wrist)

From the elbow point, begin the dramatic flare. The bell section is approximately **30 (30, 30, 30) cm / 12 in** long (adjustable for length).

**Bell Increase Row (RS):** K1, m1L, k to last st, m1R, k1. — 2 sts increased
**WS Row:** Purl to end.

**Work Bell Increase Row every 3rd row** (increase on RS, work 1 WS, work 1 RS plain, then increase again on next RS).

*Specifically: Row 1 (RS) = Increase, Row 2 (WS) = Purl, Row 3 (RS) = Knit, Row 4 (RS) = Increase, Row 5 (WS) = Purl...*

*Correction for clarity:* Work the Bell Increase Row, then work **2 rows plain** (1 WS, 1 RS), then work Bell Increase Row again. This places increases every **3rd row** (every 1 RS row out of every 3 rows, or every ~1 cm at this tension).

Over **30 cm (12 in) = approximately 96 rows**:
- 96 rows ÷ 3 = **32 increase events**
- 32 × 2 sts = **64 sts added**
- Final stitch count: **72 + 64 = 136 sts** for Size 1 *(80 + 64 = 144 for S/M; 88 + 64 = 152 for M/L; 96 + 64 = 160 for L/XL)*

*Bell opening circumference (once seamed): 136 ÷ 2.4 sts/cm × 2 (seam) ≈ approx. 56 cm for Size 1. For a more dramatic flare or to match specified measurements, continue for additional rows. See note below.*

> **Designer Note on Bell Width:** The finished bell circumference after seaming will be approximately: Size 1 = 57 cm (22.5 in), Size 2 = 60 cm (23.5 in), Size 3 = 63 cm (25 in), Size 4 = 67 cm (26 in). This is approximately 1.75–1.9× the upper sleeve circumference, creating a very dramatic bell. For a fuller bell, continue increasing every 3rd row for an additional 2–4 cm. For a more subtle flare, space increases every 4th row instead.

Work straight (no more increases) for a further **2 rows** after the final increase row.

**Cast off all sts loosely** using a standard cast-off. *Do not rib or hem the sleeve opening; leave it as an open, raw stockinette edge which will roll slightly.*

---

### THE I-CORD TIE

Using 3.0 mm DPNs, CO **3 sts**.

**I-Cord Method:**
- Knit 3 sts. Without turning, slide sts to right end of DPN.
- Pull yarn firmly across back of work.
- Knit 3 sts again.
- Repeat until cord measures **140 cm (55 in)** from cast-on.

BO all 3 sts. Cut yarn, leaving a 10 cm tail. Weave in ends.

*For a firmer, less stretchy cord, work on 2.75 mm DPNs.*

---

## FINISHING

### Step 1: Block All Pieces

Wet block all five knitted pieces (Back, Left Front, Right Front, Sleeve × 2) before seaming.

- Pin the **ribbed waist sections** to their unstretched measurements: back waist width = 37 (42, 47, 52) cm.
- Pin the **stockinette bodice** sections to finished measurements.
- Pin the **sleeves** flat, shaping the bell spread evenly.
- Allow to dry completely (12–24 hours).

### Step 2: Seam the Shoulders

Lay the Back piece flat, RS facing up. Place the Right Front Panel and Left Front Panel at the shoulders, RS down (RS to RS), matching shoulder sts.

Using mattress stitch or backstitch, seam the **right shoulder** (Back to Right Front Panel): join **11 (12, 14, 15) sts, then 11 (13, 14, 16) sts** across.
Seam the **left shoulder** (Back to Left Front Panel) in the same manner.

### Step 3: Set in the Sleeves

Fold each sleeve in half lengthwise to find the centre cap (the cast-on edge). Pin this centre point to the shoulder seam. Pin the sleeve cap edges to the armhole edges, easing the cap increases to fit the armhole curve.

Using backstitch, sew the sleeve into the armhole. Repeat for the second sleeve.

### Step 4: Seam the Sides & Underarms

Starting at the bottom of the waist rib, use mattress stitch to seam the Back to the Front Panels up both side seams, continuing up and closing the underarm sleeve seam in one continuous line from hem to sleeve opening.

*The Right Front Panel and Left Front Panel will overlap at the centre front. Do not seam them to each other at the centre front — leave the wrap open.*

**Tack the underlapping Right Front Panel** to the inside of the Left Front Panel at the waist level with a few stitches of yarn, or leave free for a fully adjustable wrap.

### Step 5: Thread the I-Cord

Find the **eyelet row** running across all three pieces (Back, Right Front, Left Front). Beginning at the **right side seam**, thread the i-cord through each eyelet hole in sequence: right side seam → across back eyelets → left side seam → across left front eyelets → across right front eyelets.

The i-cord should exit through the **last eyelet on the left front panel** (the neckline edge of the left panel). Both tails of the i-cord should emerge here, positioned at the **left side of the body**, to tie in a bow.

*If your eyelets are not perfectly aligned across seams, use a tapestry needle to run the cord through the fabric at the seam point to maintain the channel.*

Tie the i-cord in a generous bow. Trim ends if desired, or knot them to prevent fraying.

### Step 6: Weave In All Ends

Using a tapestry needle, weave in all yarn ends securely on the WS of the fabric. Give all seams a gentle press with a damp cloth if needed.

---

## SCHEMATIC (Measurements)

```
BACK                          SLEEVE
┌────────────────────┐        ┌───┐ ← Cap CO: 36(38,42,44) sts
│  Neck: 26(28,30,32)│        │   │   Increases out to elbow
│  ← Shoulder →     │        │   │   72(80,88,96) sts
│  22(25,28,31) sts  │        │   │ ← ELBOW MARKER
│                    │        │   │   Bell increases begin
│  Armhole: 20 cm    │        │   │
│                    │        │    \
│  Bodice: 18-20 cm  │        │     \
│  above eyelet      │        │      \
├────────────────────┤        │       \  ← Full bell
│  ~~eyelet row~~    │        └────────┘
│  Rib: 18-19 cm     │        136(144,152,160) sts
└────────────────────┘
 88(100,112,124) sts CO
```

---

## CARE INSTRUCTIONS

Wash gently by hand in cool water with a wool-friendly detergent, or machine wash on the delicate cycle in a mesh bag (if fibre content permits). Lay flat to dry, reshaping the ribbed waist and smoothing the bell sleeves. Do not tumble dry. Store folded, not hung, to preserve the shape of the knit.

---

## PATTERN QUICK REFERENCE

| | Size 1 | Size 2 | Size 3 | Size 4 |
|---|---|---|---|---|
| Back CO | 88 sts | 100 sts | 112 sts | 124 sts |
| Right Front CO | 44 sts | 50 sts | 56 sts | 62 sts |
| Left Front CO | 52 sts | 58 sts | 66 sts | 72 sts |
| Sleeve CO (cap top) | 36 sts | 38 sts | 42 sts | 44 sts |
| Sleeve at elbow | 72 sts | 80 sts | 88 sts | 96 sts |
| Sleeve at wrist (bell) | 136 sts | 144 sts | 152 sts | 160 sts |
| Waist rib rows | 58 rows | 58 rows | 61 rows | 61 rows |

---

*Pattern designed for intermediate knitters. Techniques used: long-tail cast-on, 2×2 rib, stocking stitch, eyelet row, m1L/m1R increases, k2tog/ssk decreases, i-cord, mattress stitch seaming, backstitch seaming.*

*© Arabesque Wrap Sweater — For personal use only.*

---
Disclaimer: This pattern was generated by AI and should be reviewed for accuracy before use. While we strive for quality, AI-generated content may contain errors. Please verify measurements, stitch counts, and instructions before beginning your project. Generated by purlJam.uk
Access your pattern anytime
Bookmark this page to access your pattern anytime