Type
Crochet
Difficulty
beginner
Category
amigurumi
AI Thinking Process
Planning
Verification
Pattern
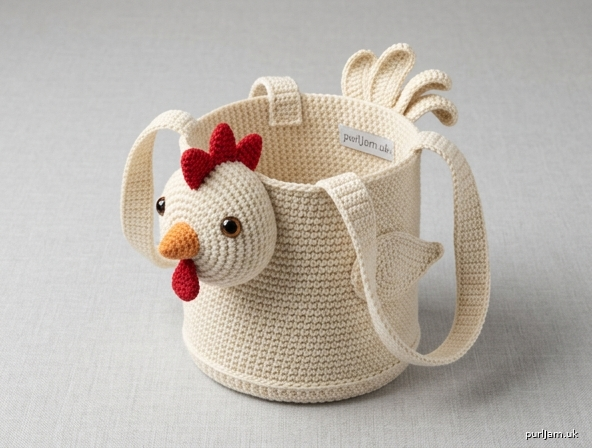
Simple Chicken Carrier
A beginner crochet tote bag
A small, sturdy chicken-shaped carrier worked in single crochet from simple shapes. The body is a hollow bag (not stuffed) so you can carry small items; a stuffed head, cone beak, comb, wings, and tail turn it into a hen. The 3.0 mm hook with worsted yarn creates a dense fabric that holds its shape with no lining.
Skill level: Beginner
Finished size: Bag body 4½" (11.5 cm) diameter × 5" (12.5 cm) tall, plus a 2½" (6.5 cm) head and 10" (25 cm) handles. Sitting height about 7" (18 cm) including the head.
Materials
- Worsted weight (medium / category 4) yarn
- MC (white or cream): 200 yd (183 m)
- CC1 (red): 20 yd (18 m)
- CC2 (orange): 10 yd (9 m)
- Tiny amount of black for embroidered eyes (if not using safety eyes)
- Hook: 3.0 mm (US D-3)
- Polyester fiberfill (head and beak only)
- Yarn needle
- Stitch marker
- Pins
- Scissors
- Optional: 2 safety eyes, 10–12 mm (insert before closing the head)
Note on hook size: 3.0 mm is smaller than the usual worsted hook. That tightness is intentional — it keeps stuffing (and small items) from showing and makes the bag stand up.
Gauge
24 sc and 28 rnds = 4" (10 cm) in single crochet, worked in the round.
Swatch: work Rnds 1–8 of the bag body and measure. At this gauge the 84-st round is 14" (35.5 cm) around (4½" / 11.5 cm diameter). A slightly different gauge only changes the bag size; it will still work.
Abbreviations (US)
- MR — magic ring
- ch — chain
- sl st — slip stitch
- sc — single crochet
- hdc — half double crochet
- dc — double crochet
- inc — 2 sc in the same stitch
- dec — single crochet 2 stitches together (invisible decrease optional)
- BLO — back loop only
- st(s) — stitch(es)
- rnd(s) — round(s)
- FO — fasten off
- MC / CC1 / CC2 — main color / contrast 1 / contrast 2
Pattern notes
- Bag, head, and beak are worked in continuous rounds. Do not join. Mark the first stitch of every round and move the marker up.
- Comb, tail feathers, and handles are worked in rows.
- Work firmly. If the fabric feels loose or holey, go down to 2.75 mm.
- Stuff the head and beak only. The bag body stays empty so it can carry things.
- Counts in [brackets] are the stitch total at the end of that round or row.
- Inline checks (✓) confirm the math for that round.
Bag body (MC)
Worked from the bottom up. Do not stuff.
Rnd 1: 6 sc in MR. [6]
Rnd 2: inc in each st around. [12] (6 increases → 6 + 6 = 12 ✓)
Rnd 3: (sc, inc) 6 times. [18] (6 increases → 12 + 6 = 18 ✓)
Rnd 4: (2 sc, inc) 6 times. [24] (6 increases → 18 + 6 = 24 ✓)
Rnd 5: (3 sc, inc) 6 times. [30] (6 increases → 24 + 6 = 30 ✓)
Rnd 6: (4 sc, inc) 6 times. [36] (6 increases → 30 + 6 = 36 ✓)
Rnd 7: (5 sc, inc) 6 times. [42] (6 increases → 36 + 6 = 42 ✓)
Rnd 8: (6 sc, inc) 6 times. [48] (6 increases → 42 + 6 = 48 ✓)
Rnd 9: (7 sc, inc) 6 times. [54] (6 increases → 48 + 6 = 54 ✓)
Rnd 10: (8 sc, inc) 6 times. [60] (6 increases → 54 + 6 = 60 ✓)
Rnd 11: (9 sc, inc) 6 times. [66] (6 increases → 60 + 6 = 66 ✓)
Rnd 12: (10 sc, inc) 6 times. [72] (6 increases → 66 + 6 = 72 ✓)
Rnd 13: (11 sc, inc) 6 times. [78] (6 increases → 72 + 6 = 78 ✓)
Rnd 14: (12 sc, inc) 6 times. [84] (6 increases → 78 + 6 = 84 ✓)
The circle should measure about 4½" (11.5 cm) across.
Rnd 15: sc in BLO around. [84]
This round folds the fabric up and makes a crisp bottom edge.
Rnds 16–45: sc around. [84]
(30 even rounds → 16 through 45 inclusive = 30 ✓)
Rnd 46: sc around, sl st in first sc to even the edge. [84]
FO, leaving a 12" (30 cm) tail for weaving in (or for tacking a handle). Weave in the starting tail on the inside.
Bag body is about 5" (12.5 cm) tall.
Head (MC)
Stuff as you go. Stuff firmly.
Rnd 1: 6 sc in MR. [6]
Rnd 2: inc in each st around. [12] (6 + 6 = 12 ✓)
Rnd 3: (sc, inc) 6 times. [18] (12 + 6 = 18 ✓)
Rnd 4: (2 sc, inc) 6 times. [24] (18 + 6 = 24 ✓)
Rnd 5: (3 sc, inc) 6 times. [30] (24 + 6 = 30 ✓)
Rnd 6: (4 sc, inc) 6 times. [36] (30 + 6 = 36 ✓)
Rnd 7: (5 sc, inc) 6 times. [42] (36 + 6 = 42 ✓)
Rnds 8–12: sc around. [42] (5 even rounds)
If using safety eyes, insert them now between Rnds 9 and 10, 7 stitches apart, and lock the washers on the inside.
Rnd 13: (5 sc, dec) 6 times. [36] (6 decreases → 42 − 6 = 36 ✓)
Rnd 14: (4 sc, dec) 6 times. [30] (36 − 6 = 30 ✓)
Rnd 15: (3 sc, dec) 6 times. [24] (30 − 6 = 24 ✓)
Rnd 16: (2 sc, dec) 6 times. [18] (24 − 6 = 18 ✓)
Stuff firmly, filling the top of the head well so it stays round.
Rnd 17: (sc, dec) 6 times. [12] (18 − 6 = 12 ✓)
Rnd 18: dec 6 times. [6] (12 − 6 = 6 ✓)
FO, leaving a 18" (45 cm) tail. Thread the tail through the remaining 6 sts, pull closed, and hide the end inside the head. The closed end is the bottom of the head (the side that will sit on the bag).
Beak (CC2)
Rnd 1: 4 sc in MR. [4]
Rnd 2: (sc, inc) 2 times. [6] (4 + 2 = 6 ✓)
Rnd 3: sc around. [6]
Rnd 4: (2 sc, inc) 2 times. [8] (6 + 2 = 8 ✓)
Rnd 5: sc around. [8]
FO, leaving a 12" (30 cm) tail. Stuff lightly. The open edge is sewn to the head.
Wattle (CC1)
Rnd 1: 6 sc in MR. [6]
Sl st in first sc. FO, leaving an 8" (20 cm) tail.
Flatten into a small teardrop. Do not stuff.
Comb (CC1) — make 3
Each piece is a small triangle.
Row 1: Ch 4, sc in 2nd ch from hook, hdc in next ch, dc in last ch. [3 sts]
FO, leaving an 8" (20 cm) tail.
Make 3. You will sew them in a row along the top of the head, tall points up.
Wings (MC) — make 2
Worked as a flat oval. Do not stuff.
Rnd 1: Ch 9, sc in 2nd ch from hook, sc in next 6 ch, 3 sc in last ch; rotate and work along the opposite side of the chain: sc in next 6 ch, 2 sc in the same ch as the first sc. [18] (7 + 3 + 6 + 2 = 18 ✓)
Rnd 2: inc, 6 sc, inc in next 3 sts, 6 sc, inc in next 2 sts. [24] (6 increases → 18 + 6 = 24 ✓)
Rnd 3: sc around. [24]
Sl st in first sc. FO, leaving an 18" (45 cm) tail for sewing.
Flatten each wing. The long, slightly pointed ends face backward when sewn on.
Tail feathers (MC) — make 3
Row 1: Ch 12, sl st in 2nd ch from hook, sc in next 2 ch, hdc in next 3 ch, dc in next 3 ch, hdc in next ch, sc in last ch. [11 sts]
FO, leaving a 10" (25 cm) tail.
The chain edge is the outer curve of the feather; the starting tail (the sl-st end) is the tip.
Handles (MC) — make 2
Worked flat in rows.
Row 1: Ch 6, sc in 2nd ch from hook and in each ch across. [5]
Rows 2–end: Ch 1, turn, sc in each st across. [5]
Repeat until the strap measures 10" (25 cm).
FO, leaving a 12" (30 cm) tail at each end (or weave in one end and use the other to sew).
Assembly
Pin every piece before sewing. Use matching yarn and a yarn needle. Whip stitch through the inside loops so seams stay neat.
1. Face
- Sew the beak to the front of the head, centered, covering Rnds 10–13, open edge against the head, point facing forward.
- Sew the wattle directly under the beak, hanging down.
- If you did not use safety eyes, embroider two small black ovals or satin-stitch circles on Rnd 9, 7 sts apart. Add a tiny white yarn highlight if you like.
- Optional: one small straight stitch of CC2 on each side of the beak for nostrils.
2. Comb
Sew the 3 comb triangles in a row along the top center of the head (Rnds 1–4 area), points up, slightly overlapping so they read as one comb. The middle triangle sits highest.
3. Head to bag
The bag opening is the top. Choose one side as the front.
Sew the bottom of the head to the outside front of the bag, just below Rnd 46, centered. The head should sit on the upper third of the bag so the comb rises above the rim and the opening stays usable. Stitch all the way around the base of the head so it cannot flop.
4. Wings
Pin one wing on each side of the bag, about halfway down, back-swept. The top of each wing sits near Rnd 30, the back tip toward the tail. Sew around the inner half of each wing, leaving the back tip free so it looks like a wing, not a patch.
5. Tail
On the back of the bag (opposite the head), sew the 3 feathers just below the rim, clustered, tips pointing up and out. Overlap them slightly at the base.
6. Handles
Treat the bag like a tote: two handles, left and right.
On each side, sew one end of a handle to the inside of Rnd 46, about 1" (2.5 cm) forward of the side, and the other end 1" (2.5 cm) back of the side, so each handle spans about 3–4" (7.5–10 cm). Repeat on the opposite side. Stitch each end down securely over 4–5 rows of the strap so the bag can take weight.
Check that the head is still centered between the two handles on the front.
Finishing
- Weave in every remaining end on the inside of the bag or inside the head.
- Shape the bag by pushing out Rnd 15 (the BLO ridge) so the bottom sits flat.
- Tug the comb and tail into place.
- Do not wash-agitate if you used safety eyes; spot clean.
The carrier is ready. It holds keys, a phone, small yarn, or (of course) a couple of pretend eggs.
Customizing
- Larger bag: Keep increasing 6 sts per round past Rnd 14 until the base is the width you want, then work even in that new count for 4–5" (10–12.5 cm).
- Chick version: Use yellow MC and skip the comb, or crochet a smaller 2-triangle comb.
- No safety eyes: Embroidered eyes are best if the bag will be used by young children.
- Stiffer handles: Work the handle rows through the back loop only, or fold each 5-st strap in half lengthwise and whip stitch the long edge closed into a cord.
Disclaimer: This pattern was generated by AI and should be reviewed for accuracy before use. While we strive for quality, AI-generated content may contain errors. Please verify measurements, stitch counts, charts, and instructions before beginning your project. Generated by purlJam.uk
Love this pattern?
Save this pattern to your free PurlJam libraryAccess your pattern anytime
Bookmark this page to access your pattern anytime