Type
Crochet
Difficulty
beginner
Category
amigurumi
AI Thinking Process
Planning
Verification
Pattern
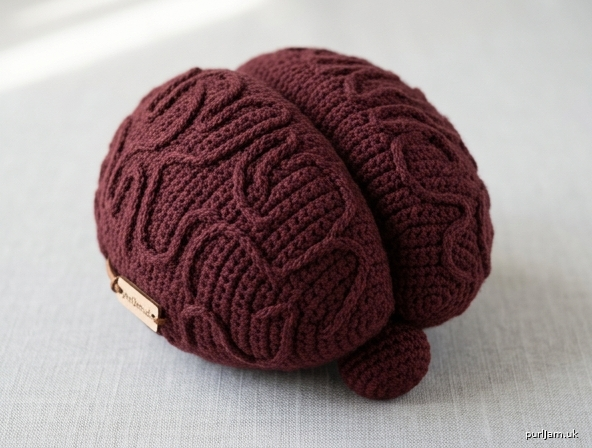
Simple Crochet Brain
Stylised amigurumi brain in dark maroon
A beginner-friendly desk toy worked from two simple ovoids. The pair is sewn together to form the left and right hemispheres, then covered with winding surface slip stitch to suggest gyri and sulci. An optional cerebellum (a tiny sphere) sits at the back. No facial features and no complex shaping — only double crochet, increases, decreases, stuffing, and sewing.
Skill level: Beginner
Techniques used: Magic ring, double crochet in the round, increase, invisible decrease, stuffing, whip stitch, surface slip stitch
Finished size
Approximately 9 cm wide × 7 cm long × 5 cm tall (3½ × 2¾ × 2 in) using worsted-weight yarn and a 3.5 mm hook. Size will vary with tension and stuffing.
Materials
- Dark maroon worsted-weight yarn (aran / 10-ply, CYC 4), approx. 40 g / 80 m (one 50 g ball is plenty). A shade one step darker is optional for the surface folds.
- 3.5 mm crochet hook (US E-4). Use 4 mm only if your fabric is already very tight.
- Polyester fibre filling
- Yarn needle
- Stitch marker
- Pins for assembly
- Scissors
Tension (gauge)
20 dc and 22 rnds = 10 × 10 cm (4 × 4 in) using 3.5 mm hook, or a firm fabric with no visible gaps.
Tension is not critical for fit, but the fabric must be dense so the filling does not show. If you see holes, go down a hook size. Do not worry if your brain is a centimetre larger or smaller.
Abbreviations (UK crochet terms)
| Abbrev. | Meaning |
|---|---|
| BLO | back loop only |
| ch | chain |
| dc | double crochet (US single crochet) |
| dc2tog | double crochet 2 together (decrease) |
| inc | 2 dc in next stitch (increase) |
| MR | magic ring (magic loop) |
| rnd(s) | round(s) |
| ss | slip stitch |
| st(s) | stitch(es) |
| yrh | yarn round hook |
This pattern is written in UK terms. UK dc = US sc.
Pattern notes
- Work in a continuous spiral. Do not join rounds and do not turn. Place a stitch marker in the first stitch of each round and move it up as you go.
- Magic ring alternative: If you prefer not to use a magic ring, ch 2, then work the number of dc given for Rnd 1 into the 2nd ch from the hook. Pull the starting tail tight to close the hole.
- Invisible decrease (recommended): Insert hook under the front loop only of the next st, then under the front loop only of the following st (3 loops on hook), yrh, pull through 2 loops, yrh, pull through remaining 2 loops. This sits flatter than a standard dc2tog.
- Stuff as you go, and stuff firmly. A brain that is under-stuffed looks saggy; over-stuffing at the “front” of each hemisphere helps the frontal lobes read clearly.
- The two hemispheres are identical. Count stitches at the end of every increase and decrease round.
- The surface folds are what turn two ovoids into a brain — do not skip them.
Hemisphere (make 2)
Using dark maroon, work in a spiral.
Rnd 1: 6 dc in MR. [6]
Pull the ring closed.
Rnd 2: inc in each st around. [12] (6 increases → 6 + 6 = 12 ✓)
Rnd 3: (1 dc, inc) 6 times. [18] (6 increases → 12 + 6 = 18 ✓)
Rnd 4: (2 dc, inc) 6 times. [24] (6 increases → 18 + 6 = 24 ✓)
Rnd 5: (3 dc, inc) 6 times. [30] (6 increases → 24 + 6 = 30 ✓)
Rnds 6–11: 1 dc in each st around. [30]
(6 even rounds)
Rnd 12: (3 dc, dc2tog) 6 times. [24] (6 decreases → 30 − 6 = 24 ✓)
Rnd 13: (2 dc, dc2tog) 6 times. [18] (6 decreases → 24 − 6 = 18 ✓)
Stuff firmly now, pushing filling into a slightly elongated egg shape. Add a little extra filling at one end — this will be the frontal lobe (the front of the brain). Flatten the side that will face inwards very slightly with your fingers so the two pieces nestle together later.
Rnd 14: (1 dc, dc2tog) 6 times. [12] (6 decreases → 18 − 6 = 12 ✓)
Add a last pinch of filling if needed. Do not stuff the opening so full that you cannot close it.
Rnd 15: dc2tog 6 times. [6] (6 decreases → 12 − 6 = 6 ✓)
Fasten off, leaving a 20 cm tail. Thread the tail onto a yarn needle, weave through the front loops of the remaining 6 sts, pull tight to close the hole, and weave in the end securely. Shape the piece in your hands: longer than it is tall, with one end a touch fuller than the other.
Make a second hemisphere to match. Aim for the same amount of filling in each.
Cerebellum (optional)
A small sphere sewn to the back underside makes the outline more recognisable. Skip this piece if you want the simplest possible version.
Using dark maroon:
Rnd 1: 6 dc in MR. [6]
Rnd 2: inc in each st around. [12] (6 increases → 6 + 6 = 12 ✓)
Rnd 3: (1 dc, inc) 6 times. [18] (6 increases → 12 + 6 = 18 ✓)
Rnds 4–5: 1 dc in each st around. [18]
Rnd 6: (1 dc, dc2tog) 6 times. [12] (6 decreases → 18 − 6 = 12 ✓)
Stuff firmly.
Rnd 7: dc2tog 6 times. [6] (6 decreases → 12 − 6 = 6 ✓)
Fasten off, close the hole as for the hemispheres, and leave a 25 cm tail for sewing.
Assembly
- Orient the hemispheres. Lay the two ovoids side by side on a table, fuller ends together at the front, closed ends (Rnd 15) toward the back and slightly down. The flatter sides should face each other. You should already see a walnut-like pair.
- Pin the join. Pin along the touching inner faces, starting about 1 cm in from the front and stopping about 1 cm from the back. Leave the very front (frontal poles) and the very back slightly separate so a groove — the longitudinal fissure — shows at both ends.
- Sew the medial faces. With dark maroon and a yarn needle, whip stitch or mattress stitch through the inner stitches only, about one-third of the way down from the top of each hemisphere. Sew a line 4–5 cm long. Pull the yarn snug as you go so the pieces sit tightly together and a deep valley forms down the centre. Do not sew them into one smooth ball — that valley is the most important shape on the toy.
- Cerebellum (if made). Pin the small sphere to the back underside, centred on the join and sitting a little lower than the hemispheres. Sew all around with the remaining tail, catching stuffing in so it does not shift.
Weave in remaining ends.
Surface texture (gyri and sulci)
This step is what makes it look like a brain. Use the same dark maroon (the stitches will catch the light and read as ridges) or a slightly darker leftover.
Surface slip stitch:
- Make a slip knot and hold it on the wrong side (or start by pulling a loop up from the inside of the toy so the starting knot is buried).
- Insert the hook from front to back through the fabric around a dc post, yrh, pull a loop through to the front.
- Insert the hook around a neighbouring stitch in the direction you want the line to travel, yrh, pull through the fabric and the loop on the hook (one loop remains).
- Continue, walking the hook in curved, irregular paths — never in a straight grid. Real brain folds wander, split, and loop back.
Where to work the lines:
- Cover each hemisphere with 8–12 winding paths.
- Let some lines run front to back, some loop in a C-shape, and some hug the centre groove.
- Keep a clear channel down the middle join (do not stitch over the fissure).
- On the outer sides, add a couple of deeper-looking folds by working two surface lines close together.
- If you made a cerebellum, add 3–4 short curved lines across it.
Do not pull the surface stitches tight or they will pucker the ovoids. They should sit on the fabric like piping. When a line has gone as far as you want, pull the yarn to the inside, weave it in, and start a new line elsewhere rather than spanning a long, empty stretch.
Stand back after every few lines. Stop when the surface looks wrinkled rather than striped.
Finishing
- Roll the brain gently between your palms to round any flat spots from sewing.
- Check that the centre groove is still deep; a couple of extra tacking stitches from the underside can deepen it if needed.
- Weave in every tail on the inside. There should be no loose ends on the surface.
- If the toy is a gift for a small child, sew the join and the cerebellum on extra firmly and check that no filling can escape.
Your brain is ready — a small, squashable maroon plush for a desk, a science shelf, or a Halloween bowl.
Quick reference — stitch counts
| Piece | Rounds | Stitch path | End |
|---|---|---|---|
| Hemisphere × 2 | 15 | 6–12–18–24–30, six even rnds at 30, then 24–18–12–6 | Close |
| Cerebellum × 1 (optional) | 7 | 6–12–18, two even rnds at 18, then 12–6 | Close |
All increase and decrease rounds use 6 shaping stitches, so every count stays divisible by 6.
Disclaimer: This pattern was generated by AI and should be reviewed for accuracy before use. While we strive for quality, AI-generated content may contain errors. Please verify measurements, stitch counts, charts, and instructions before beginning your project. Generated by purlJam.uk
Love this pattern?
Save this pattern to your free PurlJam libraryAccess your pattern anytime
Bookmark this page to access your pattern anytime