Type
Crochet
Difficulty
beginner
Category
amigurumi
AI Thinking Process
Planning
Verification
Pattern
Simple Fish Plushie
Beginner amigurumi • Crochet toy
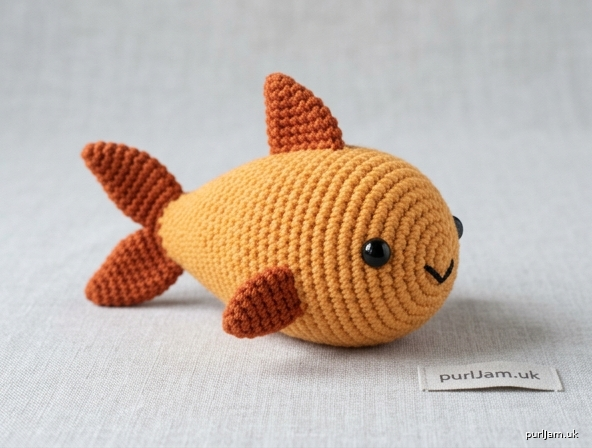
A chubby little fish worked from basic shapes: a rounded head that tapers to a closed tail, with flat triangle fins sewn on. Uses only single crochet, increases, and decreases—perfect as a first stuffed toy.
Skill level: Beginner
Finished size: About 4½" (11.5 cm) long including tail × 2" (5 cm) tall including dorsal fin, with worsted yarn at given gauge.
Materials
- Worsted weight (4) yarn
- Main color (MC, body): 50 yd (46 m)
- Contrast color (CC, fins): 20 yd (18 m)
Suggested: acrylic or cotton-acrylic (e.g. goldfish orange MC with darker orange or white CC; teal MC with navy CC)
- Hook: US E-4 (3.5 mm), or a hook 1–2 sizes smaller than the yarn label so fabric is dense
- Polyester fiberfill stuffing
- Yarn needle
- Stitch marker
- Optional: 6 mm or 8 mm safety eyes (pair)
- Optional: black embroidery floss or scrap yarn for mouth
- Scissors; pins for assembly
Safety note: Do not use safety eyes on toys for children under 3 years. Embroider eyes instead.
Gauge
6 sc and 6 rnds = 1" (2.5 cm) in single crochet, worked tightly in the round.
Gauge is a density check, not a fit check. You should not see stuffing through the stitches. If the fabric is loose or holey, go down a hook size.
Abbreviations (US)
- ch — chain
- sc — single crochet
- inc — increase (2 sc in the same stitch)
- dec — decrease (sc2tog; invisible decrease preferred)
- sc2tog — single crochet 2 stitches together
- sc3tog — single crochet 3 stitches together
- st(s) — stitch(es)
- rnd(s) — round(s)
- MR — magic ring (adjustable ring)
- FO — fasten off
- MC / CC — main color / contrast color
- [ ] — stitch count at end of round or row
Pattern Notes
- Body is worked in continuous spirals (do not join or chain up). Mark the first stitch of every round and move the marker up as you go.
- Work tightly for a smooth amigurumi surface.
- Use an invisible decrease (insert hook in front loops only of next 2 sts, yarn over, pull through both, yarn over, pull through 2) for a smoother taper.
- Stuff as you go. Add filling before the opening is smaller than 12 stitches; pack the head firmly and the tail end a little lighter so it tapers.
- Fins are worked flat, turning rows. The chain-1 at the start of a row does not count as a stitch.
- Leave long yarn tails (8–10" / 20–25 cm) on every fin for sewing.
- Parenthetical checks (e.g. 6 inc → 6 + 6 = 12 ✓) confirm the count; work the stitches, then confirm you have the number in brackets.
Body (MC)
Worked from the nose toward the tail, in continuous rounds.
Rnd 1: 6 sc in magic ring. [6]
Rnd 2: Inc in each st around. [12] (6 inc → 6 + 6 = 12 ✓)
Rnd 3: (Sc, inc) around. [18] (6 inc → 12 + 6 = 18 ✓)
Rnd 4: (2 sc, inc) around. [24] (6 inc → 18 + 6 = 24 ✓)
Rnd 5: (3 sc, inc) around. [30] (6 inc → 24 + 6 = 30 ✓)
If using safety eyes, insert them now between Rnds 4 and 5, about 7 stitches apart, centered on the face. Do not snap the washers until you like the placement.
Rnds 6–11: Sc around. [30] (6 even rounds ✓)
Rnd 12: (3 sc, dec) around. [24] (6 dec → 30 − 6 = 24 ✓)
Rnds 13–14: Sc around. [24]
Rnd 15: (2 sc, dec) around. [18] (6 dec → 24 − 6 = 18 ✓)
Rnds 16–17: Sc around. [18]
Stuff the head and body firmly. Keep adding stuffing through the next two rounds.
Rnd 18: (Sc, dec) around. [12] (6 dec → 18 − 6 = 12 ✓)
Rnd 19: Sc around. [12]
Add a last bit of stuffing in the tail end—enough to fill, not enough to bulge.
Rnd 20: Dec around. [6] (6 dec → 12 − 6 = 6 ✓)
FO, leaving a 8" (20 cm) tail. Thread the tail through the front loops of the remaining 6 sts, pull snug to close the hole, and weave in. The closed end is the tail base.
Tail Fins (make 2, CC)
Worked flat.
Ch 7.
Row 1: Sc in 2nd ch from hook and in each ch across. [6]
Row 2: Ch 1, turn, sc2tog, sc in next 2 sts, sc2tog. [4] (2 dec → 6 − 2 = 4 ✓)
Row 3: Ch 1, turn, sc2tog, sc2tog. [2] (2 dec → 4 − 2 = 2 ✓)
Row 4: Ch 1, turn, sc2tog. [1]
FO, leaving a long tail for sewing. The foundation-chain edge (Row 1, 6 sts wide) is the edge that sews to the body.
Dorsal Fin (make 1, CC)
Top fin. Worked flat.
Ch 8.
Row 1: Sc in 2nd ch from hook and in each ch across. [7]
Row 2: Ch 1, turn, sc2tog, sc in next 3 sts, sc2tog. [5] (2 dec → 7 − 2 = 5 ✓)
Row 3: Ch 1, turn, sc2tog, sc in next st, sc2tog. [3] (2 dec → 5 − 2 = 3 ✓)
Row 4: Ch 1, turn, sc3tog. [1]
FO, leaving a long tail for sewing. Sew along the 7-st foundation edge.
Pectoral Fins (make 2, CC)
Side fins. Worked flat.
Ch 5.
Row 1: Sc in 2nd ch from hook and in each ch across. [4]
Row 2: Ch 1, turn, sc2tog, sc2tog. [2] (2 dec → 4 − 2 = 2 ✓)
Row 3: Ch 1, turn, sc2tog. [1]
FO, leaving a long tail for sewing. Sew along the 4-st foundation edge.
Assembly
Pin every piece before you sew. Use the yarn tails and a yarn needle; whip stitch through both loops of the fin edge and into the body, catching enough fabric so the fin stands up. Weave in as you go.
-
Tail (forked): Hold the two tail fins with their wide (6-st) edges against the closed tail end of the body. Angle them into a V (slightly overlapping at the center, fanning out behind). Sew each wide edge firmly to Rnds 19–20. A few extra stitches through the inner corners keep the fork from splitting.
-
Dorsal fin: Center it along the top midline. Sew the 7-st edge from about Rnd 8 to Rnd 14, with the point aiming up and slightly toward the tail.
-
Pectoral fins: Sew one on each side, just below the eye line, around Rnds 7–8. Points should angle slightly backward (toward the tail), like swimming fins. Check both sides from the front so they sit at the same height.
-
Eyes (if not using safety eyes): With black yarn or floss, stitch two small satin-stitch ovals or French knots on Rnd 4, 7 sts apart. Add a tiny white highlight stitch on each if you like.
-
Mouth (optional): With black or dark yarn, embroider a short curved line or a tiny V on Rnd 2–3, centered below the eyes.
Finishing
- Weave in every remaining end on the inside or under a fin.
- Roll the body gently between your palms to even out the stuffing.
- If a fin flops, add a second pass of stitches along the same edge, pulling just snug (not so tight that the body puckers).
Optional extras (still beginner)
- Stripes: Carry a second color and work 2–3 even body rounds in CC, or add surface slip-stitch lines after assembly.
- One-color fish: Make body and fins in MC.
- Keychain size: Stop increasing at Rnd 3 [18], work 4 even rounds, then decrease 18 → 12 → 6. Use the same small pectoral fins; skip the dorsal or work the pectoral triangle for the tail.
- Stress-ball stuffing: Pack the body very firmly through Rnd 17; keep the tail end only moderately filled so the shape still tapers.
Your fish is done. Swim it across a shelf, gift it, or make a whole school in different colors.
Disclaimer: This pattern was generated by AI and should be reviewed for accuracy before use. While we strive for quality, AI-generated content may contain errors. Please verify measurements, stitch counts, charts, and instructions before beginning your project. Generated by purlJam.uk
Love this pattern?
Save this pattern to your free PurlJam libraryAccess your pattern anytime
Bookmark this page to access your pattern anytime