Type
Crochet
Difficulty
beginner
Category
amigurumi
AI Thinking Process
Planning
Verification
Pattern
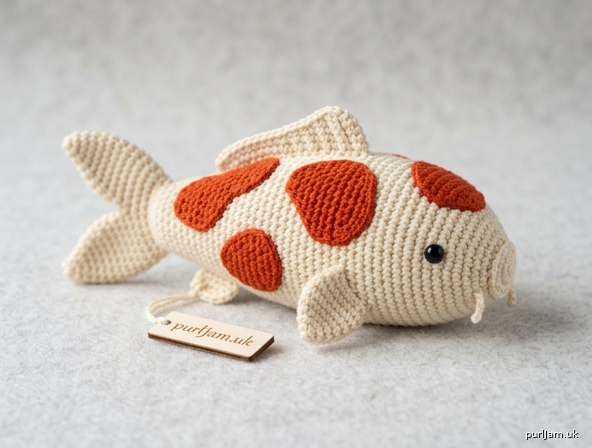
Cream Koi Fish Plush
Beginner Amigurumi — Simple Shapes
A plump little Kohaku-style koi (cream body, orange patches) worked from basic amigurumi shapes: a tapered spiral body plus flat fins. Only single crochet, increases, and decreases are required for the body; fins add a few half double and double crochets in short rows. Perfect as a desk toy, baby-safe plush (if you embroider the eyes), or a first “almost-animal” project.
Skill level: Beginner
Finished size: About 6" (15 cm) long including tail, 2" (5 cm) tall at the body, using worsted yarn and a US E-4 (3.5 mm) hook.
Materials
Yarn — Worsted weight (category 4), acrylic or cotton
- MC (cream, white, or pale yellow): 45 yd (41 m)
- CC (orange, red-orange, or gold): 15 yd (14 m)
- Black: a few yards for eyes and mouth (skip if using safety eyes)
Hook: US E-4 / 3.5 mm (go down 1–2 sizes from the yarn label for a tight fabric). US G-6 / 4.0 mm makes a slightly larger, softer toy.
Notions
- Polyester fiberfill
- Yarn needle
- Stitch marker
- 6 mm safety eyes (optional; not for children under 3)
- Pins for assembly
- Scissors
Yardage note: One standard 3.5 oz (100 g) skein of MC is more than enough; CC is a scrap amount.
Gauge
5 sc and 5 rnds = 1" (2.5 cm) in single crochet, worked tightly in the round.
Gauge is not critical for this toy, but a firm fabric (stuffing should not show through) is. If your fabric is loose, drop a hook size.
Abbreviations (US)
| Abbreviation | Meaning |
|---|---|
| ch | chain |
| sc | single crochet |
| inc | increase — 2 sc in the same stitch |
| dec | invisible decrease (sc2tog through front loops) |
| hdc | half double crochet |
| dc | double crochet |
| sl st | slip stitch |
| st(s) | stitch(es) |
| rnd(s) | round(s) |
| MR | magic ring |
| FO | fasten off |
| MC / CC | main color / contrast color |
| [ ] | stitch count at end of round or row |
Pattern Notes
- Body is worked in a continuous spiral (do not join rounds). Mark the first stitch of every round and move the marker up.
- Use the invisible decrease for a smooth surface.
- Work tightly. Amigurumi looks crisp when the stitches sit close together.
- Stuff as you go. It is hard to fill the snout and tail after they close.
- Stuff the body slightly flattened (oval in cross-section), not like a ball — koi are disc-shaped, not round.
- Color changes are not required. Orange markings are small circles sewn on at the end.
- Safety eyes go in before the body opening is smaller than your finger. Embroidered eyes are the child-safe option.
Body
With MC, work from snout to tail.
Rnd 1: 6 sc in MR. [6]
Rnd 2: inc in each st around. [12] (6 increases → 6 + 6 = 12 ✓)
Rnd 3: (sc, inc) around. [18] (6 increases → 12 + 6 = 18 ✓)
Rnd 4: (2 sc, inc) around. [24] (6 increases → 18 + 6 = 24 ✓)
Rnd 5: (3 sc, inc) around. [30] (6 increases → 24 + 6 = 30 ✓)
Place a marker between Rnds 4 and 5 to remember the eye line.
Rnds 6–15: sc around. [30] (10 even rounds ✓)
Eye placement (do this during Rnds 6–8, before the body gets long): Insert 6 mm safety eyes between Rnds 4 and 5, 7 stitches apart, centered on what will be the face. If embroidering eyes instead, skip this and add them after assembly.
Rnd 16: (3 sc, dec) around. [24] (6 decreases → 30 − 6 = 24 ✓)
Rnds 17–18: sc around. [24]
Rnd 19: (2 sc, dec) around. [18] (6 decreases → 24 − 6 = 18 ✓)
Rnds 20–21: sc around. [18]
Stuff the head and body firmly now, keeping the shape a little flattened from side to side. Add stuffing in small pinches so the snout stays round and the belly is smooth.
Rnd 22: (sc, dec) around. [12] (6 decreases → 18 − 6 = 12 ✓)
Rnd 23: sc around. [12]
Add the last of the stuffing, filling the tail taper so it does not collapse.
Rnd 24: (sc, dec) 4 times. [8] (4 decreases → 12 − 4 = 8 ✓)
FO, leaving a 12" (30 cm) tail. Thread the tail through the remaining 8 stitches, pull closed, and weave in. The closed end is where the tail fin sits.
Tail Fin (make 2 lobes)
Koi have a forked caudal fin. Two matching lobes are sewn together at the base, then attached to the body.
With MC (or CC if you want a tipped tail), worked flat in rows.
Row 1: Ch 9, sc in 2nd ch from hook and in each ch across. [8]
Row 2: Ch 1, turn, inc, sc 6, inc. [10] (2 increases → 8 + 2 = 10 ✓)
Row 3: Ch 1, turn, sc across. [10]
Row 4: Ch 1, turn, inc, sc 8, inc. [12] (2 increases → 10 + 2 = 12 ✓)
Row 5: Ch 1, turn, sc across. [12]
FO, leaving a 10" (25 cm) tail for sewing.
Make the second lobe identical.
Dorsal Fin (top)
With MC.
Ch 10. Working in the 2nd ch from the hook and across:
sl st, sc, hdc, dc, dc, dc, hdc, sc, sl st. [9]
FO, leaving an 8" (20 cm) tail. The chain edge is the edge you sew to the back.
Pectoral Fins (make 2, sides)
With MC.
Ch 7. Working in the 2nd ch from the hook and across:
sc, hdc, dc, dc, hdc, sc. [6]
FO, leaving an 8" (20 cm) tail.
Anal Fin (underside, near tail)
With MC.
Ch 6. Working in the 2nd ch from the hook and across:
sc, hdc, dc, hdc, sc. [5]
FO, leaving an 8" (20 cm) tail.
Barbels (make 2, optional whiskers)
Koi have small whiskers at the corners of the mouth. These are tiny and beginner-friendly.
With MC.
Ch 5, sl st in 2nd ch from hook and in each remaining ch. [4 sl st]
FO, leaving a 6" (15 cm) tail. Make 2.
Orange Markings (make 4–6 patches)
Classic Kohaku koi are cream with irregular red-orange blotches. These little circles are sewn on and gently flattened into ovals.
Small (make 2–3) — with CC
Rnd 1: 6 sc in MR. [6]
Rnd 2: (sc, inc) 3 times. [9] (3 increases → 6 + 3 = 9 ✓)
FO, leaving a 10" (25 cm) tail.
Medium (make 2–3) — with CC
Rnd 1: 6 sc in MR. [6]
Rnd 2: inc in each st around. [12] (6 increases → 6 + 6 = 12 ✓)
FO, leaving a 10" (25 cm) tail.
Do not stuff the patches. They sew on flat.
Assembly
Pin every piece before you sew. A koi looks “right” when the fins are mirrored and the tail sits on the centerline.
1. Tail fin. Stack the two lobes with wrong sides together. With the yarn tails, sew the narrow (Row 1) edges together for about ½" (1.5 cm) to form a fork. Spread the two lobes into a V. Sew the joined base over the closed tail end of the body, covering the fastened-off hole. The lobes should fan up and out, not hang straight down.
2. Dorsal fin. Pin along the top centerline, starting near Rnd 8 and running toward the tail (the taller dc section sits in the middle of the back). Sew the chain edge down with small stitches.
3. Pectoral fins. Pin one on each side at Rnds 7–8, just behind the eye line, angled slightly back and down. Sew the chain edge to the body.
4. Anal fin. Pin on the underside, centered, near Rnds 20–22 (the tail taper). Sew the chain edge down.
5. Barbels. Sew one on each side of the snout, at the corners of where the mouth will sit (about Rnd 2), so they stick forward and slightly down.
6. Face.
- If you used safety eyes, they are already in.
- If embroidering: with black, make two small satin-stitch ovals or French knots on Rnds 4–5, 7 stitches apart. Add a tiny white or cream highlight stitch on each eye if you like.
- Mouth: with black, embroider a short shallow V or a 2–3 stitch straight line over Rnd 1.
7. Koi patches. Flatten each CC circle into a soft oval. Pin 4–6 patches along the back and sides — typical Kohaku placement is one large blotch over the head/shoulder, one or two on the back, and a smaller one near the tail, with cream still showing between them. Do not cover the whole fish; the white “net” of MC is what makes it read as a koi. Sew around the edge of each patch with CC, catching the body stitches underneath. A few patches that wrap slightly onto the belly look natural.
8. Weave in every remaining end, burying them inside the body.
Finishing
Steam is not needed. Smooth the fins with your fingers so they stand away from the body. If a fin flops, a couple of extra tacking stitches at the base will perk it up.
Color variations (same pattern)
- Solid orange koi: work the entire body and fins in CC; skip the patches or add a few cream ones.
- Showa / Sanke (calico): add 2–3 tiny black patches (same as the small orange patch) on top of the orange and cream.
- Gold koi: use gold or mustard worsted for MC and skip the patches.
Care
Spot clean or hand wash cold, squeeze (do not wring), and air dry. If you used safety eyes, do not machine wash.
Quick Reference — Stitch Counts
| Piece | Start | Max / end | Notes |
|---|---|---|---|
| Body | 6 in MR | 30, then close to 8 | 24 rounds, snout → tail |
| Tail lobe × 2 | ch 9 → 8 sc | 12 | 5 rows, sewn into a fork |
| Dorsal | ch 10 | 9 shaped sts | 1 row |
| Pectoral × 2 | ch 7 | 6 shaped sts | 1 row each |
| Anal | ch 6 | 5 shaped sts | 1 row |
| Barbel × 2 | ch 5 | 4 sl st | optional |
| Small patch | 6 in MR | 9 | 2–3 pieces |
| Medium patch | 6 in MR | 12 | 2–3 pieces |
Body math check: 6 → 12 → 18 → 24 → 30 (Rnds 1–5); even at 30 (Rnds 6–15 = 10 rnds); 30 → 24 → 18 → 12 → 8 (Rnds 16–24). All even-round counts hold. ✓
Disclaimer: This pattern was generated by AI and should be reviewed for accuracy before use. While we strive for quality, AI-generated content may contain errors. Please verify measurements, stitch counts, charts, and instructions before beginning your project. Generated by purlJam.uk
Love this pattern?
Save this pattern to your free PurlJam libraryAccess your pattern anytime
Bookmark this page to access your pattern anytime