Type
Crochet
Difficulty
beginner
Category
amigurumi
AI Thinking Process
Planning
Verification
Pattern
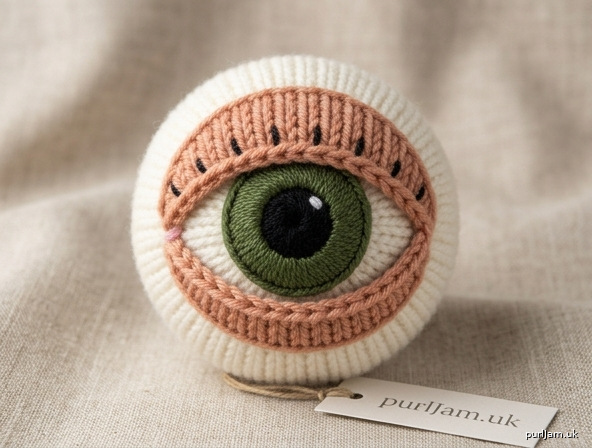
Loom Knit Plush Eye with Eyelids
Beginner · Soft toy / simple shape · Worsted weight
A round stuffed eyeball with a colored iris, dark pupil, and separate upper and lower eyelids you sew in place (open, half-lidded, or “winking”). Uses only e-wrap knit on a small round loom—no purling, no figure-eight wrap required.
Finished Size
About 2¾–3½ in (7–9 cm) wide after stuffing, depending on loom peg spacing and how firmly you stuff.
Gauge
About 5 sts and 7 rows = 1 in (2.5 cm) in e-wrap knit in the round on a round loom with ~⅜ in (1 cm) peg spacing.
Exact gauge is not critical; work firmly so stuffing does not show.
Materials
- Yarn (worsted weight / category 4), acrylic or cotton blend recommended:
- Color A (sclera / white): ~25 yd (23 m)
- Color B (iris): ~8 yd (7 m) — blue, green, brown, hazel, etc.
- Color C (pupil / lashes optional): ~5 yd (5 m) black or very dark brown
- Color D (eyelids / skin or fantasy color): ~15 yd (14 m)
- Small round loom, 24 pegs (common 3½–4 in / 9–10 cm diameter loom with ~⅜ in spacing). A 12-peg extra-small loom also works for a keychain size (see Size Notes).
- Loom hook / pick
- Yarn needle
- Stitch markers or scrap yarn scrap to mark round beginning
- Polyester fiberfill
- Optional: 12–14 mm safety eye (pupil) or black felt circle; embroidery needle
- Optional: small amount of pink yarn for inner corner detail
- Scissors
Child safety: If the toy is for a child under 3, do not use safety eyes or hard beads—embroider the pupil and iris only and sew all parts very securely.
Abbreviations (US loom knit)
- CO: cast on
- EW: e-wrap knit (wrap peg clockwise or in your usual e-wrap direction, then lift bottom loop over)
- st(s): stitch(es) / peg(s) in work
- rnd(s): round(s)
- row(s): flat row(s)
- BO: bind off
- rep: repeat
- wyib / carry: carry unused color loosely on wrong side when noted
Loom Notes for Beginners
- Work e-wrap knit only. Keep wraps snug but not tight enough to fight the hook.
- Mark peg 1 with a stitch marker; that is the start of every round.
- Stuff as directed—once the opening is small, stuffing is hard to adjust.
- “Gather close” means: cut yarn leaving a 12 in (30 cm) tail, thread tail on yarn needle, take the live loop off each peg and run the tail through every loop, pull tight like a drawstring, and secure.
Pattern
Eyeball (Color A – white)
Using the 24-peg round loom and Color A:
CO 24 sts with e-wrap cast-on (1 loop per peg). Join to work in the round; be careful not to twist. Place marker at peg 1.
Rnds 1–14: EW around (24 sts).
(About 2 in / 5 cm of tube—adjust 12–16 rnds if your row gauge differs.)
Shape top (optional gentle crown):
Rnd 15: EW around (24).
Do not remove work yet.
Stuff the tube firmly into a round ball shape, pushing fill toward the cast-on edge. Add more fill than you think you need; the ball should be plump and round.
Close top:
Gather all 24 live loops with the working yarn tail. Pull tight. Weave through the gathered stitches a second time. Secure and weave in end.
Close bottom (cast-on edge):
Thread a new 12 in (30 cm) length of Color A. Weave through the cast-on loops all the way around, pull to gather, and close the hole. Add a last bit of stuffing if needed before fully closing. Secure. Shape with hands into a smooth sphere.
(Stitch math: 24 sts gathered → closed sphere ✓)
Set eyeball aside.
Iris (Color B)
Option A – Embroidered iris (easiest, recommended for true beginners)
With Color B and yarn needle, embroider a filled circle on the front of the eyeball about 1–1¼ in (2.5–3 cm) across using satin stitch or tightly packed straight stitches. Center it on one “face” of the sphere.
Option B – Small knit disc (still beginner)
On the same 24-peg loom, use only 12 consecutive pegs as a small flat panel (or use a 12-peg loom):
With Color B, CO 12, work flat.
Rows 1–6: EW across, turning at each end (wrap the end pegs firmly).
BO. Coil/gather the piece into a flat circle ~1–1¼ in (2.5–3 cm), stitch edges under, and sew centered on the eyeball.
Pupil (Color C)
- Embroider a solid black circle in the center of the iris, about ⅜–½ in (1–1.3 cm) across, or
- Install a 12–14 mm safety eye through the iris and into the stuffed ball before you fully commit if using a washable eye (follow manufacturer backing), or
- Cut a small felt circle and sew down securely.
Optional: add a tiny white straight stitch “catchlight” on the pupil for a shiny look.
Upper Eyelid (Color D)
Worked flat on the loom using 14 pegs (leave other pegs empty).
With Color D:
CO 14 sts (e-wrap). Work flat.
Rows 1–5: EW across (14 sts).
Row 6 (optional slight curve): EW2tog at each end once by moving the end loop onto the neighboring peg and knitting them together as one, then EW across — 12 sts remain.
Rows 7–8: EW across (12).
BO loosely in pattern, leaving a 18 in (45 cm) tail for sewing.
Make the BO edge the lash line (front edge that sits nearest the iris). The CO edge sits toward the back of the eyeball.
Lower Eyelid (Color D)
Slightly narrower/shorter than the upper lid.
With Color D:
CO 12 sts on the loom (flat).
Rows 1–4: EW across (12 sts).
Row 5: Optional EW2tog each end → 10 sts.
Row 6: EW across (10).
BO loosely, leaving a long tail for sewing.
Optional Lashes (Color C)
With Color C, embroider short straight stitches or tiny chain loops along the BO edge of the upper eyelid only. Keep lashes short for a toy look (¼ in / 6 mm). Skip for a smooth cartoon eye.
Assembly
- Position lids: Place the eyeball so the iris faces you. Pin the upper eyelid in an arc covering the top third of the iris (or higher for a wide-awake look; lower for sleepy). Pin the lower eyelid along the bottom rim of the iris. Ends of upper and lower lids should meet (or slightly overlap) at the inner and outer corners.
- Sew lids: With the long tails (or matching Color D), whipstitch each lid to the eyeball along the back (CO) edge and lightly tack the corners. Do not sew the front (lash) edge down flat if you want dimension—leave it free so the lid has a small overhang.
- Corners: Take 1–2 tiny stitches at inner and outer corners so lids meet cleanly. Optional: one small pink stitch at the inner corner for a tear-duct hint.
- Expression presets:
- Open: lids rest at top and bottom edges of iris.
- Half-lidded: bring upper lid down to cover upper third–half of iris before sewing.
- Wink: omit or fold lower lid and sew upper lid covering most of that eye (make a second eye open if you pair them).
- Weave in all ends through the stuffing. Smooth lids with your fingers.
Finishing
- Roll the eye between your palms to round it.
- If white yarn peeks through lids, take a few invisible tacking stitches.
- Optional back loop: crochet or braid a short chain of Color A and sew to the back for a charm/keychain (supervise use).
- Spot clean; if all acrylic, gentle machine wash in a bag on cold and air dry only if you embroidered (not glued) details.
Size Notes
| Loom | CO (eyeball) | Typical finished width | Best for |
|---|---|---|---|
| 24-peg round | 24 | ~3 in (7.5 cm) | Standard plush eye |
| 12-peg mini | 12; work ~10–12 rnds | ~1½–2 in (4–5 cm) | Keychain / doll |
| 36-peg (bulkier look) | 36; add 4–6 extra even rnds | ~4 in (10 cm) | Oversized prop |
For 12-peg mini: gather close the same way; iris ~¾ in (2 cm); upper lid CO 8–10, lower CO 6–8.
Inline Count Validation (summary)
- Eyeball: CO 24 → 14 even rnds at 24 sts → gather 24 = closed sphere ✓
- Upper lid: CO 14 → optional dec to 12 → BO ✓
- Lower lid: CO 12 → optional dec to 10 → BO ✓
- Iris target diameter ~⅓ of ball width so lids frame it cleanly ✓
Tips for Success
- Even e-wrap tension = rounder ball. If the tube flares, you are wrapping too loose.
- Stuff in small pinches; overstuff slightly before final gather.
- Pin lids, step back, and check both corners before permanent sewing.
- Pair two eyes with mirrored lid angles for a character face; sew onto a larger loom-knit or sewn head.
Enjoy your loom-knit eye—open, sleepy, or winking!
Disclaimer: This pattern was generated by AI and should be reviewed for accuracy before use. While we strive for quality, AI-generated content may contain errors. Please verify measurements, stitch counts, charts, and instructions before beginning your project. Generated by purlJam.uk
Love this pattern?
Save this pattern to your free PurlJam libraryAccess your pattern anytime
Bookmark this page to access your pattern anytime