Type
Crochet
Difficulty
intermediate
Category
amigurumi
AI Thinking Process
Planning
Verification
Pattern
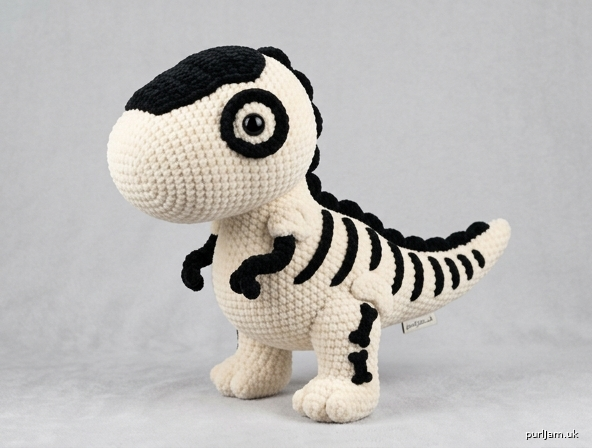
Kawaii Skeleton T-Rex Plush Amigurumi
Intermediate Crochet Pattern
A squishy, huggable T-Rex worked in super bulky plush chenille. Oversized rounded head (approximately half total length), short chunky body, stubby legs for stable four-limb stance, tiny arms, and gently curved tapering tail. Cream base with raised 3D black skeleton markings for a cute bony look.
Finished Size: Approximately 11 inches (28 cm) long × 7 inches (18 cm) tall when standing.
Difficulty: Intermediate (continuous rounds, invisible decreases, appliqué sewing, shaping)
Materials
- Super bulky weight (6) plush chenille yarn:
- Main Color (MC): Cream/off-white – 150 g / 5.3 oz
- Contrast Color (CC): Black – 50 g / 1.8 oz
- Crochet hook: US L/11 (8 mm) – or size needed to obtain gauge (go down if stitches are loose)
- Two 10 mm black safety eyes
- Polyester fiberfill stuffing
- Yarn needle
- Stitch marker
- Scissors
- Optional: fabric glue for securing bone ends (in addition to sewing)
Gauge
9 sc × 9 rnds = 4 inches (10 cm) in continuous sc spiral with 8 mm hook. Gauge is important for a dense fabric that holds stuffing and keeps the plush firm yet squishy. Adjust hook size if needed.
Abbreviations (US Terms)
- MR: magic ring (adjustable ring)
- sc: single crochet
- inc: increase (2 sc in same stitch)
- dec: invisible decrease (insert hook in FLO of next 2 sts, yo, pull through both, yo, pull through all 3 loops)
- st(s): stitch(es)
- rnd(s): round(s)
- FLO: front loop only
- BLO: back loop only
- ch: chain
- sl st: slip stitch
- [ ]: total stitch count at end of rnd
- ( ): work instructions in parentheses as a set
-
- *: repeat instructions between asterisks
Pattern Notes
- Work in continuous spiral rounds unless stated. Do not join at end of rnds. Use stitch marker to mark first st of each rnd and move it up.
- Keep stitches tight for dense fabric.
- Stuff firmly as you go, especially head and body, before openings become too small. Legs and arms are stuffed lightly to moderately.
- All skeleton bones are worked separately in CC and sewn on raised for 3D texture after base pieces are complete but before final assembly where noted.
- Invisible decrease is used throughout for smooth shaping.
- The neck is extremely short and is formed by continuing directly from head decreases into body increases so the transition is seamless.
- Final silhouette is compact, rounded, and symmetrical with no sharp edges.
HEAD (MC)
Worked from snout toward back of head. Creates almost-spherical shape with slightly flattened snout and wide forehead.
Rnd 1: 6 sc in MR [6] Rnd 2: inc in each st around [12] Rnd 3: (sc, inc) around [18] Rnd 4: (2 sc, inc) around [24] Rnd 5: (3 sc, inc) around [30] Rnd 6: (4 sc, inc) around [36] Rnds 7–12: sc in each st around [36] (6 rnds for height and forehead) Rnd 13: (4 sc, dec) around [30] Rnd 14: (3 sc, dec) around [24]
Insert 10 mm safety eyes between Rnds 8 and 9, spaced approximately 8 sts apart and centered on the face. The large rounded eye-socket bones (crocheted later) will frame them.
Begin stuffing firmly. Continue stuffing as you close. Rnd 15: (2 sc, dec) around [18] Rnd 16: (sc, dec) around [12] Rnd 17: dec around [6] Fasten off, leaving a 12-inch (30 cm) tail. Thread tail through remaining 6 sts and pull tight to close. Weave in end. Head measures approximately 5 inches (13 cm) diameter.
BODY (MC)
Worked from tail-end forward, creating short oval shape with full rounded belly. The final rnds form the ultra-short neck that blends directly into the head.
Rnd 1: 6 sc in MR [6] Rnd 2: inc in each st around [12] Rnd 3: (sc, inc) around [18] Rnd 4: (2 sc, inc) around [24] Rnd 5: (3 sc, inc) around [30] Rnd 6: (4 sc, inc) around [36] Rnd 7: (5 sc, inc) around [42] Rnds 8–14: sc in each st around [42] (7 rnds for chunky oval belly length) Rnd 15: (5 sc, dec) around [36] Rnd 16: (4 sc, dec) around [30] Rnd 17: (3 sc, dec) around [24]
Stuff body very firmly, shaping a full rounded belly. The remaining opening is the short neck. Rnd 18: (2 sc, dec) around [18] Rnd 19: sc in each st around [18] Fasten off, leaving a long 18-inch (45 cm) tail for sewing. Do not close. The 18-st opening will be sewn directly to the base of the head for a seamless blend. Body (including short neck) measures approximately 5 inches (13 cm) long.
LEGS (make 4 – MC)
Short, thick, cylindrical legs that sit directly under the body. Feet are slightly wider for a stable base.
Rnd 1: 6 sc in MR [6] Rnd 2: inc in each st around [12] Rnd 3: (3 sc, inc) around [15] (slight foot widening) Rnds 4–8: sc in each st around [15] (5 rnds for short thick leg) Stuff lightly to moderately (enough for structure but still soft and squishy). Rnd 9: (3 sc, dec) around [12] Fasten off, leaving a 12-inch (30 cm) tail for sewing. Do not close tightly; leave the top open for attachment. Each finished leg is approximately 3 inches (7.5 cm) tall. (Arms will be one-third this length.)
ARMS (make 2 – MC)
Very small arms (approximately one-third leg length), attached high on the sides, slightly curved inward with tiny rounded hands.
Rnd 1: 6 sc in MR [6] Rnd 2: (sc, inc) around [9] Rnds 3–5: sc in each st around [9] (3 rnds) Stuff very lightly. Rnd 6: (sc, dec) around [6] Fasten off, leaving a 10-inch (25 cm) tail. Thread through remaining sts, pull almost closed but leave a tiny rounded hand shape. Weave end to the side so the arm can be sewn with a gentle inward curve. Each arm is approximately 1 inch (2.5 cm) long.
TAIL (MC)
Begins thick at the body and gradually tapers to a rounded tip. It will be posed curving gently upward and outward.
Rnd 1: 6 sc in MR [6] Rnd 2: inc in each st around [12] Rnd 3: (sc, inc) around [18] Rnds 4–6: sc in each st around [18] Rnd 7: (4 sc, dec) around [15] Rnds 8–9: sc in each st around [15] Rnd 10: (3 sc, dec) around [12] Rnds 11–12: sc in each st around [12] Rnd 13: (2 sc, dec) around [9] Rnds 14–15: sc in each st around [9] Rnd 16: (sc, dec) around [6] Rnd 17: sc in each st around [6] Stuff moderately as you go, firmer at the base and lighter toward the tip so it holds a gentle upward curve. Fasten off, leaving a 12-inch (30 cm) tail. Thread through remaining 6 sts and pull tight to close. Weave in end. Tail measures approximately 5.5 inches (14 cm) long.
SKELETON DETAILS (all in CC – Black)
All bones are worked as small flat or slightly dimensional pieces and sewn on top of the cream body so they sit raised and three-dimensional. Use matching black yarn tails for sewing. Position symmetrically.
Skull & Eye Sockets (make 1 skull panel + 2 eye socket rings)
Skull panel (covers most of face/forehead): Ch 11. Row 1: sc in 2nd ch from hook and each ch across [10] Rows 2–6: ch 1, turn, sc across [10] Row 7: ch 1, turn, dec, sc 6, dec [8] Row 8: ch 1, turn, dec, sc 4, dec [6] Fasten off, leaving long tail. This rounded rectangle sits over the forehead and upper face, leaving the snout tip cream. Sew centered on head after eyes are in, curving it smoothly over the contours.
Eye socket rings (make 2): Rnd 1: 8 sc in MR, join with sl st to first sc [8] Fasten off, leaving tail. Place each ring around a safety eye and sew securely so the black ring frames the eye, creating large rounded sockets and a cute expression. The skull panel edges should meet the outer edges of the rings.
Spine (long center strip from back of head to tail tip)
Ch 42 (or measure to run from crown of head, down neck blend, along body center, and full length of tail). Row 1: sc in 2nd ch from hook and each ch across [41] Fasten off, leaving long tails at both ends. Sew centered along the back midline, starting at the back of the skull panel, continuing seamlessly over the neck blend, down the body, and all the way to the tail tip. Keep it smooth and slightly raised.
Ribs (make 8 – 4 pairs)
For each rib: Ch 9. Row 1: sc in 2nd ch from hook and next 7 ch [8] Fasten off, leaving tails. Sew 4 ribs evenly spaced on each side of the spine on the body only (not head or tail). Curve each rib downward and slightly forward along the rounded belly so they look natural. Space them about 2 sts apart along the spine.
Shoulder Bones (make 2 – simplified rounded shapes)
Rnd 1: 6 sc in MR [6] Rnd 2: (sc, inc) around [9] Rnd 3: sc in each st around [9] Flatten and sl st closed through both layers. Fasten off, leaving tail. Sew one on each upper side of the body, just below where the arms will attach, as simplified rounded shoulder bones.
Hip Bones (make 2)
Same as shoulder bones. Sew one on each lower side of the body, above the rear legs, as simplified rounded hip bones.
Leg Bone Segments (make 8 – 2 per leg)
For each segment: Ch 6. Row 1: sc in 2nd ch from hook and next 4 ch [5] Fasten off, leaving tails. On each leg, sew two segments stacked vertically along the outer side, following the cylindrical shape (upper segment near body attachment, lower near foot). Keep them stylized and rounded, not realistic.
Tail Vertebrae (make 6–7, graduating smaller)
Make in decreasing sizes:
- 2 large: Ch 5, sc across [4]
- 2 medium: Ch 4, sc across [3]
- 2–3 small: Ch 3, sc across [2] Fasten off each with tails. Sew evenly spaced along the top of the tail on either side of (or centered on) the spine continuation, largest near the body and becoming smaller toward the tip. This creates the graduated vertebrae look.
Weave in all CC ends securely on the inside or under the bones so nothing shows.
ASSEMBLY
- Attach Head to Body: With the long MC tail from the body, whip-stitch the 18-st neck opening of the body to the underside of the head (centered, roughly under Rnds 14–16 of the head). Add extra stuffing through the opening as you sew to keep the short neck firm and the blend seamless and rounded. The head should sit low and oversized, roughly half the total length.
- Attach Legs: Position all four legs directly underneath the body so the T-Rex stands securely and level on a flat surface. Front legs slightly forward, back legs slightly back, all vertical and symmetrical. Pin first, then whip-stitch firmly with the leg tails. The wider foot rnds create a stable base. Stuffing should allow slight give but hold the pose.
- Attach Arms: Sew the tiny arms high on the sides of the body (just below the shoulder bones and near the neck blend). Angle them so they curve slightly inward toward the chest with the rounded hands facing in. Keep them very short and cute.
- Attach Tail: Sew the thick base of the tail to the lower back of the body, centered over the spine end. Pose the tail so it curves gently upward and outward for visual balance against the large head. Secure with firm stitches; the moderate stuffing will hold the curve.
- Final Skeleton Check: Ensure all bones are symmetrically placed, spine is continuous and centered, ribs curve evenly, and everything sits slightly raised. Add a few extra tack stitches if any bone edge lifts.
- Finishing: Weave in every remaining end. Gently reshape the entire plush with your hands—push stuffing into the belly and cheeks, smooth the forehead, round the snout, and confirm the compact silhouette has no long thin sections. The chenille will look soft, fluffy, and velvety with clearly visible chunky stitches.
Safety & Care
- Safety eyes are locked in place before closing the head; pull firmly to confirm they cannot come out.
- All limbs, tail, and bones are sewn with multiple passes of yarn so they cannot be pulled off.
- Suitable for children under 3 only if you have secured every element extremely firmly and supervise play; otherwise recommend 3+.
- Surface wash only with cool water and mild soap; lay flat to dry. Do not machine wash or tumble dry (chenille can shed or mat).
Your kawaii skeleton T-Rex is complete! It should stand securely on all four limbs, feel squishy and huggable, and display clean raised bone details wrapping naturally around the rounded cream body. Enjoy your prehistoric plush friend.
Disclaimer: This pattern was generated by AI and should be reviewed for accuracy before use. While we strive for quality, AI-generated content may contain errors. Please verify measurements, stitch counts, charts, and instructions before beginning your project. Generated by purlJam.uk
Love this pattern?
Save this pattern to your free PurlJam libraryAccess your pattern anytime
Bookmark this page to access your pattern anytime