Type
Crochet
Difficulty
beginner
Category
amigurumi
AI Thinking Process
Planning
Verification
Pattern
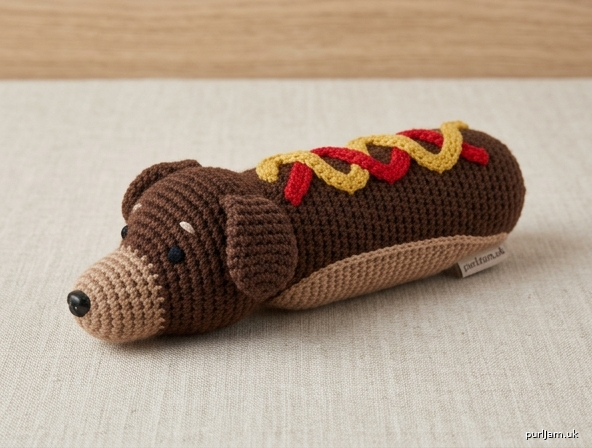
"Salsa" Hot Dog Plush — Dog-Colored Edition
Beginner Crochet Toy | Worsted Weight
This pattern turns the classic "perrito caliente" (hot dog) shape into a fun tribute to your own dog, using simple color-blocking and embroidery — plus the ketchup and mustard squiggle you described, crossed like an "S" the way real hot dog sauce lines cross.
Direct Answers to Your Questions
"¿Dónde pongo el enganche de nariz?" — Insert the safety nose at the very center of the snout tip, at Round 22 (the point where the stitch count reaches 6, right before the final plain round). At that stage the opening is still small, so you can push the nose post through from the outside and secure the washer on the inside easily, then finish stuffing and close the last round around it.
On the dog's coloring: Since a hot dog shape has no separate legs, the light-brown patch that runs "from the jaw to the chest and down the legs" on your real dog is translated into one continuous tapering belly stripe running the full underside of the body — wide near the head/jaw, narrowing toward the tail. This keeps the coloring recognizable while staying true to the simple hot dog silhouette.
Materials
- Worsted weight (Weight 4) yarn:
- Color A – Dark Brown (main body, head top, ears) — ~40 g
- Color B – Light Brown (muzzle, brows, belly stripe) — ~10 g
- Color C – Red (ketchup strip) — small amount
- Color D – Yellow/Mustard (mustard strip) — small amount
- Color E – Black, for optional embroidered eyes/nose backup — small amount
- Hook: US G-6 (4.0 mm)
- Notions: Fiberfill stuffing, yarn needle, stitch marker, one 9–10mm safety nose (or black yarn for an embroidered alternative), two 6mm safety eyes (optional)
Gauge
4 sc x 4 rounds = 1 in (2.5 cm), worked firmly (gauge is not critical to fit, but affects final proportions)
Abbreviations (US terms)
sc = single crochet | inc = 2 sc in same st | dec = invisible decrease (sc2tog) | st(s) = stitch(es) | rnd(s) = round(s) | ch = chain
Finished Size
Approx. 6 in (15 cm) long x 2 in (5 cm) diameter
PART 1: BODY (Tail → Head, worked in continuous rounds)
Start with Color A (Dark Brown).
- Rnd 1: 6 sc in magic ring [6]
- Rnd 2: inc in each st around (6 inc → 6+6 = 12 ✓) [12]
- Rnd 3: (sc, inc) x6 (6 inc → 12+6 = 18 ✓) [18]
- Rnd 4: (2 sc, inc) x6 (6 inc → 18+6 = 24 ✓) [24]
- Rnds 5–19 (15 rounds): sc around [24] — this is the straight "sausage" tube. Begin stuffing lightly as you go.
- Rnd 20: (2 sc, dec) x6 (6 dec → 24−6 = 18 ✓) [18] — dark brown ends here
- Rnd 21: Switch to Color B (Light Brown). (sc, dec) x6 (6 dec → 18−6 = 12 ✓) [12] — muzzle begins
- Rnd 22: dec around (6 dec → 12−6 = 6 ✓) [6]
➡ Insert the safety nose now, pushing the post through the center of this round from outside to inside, and secure the washer inside the body.
- Rnd 23: sc around [6] — forms the small snout tip
Stuff the body firmly, making sure the head/snout area is well filled. Fasten off Color B, leaving a long tail; cinch the remaining 6 sts closed and weave in the end.
(Total rounds: 4 increase + 15 straight + 4 shaping = 23 rounds ≈ 6 in / 15 cm ✓)
PART 2: EARS (make 2, Color A – Dark Brown)
- Row 1: 5 sc in magic ring, do not join, ch 1, turn [5]
- Row 2: 2 sc in each st across (5 x 2 = 10 ✓) [10]
Fasten off, leaving a 6 in tail for sewing.
Placement: Sew the flat (magic ring) edge of each ear along the top of the body, just behind the boundary where light brown meets dark brown (around Rnd 20–21), spaced about 1 in apart, angled slightly outward so they flop naturally — matching the dark brown "forehead, ears, and top of head" area you described.
PART 3: FACE DETAILS
- Eyebrows: With Color B (Light Brown), embroider two short straight or slightly curved stitches (~0.3 in / 0.75 cm) just above the eye position, symmetrically placed on the dark brown area directly behind the light brown muzzle boundary.
- Eyes (optional): Insert two 6mm safety eyes at Rnd 20, spaced evenly on either side of center, OR embroider small black French knots in the same spot.
- Nose: Already placed at Rnd 22 (see Part 1). If you don't have a safety nose, embroider a small black satin-stitch triangle at the same location instead.
PART 4: BELLY STRIPE (Color B – Light Brown)
Using duplicate stitch (embroidering over existing sc stitches) or surface slip stitch:
- Start at the center-bottom of the muzzle/jaw area (Rnd 21–23), where the stripe should be at its widest (about 3 stitches across).
- Work the stripe straight back along the very bottom row of stitches, gradually narrowing to a single stitch-wide line by the time you reach Rnd 8–10.
- Continue the single line to just past the halfway point of the body, then fasten off and weave in — this mimics the coloring fading from chest to "legs" along the body's underside.
PART 5: KETCHUP STRIP (Color C – Red)
- Ch 15.
- Row 2: sc in 2nd ch from hook and in each ch across (14 sc ✓) [14]
- Fasten off, leaving a 6 in tail for sewing.
PART 6: MUSTARD STRIP (Color D – Yellow)
- Ch 15.
- Row 2: sc in 2nd ch from hook and in each ch across (14 sc ✓) [14]
- Fasten off, leaving a 6 in tail for sewing.
PART 7: ASSEMBLY — Sauce on Top
- Lay the hot dog body flat with the seam/belly-stripe side down.
- Pin the ketchup strip along the top of the body in a loose, wavy zig-zag from near the head end toward the tail end.
- Pin the mustard strip in a second wavy zig-zag running the opposite direction, so the two strips cross over each other 2–3 times, forming an "S" pattern the way sauce naturally sits on a real hot dog.
- Using the yarn tails, tack each strip down at 1–1.5 in intervals (not a continuous flat seam) so the strips keep a slightly raised, wavy, dimensional look rather than lying pancake-flat.
- Weave in all ends.
Finishing Checklist
- [ ] Nose inserted at Rnd 22, washer secure
- [ ] Body stuffed firmly, especially snout and shoulders
- [ ] Ears sewn symmetrically behind the muzzle boundary
- [ ] Eyebrows and eyes placed symmetrically
- [ ] Belly stripe tapers from wide (jaw/chest) to narrow (toward tail)
- [ ] Ketchup and mustard strips cross at least twice in an S-curve
- [ ] All ends woven in
Enjoy your one-of-a-kind hot dog plush inspired by your own pup! 🌭🐾
Disclaimer: This pattern was generated by AI and should be reviewed for accuracy before use. While we strive for quality, AI-generated content may contain errors. Please verify measurements, stitch counts, and instructions before beginning your project. Generated by purlJam.uk
Love this pattern?
Save this pattern to your free PurlJam libraryAccess your pattern anytime
Bookmark this page to access your pattern anytime