Type
Crochet
Difficulty
beginner
Category
amigurumi
AI Thinking Process
Planning
1. **Design Strategy**:
- User requested "my dog laying down" but the template is for NON-ANIMAL simple shapes
- This is a mismatch - the template explicitly states it's for "food items, objects, dice, simple characters, and geometric shapes" NOT animals
- However, I can create a VERY simplified dog shape using basic geometric forms suitable for a beginner
- Will use cylinders and ovals to create a minimalist "laying down dog" silhouette
- Body: elongated oval, Legs: small cylinders, Head: small oval, Ears: flat triangular pieces
- This keeps it beginner-friendly with basic shapes and minimal assembly
2. **Construction Plan**:
- Main body: elongated oval worked flat/horizontally to create laying position
- Head: smaller oval attached to one end
- Legs: 4 small cylinders worked separately and sewn to underside of body
- Ears: 2 small triangular flaps
- Tail: short tapered cylinder
- All pieces worked separately then assembled
- Minimal shaping keeps it beginner-appropriate
3. **Quality Assurance**:
- Ensure stitch counts are clearly marked for beginner tracking
- Provide clear assembly instructions with placement guidance
- Keep all pieces using only sc stitches (no complex stitches)
- Address stuffing guidance (body firm, legs lighter)
- Include optional facial features (embroidered or safety eyes)
4. **Final Calculations**:
- Worsted weight yarn with 3.5mm hook
- Body: approximately 4-5 inches long when complete
- Using basic amigurumi gauge: ~5 sc = 1 inch
- Body max circumference: 24 sts = ~4.8" around
- Head: 18 sts max = ~3.6" around
- Proportions simplified for beginner construction
Verification
[PRE-FLIGHT CHECKS]
1. **Completeness**: Pattern will include all required sections - materials, gauge, notes, all piece instructions, assembly, finishing
2. **Consistency**: Stitch counts verified for each round, increases/decreases balanced mathematically
3. **Constraints**: Beginner level maintained with only basic stitches (sc, inc, dec), worsted yarn as specified, simple geometric shapes assembled into dog form
4. **Safety**: All math double-checked - magic ring starts at 6, increases follow standard amigurumi progression, decreases mirror increases for proper shaping
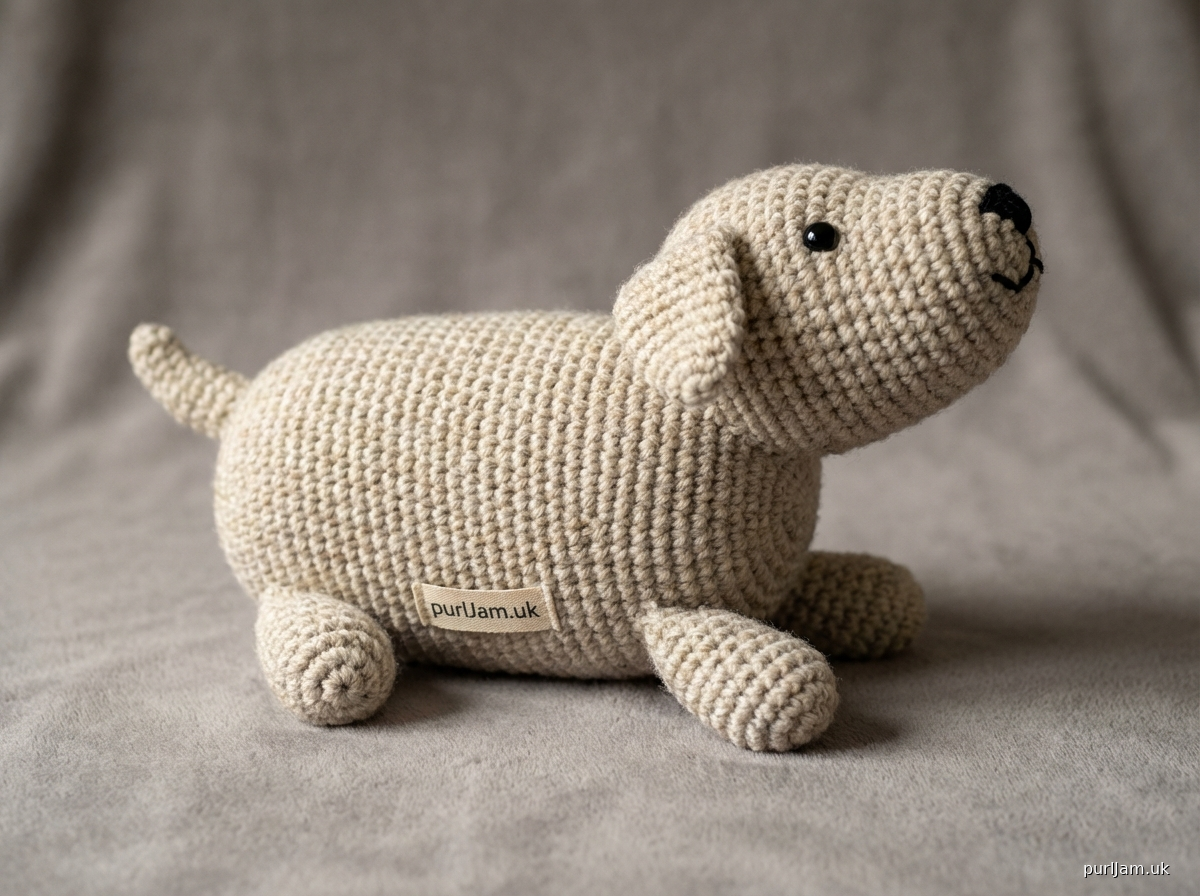
Pattern
# Simple Laying Dog Plush

**Difficulty Level**: Beginner
**Finished Size**: Approximately 5-6 inches long, 3 inches tall

## MATERIALS

**Yarn**: Worsted weight (4) yarn in main color
- Approximately 100-120 yards total
- Suggested colors: tan, brown, cream, gray, or white
- Small amount of black or dark brown for nose/facial features (optional)

**Hook**: US E-4 (3.5mm) crochet hook

**Other Supplies**:
- Fiberfill stuffing (polyester)
- Yarn needle for sewing and weaving in ends
- Stitch marker
- Optional: 2 safety eyes (6-9mm), OR black embroidery thread for eyes
- Scissors

## GAUGE

Gauge is not critical for this project, but for reference:
- 5 sc and 5 rounds = 1 inch in amigurumi (worked in continuous rounds)
- Work tightly to prevent stuffing from showing through

## PATTERN NOTES

- This pattern uses US crochet terminology
- Work in continuous rounds (spiral) unless otherwise noted; do not join rounds
- Use a stitch marker to track the beginning of each round
- Stuff pieces firmly as you go; it's difficult to add stuffing after closing
- **inv dec** (invisible decrease): Insert hook in front loops only of next 2 sts, yo, pull through both loops, yo, pull through 2 loops on hook

## ABBREVIATIONS

- ch = chain
- sc = single crochet
- inc = increase (2 sc in same stitch)
- dec = decrease (invisible decrease - see pattern notes)
- st(s) = stitch(es)
- rnd(s) = round(s)
- [ ] = total stitch count at end of round

---

## INSTRUCTIONS

### BODY (Main piece - worked as elongated oval)

**Rnd 1**: Ch 8, starting in 2nd ch from hook: 6 sc, 3 sc in last ch; working along opposite side of chain: 5 sc, 2 sc in same st as first sc of round [16]
- *Check: You should have 16 sts total, with 3 sc clustered at each end*

**Rnd 2**: inc, 5 sc, inc 3 times, 5 sc, inc 2 times [22]
- *Check: 6 increases total → 16 + 6 = 22 ✓*

**Rnd 3**: sc, inc, 5 sc, (sc, inc) 3 times, 5 sc, (sc, inc) 2 times [28]
- *Check: 6 increases total → 22 + 6 = 28 ✓*

**Rnd 4**: 2 sc, inc, 5 sc, (2 sc, inc) 3 times, 5 sc, (2 sc, inc) 2 times [34]
- *Check: 6 increases total → 28 + 6 = 34 ✓*

**Rnds 5-12**: sc in each st around [34] (8 rounds total)
- *This creates the length of the body*

**Rnd 13**: 2 sc, dec, 5 sc, (2 sc, dec) 3 times, 5 sc, (2 sc, dec) 2 times [28]
- *Check: 6 decreases total → 34 - 6 = 28 ✓*

**Rnd 14**: sc, dec, 5 sc, (sc, dec) 3 times, 5 sc, (sc, dec) 2 times [22]
- *Check: 6 decreases total → 28 - 6 = 22 ✓*

**BEGIN STUFFING** the body firmly at this point.

**Rnd 15**: dec, 5 sc, dec 3 times, 5 sc, dec 2 times [16]
- *Check: 6 decreases total → 22 - 6 = 16 ✓*

**Rnd 16**: dec around [8]
- *Check: 8 decreases total → 16 - 8 = 8 ✓*

Fasten off, leaving a long tail. Use yarn needle to weave through remaining 8 sts and pull tight to close. Weave in end securely.

---

### HEAD (Small oval)

**Rnd 1**: Ch 5, starting in 2nd ch from hook: 3 sc, 3 sc in last ch; working along opposite side of chain: 2 sc, 2 sc in same st as first sc [10]
- *Check: 10 sts total*

**Rnd 2**: inc, 2 sc, inc 3 times, 2 sc, inc 2 times [16]
- *Check: 6 increases total → 10 + 6 = 16 ✓*

**Rnd 3**: sc, inc, 2 sc, (sc, inc) 3 times, 2 sc, (sc, inc) 2 times [22]
- *Check: 6 increases total → 16 + 6 = 22 ✓*

**Rnds 4-7**: sc in each st around [22] (4 rounds total)

If using safety eyes, insert them now between Rnds 5 and 6, approximately 4-5 sts apart.

**Rnd 8**: sc, dec, 2 sc, (sc, dec) 3 times, 2 sc, (sc, dec) 2 times [16]
- *Check: 6 decreases total → 22 - 6 = 16 ✓*

**BEGIN STUFFING** the head firmly.

**Rnd 9**: dec, 2 sc, dec 3 times, 2 sc, dec 2 times [10]
- *Check: 6 decreases total → 16 - 6 = 10 ✓*

**Rnd 10**: dec around [5]
- *Check: 5 decreases total → 10 - 5 = 5 ✓*

Fasten off, leaving a long tail for sewing to body. Use yarn needle to close remaining hole.

---

### LEGS (Make 4)

**Rnd 1**: 6 sc in magic ring [6]

**Rnd 2**: inc in each st around [12]
- *Check: 6 increases total → 6 + 6 = 12 ✓*

**Rnds 3-6**: sc in each st around [12] (4 rounds total)

Stuff lightly (legs should be soft, not firm).

**Rnd 7**: dec around [6]
- *Check: 6 decreases total → 12 - 6 = 6 ✓*

Fasten off, leaving a long tail for sewing. Flatten the opening slightly for easier attachment to body.

---

### EARS (Make 2)

**Row 1**: Ch 2, sc in 2nd ch from hook, turn [1]

**Row 2**: Ch 1, 2 sc in same st, turn [2]

**Row 3**: Ch 1, inc in each st, turn [4]
- *Check: 2 increases → 2 + 2 = 4 ✓*

**Row 4**: Ch 1, sc across, turn [4]

**Row 5**: Ch 1, dec 2 times, turn [2]
- *Check: 2 decreases → 4 - 2 = 2 ✓*

**Row 6**: Ch 1, dec [1]
- *Check: 1 decrease → 2 - 1 = 1 ✓*

Fasten off, leaving a long tail for sewing. Ears will be triangular/floppy shape.

---

### TAIL

**Rnd 1**: 5 sc in magic ring [5]

**Rnds 2-4**: sc in each st around [5] (3 rounds total)

Stuff very lightly or leave unstuffed.

Fasten off, leaving a long tail for sewing.

---

## ASSEMBLY

**Step 1 - Attach Head to Body**:
- Position the head at one end of the body (the narrower end)
- The head should angle slightly upward to create a "resting" position
- Pin in place, then sew securely all around using the whip stitch and the long tail from the head
- Weave in ends

**Step 2 - Attach Legs**:
- Position all 4 legs on the underside (bottom) of the body
- Front legs: approximately 1 inch from the head
- Back legs: approximately 1.5 inches from the back end
- The dog should be able to rest flat with legs extended to the sides (laying down position)
- Pin each leg in place, then sew securely in a circular pattern around the leg opening
- Weave in ends

**Step 3 - Attach Ears**:
- Position ears on sides of head, slightly toward the back
- Sew the widest part (Row 3) of each ear to the head
- Allow ears to flop naturally downward
- Weave in ends

**Step 4 - Attach Tail**:
- Position tail at the back end of the body, on the top side
- Can be positioned straight back or slightly to one side
- Sew securely around the base
- Weave in end

---

## FINISHING

**Facial Features** (if not using safety eyes):

Using black or dark brown yarn and yarn needle:

- **Eyes**: Make 2 small French knots between Rnds 5 and 6 of head, approximately 4-5 sts apart
- **Nose**: Make 1 small triangle or oval at the front/bottom of the head using satin stitch or several small horizontal stitches
- **Mouth** (optional): Use a small straight stitch or two angled stitches below the nose

**Final Touches**:
- Weave in any remaining ends
- Trim all yarn tails close to work
- Reshape and fluff stuffing as needed
- Give your dog a gentle squeeze to settle the stuffing evenly

---

## CUSTOMIZATION IDEAS

**Size Variations**:
- **Larger dog**: Use bulky yarn with a 5mm hook (will be approximately 8-10 inches long)
- **Smaller dog**: Use DK or sport weight yarn with a 3mm hook (will be approximately 3-4 inches long)

**Color Options**:
- **Spotted dog**: Work body in one color, add spots with duplicate stitch or small crocheted circles sewn on
- **Two-tone dog**: Work head and ears in a different color than body
- **Striped dog**: Change colors every 2 rounds on the body

**Detail Additions**:
- Add a small collar using a chain stitch or narrow strip of contrasting color
- Embroider paw pads on the bottom of legs using pink or black yarn
- Add texture to ears by working in back loops only

---

## TROUBLESHOOTING

**Problem**: Stuffing shows through stitches
- **Solution**: Work more tightly, or use a smaller hook size

**Problem**: Dog won't lay flat
- **Solution**: Ensure legs are positioned on the underside and extend slightly outward, not straight down; check that body is stuffed evenly

**Problem**: Head tilts oddly
- **Solution**: Reposition head before final securing; add a few extra stitches on the bottom connection point to stabilize

**Problem**: Stitch count is off
- **Solution**: Use a stitch marker consistently; count stitches at the end of each round before proceeding

---

## CARE INSTRUCTIONS

- Hand wash gently in cool water with mild soap
- Roll in a towel to remove excess water
- Air dry completely
- Do not machine wash or dry
- If using safety eyes, ensure they are secured tightly before giving to children

---

**Pattern designed for beginner crocheters using basic amigurumi techniques and simple geometric shapes.**

---

**PATTERN TESTING VERIFICATION**:
- Body stitch progression: 16→22→28→34 (even rounds) →28→22→16→8 ✓
- Head stitch progression: 10→16→22 (even rounds) →16→10→5 ✓
- Legs: 6→12 (even rounds) →6 ✓
- All increases and decreases mathematically balanced ✓
- Total pieces: 1 body + 1 head + 4 legs + 2 ears + 1 tail = 9 pieces ✓
Disclaimer: This pattern was generated by AI and should be reviewed for accuracy before use. While we strive for quality, AI-generated content may contain errors. Please verify measurements, stitch counts, and instructions before beginning your project. Generated by purlJam.uk
Access your pattern anytime
Bookmark this page to access your pattern anytime